
Spring Boot 与 Mybatis、Mysql整合使用的例子
第一步: 创建一个SpringBoot的工程,在其中的Maven依赖配置中添加对JDBC、MyBatis、Mysql Driver的依赖具体如下:
<!-- JDBC -->

        <dependency>

            <groupId>org.springframework.boot</groupId>

            <artifactId>spring-boot-starter-jdbc</artifactId>

        </dependency>

        <!-- MyBatis -->

        <dependency>

            <groupId>org.mybatis.spring.boot</groupId>

            <artifactId>mybatis-spring-boot-starter</artifactId>

            <version>1.3.1</version>

        </dependency>

        <!-- MySQL Driver -->

        <dependency>

            <groupId>mysql</groupId>

            <artifactId>mysql-connector-java</artifactId>

            <scope>runtime</scope>

        </dependency>
第二步:在SprintBoot的配置文件application-dev.yml中添加mybatis、数据源的配置:
mybatis:

  mapper-locations: classpath:mapping/*.xml

  type-aliases-package: com.cs.pojo
mapper-locations:扫描指定路径下的*.xml的映射文件
type-aliases-package:完全限定名来指定这些POJO的引用
datasource:

    username: 数据库登录用户名

    password: 数据库登录密码

    url: jdbc:mysql://数据库ip地址:端口/数据库名称?useUnicode=true&characterEncoding=utf-8&useSSL=true&serverTimezone=UTC

    driver-class-name: com.mysql.jdbc.Driver
第三步:使用 Navicat在数据库上创建一个用于测试的数据库和数据表
数据库名称为:cs_orchard
表名和结构:login_user{
id int
user_name varchar
password varchar
description varchar
}
写入几条记录: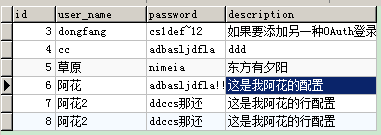
第四步:代码工程结构创建
- 四个包以com.cs.pojo、com.cs.mapper、com.cs.service、com.cs.controller
- 在src/main/resources下创建mapping文件夹用于存放mybatis的映射xml
第五步:编写代码
- 在pojo报下创建一个实体类如:LoginUser
@Component

public class LoginUser {

    private int id;

    private String user_name;

    private String password;

    private String description;

    public LoginUser(){}

    public String getDescription() {

        return description;

    }

    public void setDescription(String description) {

        this.description = description;

    }

    public String getUser_name() {

        return user_name;

    }

    public void setUser_name(String user_name) {

        this.user_name = user_name;

    }

    public int getId() {

        return id;

    }

    public void setId(int id) {

        this.id = id;

    }

    public String getPassword() {

        return password;

    }

    public void setPassword(String password) {

        this.password = password;

    }

}
2. 创建Mybatis的接口
@Mapper

public interface  LoginUserMapper {

    //获取用户名单

    public List<LoginUser> getLoginUser() throws Exception;

    //根据id删除用户

    public void deleteLoginUser(int id)throws Exception;

    //新增用户

    public void addLoginUser(LoginUser user)throws Exception;

}
3. 编写LoginUser的映射文件
<?xml version="1.0" encoding="UTF-8"?>

<!DOCTYPE mapper PUBLIC "-//mybatis.org//DTD Mapper 3.0//EN" "http://www.mybatis.org/dtd/mybatis-3-mapper.dtd">

<mapper namespace="com.cs.mapper.LoginUserMapper">

    <select id="getLoginUser" resultType="com.cs.pojo.LoginUser">

        select * from login_user

    </select>

    <delete id="deleteLoginUser" parameterType="Integer">

        delete from login_user where id =#{id}

    </delete>

    <insert id="addLoginUser" parameterType="com.cs.pojo.LoginUser">

        insert into login_user(user_name, password, description) values (#{user_name}, #{password}, #{description})

    </insert>

</mapper>
其中注意每个操作与mapper接口类的对应,resultType和parameterType的类型。
4. 业务层的接口与实现类:LoginUserService.java LoginUserServiceImp.java
public interface LoginUserService {

    public List<LoginUser> getLoginUser() throws Exception;

    public void deleteUser(int id) throws Exception;

    public void addLoginUser(LoginUser user) throws Exception;
@Service

public class LoginUserServiceImp implements LoginUserService {

    @Autowired

    private LoginUserMapper loginUserMapper;

    public List<LoginUser> getLoginUser(){

        try {

            return loginUserMapper.getLoginUser();

        } catch (Exception e) {

            e.printStackTrace();

        }

        return null;

    }

    public void deleteUser(int id) {

        try {

            loginUserMapper.deleteLoginUser(id);

        } catch (Exception e) {

            e.printStackTrace();

        }

    }

    public void addLoginUser(LoginUser user) {

        try {

            loginUserMapper.addLoginUser(user);

        } catch (Exception e) {

            e.printStackTrace();

        }

    }

}
5. 前端控制器类:LoginUserController
@RestController

@RequestMapping("/loginuser")

public class LoginUserController {

    @Autowired

    private LoginUserService loginUserService;

    @Autowired

    private LoginUser user;

    //显示用户

    @RequestMapping("/list")

    public List<LoginUser> index() throws Exception {

        return loginUserService.getLoginUser();

    }

    //删除用户

    @RequestMapping("/delete/{id}")

    public String delete(@PathVariable int id) throws Exception {

        loginUserService.deleteUser(id);

        return "你已经删掉了id为"+id+"的用户";

    }

    //增加用户

    @RequestMapping("/addLoginUser")

    public String addLoginUser() throws Exception {

        user.setUser_name("阿花2");

        user.setPassword("ddccs那还");

        user.setDescription("这是我阿花的行配置");

        loginUserService.addLoginUser(user);

        return "增加用户";

    }

}
调试运行,在浏览器中输入地址访问测试。
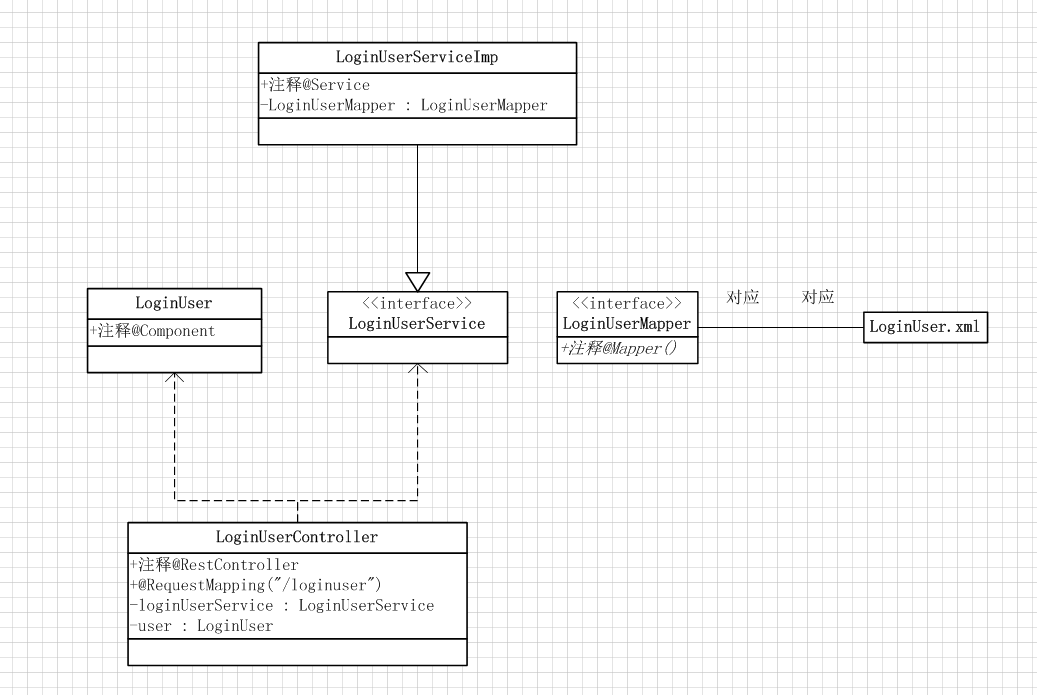
附上UML图:图用的是visio不太好表示
Spring Boot 与 Mybatis、Mysql整合使用的例子的更多相关文章
- Spring Boot数据访问之整合Mybatis
在Mybatis整合Spring - 池塘里洗澡的鸭子 - 博客园 (cnblogs.com)中谈到了Spring和Mybatis整合需要整合的点在哪些方面,需要将Mybatis中数据库连接池等相关对 ...
- spring boot(二)整合mybatis plus+ 分页插件 + 代码生成
先创建spring boot项目,不知道怎么创建项目的 可以看我上一篇文章 用到的环境 JDK8 .maven.lombok.mysql 5.7 swagger 是为了方便接口测试 一.Spring ...
- Spring boot教程mybatis访问MySQL的尝试
Windows 10家庭中文版,Eclipse,Java 1.8,spring boot 2.1.0,mybatis-spring-boot-starter 1.3.2,com.github.page ...
- spring boot + druid + mybatis + atomikos 多数据源配置 并支持分布式事务
文章目录 一.综述 1.1 项目说明 1.2 项目结构 二.配置多数据源并支持分布式事务 2.1 导入基本依赖 2.2 在yml中配置多数据源信息 2.3 进行多数据源的配置 三.整合结果测试 3.1 ...
- Spring Boot 实战 —— MyBatis(注解版)使用方法
原文链接: Spring Boot 实战 -- MyBatis(注解版)使用方法 简介 MyBatis 官网 是这么介绍它自己的: MyBatis 是一款优秀的持久层框架,它支持定制化 SQL.存储过 ...
- spring boot集成mybatis只剩两个sql 并提示 Cannot obtain primary key information from the database, generated objects may be incomplete
前言 spring boot集成mybatis时只生成两个sql, 搞了一个早上,终于找到原因了 找了很多办法都没有解决, 最后注意到生成sql的时候打印了一句话: Cannot obtain pri ...
- 使用intelliJ创建 spring boot + gradle + mybatis站点
Spring boot作为快速入门是不错的选择,现在似乎没有看到大家写过spring boot + gradle + mybatis在intellij下的入门文章,碰巧.Net同事问到,我想我也可以写 ...
- spring boot与jdbcTemplate的整合案例2
简单入门了spring boot后,接下来写写跟数据库打交道的案例.博文采用spring的jdbcTemplate工具类与数据库打交道. 下面是搭建的springbootJDBC的项目的总体架构图: ...
- Spring Boot集成MyBatis开发Web项目
1.Maven构建Spring Boot 创建Maven Web工程,引入spring-boot-starter-parent依赖 <project xmlns="http://mav ...
- 详解Spring Boot集成MyBatis的开发流程
MyBatis是支持定制化SQL.存储过程以及高级映射的优秀的持久层框架,避免了几乎所有的JDBC代码和手动设置参数以及获取结果集. spring Boot是能支持快速创建Spring应用的Java框 ...
随机推荐
- Day1 -Python program
采用python 3.5 用PyCharm编译 第一串代码 print ("hello,world!") 练习1 输入一个用户名和密码,如果输入正确,就欢迎登陆,否则就显示错误. ...
- MD5的简单用法
非常简单的MD5加密和解密(即用即copy) 点击帮助灯泡引用就可使用 //生成MD5帮助文件文件 public class MD5Help{ ///MD5加密 方法类 public static s ...
- 微信小程序开发--页面之间的跳转
一.navigator--完成页面之间的跳转 1.新建一个页面文件夹 2.在app.json文件中引入页面 "pages": [ "pages/index/index&q ...
- hdu6396 Swordsman(贪心)
Swordsman 题目传送门 解题思路 先将每种属性排序,因为打倒怪兽会使属性增强,所以肯定是能打就打,用cnt[i]记录怪兽i已经被超过的属性数量,如果被超过的属性数为k了,则打倒此怪兽,将获得的 ...
- 7月新的开始 - LayUI的基本使用 - 分页
LayUI 分页处理 数据展示是以表格的形式展示的.使用模块如下: 首先使用内置模块-数据表格 然后使用内置模块-分页 官方文档地址:https://www.layui.com/doc/ 官方示例地址 ...
- ArcGIS API For JavaScript 开发(五)要素图层的编辑
2018-4-3 这篇博客主要讲述要素的层的编辑功能,是基于FeatureLayer的applyEdit方法.由于自己目前正在学习当中,有许多不足之处请各位指出,欢迎指导学习! 主要功能是 1.将地图 ...
- Android App安装包瘦身计划
Android App安装包瘦身计划 Android App安装包体积优化: 理由, 指标和可以采用的方法. 本文内容归纳如下图: 为什么要安装包瘦身 安装包需要瘦身吗? 不需要吗? 安装包要瘦身的主 ...
- gawk(awk)的用法案例
gawk(awk)的用法案例 本文首先简单介绍一个gawk和awk的区别,然后是一点基本使用流程,最后是自己做的一个分析数据文件的脚本代码,供大家参考.另外想了解基本流程的入门知识的可以下载附件pdf ...
- html5教程 《实用技巧》—让你的网站变成响应式的3个简单步骤
如今,一个网站只在桌面屏幕上好看是远远不够的,同时也要在平板电脑和智能手机中能够良好呈现.响应式的网站是指它能够适应客户端的屏幕尺寸,自动响应客户端尺寸变化.在这篇文章中,我将向您展示如何通过3个简单 ...
- Thinkphp 3.2.3 parseWhere设计缺陷导致update/delete注入 分析
目录 分析 总结 分析 首先看一下控制器,功能是根据用户传来的id,修改对应用户的密码. 13行把用户传来的id参数送入where()作为SQL语句中的WHERE语句,将pwd参数送入save()作为 ...