SpringBoot Application深入学习
本节主要介绍SpringBoot Application类相关源码的深入学习。
主要包括:
- SpringBoot应用自定义启动配置
- SpringBoot应用生命周期,以及在生命周期各个阶段自定义配置。
本节采用SpringBoot 2.1.10.RELASE,对应示例源码在:https://github.com/laolunsi/spring-boot-examples
SpringBoot应用启动过程:
SpringApplication application = new SpringApplication(DemoApplication.class);

application.run(args);
一、Application类自定义启动配置
创建SpringApplication对象后,在调用run方法之前,我们可以使用SpringApplication对象来添加一些配置,比如禁用banner、设置应用类型、设置配置文件(profile)
举例:
@SpringBootApplication

public class DemoApplication {

    public static void main(String[] args) {

        SpringApplication application = new SpringApplication(DemoApplication.class);

        // 设置banner禁用

        application.setBannerMode(Banner.Mode.OFF);

        // 将application-test文件启用为profile

        application.setAdditionalProfiles("test");

        // 设置应用类型为NONE,即启动完成后自动关闭

        application.setWebApplicationType(WebApplicationType.NONE);

        application.run(args);

    }

}
也可以使用SpringApplicationBuilder类来创建SpringApplication对象,builder类提供了链式调用的API,更方便调用,增强了可读性。
        new SpringApplicationBuilder(YqManageCenterApplication.class)

                .bannerMode(Banner.Mode.OFF)

                .profiles("test")

                .web(WebApplicationType.NONE)

                .run(args);
二、application生命周期
SpringApplication的生命周期主要包括:
- 准备阶段:主要包括加载配置、设置主bean源、推断应用类型(三种)、创建和设置SpringBootInitializer、创建和设置Application监听器、推断主入口类
- 运行阶段:开启时间监听、加载运行监听器、创建Environment、打印banner、创建和装载context、广播应用已启动、广播应用运行中
我们先来看一下源码的分析:
SpringBootApplication构造器:
public SpringApplication(ResourceLoader resourceLoader, Class<?>... primarySources) {

        // 设置默认配置

    	this.sources = new LinkedHashSet();

        this.bannerMode = Mode.CONSOLE;

        this.logStartupInfo = true;

        this.addCommandLineProperties = true;

        this.addConversionService = true;

        this.headless = true;

        this.registerShutdownHook = true;

        this.additionalProfiles = new HashSet();

        this.isCustomEnvironment = false;

        this.resourceLoader = resourceLoader;

        Assert.notNull(primarySources, "PrimarySources must not be null");

    	// 设置主bean源

        this.primarySources = new LinkedHashSet(Arrays.asList(primarySources));

        // 推断和设置应用类型(三种)

    	this.webApplicationType = WebApplicationType.deduceFromClasspath();

      	// 创建和设置SpringBootInitializer

  this.setInitializers(this.getSpringFactoriesInstances(ApplicationContextInitializer.class));

      	// 创建和设置SpringBoot监听器

    this.setListeners(this.getSpringFactoriesInstances(ApplicationListener.class));

        // 推断和设置主入口类

    	this.mainApplicationClass = this.deduceMainApplicationClass();

    }
SpringApplication.run方法源码:
public ConfigurableApplicationContext run(String... args) {

    	// 开启时间监听

        StopWatch stopWatch = new StopWatch();

        stopWatch.start();

        ConfigurableApplicationContext context = null;

        Collection<SpringBootExceptionReporter> exceptionReporters = new ArrayList();

        this.configureHeadlessProperty();

    	// 加载Spring应用运行监听器(SpringApplicationRunListenter)

        SpringApplicationRunListeners listeners = this.getRunListeners(args);

        listeners.starting();

        Collection exceptionReporters;

        try {

            // 创建environment(包括PropertySources和Profiles)

            ApplicationArguments applicationArguments = new DefaultApplicationArguments(args);

            ConfigurableEnvironment environment = this.prepareEnvironment(listeners, applicationArguments);

            this.configureIgnoreBeanInfo(environment);

            // 打印banner

            Banner printedBanner = this.printBanner(environment);

            // 创建context(不同的应用类型对应不同的上下文)

            context = this.createApplicationContext();

            exceptionReporters = this.getSpringFactoriesInstances(SpringBootExceptionReporter.class, new Class[]{ConfigurableApplicationContext.class}, context);

            // 装载context(其中还初始化了IOC容器)

            this.prepareContext(context, environment, listeners, applicationArguments, printedBanner);

            // 调用applicationContext.refresh

            this.refreshContext(context);

            // 空方法

            this.afterRefresh(context, applicationArguments);

            stopWatch.stop(); // 关闭时间监听;这样可以计算出完整的启动时间

            if (this.logStartupInfo) {

                (new StartupInfoLogger(this.mainApplicationClass)).logStarted(this.getApplicationLog(), stopWatch);

            }

            // 广播SpringBoot应用已启动,会调用所有SpringBootApplicationRunListener里的started方法

            listeners.started(context);

            // 遍历所有ApplicationRunner和CommadnLineRunner的实现类,执行其run方法

            this.callRunners(context, applicationArguments);

        } catch (Throwable var10) {

            this.handleRunFailure(context, var10, exceptionReporters, listeners);

            throw new IllegalStateException(var10);

        }

        try {

            // 广播SpringBoot应用运行中,会调用所有SpringBootApplicationRunListener里的running方法

            listeners.running(context);

            return context;

        } catch (Throwable var9) {

            // run出现异常时,处理异常;会调用报错的listener里的failed方法,广播应用启动失败,将异常扩散出去

            this.handleRunFailure(context, var9, exceptionReporters, (SpringApplicationRunListeners)null);

            throw new IllegalStateException(var9);

        }

    }
三、application生命周期自定义配置
在SpringApplication的生命周期中,我们还可以添加一些自定义的配置。
下面的配置,主要是通过实现Spring提供的接口,然后在resources下新建META-INF/spring.factories文件,在里面添加这个类而实现引入的。
在准备阶段,可以添加如下自定义配置:
3.1 自定义ApplicationContextInitializer的实现类
@Order(100)
public class MyInitializer implements ApplicationContextInitializer {
@Override
public void initialize(ConfigurableApplicationContext configurableApplicationContext) {
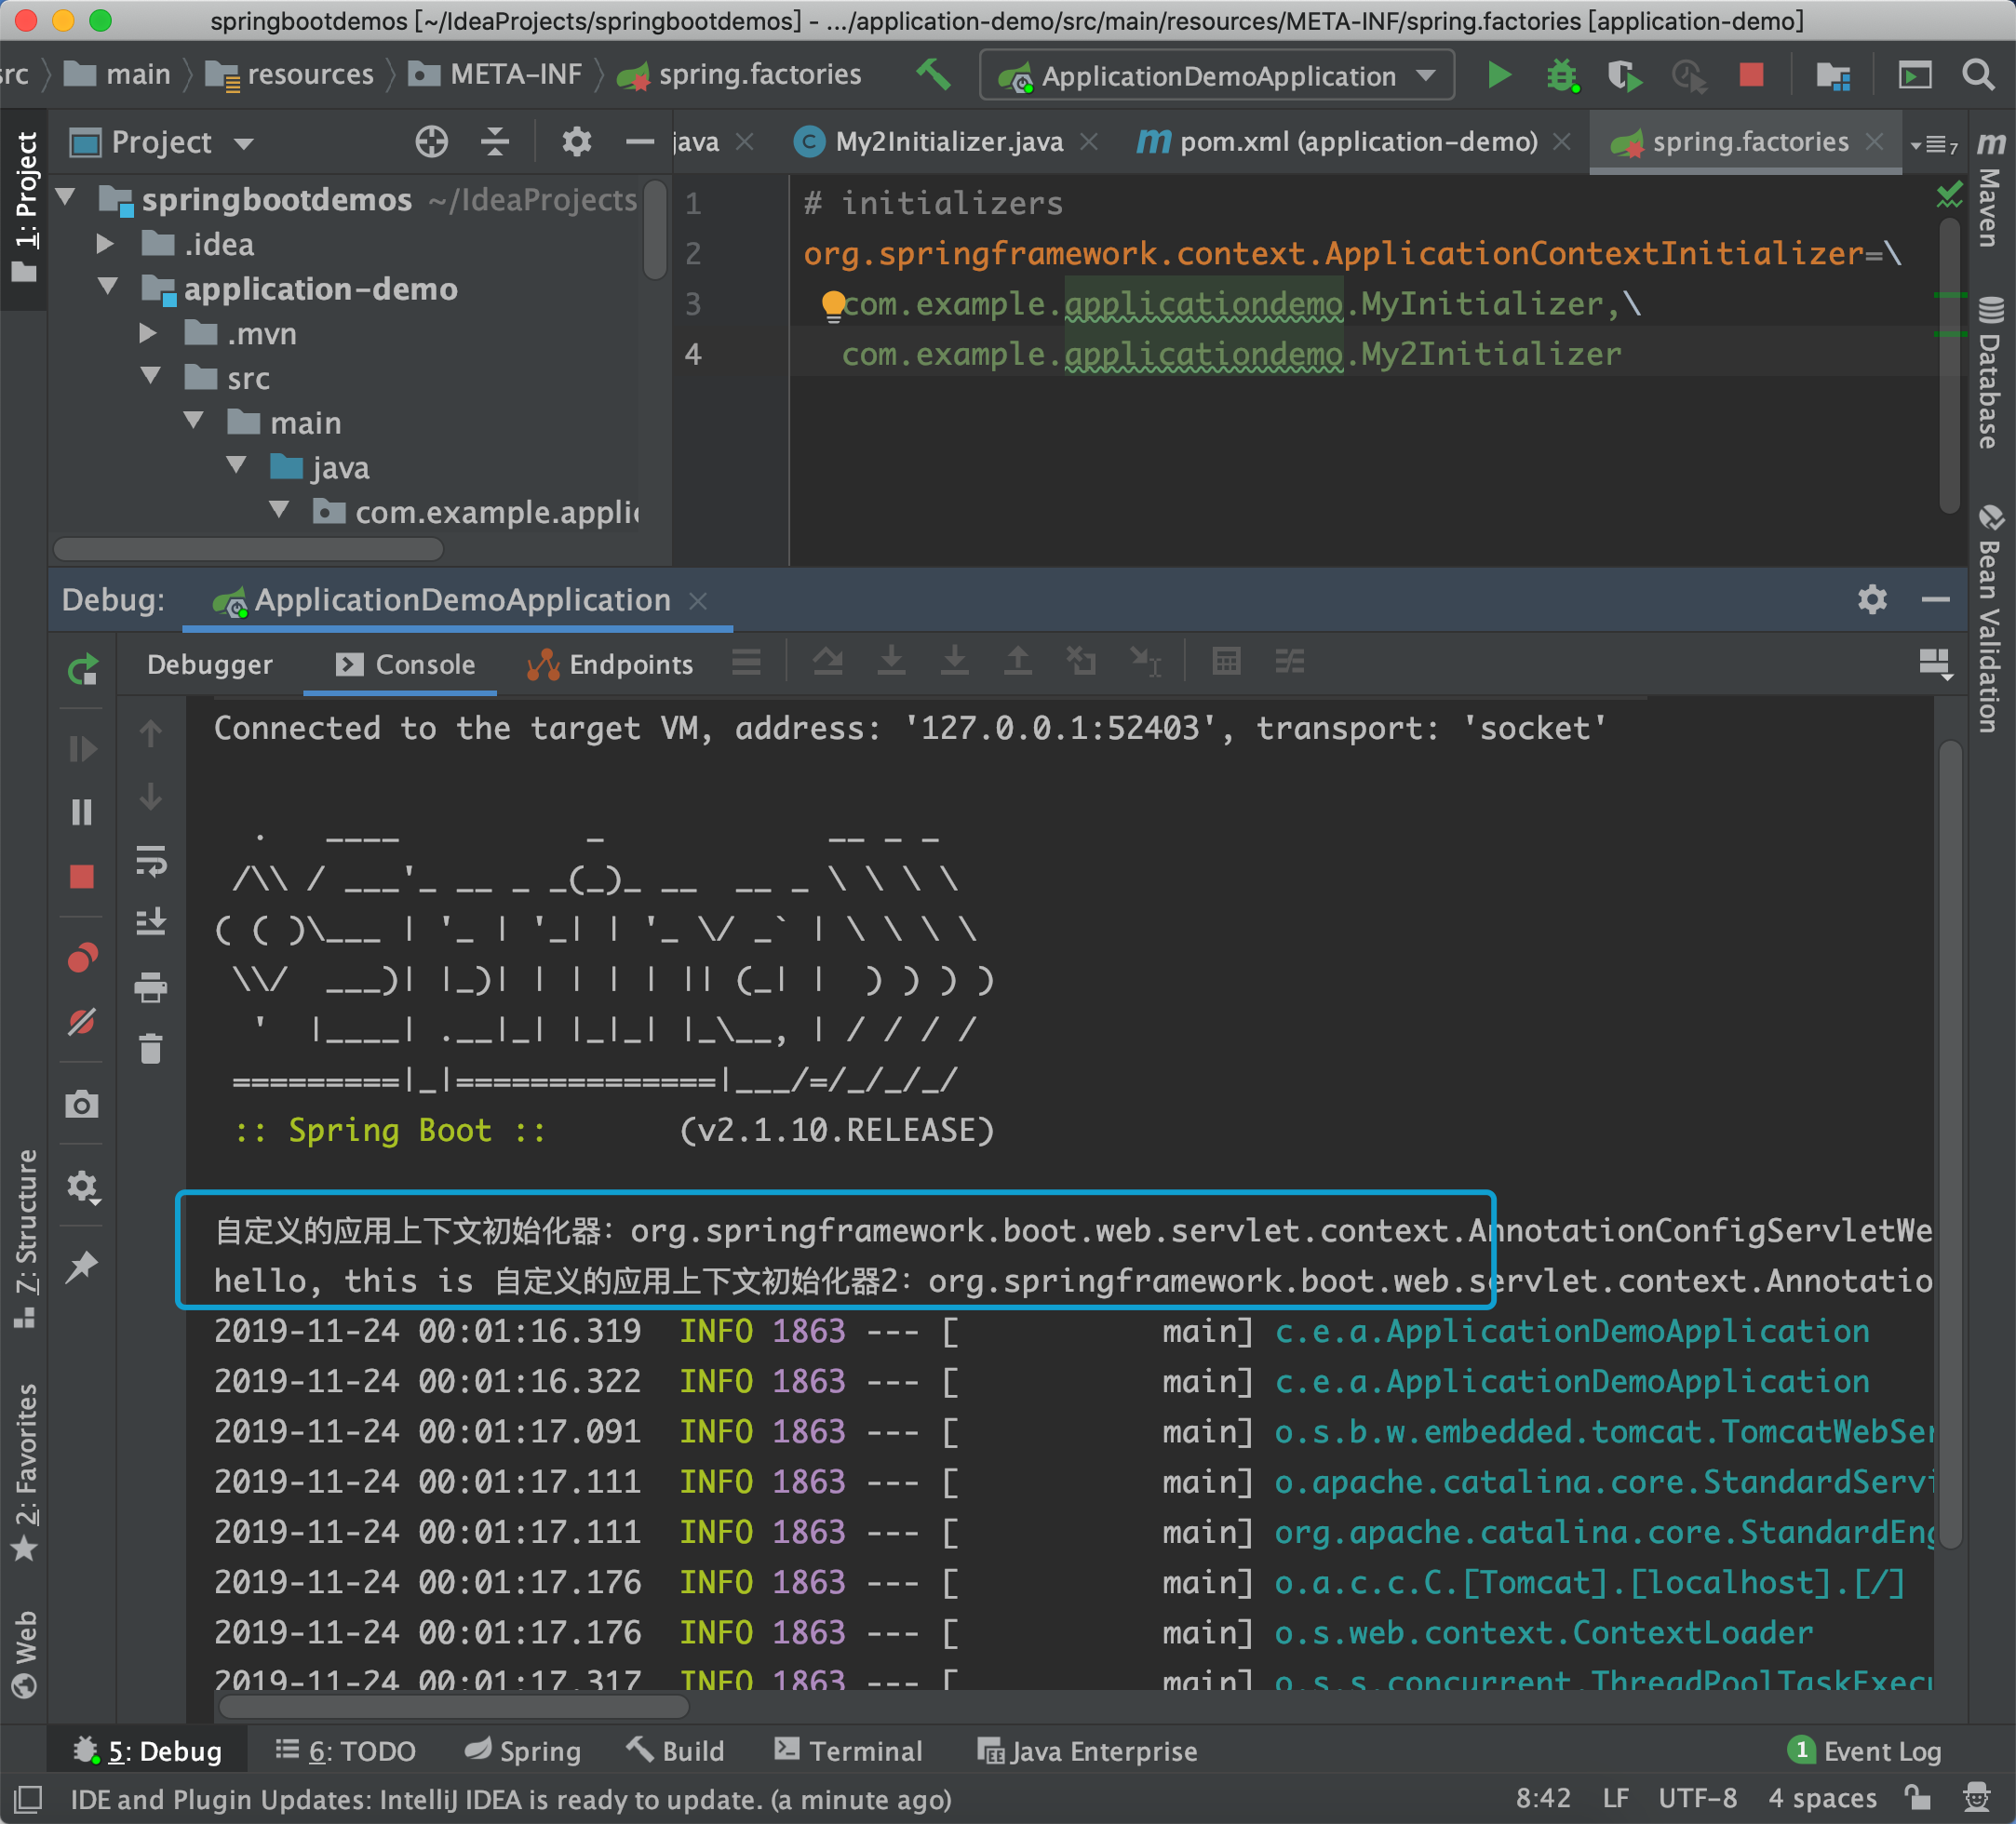
System.out.println("自定义的应用上下文初始化器:" + configurableApplicationContext.toString());
}
}
再定义一个My2Initializer,设置@Order(101)
然后在spring.factories文件里如下配置:
# initializers

org.springframework.context.ApplicationContextInitializer=\

  com.example.applicationdemo.MyInitializer,\

  com.example.applicationdemo.My2Initializer
启动项目:
3.2 自定义ApplicationListener的实现类
@FunctionalInterface
public interface ApplicationListener<E extends ApplicationEvent> extends EventListener {
void onApplicationEvent(E var1);
}
即监听ApplicationEvents类的ApplicationListener接口的实现类。
首先查看有多少种ApplicationEvents:
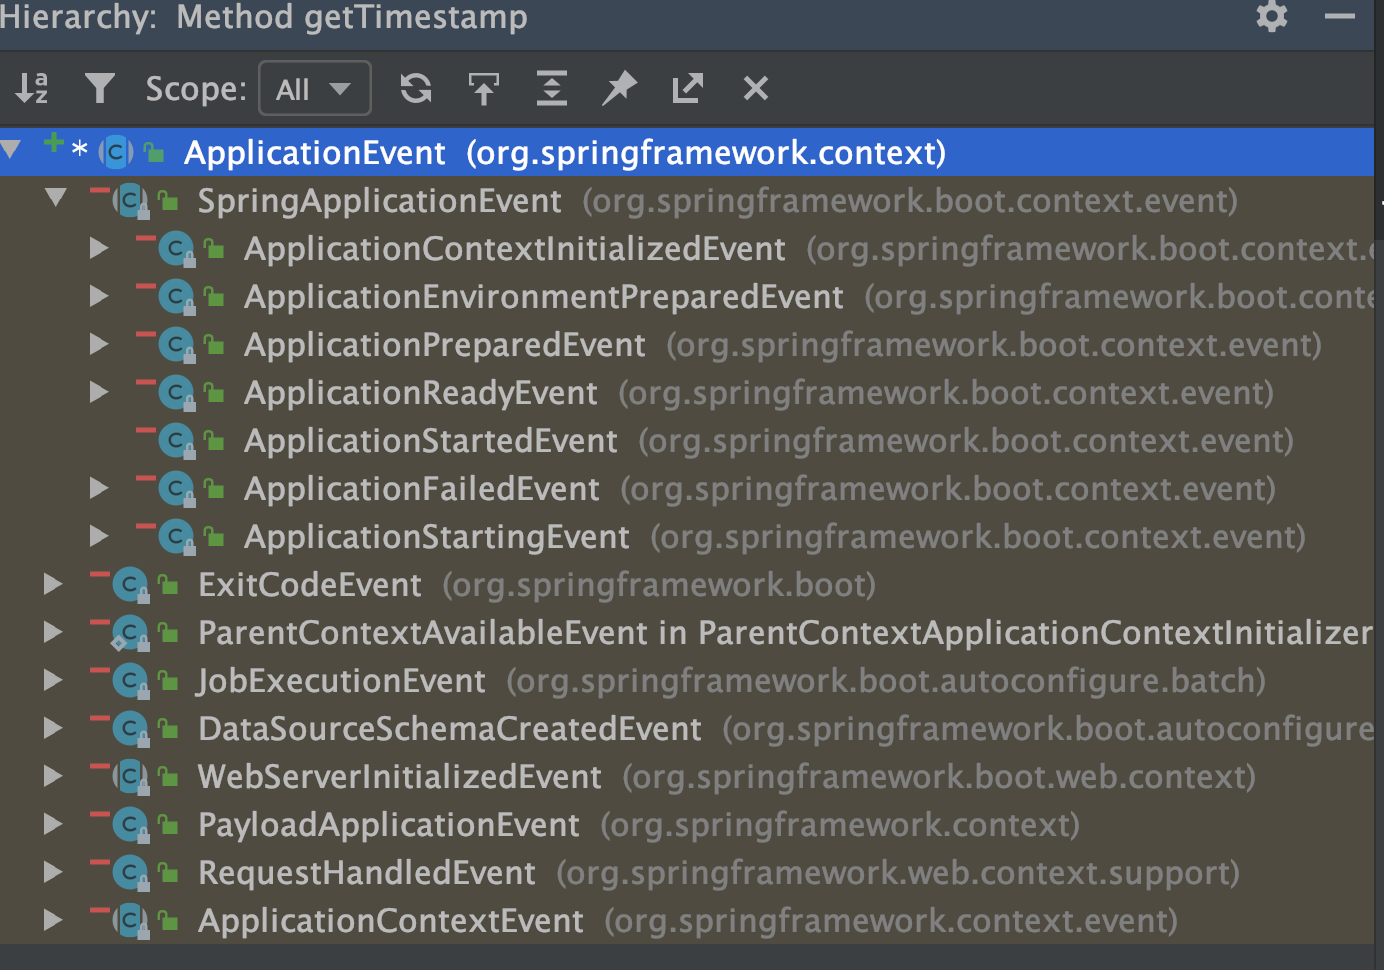
里面还可以进行拆分。
我们这里设置两个ApplicationListener,都用于监听ApplicationEnvironmentPreparedEvent
@Order(200)

public class MyApplicationListener implements ApplicationListener<ApplicationEnvironmentPreparedEvent> {

    @Override

    public void onApplicationEvent(ApplicationEnvironmentPreparedEvent applicationEnvironmentPreparedEvent) {

        System.out.println("MyApplicationListener: 应用环境准备完毕" + applicationEnvironmentPreparedEvent.toString());

    }

}
在spring.factories中加入applicationListener的配置:
# application-listeners

org.springframework.context.ApplicationListener=\

  com.example.applicationdemo.MyApplicationListener,\

  com.example.applicationdemo.MyApplicationListener2

在启动阶段,可以添加如下自定义配置:
3.3 自定义SpringBootRunListener的实现类
监听整个SpringBoot应用生命周期
public interface SpringApplicationRunListener {

  	// 应用启动

    void starting();

    // 应用ConfigurableEnvironment准备完毕,此刻可以将其调整

    void environmentPrepared(ConfigurableEnvironment environment);

  	// 上下文准备完毕

    void contextPrepared(ConfigurableApplicationContext context);

  	// 上下文装载完毕

    void contextLoaded(ConfigurableApplicationContext context);

  	// 启动完成(Beans已经加载到容器中)

    void started(ConfigurableApplicationContext context);

  	// 应用运行中

    void running(ConfigurableApplicationContext context);

  	// 应用运行失败

    void failed(ConfigurableApplicationContext context, Throwable exception);

}
我们可以自定义SpringApplicationRunListener的实现类,通过重写以上方法来定义自己的listener。
比如:
public class MyRunListener implements SpringApplicationRunListener {

    // 注意要加上这个构造器,两个参数都不能少,否则启动会报错,报错的详情可以看这个类的最下面

    public MyRunListener(SpringApplication springApplication, String[] args) {

    }

    @Override

    public void starting() {

        System.out.println("MyRunListener: 程序开始启动");

    }

    // 其他方法省略,不做修改

}
然后在spring.factories文件中添加这个类:
org.springframework.boot.SpringApplicationRunListener=\

  com.example.applicationdemo.MyRunListener
启动:

3.4 自定义ApplicationRunner或CommandLineRunner
application的run方法中,有这样一行:
this.callRunners(context, applicationArguments);
仔细分析源码,发现这一句的作用是:SpringBoot应用启动过程中,会遍历所有的ApplicationRunner和CommandLineRunner,执行其run方法。
private void callRunners(ApplicationContext context, ApplicationArguments args) {

        List<Object> runners = new ArrayList();

        runners.addAll(context.getBeansOfType(ApplicationRunner.class).values());

        runners.addAll(context.getBeansOfType(CommandLineRunner.class).values());

        AnnotationAwareOrderComparator.sort(runners);

        Iterator var4 = (new LinkedHashSet(runners)).iterator();

        while(var4.hasNext()) {

            Object runner = var4.next();

            if (runner instanceof ApplicationRunner) {

                this.callRunner((ApplicationRunner)runner, args);

            }

            if (runner instanceof CommandLineRunner) {

                this.callRunner((CommandLineRunner)runner, args);

            }

        }

    }
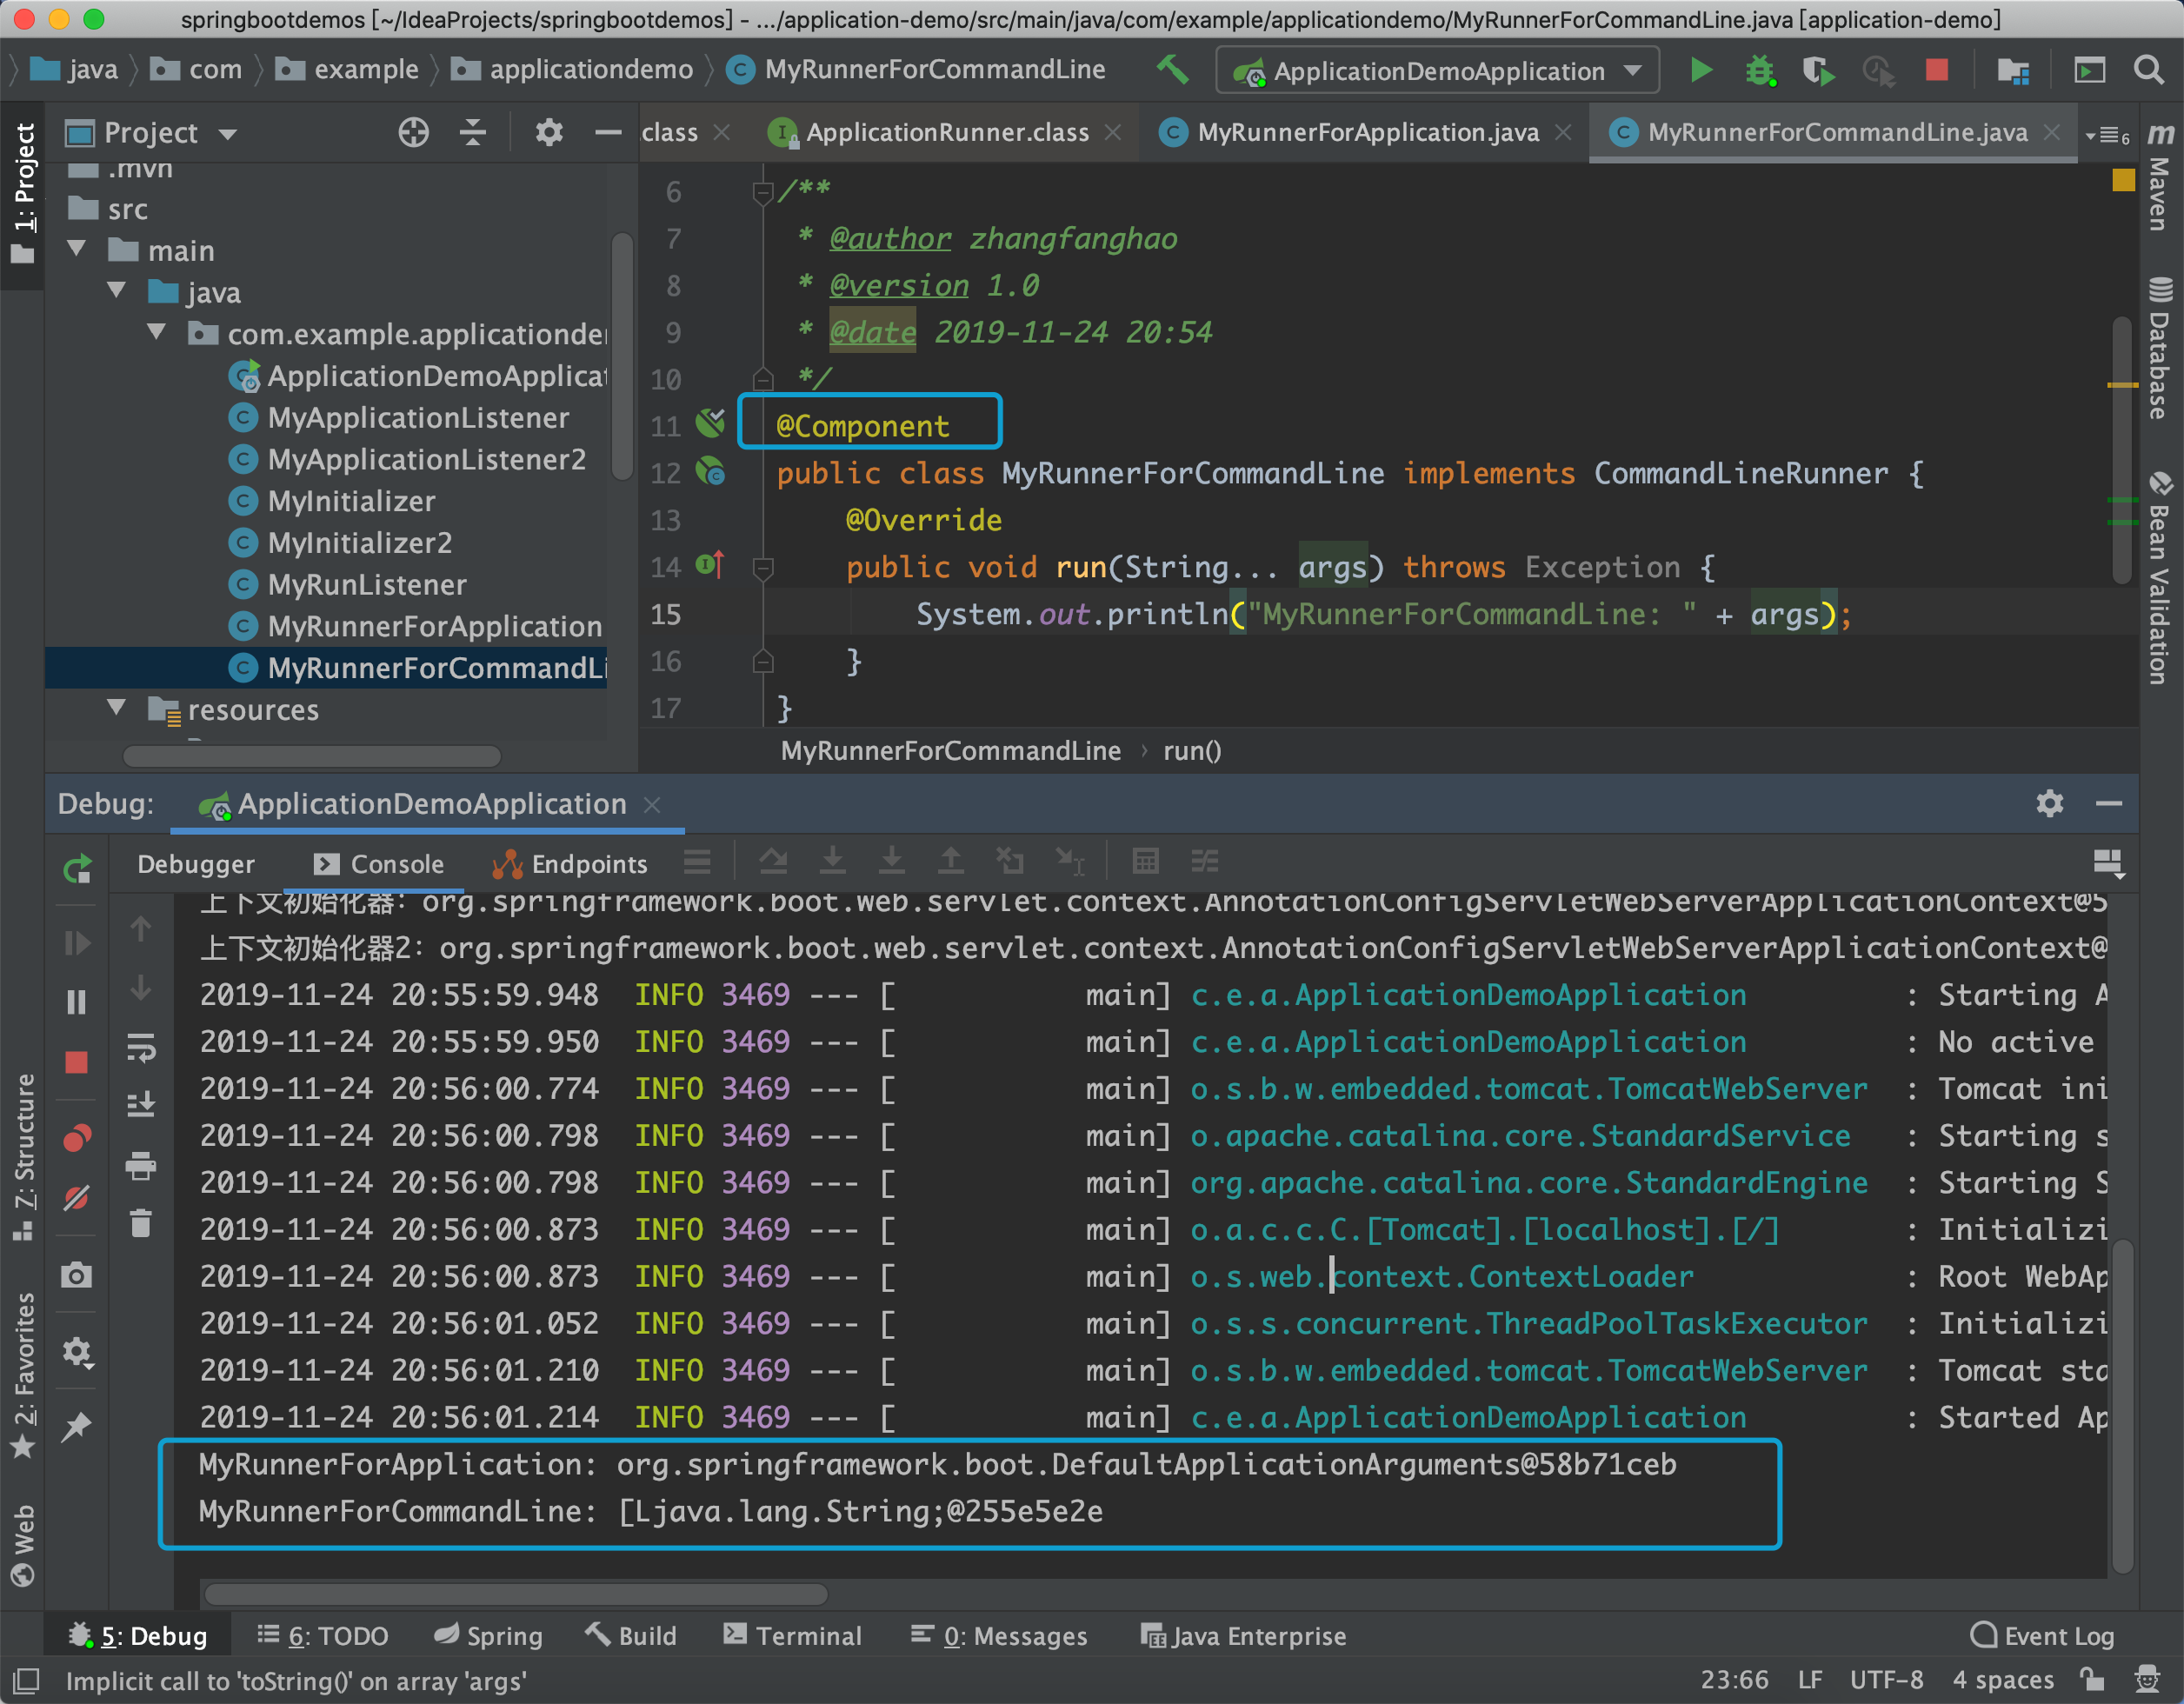
@FunctionalInterface

public interface CommandLineRunner {

    void run(String... args) throws Exception;

}
@FunctionalInterface

public interface ApplicationRunner {

    void run(ApplicationArguments args) throws Exception;

}
分别定义一个实现类,添加@Component,这两个实现类不需要在spring.factories中配置。
好了,关于这些自定义配置的具体使用,后续会继续进行介绍,请持续关注!感谢!
具体示例代码请去https://github.com/laolunsi/spring-boot-examples查看。
SpringBoot Application深入学习的更多相关文章
- SpringBoot源码学习系列之异常处理自动配置
SpringBoot源码学习系列之异常处理自动配置 1.源码学习 先给个SpringBoot中的异常例子,假如访问一个错误链接,让其返回404页面 在浏览器访问: 而在其它的客户端软件,比如postm ...
- SpringBoot源码学习系列之嵌入式Servlet容器
目录 1.博客前言简单介绍 2.定制servlet容器 3.变换servlet容器 4.servlet容器启动原理 SpringBoot源码学习系列之嵌入式Servlet容器启动原理 @ 1.博客前言 ...
- SpringBoot 企业级核心技术学习专题
专题 专题名称 专题描述 001 Spring Boot 核心技术 讲解SpringBoot一些企业级层面的核心组件 002 Spring Boot 核心技术章节源码 Spring Boot 核心技术 ...
- SpringBoot + Spring Security 学习笔记(五)实现短信验证码+登录功能
在 Spring Security 中基于表单的认证模式,默认就是密码帐号登录认证,那么对于短信验证码+登录的方式,Spring Security 没有现成的接口可以使用,所以需要自己的封装一个类似的 ...
- SpringBoot + Spring Security 学习笔记(三)实现图片验证码认证
整体实现逻辑 前端在登录页面时,自动从后台获取最新的验证码图片 服务器接收获取生成验证码请求,生成验证码和对应的图片,图片响应回前端,验证码保存一份到服务器的 session 中 前端用户登录时携带当 ...
- Springboot Application 集成 OSGI 框架开发
内容来源:https://www.ibm.com/developerworks/cn/java/j-springboot-application-integrated-osgi-framework-d ...
- SpringBoot application.properties (application.yml)优先级从高到低
SpringBoot application.properties(application.yml) 优先级从高到低 SpringBoot配置文件优先级从高到低 =================== ...
- springboot application.properties配置大全
springboot application.properties配置大全 官方文档 https://docs.spring.io/spring-boot/docs/current/reference ...
- springboot日志框架学习------slf4j和log4j2
springboot日志框架学习------slf4j和log4j2 日志框架的作用,日志框架就是用来记录系统的一些行为的,可以通过日志发现一些问题,在出现问题之后日志是好的一个帮手. 市面上的日志框 ...
随机推荐
- spring boot 中通过CORS实现跨域
一.跨域问题出现的原因 出现跨域问题的原因是同源策略. 同源策略 主要是三同:同协议.同域名.同端口, 同源策略目的 保证用户信息安全,防止恶意网站窃取数据.同源策略是必须的,否则cookie可以共享 ...
- 百万年薪python之路 -- 并发编程之 多进程 一
并发编程之 多进程 一. multiprocessing模块介绍 python中的多线程无法利用多核优势,如果想要充分地使用多核CPU的资源(os.cpu_count()查看),在python中大 ...
- konva canvas插件写雷达图示例
最近,做了一个HTML5的项目,里面涉及到了雷达图效果,这里,我将react实战项目中,用到的雷达图单拎出来写一篇博客,供大家学习. 以下内容涉及的代码在我的gitlab仓库中:Konva canva ...
- IOT设备的7大安全问题
IOT设备的7大安全问题 串口安全 IOT设备一般包含各类串口,并且这些串口缺乏认证机制.一旦暴露给了hacker,hacker可以很容易的查找敏感信息和dump固件,从而导致各类安全问题.建议厂家在 ...
- Shiro权限管理框架(四):深入分析Shiro中的Session管理
其实关于Shiro的一些学习笔记很早就该写了,因为懒癌和拖延症晚期一直没有落实,直到今天公司的一个项目碰到了在集群环境的单点登录频繁掉线的问题,为了解决这个问题,Shiro相关的文档和教程没少翻.最后 ...
- SpringBoot与MybatisPlus3.X整合之通用枚举(十二)
一 通用枚举 解决了繁琐的配置,让 mybatis 优雅的使用枚举属性! 自3.1.0开始,可配置默认枚举处理类来省略扫描通用枚举配置 默认枚举配置 升级说明: 3.1.0 以下版本改变了原生默认行为 ...
- ORM之多表操作
一.创建模型 from django.db import models # Create your models here. class Book(models.Model): nid = model ...
- zookeeper+springboot+dubbo简单实现
第一步:在虚拟机中搭建zookeeper. 第二步:本地创建3个maven工程,分别为wxh-dubbo-api(对外暴露的接口),wxh-dubbo-provider(服务提供者,接口的具体实现), ...
- Logstash 安装及简单实用(同步MySql数据到Elasticsearch)(Windows)
Logstash是一款轻量级的日志搜集处理框架,可以方便的把分散的.多样化的日志搜集起来,并进行自定义的处理,然后传输到指定的位置,比如某个服务器或者文件 Windows环境: 1.下载logstas ...
- 使用XPath
XPath----XML路径语言 XPath概览 XPath是一门在XML文档中查找信息的语言,它提供了非常简洁明了的路径选择表达式. XPath常用规则 表达式 描 述 nodename 选取此节 ...