
通过ImageReader进行图像裁剪时出现NoSuchElementException异常
首先放上最初的Image工具类
package util;

import java.awt.Rectangle;

import java.awt.image.BufferedImage;

import java.io.File;

import java.io.FileInputStream;

import java.util.Iterator;

import javax.imageio.ImageIO;

import javax.imageio.ImageReadParam;

import javax.imageio.ImageReader;

import javax.imageio.stream.ImageInputStream;

public class ImageUtil {

    private ImageUtil() {

    }

    /**

     * 裁剪图像

     *

     * @param x,y 起始点

     * @param width,height 宽高

     * @param srcpath 被裁减图像路径

     * @param subpath 裁剪后保存路径

     * @param type 图像类型

     * @throws Exception

     */

    public static void cut(int x, int y, int width, int height, String srcpath,

            String subpath, String type) throws Exception {

        FileInputStream is = null;

        ImageInputStream iis = null;

        try {

            // 读取图片文件

            is = new FileInputStream(srcpath);

            Iterator<ImageReader> it = ImageIO.getImageReadersByFormatName(type);

            ImageReader reader = it.next();

            // 获取图片流

            iis = ImageIO.createImageInputStream(is);

            reader.setInput(iis, true);

            ImageReadParam param = reader.getDefaultReadParam();

            Rectangle rect = new Rectangle(x, y, width, height);

            // 提供一个 BufferedImage,将其用作解码像素数据的目标。

            param.setSourceRegion(rect);

            BufferedImage bi = reader.read(0, param);

            ImageIO.write(bi, type, new File(subpath));

        } finally {

            if (is != null)

                is.close();

            if (iis != null)

                iis.close();

        }

    }

    /**

     * 获取图像真实类型

     *

     * @param path 图像路径

     * @return 图像类型

     * @throws Exception

     */

    public static String getTypeByStream(String path) throws Exception {

        FileInputStream is = new FileInputStream(path);

        String type = "";

        byte[] b = new byte[4];

        try {

            is.read(b, 0, b.length);

        } catch (Exception e) {

            e.printStackTrace();

        } finally {

            if (null != is) {

                is.close();

            }

        }

        type = bytesToHexString(b).toUpperCase();

        if (type.contains("FFD8FF")) {

            return "jpg";

        } else if (type.contains("89504E47")) {

            return "png";

        } else if (type.contains("47494638")) {

            return "gif";

        } else if (type.contains("49492A00")) {

            return "tif";

        } else if (type.contains("424D")) {

            return "bmp";

        }

        return type;

    }

    /**

     * byte数组转换成16进制字符串

     *

     * @param src

     * @return

     */

    private static String bytesToHexString(byte[] src) {

        StringBuilder stringBuilder = new StringBuilder();

        if (src == null || src.length <= 0) {

            return null;

        }

        for (int i = 0; i < src.length; i++) {

            int v = src[i] & 0xFF;

            String hv = Integer.toHexString(v);

            if (hv.length() < 2) {

                stringBuilder.append(0);

            }

            stringBuilder.append(hv);

        }

        return stringBuilder.toString();

    }

}
ImageUtil-origin
以前使用ImageReader对jpg图像进行裁剪没有任何异常,这几天接到新的需求,要能对tif图像进行裁剪。原以为只需将传入的type值改为tif即可,但报出了NoSuchElementException异常
java.util.NoSuchElementException

    at javax.imageio.spi.FilterIterator.next(ServiceRegistry.java:825)

    at javax.imageio.ImageIO$ImageReaderIterator.next(ImageIO.java:528)

    at javax.imageio.ImageIO$ImageReaderIterator.next(ImageIO.java:513)
网上查了半天,各种说法都有,最终找到了问题所在:
在jdk下的src中可以看到jdk自带支持的imageio类型——bmp、gif、jpeg(jpg)、png等,就 是 没 有 tif !!!
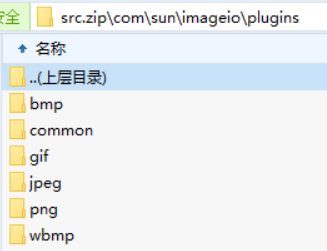
所以就有了解决的方向——导入tif的imageio,需要的jar包有3个jai_codec、jai_core、jai_imageio
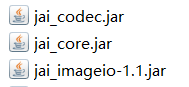
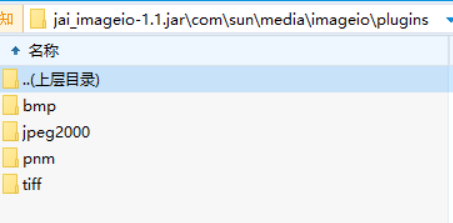
导入3个jar包后,对工具类进行测试,发现不报异常了,图像也正确切割了
原本到此应该就已经结束了,但是。。。
放到web项目中又报出了NoSuchElementException的异常
于是又是一顿搜索和实验,终于找到了正解——要在迭代器中注册tif的imageio类
IIORegistry registry = IIORegistry.getDefaultInstance();

registry.registerServiceProvider(new com.sun.media.imageioimpl.plugins.tiff.TIFFImageWriterSpi());

registry.registerServiceProvider(new com.sun.media.imageioimpl.plugins.tiff.TIFFImageReaderSpi());
加上这段代码后,在web中终于不会报异常了
所以最后的图片工具类就变成了这样
import java.awt.Rectangle;

import java.awt.image.BufferedImage;

import java.io.File;

import java.io.FileInputStream;

import java.util.Iterator;

import javax.imageio.ImageIO;

import javax.imageio.ImageReadParam;

import javax.imageio.ImageReader;

import javax.imageio.spi.IIORegistry;

import javax.imageio.stream.ImageInputStream;

public class ImageUtil {

    private ImageUtil() {

    }

    static {

        IIORegistry registry = IIORegistry.getDefaultInstance();

        registry.registerServiceProvider(new com.sun.media.imageioimpl.plugins.tiff.TIFFImageWriterSpi());

        registry.registerServiceProvider(new com.sun.media.imageioimpl.plugins.tiff.TIFFImageReaderSpi());

    }

    /**

     * 裁剪图像

     *

     * @param x,y 起始点

     * @param width,height 宽高

     * @param srcpath 被裁减图像路径

     * @param subpath 裁剪后保存路径

     * @param type 图像类型

     * @throws Exception

     */

    public static void cut(int x, int y, int width, int height, String srcpath,

            String subpath, String type) throws Exception {

        FileInputStream is = null;

        ImageInputStream iis = null;

        try {

            // 读取图片文件

            is = new FileInputStream(srcpath);

            Iterator<ImageReader> it = ImageIO.getImageReadersByFormatName(type);

            ImageReader reader = it.next();

            // 获取图片流

            iis = ImageIO.createImageInputStream(is);

            reader.setInput(iis, true);

            ImageReadParam param = reader.getDefaultReadParam();

            Rectangle rect = new Rectangle(x, y, width, height);

            // 提供一个 BufferedImage,将其用作解码像素数据的目标。

            param.setSourceRegion(rect);

            BufferedImage bi = reader.read(0, param);

            ImageIO.write(bi, type, new File(subpath));

        } finally {

            if (is != null)

                is.close();

            if (iis != null)

                iis.close();

        }

    }

    /**

     * 获取图像真实类型

     *

     * @param path 图像路径

     * @return 图像类型

     * @throws Exception

     */

    public static String getTypeByStream(String path) throws Exception {

        FileInputStream is = new FileInputStream(path);

        String type = "";

        byte[] b = new byte[4];

        try {

            is.read(b, 0, b.length);

        } catch (Exception e) {

            e.printStackTrace();

        } finally {

            if (null != is) {

                is.close();

            }

        }

        type = bytesToHexString(b).toUpperCase();

        if (type.contains("FFD8FF")) {

            return "jpg";

        } else if (type.contains("89504E47")) {

            return "png";

        } else if (type.contains("47494638")) {

            return "gif";

        } else if (type.contains("49492A00")) {

            return "tif";

        } else if (type.contains("424D")) {

            return "bmp";

        }

        return type;

    }

    /**

     * byte数组转换成16进制字符串

     *

     * @param src

     * @return

     */

    private static String bytesToHexString(byte[] src) {

        StringBuilder stringBuilder = new StringBuilder();

        if (src == null || src.length <= 0) {

            return null;

        }

        for (int i = 0; i < src.length; i++) {

            int v = src[i] & 0xFF;

            String hv = Integer.toHexString(v);

            if (hv.length() < 2) {

                stringBuilder.append(0);

            }

            stringBuilder.append(hv);

        }

        return stringBuilder.toString();

    }

}
ImageUtil
和初始的工具类相比没什么太多的变动。。。
最后是3个包的下载地址 https://gitee.com/shizuru/ImageUtil/tree/master
通过ImageReader进行图像裁剪时出现NoSuchElementException异常的更多相关文章
- Java 使用Scanner时的NoSuchElementException异常
做实验时设计了一个类,在类中的两个不同函数中分别创建了两个Scanner对象,并且在各个函数的结尾使用了close()方法,结果在运行时产生了NoSuchElementException异常. 实验的 ...
- 【开源】canvas图像裁剪、压缩、旋转
前言 前段时间遇到了一个移动端对图像进行裁剪.压缩.旋转的需求. 考虑到已有各轮子的契合度都不高,于是自己重新造了一个轮子. 关于图像裁剪.压缩 在HTML5时代,canvas的功能已经非常强大了,可 ...
- canvas图像裁剪、压缩、旋转
转载于:http://www.cnblogs.com/dailc/p/7843204.html 前言 前段时间遇到了一个移动端对图像进行裁剪.压缩.旋转的需求.考虑到已有各轮子的契合度都不高,于是自己 ...
- STM32内存受限情况下摄像头驱动方式与图像裁剪的选择
1.STM32图像接收接口 使用stm32芯片,128kB RAM,512kB Rom,资源有限,接摄像头采集图像,这种情况下,内存利用制约程序设计. STM32使用DCMI接口读取摄像头,协议如下. ...
- PHP图像裁剪为任意大小的图像,图像不变形,不留下空白
<?php /** * 说明:函数功能是把一个图像裁剪为任意大小的图像,图像不变形 * 参数说明:输入 需要处理图片的 文件名,生成新图片的保存文件名,生成新图片的宽,生成新图片的高 */ fu ...
- jQuery的图像裁剪插件Jcrop
1.最基本使用方法 html代码部分: <img src="demo_files/flowers.gif" id="demoImage"/> ...
- HTML canvas图像裁剪
canvas drawImage方法的图像裁剪理解可能会比较耗时,记录一下,以便供人翻阅! context.drawImage(img,sx,sy,swidth,sheight,x,y,width,h ...
- php 图像裁剪(自定义裁剪图片大小)
<?php /** * 图像裁剪 * @param $title string 原图路径 * @param $content string 需要裁剪的宽 * @param $encode str ...
- jQuery Jcrop 图像裁剪
jQuery Jcrop 图像裁剪 http://code.ciaoca.com/jquery/jcrop/ cropper.js 实现HTML5 裁剪图片并上传(裁剪上传头像.) https://b ...
随机推荐
- 将String类型的字符串拼接成以逗号分隔的字符输出
package test; import java.util.ArrayList; import java.util.List; public class Tesdssss { private sta ...
- 2019PKUWC游记
有的时候,不是你不会 而是你,认为你不会 ——*Miracle* 本篇游记就简单写了 Day-inf 犹豫许久,还是选择了北大 不是因为喜欢——甚至恰好相反 而是,听说清华高手较多,约型单一, 于是我 ...
- sqli-labs通关记录
环境搭建:https://www.cnblogs.com/kagari/p/11910749.html 总体感受:sqli-labs还是只适合入门 在此基础上添加了一个flag数据库,库名flag,表 ...
- oracle-密码
Oracle 11g 默认用户名和密码安装ORACLE时,若没有为下列用户重设密码,则其默认密码如下: 用户名/密码 登录身份 说明sys/change_on_install SYSDBA 或 SYS ...
- php判断为空就插入,判断不为空就更新
if ($_GET['tplname']!==null) { if ($userinfo[0] == ''){$exec="INSERT INTO cblej_company_pc_temp ...
- ajax结合mysql数据库和smarty实现局部数据状态的刷新
效果状态:通过点击锁定状态实现状态锁定与不锁定之间的切换 1.主程序:01.php导入smarty和mysql类,取得数据导入列表模板 <?php include './include/M ...
- JAVA 基础编程练习题31 【程序 31 数组逆序】
31 [程序 31 数组逆序] 题目:将一个数组逆序输出. 程序分析:用第一个与最后一个交换. package cskaoyan; public class cskaoyan31 { @org.jun ...
- 不要在viewWillDisappear:方法中移除通知
都知道viewWillAppear:方法是在控制器的view将要显示的时候调用的,而viewWillDisappear:方法是在控制器的view将要隐藏的时候调用. 这看上去没什么问题,键盘的显示和隐 ...
- Django -- DateTimeField
默认为时区时间时,需要导入django内置的timezone模块 from django.utils import timezone create_at = models.DateTimeField( ...
- webdriervAPI(控制浏览器及简单元素操作)
from selenium import webdriver driver = webdriver.Chorme() driver.get("http://www.baidu.co ...