Android ConstraintLayout 说明和例子
快速说明
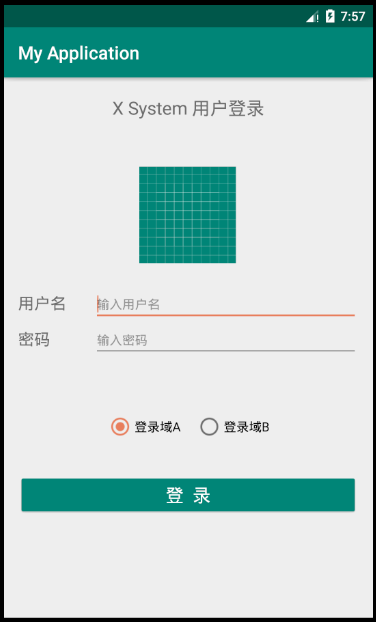
当我们点击一个按钮时,显示效果如下
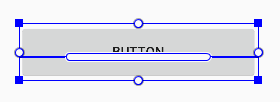

约束类型
尺寸约束

实心方块,用来调整组件的大小
边界约束

空心圆圈,建立组件之间,组件和parent的约束关系。
基准线约束

是让两个带有文本属性的组件对齐的。
清除约束
点击 清除所有控件的约束,
右键 清除所选控件的约束
约束实例


点击 打开自动约束
点击 进行自动约束
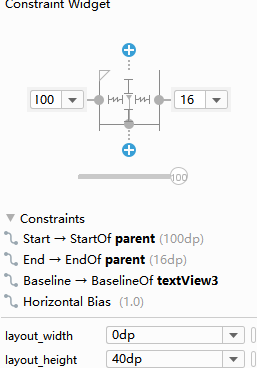
ViewInspector
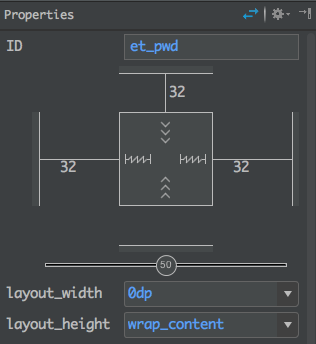
1.盒子四周的线,代表Margin的值
2.数字圆圈的两个bar,是控制相对位置的比例的。
盒子的线 含义
Fixed

写具体的大小数值
Wrap Content

Match Constraint

例子
效果如下

WrapContent,和parent左右对齐,距离parent的top为20dp
    <TextView

        android:id="@+id/textView"

        android:layout_width="wrap_content"

        android:layout_height="wrap_content"

        android:layout_marginTop="20dp"

        android:text="X System 用户登录"

        android:textSize="20sp"

        app:layout_constraintEnd_toEndOf="parent"

        app:layout_constraintStart_toStartOf="parent"

        app:layout_constraintTop_toTopOf="parent" />
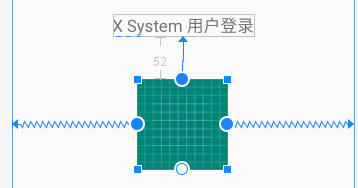
同理,ImageView 和parent左右对齐,他的top距离上面textview的距离为52dp
    <ImageView

        android:id="@+id/imageView"

        android:layout_width="wrap_content"

        android:layout_height="wrap_content"

        android:layout_marginTop="52dp"

        app:layout_constraintEnd_toEndOf="parent"

        app:layout_constraintHorizontal_bias="0.498"

        app:layout_constraintStart_toStartOf="parent"

        app:layout_constraintTop_toBottomOf="@+id/textView"

        app:srcCompat="@drawable/ic_launcher_background" />
    <TextView

        android:id="@+id/textView3"

        android:layout_width="wrap_content"

        android:layout_height="wrap_content"

        android:layout_marginStart="16dp"

        android:layout_marginTop="32dp"

        android:text="用户名"

        android:textSize="18sp"

        app:layout_constraintStart_toStartOf="parent"

        app:layout_constraintTop_toBottomOf="@+id/imageView" />

    <TextView

        android:id="@+id/textView4"

        android:layout_width="wrap_content"

        android:layout_height="wrap_content"

        android:layout_marginStart="16dp"

        android:layout_marginTop="16dp"

        android:text="密码"

        android:textSize="18sp"

        app:layout_constraintStart_toStartOf="parent"

        app:layout_constraintTop_toBottomOf="@+id/textView3" />
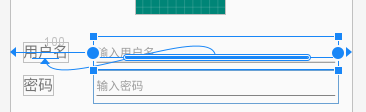
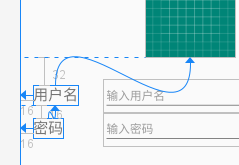
文本输入框,宽度设置为0,适应约束类型
左右和parent对齐,留有margin,
使用了Baseline和左侧的文本框对齐
    <EditText

        android:id="@+id/editText7"

        android:layout_width="0dp"

        android:layout_height="40dp"

        android:layout_marginStart="100dp"

        android:layout_marginEnd="16dp"

        android:ems="10"

        android:hint="输入用户名"

        android:inputType="textPersonName"

        android:textSize="14sp"

        app:layout_constraintBaseline_toBaselineOf="@+id/textView3"

        app:layout_constraintEnd_toEndOf="parent"

        app:layout_constraintStart_toStartOf="parent" />

    <EditText

        android:id="@+id/editText8"

        android:layout_width="0dp"

        android:layout_height="40dp"

        android:layout_marginStart="100dp"

        android:layout_marginEnd="16dp"

        android:ems="10"

        android:hint="输入密码"

        android:inputType="textPassword"

        android:textSize="14sp"

        app:layout_constraintBaseline_toBaselineOf="@+id/textView4"

        app:layout_constraintEnd_toEndOf="parent"

        app:layout_constraintStart_toStartOf="parent" />
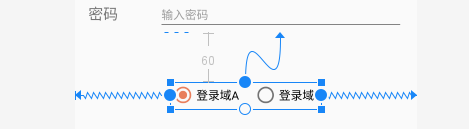
先放置一个RadioGroup,为了放置radiobutton,可以先设置宽和高,然后拖入radiobutton,
注意RadioGroup默认是Vertic的这里改成Horizontal。第二个button设置下
layout_marginLeft以便分开
    <RadioGroup

        android:id="@+id/radioGroup"

        android:layout_width="wrap_content"

        android:layout_height="wrap_content"

        android:layout_marginTop="60dp"

        android:orientation="horizontal"

        app:layout_constraintEnd_toEndOf="parent"

        app:layout_constraintHorizontal_bias="0.498"

        app:layout_constraintStart_toStartOf="parent"

        app:layout_constraintTop_toBottomOf="@+id/editText8">

        <RadioButton

            android:id="@+id/radioButton7"

            android:layout_width="wrap_content"

            android:layout_height="wrap_content"

            android:layout_weight="1"

            android:checked="true"

            android:text="登录域A" />

        <RadioButton

            android:id="@+id/radioButton8"

            android:layout_width="wrap_content"

            android:layout_height="wrap_content"

            android:layout_marginLeft="16dp"

            android:layout_weight="1"

            android:text="登录域B" />

    </RadioGroup>

    <Button

        android:id="@+id/button"

        android:layout_width="0dp"

        android:layout_height="wrap_content"

        android:layout_marginStart="16dp"

        android:layout_marginTop="36dp"

        android:layout_marginEnd="16dp"

        android:textSize="20dp"

        android:textColor="@color/pureWhite"

        android:text="登  录"

        android:theme="@style/GenericButtonStyle"

        app:layout_constraintEnd_toEndOf="parent"

        app:layout_constraintHorizontal_bias="1.0"

        app:layout_constraintStart_toStartOf="parent"

        app:layout_constraintTop_toBottomOf="@+id/radioGroup" />
注意:为了有点击效果,不能简单的设置Button的背景色。
这里使用了theme,在values的style里面添加
    <style name="GenericButtonStyle" parent="ThemeOverlay.AppCompat">

        <item name="colorButtonNormal">@color/colorPrimary</item>

    </style>
全部代码
<?xml version="1.0" encoding="utf-8"?>

<androidx.constraintlayout.widget.ConstraintLayout xmlns:android="http://schemas.android.com/apk/res/android"

    xmlns:app="http://schemas.android.com/apk/res-auto"

    xmlns:tools="http://schemas.android.com/tools"

    android:layout_width="match_parent"

    android:layout_height="match_parent">

    <TextView

        android:id="@+id/textView"

        android:layout_width="wrap_content"

        android:layout_height="wrap_content"

        android:layout_marginTop="20dp"

        android:text="X System 用户登录"

        android:textSize="20sp"

        app:layout_constraintEnd_toEndOf="parent"

        app:layout_constraintStart_toStartOf="parent"

        app:layout_constraintTop_toTopOf="parent" />

    <ImageView

        android:id="@+id/imageView"

        android:layout_width="wrap_content"

        android:layout_height="wrap_content"

        android:layout_marginTop="52dp"

        app:layout_constraintEnd_toEndOf="parent"

        app:layout_constraintHorizontal_bias="0.498"

        app:layout_constraintStart_toStartOf="parent"

        app:layout_constraintTop_toBottomOf="@+id/textView"

        app:srcCompat="@drawable/ic_launcher_background" />

    <TextView

        android:id="@+id/textView3"

        android:layout_width="wrap_content"

        android:layout_height="wrap_content"

        android:layout_marginStart="16dp"

        android:layout_marginTop="32dp"

        android:text="用户名"

        android:textSize="18sp"

        app:layout_constraintStart_toStartOf="parent"

        app:layout_constraintTop_toBottomOf="@+id/imageView" />

    <TextView

        android:id="@+id/textView4"

        android:layout_width="wrap_content"

        android:layout_height="wrap_content"

        android:layout_marginStart="16dp"

        android:layout_marginTop="16dp"

        android:text="密码"

        android:textSize="18sp"

        app:layout_constraintStart_toStartOf="parent"

        app:layout_constraintTop_toBottomOf="@+id/textView3" />

    <EditText

        android:id="@+id/editText7"

        android:layout_width="0dp"

        android:layout_height="40dp"

        android:layout_marginStart="100dp"

        android:layout_marginEnd="16dp"

        android:ems="10"

        android:hint="输入用户名"

        android:inputType="textPersonName"

        android:textSize="14sp"

        app:layout_constraintBaseline_toBaselineOf="@+id/textView3"

        app:layout_constraintEnd_toEndOf="parent"

        app:layout_constraintStart_toStartOf="parent" />

    <EditText

        android:id="@+id/editText8"

        android:layout_width="0dp"

        android:layout_height="40dp"

        android:layout_marginStart="100dp"

        android:layout_marginEnd="16dp"

        android:ems="10"

        android:hint="输入密码"

        android:inputType="textPassword"

        android:textSize="14sp"

        app:layout_constraintBaseline_toBaselineOf="@+id/textView4"

        app:layout_constraintEnd_toEndOf="parent"

        app:layout_constraintStart_toStartOf="parent" />

    <RadioGroup

        android:id="@+id/radioGroup"

        android:layout_width="wrap_content"

        android:layout_height="wrap_content"

        android:layout_marginTop="60dp"

        android:orientation="horizontal"

        app:layout_constraintEnd_toEndOf="parent"

        app:layout_constraintHorizontal_bias="0.498"

        app:layout_constraintStart_toStartOf="parent"

        app:layout_constraintTop_toBottomOf="@+id/editText8">

        <RadioButton

            android:id="@+id/radioButton7"

            android:layout_width="wrap_content"

            android:layout_height="wrap_content"

            android:layout_weight="1"

            android:checked="true"

            android:text="登录域A" />

        <RadioButton

            android:id="@+id/radioButton8"

            android:layout_width="wrap_content"

            android:layout_height="wrap_content"

            android:layout_marginLeft="16dp"

            android:layout_weight="1"

            android:text="登录域B" />

    </RadioGroup>

    <Button

        android:id="@+id/button"

        android:layout_width="0dp"

        android:layout_height="wrap_content"

        android:layout_marginStart="16dp"

        android:layout_marginTop="36dp"

        android:layout_marginEnd="16dp"

        android:textSize="20dp"

        android:textColor="@color/pureWhite"

        android:text="登  录"

        android:theme="@style/GenericButtonStyle"

        app:layout_constraintEnd_toEndOf="parent"

        app:layout_constraintHorizontal_bias="1.0"

        app:layout_constraintStart_toStartOf="parent"

        app:layout_constraintTop_toBottomOf="@+id/radioGroup" />

</androidx.constraintlayout.widget.ConstraintLayout>
Android ConstraintLayout 说明和例子的更多相关文章
- android JNI处理图片的例子
android JNI处理图片的例子 原地址:http://blog.csdn.net/xjwangliang/article/details/7065670 <pre class=" ...
- Android ConstraintLayout详解(from jianshu)
Android ConstraintLayout详解 https://www.jianshu.com/p/a8b49ff64cd3 1. 概述 在本篇文章中,你会学习到有关Constraint ...
- Android ConstraintLayout约束控件链接整理
Android新特性介绍,ConstraintLayout完全解析 探索Android ConstraintLayout布局 了解使用Android ConstraintLayout
- android ConstraintLayout布局
解析ConstraintLayout的性能优势 Android新特性介绍,ConstraintLayout完全解析 1.子控件的位置约束属性: layout_constraintRight_toLef ...
- Android ConstraintLayout 构建自适应界面
原文链接 使用 ConstraintLayout 构建自适应界面 ConstraintLayout 可让您使用扁平视图层次结构(无嵌套视图组)创建复杂的大型布局.它与 RelativeLayout 相 ...
- Base64编解码Android和ios的例子,补充JNI中的例子
1.在Android中java层提供了工具类:android.util.Base64; 里面都是静态方法,方便直接使用: 使用方法如下: // Base64 编码: byte [] encode = ...
- 将android中的sample例子到eclipse中
SDK中带有很多的例子,那么我们怎么样导入到eclipse中呢?方法很简单,如下: 1. 新建android工程,选择Create project from existing sample, 2. 选 ...
- Android ViewFlow的一个例子
完成这个例子的步骤: 1.下载ViewFlow的源码,然后将类ViewFlow放在自己的工程的src的某个包下. 2.下载的源码里有2个工程view flow,viewflow-example.将vi ...
- Android ConstraintLayout 布局警告
使用 ConstraintLayout 布局出现警告: 此视图不受垂直约束.在运行时,除非添加垂直约束,否则它将跳转到左侧 解决办法: 从Android Studio v3及更高版本开始,从下拉列表中 ...
随机推荐
- Unrecognized SSL message, plaintext connection? 将https 换为http 即可
请求链接:https://59********* 升级后的项目地址有https换为了http ,出现这个错误,改为http请求即可
- ORM高阶补充:only, defer,select_related
Queryset官方文档:https://docs.djangoproject.com/en/1.11/ref/models/querysets/ 1.需求1:只取某n列 1.方法1:values 2 ...
- 基于steam的游戏销量预测 — PART 1 — 爬取steam游戏相关数据的爬虫
语言:python 环境:ubuntu 爬取内容:steam游戏标签,评论,以及在 steamspy 爬取对应游戏的销量 使用相关:urllib,lxml,selenium,chrome 解释: 流程 ...
- webpack给目录起别名
1. 配置文件目录: build>webpack.base.config.js: resolve: { alias: { '@': resolve('src'), 'styles': resol ...
- 洛谷P3935 Calculation [数论分块]
题目传送门 格式难调,题面就不放了. 分析: 实际上这个就是这道题的升级版,没什么可讲的,数论分块搞就是了. Code: //It is made by HolseLee on 18th Jul 20 ...
- 【luoguP4124 】[CQOI2016]手机号码
题目描述 人们选择手机号码时都希望号码好记.吉利.比如号码中含有几位相邻的相同数字.不含谐音不吉利的数字等.手机运营商在发行新号码时也会考虑这些因素,从号段中选取含有某些特征的号码单独出售.为了便于前 ...
- JVM GC之垃圾收集算法
1.垃圾收集概念 GC目的 分配内存,为每个新建的对象分配空间 确保还在使用的对象的内存一直还在,不能把有用的空间当垃圾回收了 释放不再使用的对象所占用的空间 我们把还被引用的对象称为活的,把不再被引 ...
- Python学习日记(一)——初识Python
Python的优势 互联网公司广泛使用python来做的事一般有:自动化运维.自动化测试.大数据分析.爬虫.Web等. Python与其他语言 C和Python.Java.C#: C 语言:代码编译 ...
- 外网访问内网的FTP服务器
转自 外网访问内网的FTP服务器 首先感谢作者给出的总结,原文是介绍Serv-U的,我针对FileZilla Server进行了稍微修改,仅看操作可直接跳到分割线后第3部分. 1. 背景简介最近研究如 ...
- Python中调用shell
1 简单调用shell命令 os.system(command) 在一个子shell中运行command命令, 并返回command命令执行完毕后的退出状态. 这实际上是使用C标准库函数system( ...