快速设置UITableView不同section对应于不同种类的cell
快速设置UITableView不同section对应于不同种类的cell

本文主要是为了写明如何在UITableView中,一个section对应于一种类型的cell,写起来不凌乱.
在不封装任何类的前提下提供如下源码:
请自行创建出3种类型的cell,创建好了就行,你需要创建出ModelOneCell,ModelTwoCell,ModelThreeCell,内容为空
//
// RootViewController.m
// Sections
//
// Copyright (c) 2014年 Y.X. All rights reserved.
// #import "RootViewController.h"
#import "ModelOneCell.h"
#import "ModelTwoCell.h"
#import "ModelThreeCell.h" @interface RootViewController ()<UITableViewDelegate, UITableViewDataSource> @property (nonatomic, strong) UITableView *tableView; // tableView @property (nonatomic, strong) NSMutableArray *dataArray; // 数据数组
@property (nonatomic, strong) NSMutableArray *nameList; // 数组名字 @end @implementation RootViewController #pragma mark - 只初始化一次
#define REUESED_SIZE 100
static NSString *reUsedStr[REUESED_SIZE] = {nil}; // 重用标示
#define REUESED_FLAG reUsedStr[0]
+ (void)initialize
{
if (self == [RootViewController class])
{
for (int i = ; i < REUESED_SIZE; i++)
{
reUsedStr[i] = [NSString stringWithFormat:@"GoodBoy_%d", i];
}
}
} - (void)viewDidLoad
{
[super viewDidLoad]; // 初始化tableView
_tableView = [[UITableView alloc] initWithFrame:self.view.bounds
style:UITableViewStylePlain];
[self.view addSubview:_tableView];
_tableView.delegate = self;
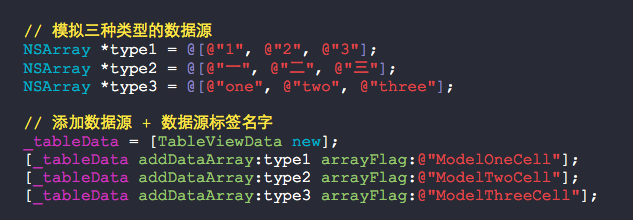
_tableView.dataSource = self; // 模拟三种类型的数据源
NSArray *type1 = @[@"", @"", @""];
NSArray *type2 = @[@"一", @"二", @"三"];
NSArray *type3 = @[@"one", @"two", @"three"]; // 添加数据源 + 数据源标签名字
_dataArray = [NSMutableArray new];
_nameList = [NSMutableArray new];
[_dataArray addObject:type1]; [_nameList addObject:@"ModelOneCell"];
[_dataArray addObject:type2]; [_nameList addObject:@"ModelTwoCell"];
[_dataArray addObject:type3]; [_nameList addObject:@"ModelThreeCell"];
} #pragma mark - UITableView'delegate & dataSource
// 每个区有几个cell
- (NSInteger)tableView:(UITableView *)tableView numberOfRowsInSection:(NSInteger)section
{
return [_dataArray[section] count];
} // 设定tableView有几个区域
- (NSInteger)numberOfSectionsInTableView:(UITableView *)tableView
{
return [_nameList count];
} // cell的初始化以及重用设置
-(UITableViewCell *)tableView:(UITableView *)tableView
cellForRowAtIndexPath:(NSIndexPath *)indexPath
{
// 根据section区域获取几种cell的公共父类
UITableViewCell *cell = [tableView dequeueReusableCellWithIdentifier:reUsedStr[indexPath.section]]; // 根据不同的区域对应创建出该区域的cell
if (cell == nil)
{
if ([_nameList[indexPath.section] isEqualToString:@"ModelOneCell"])
{
cell = [[ModelOneCell alloc] initWithStyle:UITableViewCellStyleDefault
reuseIdentifier:reUsedStr[indexPath.section]];
}
else if ([_nameList[indexPath.section] isEqualToString:@"ModelTwoCell"])
{
cell = [[ModelTwoCell alloc] initWithStyle:UITableViewCellStyleDefault
reuseIdentifier:reUsedStr[indexPath.section]];
} else if ([_nameList[indexPath.section] isEqualToString:@"ModelThreeCell"])
{
cell = [[ModelThreeCell alloc] initWithStyle:UITableViewCellStyleDefault
reuseIdentifier:reUsedStr[indexPath.section]];
}
} // 对cell进行设置
if ([_nameList[indexPath.section] isEqualToString:@"ModelOneCell"])
{
cell = [[ModelOneCell alloc] initWithStyle:UITableViewCellStyleDefault
reuseIdentifier:reUsedStr[indexPath.section]];
cell.textLabel.text = _dataArray[indexPath.section][indexPath.row];
}
else if ([_nameList[indexPath.section] isEqualToString:@"ModelTwoCell"])
{
cell = [[ModelTwoCell alloc] initWithStyle:UITableViewCellStyleDefault
reuseIdentifier:reUsedStr[indexPath.section]];
cell.textLabel.text = _dataArray[indexPath.section][indexPath.row];
} else if ([_nameList[indexPath.section] isEqualToString:@"ModelThreeCell"])
{
cell = [[ModelThreeCell alloc] initWithStyle:UITableViewCellStyleDefault
reuseIdentifier:reUsedStr[indexPath.section]];
cell.textLabel.text = _dataArray[indexPath.section][indexPath.row];
} return cell;
} // 点击cell获取数据
- (void)tableView:(UITableView *)tableView didSelectRowAtIndexPath:(NSIndexPath *)indexPath
{
if ([_nameList[indexPath.section] isEqualToString:@"ModelOneCell"])
{
NSLog(@"%@", _dataArray[indexPath.section][indexPath.row]);
}
else if ([_nameList[indexPath.section] isEqualToString:@"ModelTwoCell"])
{
NSLog(@"%@", _dataArray[indexPath.section][indexPath.row]);
} else if ([_nameList[indexPath.section] isEqualToString:@"ModelThreeCell"])
{
NSLog(@"%@", _dataArray[indexPath.section][indexPath.row]);
}
} // 设定不同种类cell的高度
- (CGFloat)tableView:(UITableView *)tableView heightForRowAtIndexPath:(NSIndexPath *)indexPath
{
if ([_nameList[indexPath.section] isEqualToString:@"ModelOneCell"])
{
return ;
}
else if ([_nameList[indexPath.section] isEqualToString:@"ModelTwoCell"])
{
return ;
} else if ([_nameList[indexPath.section] isEqualToString:@"ModelThreeCell"])
{
return ;
}
else
{
return ;
}
} @end
运行时候的效果如下:

核心思想:

接下来,我们就要来进行封装,达到好用的目的:)
我们把数据源以及数据源标签抽象成一个对象就可以很好的管理这些东西了,以下给出源码:
//

//  TableVewData.h

//  Sections

//

//  Copyright (c) 2014年 Y.X. All rights reserved.

//

#import <Foundation/Foundation.h>

@interface TableViewData : NSObject

// 添加数据源 + 数据源标签

- (void)addDataArray:(NSArray *)array arrayFlag:(NSString *)flag;

// 对应区域中的row的个数

- (NSInteger)numberOfRowsInSection:(NSInteger)section;

// 有几个section

- (NSInteger)numberOfSections;

// 对应于Section上的flag值标签

- (NSString *)flagInSection:(NSIndexPath *)indexPath;

// 对应于indexPath中的数据

- (id)dataInIndexPath:(NSIndexPath *)indexPath;

@end
//

//  TableVewData.m

//  Sections

//

//  Copyright (c) 2014年 Y.X. All rights reserved.

//

#import "TableViewData.h"

@interface TableViewData ()

@property (nonatomic, strong) NSMutableArray  *dataArray;

@property (nonatomic, strong) NSMutableArray  *nameList;

@end

@implementation TableViewData

- (instancetype)init

{

    self = [super init];

    if (self)

    {

        _dataArray = [NSMutableArray new];

        _nameList  = [NSMutableArray new];

    }

    return self;

}

- (void)addDataArray:(NSArray *)array arrayFlag:(NSString *)flag

{

    [_dataArray addObject:array];

    [_nameList  addObject:flag];

}

- (NSInteger)numberOfRowsInSection:(NSInteger)section

{

    return [_dataArray[section] count];

}

- (NSInteger)numberOfSections

{

    return [_dataArray count];

}

- (NSString *)flagInSection:(NSIndexPath *)indexPath

{

    return _nameList[indexPath.section];

}

- (id)dataInIndexPath:(NSIndexPath *)indexPath

{

    return _dataArray[indexPath.section][indexPath.row];

}

@end
主函数使用情形如下:
//
// RootViewController.m
// Sections
//
// Copyright (c) 2014年 Y.X. All rights reserved.
// #import "RootViewController.h"
#import "ModelOneCell.h"
#import "ModelTwoCell.h"
#import "ModelThreeCell.h" #import "TableViewData.h" @interface RootViewController ()<UITableViewDelegate, UITableViewDataSource> @property (nonatomic, strong) UITableView *tableView; // tableView @property (nonatomic, strong) TableViewData *tableData; @end @implementation RootViewController #pragma mark - 只初始化一次
#define REUESED_SIZE 100
static NSString *reUsedStr[REUESED_SIZE] = {nil}; // 重用标示
#define REUESED_FLAG reUsedStr[0]
+ (void)initialize
{
if (self == [RootViewController class])
{
for (int i = ; i < REUESED_SIZE; i++)
{
reUsedStr[i] = [NSString stringWithFormat:@"GoodBoy_%d", i];
}
}
} - (void)viewDidLoad
{
[super viewDidLoad]; // 初始化tableView
_tableView = [[UITableView alloc] initWithFrame:self.view.bounds
style:UITableViewStylePlain];
[self.view addSubview:_tableView];
_tableView.delegate = self;
_tableView.dataSource = self; // 模拟三种类型的数据源
NSArray *type1 = @[@"", @"", @""];
NSArray *type2 = @[@"一", @"二", @"三"];
NSArray *type3 = @[@"one", @"two", @"three"]; // 添加数据源 + 数据源标签名字
_tableData = [TableViewData new];
[_tableData addDataArray:type1 arrayFlag:@"ModelOneCell"];
[_tableData addDataArray:type2 arrayFlag:@"ModelTwoCell"];
[_tableData addDataArray:type3 arrayFlag:@"ModelThreeCell"];
} #pragma mark - UITableView'delegate & dataSource
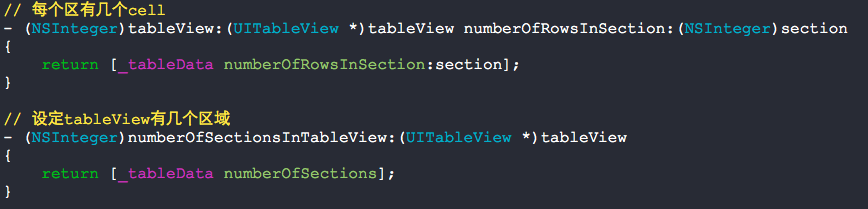
// 每个区有几个cell
- (NSInteger)tableView:(UITableView *)tableView numberOfRowsInSection:(NSInteger)section
{
return [_tableData numberOfRowsInSection:section];
} // 设定tableView有几个区域
- (NSInteger)numberOfSectionsInTableView:(UITableView *)tableView
{
return [_tableData numberOfSections];
} // cell的初始化以及重用设置
-(UITableViewCell *)tableView:(UITableView *)tableView
cellForRowAtIndexPath:(NSIndexPath *)indexPath
{
// 根据section区域获取几种cell的公共父类
UITableViewCell *cell = [tableView dequeueReusableCellWithIdentifier:reUsedStr[indexPath.section]]; // 根据不同的区域对应创建出该区域的cell
if (cell == nil)
{
if ([[_tableData flagInSection:indexPath] isEqualToString:@"ModelOneCell"])
{
cell = [[ModelOneCell alloc] initWithStyle:UITableViewCellStyleDefault
reuseIdentifier:reUsedStr[indexPath.section]];
}
else if ([[_tableData flagInSection:indexPath] isEqualToString:@"ModelTwoCell"])
{
cell = [[ModelTwoCell alloc] initWithStyle:UITableViewCellStyleDefault
reuseIdentifier:reUsedStr[indexPath.section]];
} else if ([[_tableData flagInSection:indexPath] isEqualToString:@"ModelThreeCell"])
{
cell = [[ModelThreeCell alloc] initWithStyle:UITableViewCellStyleDefault
reuseIdentifier:reUsedStr[indexPath.section]];
}
} // 对cell进行设置
if ([[_tableData flagInSection:indexPath] isEqualToString:@"ModelOneCell"])
{
cell = [[ModelOneCell alloc] initWithStyle:UITableViewCellStyleDefault
reuseIdentifier:reUsedStr[indexPath.section]];
cell.textLabel.text = [_tableData dataInIndexPath:indexPath];
}
else if ([[_tableData flagInSection:indexPath] isEqualToString:@"ModelTwoCell"])
{
cell = [[ModelTwoCell alloc] initWithStyle:UITableViewCellStyleDefault
reuseIdentifier:reUsedStr[indexPath.section]];
cell.textLabel.text = [_tableData dataInIndexPath:indexPath];
} else if ([[_tableData flagInSection:indexPath] isEqualToString:@"ModelThreeCell"])
{
cell = [[ModelThreeCell alloc] initWithStyle:UITableViewCellStyleDefault
reuseIdentifier:reUsedStr[indexPath.section]];
cell.textLabel.text = [_tableData dataInIndexPath:indexPath];
} return cell;
} // 点击cell获取数据
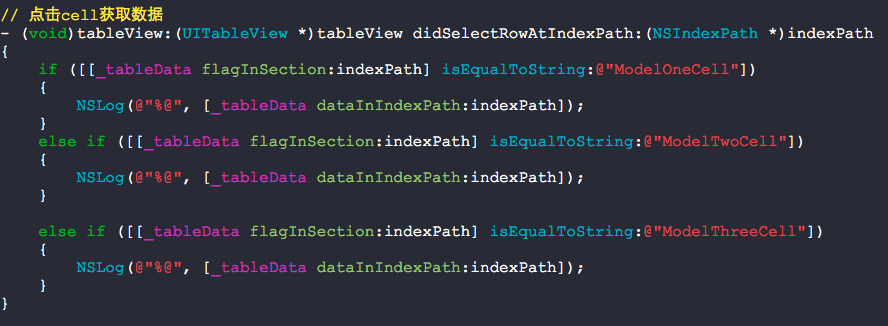
- (void)tableView:(UITableView *)tableView didSelectRowAtIndexPath:(NSIndexPath *)indexPath
{
if ([[_tableData flagInSection:indexPath] isEqualToString:@"ModelOneCell"])
{
NSLog(@"%@", [_tableData dataInIndexPath:indexPath]);
}
else if ([[_tableData flagInSection:indexPath] isEqualToString:@"ModelTwoCell"])
{
NSLog(@"%@", [_tableData dataInIndexPath:indexPath]);
} else if ([[_tableData flagInSection:indexPath] isEqualToString:@"ModelThreeCell"])
{
NSLog(@"%@", [_tableData dataInIndexPath:indexPath]);
}
} // 设定不同种类cell的高度
- (CGFloat)tableView:(UITableView *)tableView heightForRowAtIndexPath:(NSIndexPath *)indexPath
{
if ([[_tableData flagInSection:indexPath] isEqualToString:@"ModelOneCell"])
{
return ;
}
else if ([[_tableData flagInSection:indexPath] isEqualToString:@"ModelTwoCell"])
{
return ;
} else if ([[_tableData flagInSection:indexPath] isEqualToString:@"ModelThreeCell"])
{
return ;
}
else
{
return ;
}
} @end
添加数据源:
见名知意:
使用很便利:

快速设置UITableView不同section对应于不同种类的cell的更多相关文章
- collectionView代理方法快速设置cell大小上下左右间隔
#define JianGe 25 #define GeShu 4 #define ScreenWidth ([UIScreen mainScreen].bounds.size.width) #def ...
- [Xcode 实际操作]五、使用表格-(5)设置UITableView的单元格背景颜色
目录:[Swift]Xcode实际操作 本文将演示单元格背景颜色的设置 在项目导航区,打开视图控制器的代码文件[ViewController.swift] import UIKit //首先添加两个协 ...
- [Xcode 实际操作]五、使用表格-(4)设置UITableView单元格数据库源
目录:[Swift]Xcode实际操作 本文将演示如何自定义表格的数据来源. 在项目导航区,打开视图控制器的代码文件[ViewController.swift] import UIKit //首先添加 ...
- [Xcode 实际操作]五、使用表格-(3)设置UITableView单元格图标
目录:[Swift]Xcode实际操作 本文将演示如何给表格行设置图标. 打开资源文件夹[Assets.xcassets], 在资源文件夹中导入两张图片:一张彩色,一张灰色,作为单元格的图标. [+] ...
- [Xcode 实际操作]五、使用表格-(2)设置UITableView单元格高度
目录:[Swift]Xcode实际操作 本文将演示如何制作一个自定义行高的表格视图 在项目导航区,打开视图控制器的代码文件[ViewController.swift] import UIKit //首 ...
- 设置UITableView的separatorInset值为UIEdgeInsetsZero,分隔线不最左端显示的问题
一.问题描述 UITableView分割线要显示到最左端 查看UITableView的属性,发现设置separatorInset的值可以自定义分割线的位置. @property (nonatomic) ...
- 分享一个快速设置背景的js 自动获取背景图的长宽
我来分享一个快速设置背景的js (需要jq支持!) 快速切图铺页面用---就是不需要手动输入背景图的长宽 自动获取背景图的长宽 : <div class="wrap"> ...
- 设置UITableView背景透明/监听cell左边的删除按钮的点击事件
_tableView = [[UITableView alloc] init]; _tableView.delegate = self; _tableView.dataSource = self; _ ...
- 【大盛】HTC one/M7 ROM 最新本地化OrDroid8.2.6 高级、快速设置 永久root 更多自定义 稳定 流畅
了解更多:点击下载ROM和学习更多 ROM版本 HTC-one_OrDroid8.2.6 ROM作者 雪狼团队·大盛 http://weibo.com/DaShengdd Android版本 Andr ...
随机推荐
- springMVC与Struts2区别
1.拦截级别 Struts2是类级别的拦截,一个类对应一个request上下文 SpringMVC是方法级别的拦截,一个方法对应一个request上下文,而方法同时又跟一个url对应 所以说从架构本身 ...
- 用gdb理解C宏(#和##)
在Unix/Linux内核代码以及GNU libc源代码中,有两个C的宏被广泛使用. 例如: /* glibc-2.25/sysdeps/powerpc/powerpc64/sysdep.h */ # ...
- poj 1222EXTENDED LIGHTS OUT
高斯消元的题本质思想一样. 学习网址:http://www.cnblogs.com/rainydays/archive/2011/08/31/2160748.html #include <ios ...
- 周记7——ios中picker滑动穿透bug
Bug描述:使用mint-ui的picker组件时,datepicker和picker在ios的webview(bug是在Hybrid App发现的)中会出现滑动穿透的现象,导致弹层后面的页面也会滚动 ...
- Python(3):文件读写与异常
访问路径: 文件读写必然涉及到文件会放在某个路径下.在python里,可以通过引入os包来实现切换当前访问的路径: # 假设我在 /home/zyq/KiDe/Python/test 文件夹中有一个文 ...
- [转]OData – the best way to REST–实例讲解ASP.NET WebAPI OData (V4) Service & Client
本文转自:http://www.cnblogs.com/bluedoctor/p/4384659.html 一.概念介绍 1.1,什么是OData? 还是看OData官网的简单说明: An open ...
- 新装iis 页面503错误 DefaultAppPool停止解决方案
配置:应用程序池-选择要配置的应用池-高级设置-标识-选择LocalSystem
- jenkins学习之centos6.9下安装
以下为centos6.9下测试安装: docker下安装jenkins: 更新yum源: yum -y update 安装docker: yum -y install docker-io 启动dock ...
- mysql8.0遇到删除外键的错误
错误信息:Cannot drop index 'energy_type_id': needed in a foreign key constraint 创建device表的信息 CREATE TABL ...
- 使用重绘项美化WinForm中的控件
如果你觉得项目中的ComboBox.ListBox或其它的Winforms控件不能满足你的显示要求,包括窗体在内很多控件都支持重绘修改显示样式.下面的示例完成对ComBox数据项的重绘,希望能起到抛砖 ...