
Nexus Repository3安装和maven,npm配置(Linux)
Nexus Repository下载
根据操作系统选择指定版本,本文针对Linux安装,其他的安装过程可能有所差异。
https://help.sonatype.com/repomanager3/download/download-archives---repository-manager-3
安装
建议先创建一个nexus用户,将文件拷贝到/home/nexus
# 按具体下载文件名

tar -zxvf nexus-3.14.0-04-unix.tar.gz

# 按具体解压目录

cd nexus-3.14.0-04/bin

## 启动

./nexus start

# ./nexus stop #停止

# ./nexus status # 查看状态
配置修改
NexusRepository 默认占用8081端口,如果与其他服务有冲突,需要在sonatype-work/etc目录下创建一个nexus.properties,
注意不是nexus-3.14.0-04下的etc
具体配置参考nexus-default.properties
## DO NOT EDIT - CUSTOMIZATIONS BELONG IN $data-dir/etc/nexus.properties

##

# Jetty section

application-port=8081

application-host=0.0.0.0

nexus-args=${jetty.etc}/jetty.xml,${jetty.etc}/jetty-http.xml,${jetty.etc}/jetty-requestlog.xml

nexus-context-path=/

# Nexus section

nexus-edition=nexus-pro-edition

nexus-features=\

 nexus-pro-feature
Nexus不建议在root用户下运行,需要创建用户nexus用户,修改bin/nexus.rc文件
run_as_user="nexus"
开机自启动
开启自启动有init.d和systemd两种方式。
init.d
1.创建一个nexus用户
2.拷贝nexus的软链接到init.d目录
注意:最好在root做自启动配置,省的没权限
# 原文件路径按实际

ln -s /home/nexus/nexus-3.14.0-04/bin/nexus /etc/init.d/nexus
3.1 chkconfig 写法(和3.2二选一)
cd /etc/init.d

chkconfig --add nexus

chkconfig --levels 345 nexus on
3.2 update-rc.d写法(和3.1 二选一)
cd /etc/init.d

update-rc.d nexus defaults

service nexus start
4.切换到nexus用户窗口,启动服务
su nexus

service nexus start
systemd
前提是服务器有安装systemd工具,一般cenos7默认安装。
创建一个nexus用户
在/etc/systemd/system/ 目录添加如下文件
nexus.service
[Unit]

Description=nexus service

After=network.target

[Service]

Type=forking

LimitNOFILE=65536

ExecStart=/opt/nexus/bin/nexus start

ExecStop=/opt/nexus/bin/nexus stop

User=nexus

Restart=on-abort

[Install]

WantedBy=multi-user.target

Activate the service with the following commands:
启动服务命令
systemctl daemon-reload

systemctl enable nexus.service

systemctl start nexus.service
查看服务运行日志
tail -f /opt/sonatype-work/nexus3/log/nexus.log
Maven仓库配置
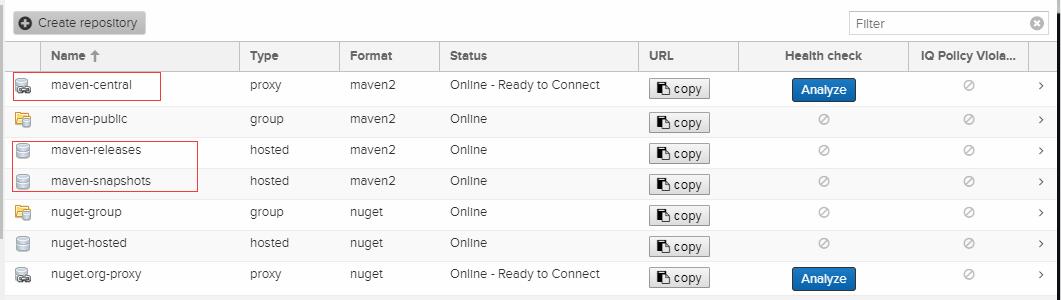
admin账户登录,访问Repository >Repositories,仓库默认配置maven本地库和代理库
默认代理maven库地址是https://repo1.maven.org/maven2/,可以修改
npm仓库配置
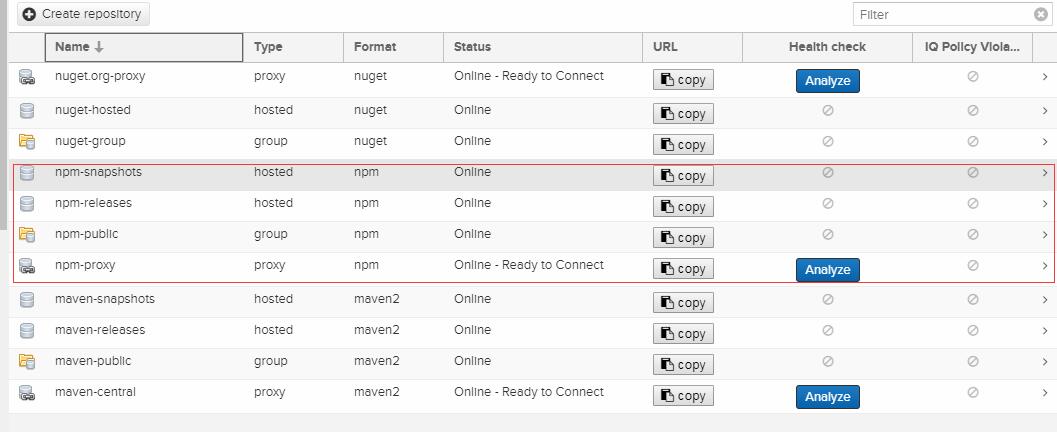
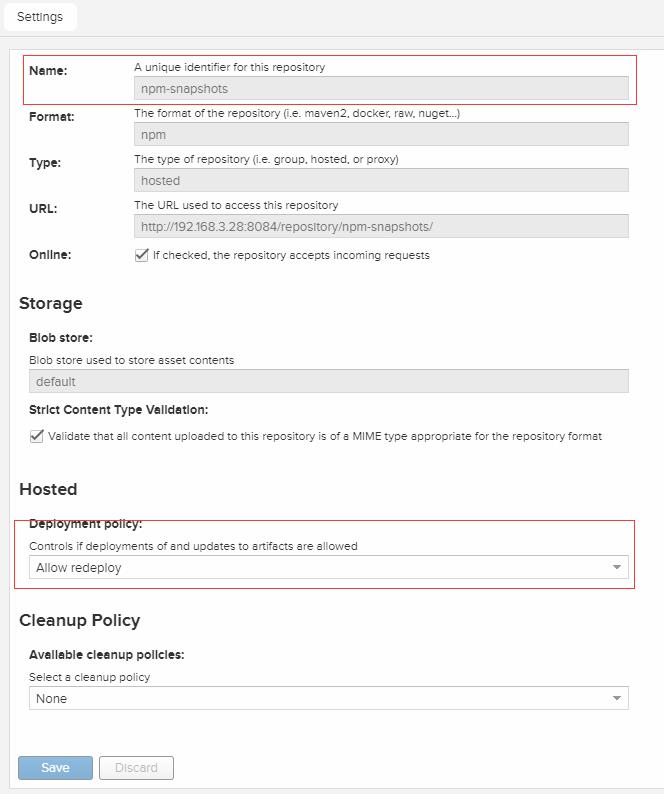
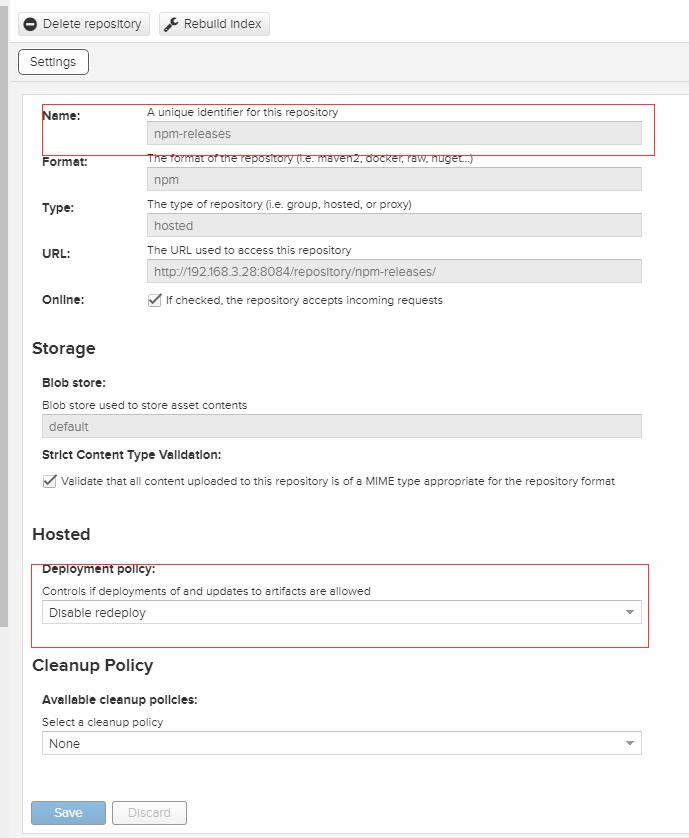
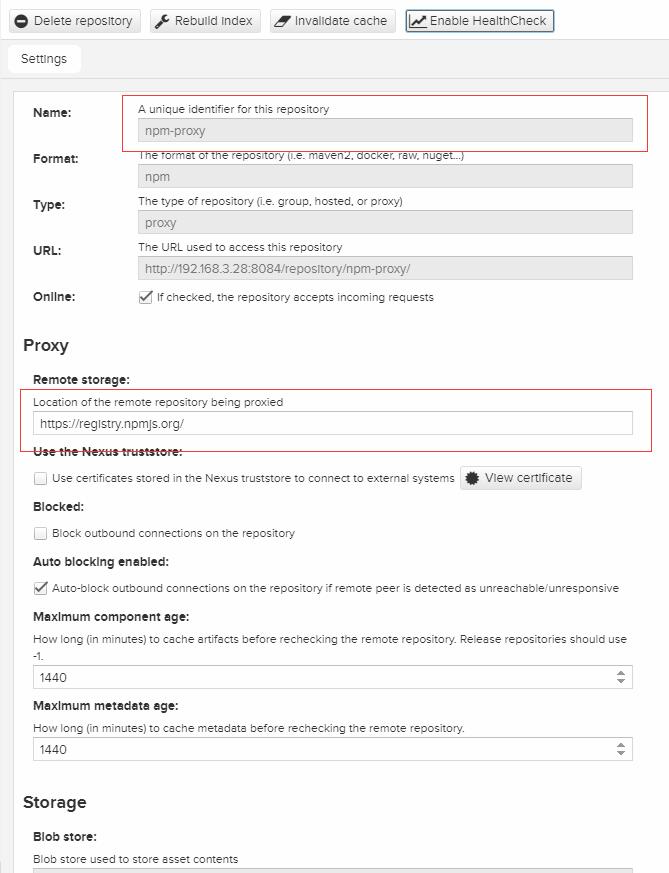
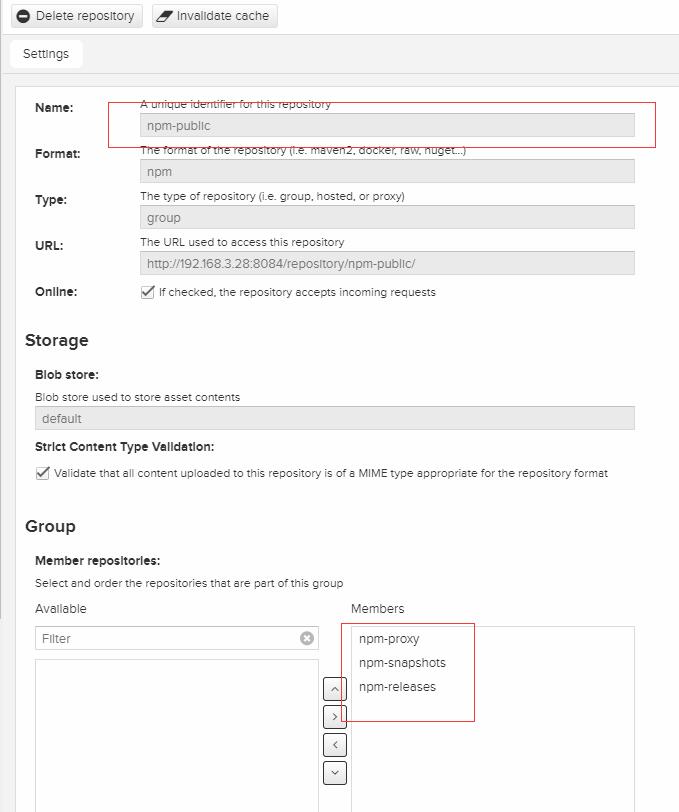
npm仓库不是内置的,需要手动配置,需要配置release,snapshots,proxy三个资源库,同时通过public合并起来,对外提供服务
具体配置见下图:
Maven私服使用
maven私服使用有两种方式,你可以任选一种
1.在maven的setting.xml配置mirror
<mirrors>

     <mirror>

        <id>alimaven</id>

        <name>aliyun maven</name>

        <url>http://maven.aliyun.com/mvn/view</url>

        <mirrorOf>central</mirrorOf>

    </mirror>

    <mirror>

        <id>jboss-public-repository-group</id>

        <mirrorOf>central</mirrorOf>

        <name>JBoss Public Repository Group</name>

        <url>http://repository.jboss.org/nexus/content/groups/public</url>

    </mirror>

    <mirror>

        <id>ibiblio</id>

        <mirrorOf>central</mirrorOf>

        <name>Human Readable Name for this Mirror.</name>

        <url>http://mirrors.ibiblio.org/pub/mirrors/maven2/</url>

    </mirror>

    <mirror>

        <id>central</id>

        <name>Maven Repository Switchboard</name>

        <url>http://repo1.maven.org/maven2/</url>

        <mirrorOf>central</mirrorOf>

    </mirror>

    <mirror>

        <id>repo2</id>

        <mirrorOf>central</mirrorOf>

        <name>Human Readable Name for this Mirror.</name>

        <url>http://repo2.maven.org/maven2/</url>

    </mirror>

</mirrors>
2.在具体项目的pom.xml文件配置资源库
    <repositories>

        <repository>

            <id>nexus</id>

            <name>Nexus Repository</name>

            <url>http://192.168.3.28:8084/repository/maven-public/</url>

            <releases>

                <enabled>true</enabled>

            </releases>

            <!--snapshots默认是关闭的,需要开启  -->

            <snapshots>

                <enabled>true</enabled>

            </snapshots>

        </repository>

    </repositories>
npm私服使用
如上npm,npm的私服地址为http://192.168.3.28:8084/repository/npm-public/
建议安装nrm工具,这样可以快速切换npm的资源库
# 安装nrm

npm install -g nrm

# 添加资源库

nrm add test http://192.168.3.28:8084/repository/npm-public/

# 切换资源库

nrm use test
maven私服发布
在pom.xml配置maven私服仓库地址,有snapshot和release两个仓库
<distributionManagement>

        <repository>

            <id>nexus-maven-repository-releases</id>

            <url>http://192.168.3.28:8084/repository/maven-releases/</url>

        </repository>

        <snapshotRepository>

            <id>nexus-maven-repository-snapshots</id>

            <url>http://192.168.3.28:8084/repository/maven-snapshots/</url>

        </snapshotRepository>

    </distributionManagement>
npm私服发布
自己开发的组件通过如下命令发布到npm私服
#  用户登录

npm login

# 编译打包

npm init

# 发布

npm publish
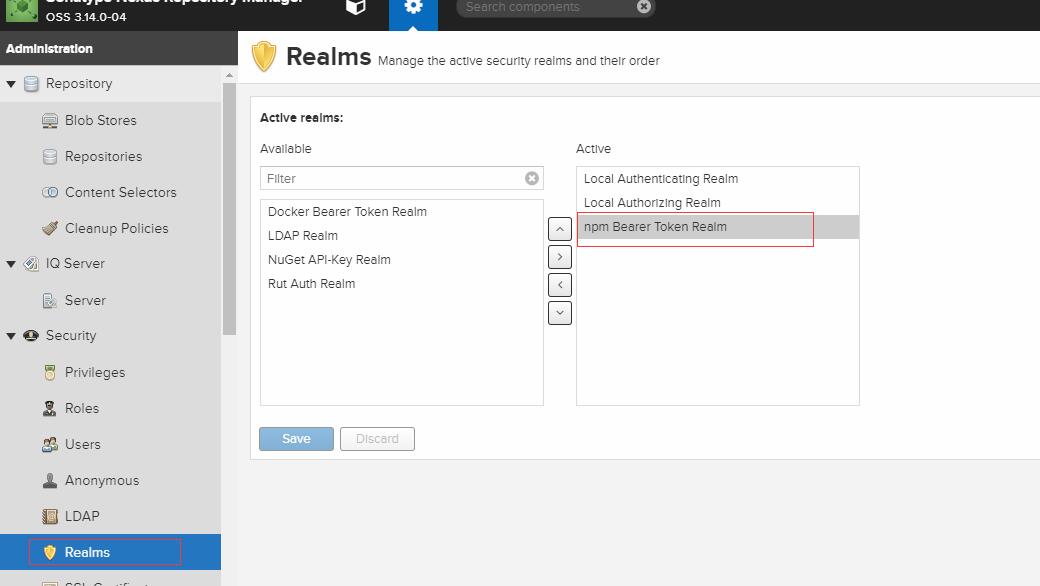
这时候你会发现发布不上去,报401,即使你的用户名和密码都是对的
你需要将npm的认证组件在nexus中开启
maven和npm发布注意事项
npm和maven发布都不能用group类型的资源库,他们是没有发布权限,只有拉取权限,你需要找到对应group的hostd资源库做发布
Nexus Repository3安装和maven,npm配置(Linux)的更多相关文章
- nexus 的使用及maven的配置
一.nexus的安装 1.下载nexus(点解这里) 2.下载后解压文件,将解压后的nexus文件放在你自己想要的地方 3.配置环境变量(和配置java的环境变量一样) 4.安装和启动nexus 由于 ...
- rabibtMQ安装及集群配置-linux
安装RabbitMQ RabbitMQ是流行的开源消息队列系统,用erlang语言开发,故首先需要安装erlang依赖及erlang. 安装erlang依赖的基本环境,通过yum方式进行安装: yum ...
- Maven仓库Nexus的安装配置
1.下载nexus,最新版本是nexus-2.8.0-05 参考文章 下载nexus-latest-bundle.zip文件后,并解压到 D:\nexus下 配置nexus的环境变量:先配置NE ...
- linux虚拟机安装jenkins及maven/jdk配置
一.jenkins安装 (1)tomcat下载,下载地址:https://tomcat.apache.org 选择对应的版本,以下以新版的tomcat 9.0版本为例 下载zip包 (2)jenkin ...
- windows下安装jdk+tomcat+maven并配置
一.下载安装jdk并配置 1.1 进行JDK下载 下载地址:一键直达 一般下载后,安装位置默认,一路下一步,一直到安装完毕-"关闭". 1.2 环境变量配置 不要管是不是一般情况, ...
- maven的安装,maven库配置和Eclipse插件的安装
maven的安装,maven库配置和Eclipse插件的安装 1.下载并解压maven 2.配置环境变量 3.配置maven配置文件 1.下载链接 Downloading Apache Maven 2 ...
- maven安装和环境变量配置
maven安装和环境变量配置 myeclipse自带maven(Maven4MyEclipse)创建项目:新建Web Projects项目,在新建的页面上打上maven的勾.新建的项目里会多出个pom ...
- SpringBoot01 InteliJ IDEA安装、Maven配置、创建SpringBoot项目、属性配置、多环境配置
1 InteliJ IDEA 安装 下载地址:点击前往 注意:需要下载专业版本的,注册码在网上随便搜一个就行啦 2 MAVEN工具的安装 2.1 获取安装包 下载地址:点击前往 2.2 安装过程 到官 ...
- eclipse中安装maven,配置本地仓库和镜像
1.安装maven,配置MAVEN_HOME 首先:下载免安装版解压配置MAVEN_HOME(和配置JAVA_HOME一样) 然后按照下面的配置,主要第3步,指定settings.xml文件的位置(在 ...
随机推荐
- Asp.Net MVC Identity 2.2.1 使用技巧(三)
使用用户管理器之用户注册 用户管理的基本功能模块中已经做好了,我们现在做一些调整. 1.修改用户名注册规则. 上一篇中可选操作已经详解了这里把基本的设置简介下. 打开App_Start/identit ...
- apt 安装 Oracle Java JDK
apt 安装 Oracle Java JDK 8/10 "Linux Uprising"团队维护一个PPA存储库,其中包含适用于所有当前Ubuntu版本的Oracle Java 1 ...
- [T-ARA][Sugar Free]
歌词来源:http://music.163.com/#/song?id=29343991 作曲 : 新沙洞老虎/범이낭이 [作曲 : 新沙洞老虎/버미낭이] [作曲 : 新沙洞老虎/p/beo-mi- ...
- calayer defaultValueForKey
例如:我们新建一个SubLayer类继承自CALayer,则在SubLayer.m中重写此方法.如下: + (id)defaultValueForKey:(NSString *)key { if ([ ...
- tcp的三次握手:通信的本质:通信通知与信息交换
tcp的三次握手:通信的本质:通信通知与信息交换
- [WebKit] JavaScriptCore解析--基础篇 (一)JSC与WebCore
先看一下官方的基本介绍,短短几句就塞满了关键字. SquirrelFish,正式名称是JavaScriptCore,包括register-based(基于寄存器的虚拟机), direct-thread ...
- P3177 [HAOI2015]树上染色
题目描述 有一棵点数为 N 的树,树边有边权.给你一个在 0~ N 之内的正整数 K ,你要在这棵树中选择 K个点,将其染成黑色,并将其他 的N-K个点染成白色 . 将所有点染色后,你会获得黑点两两之 ...
- pytest setup和teardown初始化
用法简介: setup_method:仅作用于class用例集中的用例,置于class内,每个用例都会调用一次 setup_function:作用于独立的def用例,不可作用于class内的用例 se ...
- PAT——1034. 有理数四则运算
本题要求编写程序,计算2个有理数的和.差.积.商. 输入格式: 输入在一行中按照“a1/b1 a2/b2”的格式给出两个分数形式的有理数,其中分子和分母全是整型范围内的整数,负号只可能出现在分子前,分 ...
- 怎么在一台电脑上安装win7与centos7双系统
对于用习惯windows系统的小伙伴们来说,好像Linux系统的命令操作感觉会比较神秘,进而有部分小伙伴就想说也学一学LInux操作系统.但是苦于资源的问题--就一台计算机,一块硬盘,担心说如果安装了 ...