iOS开发——UI进阶篇(三)自定义不等高cell,如何拿到cell的行高,自动计算cell高度,(有配图,无配图)微博案例
一、纯代码自定义不等高cell
废话不多说,直接来看下面这个例子
先来看下微博的最终效果

首先创建一个继承UITableViewController的控制器
@interface ViewController : UITableViewController
创建一个cell模型
@interface XMGStatusCell : UITableViewCell
再创建微博的数据模型
@interface XMGStatus : NSObject
和前面等高cell的思路是一样的
1、创建子控件
- (instancetype)initWithStyle:(UITableViewCellStyle)style reuseIdentifier:(NSString *)reuseIdentifier;
2、布局子控件
等高与不等高的区别:不等高要动态的计算(lable或者image)的高度
// 计算不换行文字所占据的尺寸
NSDictionary *nameAttrs = @{NSFontAttributeName : XMGNameFont};
CGSize nameSize = [self.status.name sizeWithAttributes:nameAttrs];
// 计算换行文字所占据的尺寸
// CGFloat textH = [self.status.text sizeWithFont:XMGTextFont constrainedToSize:textMaxSize].height;
上面这个方法在ios7.0(ios2.0-7.0)已经过时了 进入头文件系统会提示你用最新的方法 “Use -boundingRectWithSize:options:attributes:context:”
NSDictionary *textAttrs = @{NSFontAttributeName : XMGTextFont};
CGFloat textH = [self.status.text boundingRectWithSize:textMaxSize options:NSStringDrawingUsesLineFragmentOrigin attributes:textAttrs context:nil].size.height;
3、设置数据
重写模型数据的get方法
二、计算行高
这时运行程序会发现所有cell的高度都一样
而且等于storyboard内cell的高度

因为从头到尾我们都没有用代码设置过高度,那么在哪里设置呢?
方案:在heightForRowAtIndexPath:方法调用之前将所有cell的高度计算清楚
 /**

  *  返回每一行cell的具体高度

  */

 - (CGFloat)tableView:(UITableView *)tableView heightForRowAtIndexPath:(NSIndexPath *)indexPath

 {

     XMGStatus *status = self.statuses[indexPath.row];

     CGFloat margin = ;

     CGFloat cellHeight = ;

     // 头像

     CGFloat iconX = margin;

     CGFloat iconY = margin;

     CGFloat iconWH = ;

     CGRect iconImageViewFrame = CGRectMake(iconX, iconY, iconWH, iconWH);

     // 文字

     CGFloat textX = iconX;

     CGFloat textY = CGRectGetMaxY(iconImageViewFrame) + margin;

     CGFloat textW = [UIScreen mainScreen].bounds.size.width -  * textX;

     CGSize textMaxSize = CGSizeMake(textW, MAXFLOAT);

     NSDictionary *textAttrs = @{NSFontAttributeName : [UIFont systemFontOfSize:]};

     CGFloat textH = [status.text boundingRectWithSize:textMaxSize options:NSStringDrawingUsesLineFragmentOrigin attributes:textAttrs context:nil].size.height;

     CGRect text_labelFrame = CGRectMake(textX, textY, textW, textH);

     // 配图

     if (status.picture) {

         CGFloat pictureWH = ;

         CGFloat pictureX = textX;

         CGFloat pictureY = CGRectGetMaxY(text_labelFrame) + margin;

         CGRect pictureImageViewFrame = CGRectMake(pictureX, pictureY, pictureWH, pictureWH);

         cellHeight = CGRectGetMaxY(pictureImageViewFrame);

     } else {

         cellHeight = CGRectGetMaxY(text_labelFrame);

     }

     cellHeight += margin;

     return cellHeight;

 }
这样就能达到案例的效果了

虽然能解决上面的问题,但这样的代码看起来很垃圾,因为控制器知道的太多了,计算高度最好在你拿到数据的时候就已经计算好了,只要拿着用就行了
我们可以把计算高度封装到数据模型XMGStatus里
 /**

  *  返回每一行cell的具体高度

  */

 - (CGFloat)tableView:(UITableView *)tableView heightForRowAtIndexPath:(NSIndexPath *)indexPath

 {

     XMGStatus *status = self.statuses[indexPath.row];

     return status.cellHeight;

 }

 /*************XMGStatus*****************/

 #import <UIKit/UIKit.h>

 @interface XMGStatus : NSObject

 /**** 文字\图片数据 ****/

 /** 姓名 */

 @property (nonatomic, copy) NSString *name;

 /** 文本 */

 @property (nonatomic, copy) NSString *text;

 /** 头像 */

 @property (nonatomic, copy) NSString *icon;

 /** 配图 */

 @property (nonatomic, copy) NSString *picture;

 /** 是否为会员 */

 @property (nonatomic, assign) BOOL vip;

 /**** frame数据 ****/

 /** 头像的frame */

 @property (nonatomic, assign) CGRect iconFrame;

 /** 昵称的frame */

 @property (nonatomic, assign) CGRect nameFrame;

 /** 会员的frame */

 @property (nonatomic, assign) CGRect vipFrame;

 /** 文字的frame */

 @property (nonatomic, assign) CGRect textFrame;

 /** 配图的frame */

 @property (nonatomic, assign) CGRect pictureFrame;

 /** cell的高度 */

 @property (nonatomic, assign) CGFloat cellHeight;

 @end

 #import "XMGStatus.h"

 @implementation XMGStatus

 - (CGFloat)cellHeight

 {

     if (_cellHeight == ) {

         CGFloat margin = ;

         // 头像

         CGFloat iconX = margin;

         CGFloat iconY = margin;

         CGFloat iconWH = ;

         self.iconFrame = CGRectMake(iconX, iconY, iconWH, iconWH);

         // 昵称(姓名)

         CGFloat nameY = iconY;

         CGFloat nameX = CGRectGetMaxX(self.iconFrame) + margin;

         // 计算文字所占据的尺寸

         NSDictionary *nameAttrs = @{NSFontAttributeName : [UIFont systemFontOfSize:]};

         CGSize nameSize = [self.name sizeWithAttributes:nameAttrs];

         self.nameFrame = (CGRect){{nameX, nameY}, nameSize};

         // 会员图标

         if (self.vip) {

             CGFloat vipW = ;

             CGFloat vipH = nameSize.height;

             CGFloat vipY = nameY;

             CGFloat vipX = CGRectGetMaxX(self.nameFrame) + margin;

             self.vipFrame = CGRectMake(vipX, vipY, vipW, vipH);

         }

         // 文字

         CGFloat textX = iconX;

         CGFloat textY = CGRectGetMaxY(self.iconFrame) + margin;

         CGFloat textW = [UIScreen mainScreen].bounds.size.width -  * textX;

         CGSize textMaxSize = CGSizeMake(textW, MAXFLOAT);

         NSDictionary *textAttrs = @{NSFontAttributeName : [UIFont systemFontOfSize:]};

         CGFloat textH = [self.text boundingRectWithSize:textMaxSize options:NSStringDrawingUsesLineFragmentOrigin attributes:textAttrs context:nil].size.height;

         self.textFrame = CGRectMake(textX, textY, textW, textH);

         // 配图

         if (self.picture) {

             CGFloat pictureWH = ;

             CGFloat pictureX = textX;

             CGFloat pictureY = CGRectGetMaxY(self.textFrame) + margin;

             self.pictureFrame = CGRectMake(pictureX, pictureY, pictureWH, pictureWH);

             _cellHeight = CGRectGetMaxY(self.pictureFrame);

         } else {

             _cellHeight = CGRectGetMaxY(self.textFrame);

         }

         _cellHeight += margin;

     }

     return _cellHeight;

 }

 @end

 那么我们在XMGStatusCell.m布局子控件就可以这样写

 /**

  *  布局子控件

  */

 - (void)layoutSubviews

 {

     [super layoutSubviews];

     self.iconImageView.frame = self.status.iconFrame;

     self.nameLabel.frame = self.status.nameFrame;

     self.vipImageView.frame = self.status.vipFrame;

     self.text_label.frame = self.status.textFrame;

     self.pictureImageView.frame = self.status.pictureFrame;

 }

 当然也可以直接在设置控件数据时布局(因为在给cell赋值时使用了setStatus:(XMGStatus *)status方法)

 /**

  *  设置子控件显示的数据

  */

 - (void)setStatus:(XMGStatus *)status

 {

     _status = status;

     self.iconImageView.image = [UIImage imageNamed:status.icon];

     self.nameLabel.text = status.name;

     self.text_label.text = status.text;

     if (status.isVip) {

         self.vipImageView.hidden = NO;

         self.nameLabel.textColor = [UIColor orangeColor];

     } else {

         self.vipImageView.hidden = YES;

         self.nameLabel.textColor = [UIColor blackColor];

     }

     if (status.picture) {

         self.pictureImageView.hidden = NO;

         self.pictureImageView.image = [UIImage imageNamed:status.picture];

     } else {

         self.pictureImageView.hidden = YES;

     }

     self.iconImageView.frame = status.iconFrame;

     self.nameLabel.frame = status.nameFrame;

     self.vipImageView.frame = status.vipFrame;

     self.text_label.frame = status.textFrame;

     self.pictureImageView.frame = status.pictureFrame;

 }
运行程序效果就和案例一样
三、自定义不等高cell-storyboard(无配图)
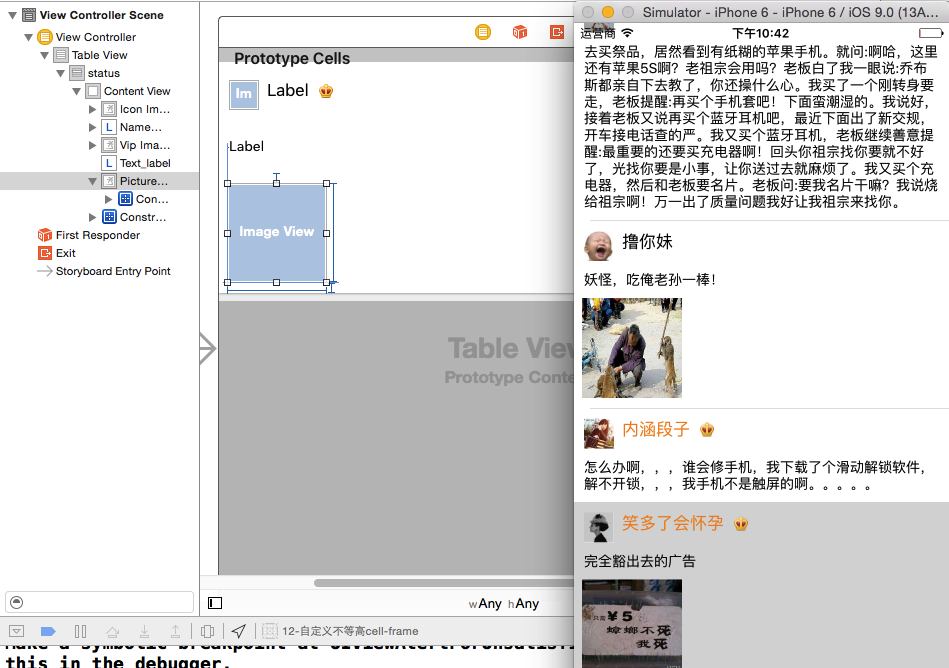
除了代码自定义不等高cell,我们还可以直接用storyboard来自定义cell,相对来说就 简单很多,我们先来看下没有配图的情况
1、首先创建一个cell模型,设置好约束

2、创建一个一个cell模型类,继承UITableViewCell,并且对应着cell模型连线,设置数据
 /*******************XMGStatusCell.m*********************/

 #import "XMGStatusCell.h"

 #import "XMGStatus.h"

 @interface XMGStatusCell()

 /** 头像 */

 @property (nonatomic, weak) IBOutlet UIImageView *iconImageView;

 /** 名称 */

 @property (nonatomic, weak) IBOutlet UILabel *nameLabel;

 /** 会员图标 */

 @property (nonatomic, weak) IBOutlet UIImageView *vipImageView;

 /** 文字 */

 @property (nonatomic, weak) IBOutlet UILabel *text_label;

 @end

 @implementation XMGStatusCell

 /**

  *  设置子控件显示的数据

  */

 - (void)setStatus:(XMGStatus *)status

 {

     _status = status;

     self.iconImageView.image = [UIImage imageNamed:status.icon];

     self.nameLabel.text = status.name;

     self.text_label.text = status.text;

     if (status.vip) {

         self.vipImageView.hidden = NO;

         self.nameLabel.textColor = [UIColor orangeColor];

     } else {

         self.vipImageView.hidden = YES;

         self.nameLabel.textColor = [UIColor blackColor];

     }

 }

 @end
3、创建数据模型类XMGStatus,在控制器实现数据源方法;
值得一提的是在返回cell之前必须先告诉tableView所有cell的估算高度,那么可以在viewDidLoad中写上下面这句:
self.tableView.estimatedRowHeight = 44; // 估算每一行的高度
而且:必须告诉tableView所有cell的真实高度是自动计算(根据设置的约束来计算)
self.tableView.rowHeight = UITableViewAutomaticDimension;
iOS8开始:self-sizing

如果没写这两句,运行出来的高度都是不对的
 #import "ViewController.h"

 #import "XMGStatus.h"

 #import "MJExtension.h"

 #import "XMGStatusCell.h"

 @interface ViewController ()

 /** 微博数据 */

 @property (nonatomic, strong) NSArray *statuses;

 @end

 @implementation ViewController

 NSString *ID = @"status";

 - (NSArray *)statuses

 {

     if (!_statuses) {

         _statuses = [XMGStatus objectArrayWithFilename:@"statuses.plist"];

     }

     return _statuses;

 }

 - (void)viewDidLoad {

     [super viewDidLoad];

     // 告诉tableView所有cell的真实高度是自动计算(根据设置的约束来计算)

     self.tableView.rowHeight = UITableViewAutomaticDimension;

     // 告诉tableView所有cell的估算高度

     self.tableView.estimatedRowHeight = ;

 }

 #pragma mark - <数据源>

 - (NSInteger)tableView:(UITableView *)tableView numberOfRowsInSection:(NSInteger)section

 {

     return self.statuses.count;

 }

 - (UITableViewCell *)tableView:(UITableView *)tableView cellForRowAtIndexPath:(NSIndexPath *)indexPath

 {

     XMGStatusCell *cell = [tableView dequeueReusableCellWithIdentifier:ID];

     cell.status = self.statuses[indexPath.row];

     return cell;

 }

 @end
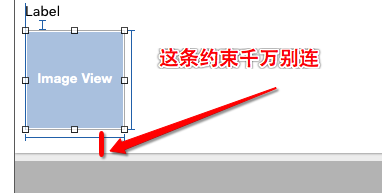
四、自定义不等高cell-storyboard(有配图)
有图片和无图片其实一样,重点在于如何自动计算行高
1、首先,cell模型里再添加imageView(配图)
2、然后,在 XMGStatusCell.m 内添加三个属性
/** 配图 */
@property (nonatomic, weak) IBOutlet UIImageView *pictureImageView;
/** 配图的高度约束 */
@property (weak, nonatomic) IBOutlet NSLayoutConstraint *pictureHeight;
/** 配图底部间距约束 */
@property (weak, nonatomic) IBOutlet NSLayoutConstraint *pictureBottom;
3、设置数据
XMGStatusCell.h
 #import <UIKit/UIKit.h>

 @class XMGStatus;

 @interface XMGStatusCell : UITableViewCell

 /** 模型数据 */

 @property (nonatomic, strong) XMGStatus *status;

 @end
XMGStatusCell.m
 /**

  *  设置子控件显示的数据

  */

 - (void)setStatus:(XMGStatus *)status

 {

     _status = status;

     self.iconImageView.image = [UIImage imageNamed:status.icon];

     self.nameLabel.text = status.name;

     self.text_label.text = status.text;

     if (status.vip) {

         self.vipImageView.hidden = NO;

         self.nameLabel.textColor = [UIColor orangeColor];

     } else {

         self.vipImageView.hidden = YES;

         self.nameLabel.textColor = [UIColor blackColor];

     }

     // 设置配图数据

     if (status.picture) { // 有配图

         self.pictureHeight.constant = ;

         self.pictureBottom.constant = ;

         self.pictureImageView.image = [UIImage imageNamed:status.picture];

     } else { // 没有配图

         // 设置图片高度为0

         self.pictureHeight.constant = ;

         // 设置图片底部间距为0

         self.pictureBottom.constant = ;

     }

 }
XMGStatus.h
 #import <UIKit/UIKit.h>

 @interface XMGStatus : NSObject

 /**** 文字\图片数据 ****/

 /** 姓名 */

 @property (nonatomic, copy) NSString *name;

 /** 文本 */

 @property (nonatomic, copy) NSString *text;

 /** 头像 */

 @property (nonatomic, copy) NSString *icon;

 /** 配图 */

 @property (nonatomic, copy) NSString *picture;

 /** 是否为会员 */

 @property (nonatomic, assign) BOOL vip;

 @end
XMGStatus.m
 #import "XMGStatus.h"

 @implementation XMGStatus

 @end
 #import "ViewController.h"

 #import "XMGStatus.h"

 #import "MJExtension.h"

 #import "XMGStatusCell.h"

 @interface ViewController ()

 /** 微博数据 */

 @property (nonatomic, strong) NSArray *statuses;

 @end

 @implementation ViewController

 NSString *ID = @"status";

 - (NSArray *)statuses

 {

     if (!_statuses) {

         _statuses = [XMGStatus objectArrayWithFilename:@"statuses.plist"];

     }

     return _statuses;

 }

 - (void)viewDidLoad {

     [super viewDidLoad];

     // iOS8开始:self-sizing

     // 告诉tableView所有cell的真实高度是自动计算(根据设置的约束来计算)

     self.tableView.rowHeight = UITableViewAutomaticDimension;

     // 告诉tableView所有cell的估算高度

     self.tableView.estimatedRowHeight = ;

 }

 #pragma mark - <数据源>

 - (NSInteger)tableView:(UITableView *)tableView numberOfRowsInSection:(NSInteger)section

 {

     return self.statuses.count;

 }

 - (UITableViewCell *)tableView:(UITableView *)tableView cellForRowAtIndexPath:(NSIndexPath *)indexPath

 {

     XMGStatusCell *cell = [tableView dequeueReusableCellWithIdentifier:ID];

     cell.status = self.statuses[indexPath.row];

     return cell;

 }

 @end
运行结果
五、最终代码
在以前ios开发中,经常会发现程序在运行前屏幕会黑屏一会,这是为什么呢?我们这里也存在类似问题,因为在程序运行前会要显示一部分cell,苹果会提前将每一个cell的高度都算好,而且内部一些运行也需要调用这个方法,总之,当我们cell特别多时,这个方法的调用会特别频繁,就会出现黑屏一会的情况
1、解决方案:
告诉tableView所有cell的估算高度(设置了估算高度,就可以减少tableView:heightForRowAtIndexPath:方法的调用次数)
self.tableView.estimatedRowHeight = 200;
有些公司的项目还是以前的老项目,没有用到IOS8,那么计算高度可以用下面这种方法解决
2、返回高度
- (CGFloat)tableView:(UITableView *)tableView heightForRowAtIndexPath:(NSIndexPath *)indexPath;
- (UITableViewCell *)tableView:(UITableView *)tableView cellForRowAtIndexPath:(NSIndexPath *)indexPath;
上面这两个方法调用顺序依次是先计算高度再返回cell,也就是说应该在返回cell前将高度算好
 #import "ViewController.h"

 #import "XMGStatus.h"

 #import "MJExtension.h"

 #import "XMGStatusCell.h"

 @interface ViewController ()

 /** 微博数据 */

 @property (nonatomic, strong) NSArray *statuses;

 @end

 @implementation ViewController

 NSString *ID = @"status";

 - (NSArray *)statuses

 {

     if (!_statuses) {

         _statuses = [XMGStatus objectArrayWithFilename:@"statuses.plist"];

     }

     return _statuses;

 }

 - (void)viewDidLoad {

     [super viewDidLoad];

     // 告诉tableView所有cell的估算高度(设置了估算高度,就可以减少tableView:heightForRowAtIndexPath:方法的调用次数)

     self.tableView.estimatedRowHeight = ;

 }

 #pragma mark - <数据源>

 - (NSInteger)tableView:(UITableView *)tableView numberOfRowsInSection:(NSInteger)section

 {

     return self.statuses.count;

 }

 - (UITableViewCell *)tableView:(UITableView *)tableView cellForRowAtIndexPath:(NSIndexPath *)indexPath

 {

     XMGStatusCell *cell = [tableView dequeueReusableCellWithIdentifier:ID];

     cell.status = self.statuses[indexPath.row];

     return cell;

 }

 #pragma mark - <代理方法>

 XMGStatusCell *cell;

 - (CGFloat)tableView:(UITableView *)tableView heightForRowAtIndexPath:(NSIndexPath *)indexPath

 {

     // 创建一个cell(cell的作用:根据模型数据布局所有的子控件,进而计算出cell的高度)

     if (!cell) {

         cell = [tableView dequeueReusableCellWithIdentifier:ID];

     }

     // 设置模型数据

     cell.status = self.statuses[indexPath.row];

     return cell.height;

 }

 @end

 /****************** XMGStatusCell.m **********************/

 #import "XMGStatusCell.h"

 #import "XMGStatus.h"

 @interface XMGStatusCell()

 /** 头像 */

 @property (nonatomic, weak) IBOutlet UIImageView *iconImageView;

 /** 名称 */

 @property (nonatomic, weak) IBOutlet UILabel *nameLabel;

 /** 会员图标 */

 @property (nonatomic, weak) IBOutlet UIImageView *vipImageView;

 /** 文字 */

 @property (nonatomic, weak) IBOutlet UILabel *text_label;

 /** 配图 */

 @property (nonatomic, weak) IBOutlet UIImageView *pictureImageView;

 @end

 @implementation XMGStatusCell

 - (void)awakeFromNib

 {

     // 如果lable有自动换行的情况时

     // 手动设置文字的最大宽度(目的是:让label知道自己文字的最大宽度,进而能够计算出自己的frame)

     self.text_label.preferredMaxLayoutWidth = [UIScreen mainScreen].bounds.size.width - ;

 }

 /**

  *  设置子控件显示的数据

  */

 - (void)setStatus:(XMGStatus *)status

 {

     _status = status;

     self.iconImageView.image = [UIImage imageNamed:status.icon];

     self.nameLabel.text = status.name;

     self.text_label.text = status.text;

     if (status.vip) {

         self.vipImageView.hidden = NO;

         self.nameLabel.textColor = [UIColor orangeColor];

     } else {

         self.vipImageView.hidden = YES;

         self.nameLabel.textColor = [UIColor blackColor];

     }

     // 设置配图数据

     if (status.picture) { // 有配图

         self.pictureImageView.hidden = NO;

         self.pictureImageView.image = [UIImage imageNamed:status.picture];

     } else { // 没有配图

         self.pictureImageView.hidden = YES;

     }

 }

 - (CGFloat)height

 {

     // 强制布局cell内部的所有子控件(label根据文字多少计算出自己最真实的尺寸)

     [self layoutIfNeeded];

     // 计算cell的高度

     if (self.status.picture) {

         return CGRectGetMaxY(self.pictureImageView.frame) + ;

     } else {

         return CGRectGetMaxY(self.text_label.frame) + ;

     }

 }

 @end
iOS开发——UI进阶篇(三)自定义不等高cell,如何拿到cell的行高,自动计算cell高度,(有配图,无配图)微博案例的更多相关文章
- iOS开发——UI进阶篇(十五)Quartz2D介绍
一.Quartz2D简介 1.什么是Quartz2DQuartz 2D是一个二维绘图引擎,同时支持iOS和Mac系统 Quartz 2D能完成的工作绘制图形 : 线条\三角形\矩形\圆\弧等绘制文字绘 ...
- iOS开发——UI进阶篇(十)导航控制器、微博详情页、控制器的View的生命周期
一.导航控制器出栈 1.initWithRootViewController本质 UIViewController *vc = [[OneViewController alloc] init]; // ...
- iOS开发——UI进阶篇(十八)核心动画小例子,转盘(裁剪图片、自定义按钮、旋转)图片折叠、音量震动条、倒影、粒子效果
一.转盘(裁剪图片.自定义按钮.旋转) 1.裁剪图片 将一张大图片裁剪为多张 // CGImageCreateWithImageInRect:用来裁剪图片 // image:需要裁剪的图片 // re ...
- iOS开发——UI进阶篇(十一)应用沙盒,归档,解档,偏好设置,plist存储,NSData,自定义对象归档解档
1.iOS应用数据存储的常用方式XML属性列表(plist)归档Preference(偏好设置)NSKeyedArchiver归档(NSCoding)SQLite3 Core Data 2.应用沙盒每 ...
- iOS开发——UI进阶篇(四)tableView的全局刷新,局部刷新,左滑操作,左滑出现更多按钮,进入编辑模式,批量删除,自定义批量删除
首先创建项目,在storyboard如下布局控件,设置好约束 然后创建cell模型类XMGWineCell数据模型类XMGWine创建UITableView,设置数据源协议,实现数据源方法懒加载数据这 ...
- iOS开发——UI进阶篇(二)自定义等高cell,xib自定义等高的cell,Autolayout布局子控件,团购案例
一.纯代码自定义等高cell 首先创建一个继承UITableViewCell的类@interface XMGTgCell : UITableViewCell在该类中依次做一下操作1.添加子控件 - ( ...
- iOS开发——UI进阶篇(十二)事件处理,触摸事件,UITouch,UIEvent,响应者链条,手势识别
触摸事件 在用户使用app过程中,会产生各种各样的事件 一.iOS中的事件可以分为3大类型 触摸事件加速计事件远程控制事件 响应者对象在iOS中不是任何对象都能处理事件,只有继承了UIResponde ...
- iOS开发——UI进阶篇(七)程序启动原理、打电话、发短信
一.Info.plist常见的设置 1.建立一个工程后,会在Supporting files文件夹下看到一个“工程名-Info.plist”的文件,该文件对工程做一些运行期的配置,非常重要,不能删除 ...
- iOS开发——UI进阶篇(十七)CALayer,核心动画基本使用
一.CALayer简介 1.CALayer在iOS中,文本输入框.一个图标等等,这些都是UIView你能看得见摸得着的东西基本上都是UIView,比如一个按钮.一个文本标签.一个其实UIView之所以 ...
随机推荐
- python redis使用心得
发布与订阅 连接池代码 redis_conn.py import redis REDIS_CONN = { 'HOST': '192.168.1.11', 'PORT': '6378', 'DB': ...
- MVC Autofac构造函数注入
建立 空的 MVC4项目 首先引用 NuGet 里 autofac 和 autofac .integration. mvc 然后 建立Model public class Person { publi ...
- phpspidercookie
<?php /** * Created by PhpStorm. * User: brady * Date: 2016/12/9 * Time: 17:32 */ ini_set("m ...
- Java递归算法——汉诺塔问题
//================================================= // File Name : Tower_demo //-------------------- ...
- ubuntu删除输入法后,循环登陆
在登陆界面ctrl+alt+F1进入tty界面,登陆账号,然后输入 dpkg -l |grep ^rc|awk '{print $2}' |sudo xargs dpkg -P 可以参考Ubuntu1 ...
- DELL服务器引导光盘图片及下载链接
DELL服务器引导光盘图片及下载链接 所有的下载地址均是ftp开头的,下载时,请 拷贝下载地址,然后放到浏览器的地址栏进行下载! 各个下载地址汇总: http://search.dell.com/re ...
- [webgrid] – header - (How to Add custom html to Header in WebGrid)
How to Add custom html to Header in WebGrid MyEvernote Link Posted on March 30, 2013by mtryambake Ho ...
- yii2.0自动登录功能的实现方法
参考地址:http://www.kuitao8.com/20150518/3747.shtml 自动登录的原理很简单.主要就是利用cookie来实现的在第一次登录的时候,如果登录成功并且选中了下次自动 ...
- PHP与Javascript的混合测试
js调用php <?php $num=88; ?> <script> var a = <?php echo $num;?>; alert(a); </scri ...
- SQLServer中获取特定表的所有列名
1.获取特定表的所有列名: Select Name FROM SysColumns Where id=Object_Id('tableName') 参考:http://blog.csdn.net/wu ...