
版本控制,svn基础,实战案例,RPM打包
版本控制,svn基础,实战案例,RPM打包
案例1:Subversion基本操作
案例2:使用Subversion协同工作
案例3:制作nginx的RPM包
1案例1:Subversion基本操作
1.1问题
本案例要求先快速搭建好一台Subversion服务器,并测试该版本控制软件:
创建版本库
导入初始化数据
检出数据至用户本地副本
对本地副本进行增删改查等操作
1.2方案
使用YUM安装subversion软件,使用svn客户端工具连接svnserver服务器并测试版本控制软件。
使用svn命令测试svnserver服务时可以使用的命令列表如表-1所示。
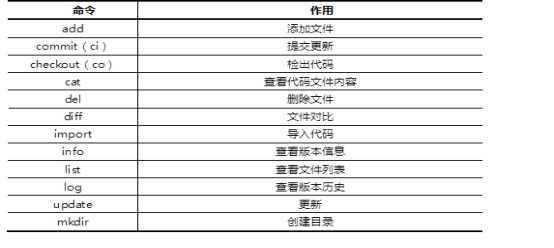
表-1 svn命令列表
1.3步骤
实现此案例需要按照如下步骤进行。
步骤一:安装Subversion服务器
1)YUM安装subversion软件
[root@web1~]#yum -y install subversion
[root@web1~]#rpm -q subversion
2)创建版本库
[root@web1~]#mkdir /var/svn/
[root@web1~]#svnadmin create/var/svn/project
[root@web1~]#ls /var/svn/project/
conf/db/format hooks/locks/README.txt
3)本地导入初始化数据
[root@web1~]#cd /usr/lib/systemd/system/
[root@web1~]#svn import.file:///var/svn/project/-m"Init Data”
4)修改配置文件,创建账户与密码
[root@web1~]#vim /var/svn/project/conf/svnserve.conf
[general]
###These options control access to the repository for unauthenticated
###and authenticated users.Valid values are"write","read",
###and"none".The sample settings below are the defaults.
anon-access=none //匿名无任何权限
auth-access=write //有效账户可写
###The password-db option controls the location of the password
###database file.Unless you specify a path starting with a/,
###the file's location is relative to the directory containing
###this configuration file.
###If SASL is enabled(see below),this file will NOT be used.
###Uncomment the line below to use the default password file.
password-db=passwd //密码文件
###The authz-db option controls the location of the authorization
###rules for path-based access control.Unless you specify a path
###starting with a/,the file's location is relative to the the
###directory containing this file.If you don't specify an
###authz-db,no path-based access control is done.
###Uncomment the line below to use the default authorization file.
authz-db=authz //ACL访问控制列表文件
###This option specifies the authentication realm of the repository.
###If two repositories have the same authentication realm,they should
###have the same password database,and vice versa.The default realm
###is repository's uuid.
#realm=My First Repository
² 修改配置文件
[root@web1~]#vim /var/svn/project/conf/passwd
……
[users]
harry=pass //用户名和密码
tom=pass //用户名和密码
[root@web1~]#cat /var/svn/project/conf/authz
² [/]//定义ACL访问控制
harry=rw //用户对项目根路径可读可写
tom=rw
*=r //其他人只读
5)启动服务
[root@web1~]#svnserve -d -r /var/svn/project1
[root@web1~]#netstat -nutlp | grep svnserve
tcp 0 0 0.0.0.0:3690 0.0.0.0:*LISTEN 4043/svnserve
步骤二:客户端测试(192.168.2.200)
1)将服务器上的代码下载到本地
[root@web2~]#cd /tmp
[root@web2~]#svn --username harry --password pass \
co svn://192.168.2.100/code
//建立本地副本,从服务器192.168.2.100上co下载代码到本地code目录
//用户名harry,密码pass
-----------------------------------------------------------------------
ATTENTION!Your password for authentication realm:
<svn://127.0.0.1:3690>b72f45f0-bbe5-4a0c-ad4a-37f52704f0b1
can only be stored to disk unencrypted!You are advised to configure
your system so that Subversion can store passwords encrypted,if
possible.See the documentation for details.
You can avoid future appearances of this warning by setting the value
of the'store-plaintext-passwords'option to either'yes'or'no'in
'/root/.subversion/servers'.
-----------------------------------------------------------------------
Store password unencrypted(yes/no)?yes//提示是否保存密码
[root@web2~]#cd /tmp/code
[root@web2 code]#ls
[root@web2 code]#vim user.slice//挑选任意文件修改其内容
[root@web2 code]#svn ci-m "modify user"//将本地修改的数据同步到服务器
[root@web2 code]#svn update//将服务器上新的数据同步到本地
[root@web2 code]#svn info svn://192.168.2.100//查看版本仓库基本信息
[root@web2 code]#svn log svn://192.168.2.100//查看版本仓库的日志
[root@web2 code]#echo "test" > test.sh//本地新建一个文件
[root@web2 code]#svn ci-m "new file"//提交失败,该文件不被svn管理
[root@web2 code]#svn add test.sh//将文件或目录加入版本控制
[root@web2 code]#svn ci-m "new file"//再次提交,成功
[root@web2 code]#svn mkdir subdir//创建子目录
[root@web2 code]#svn rm timers.target//使用svn删除文件
[root@web2 code]#svn ci-m "xxx"//提交一次代码
[root@web2 code]#vim umount.target//任意修改本地的一个文件
[root@web2 code]#svn diff//查看所有文件的差异
[root@web2 code]#svn diff umount.target//仅查看某一个文件的差异
[root@web2 code]#svn cat svn://192.168.2.100/reboot.target
//查看服务器文件的内容
[root@web2 code]#sed -i 'd' tmp.mount
//删除文件所有内容,但未提交
[root@web2 code]#svn revert tmp.mount
//还原tmp.mount文件
[root@web2 code]#rm -rf *.target
//任意删除若干文件
[root@web2 code]#svn update
//还原
[root@web2 code]#sed -i '1a#test###' tuned.service
//修改本地副本中的代码文件
[root@web2 code]#svn ci-m"xxx"
//提交代码
[root@web2 code]#svn merge-r7:2 tuned.service
//将文件从版本7还原到版本2
案例2:使用Subversion协同工作
2.1问题
沿用练习一,通过svn工具,对subversion版本库进行多人协同工作测试,要求如下:
该版本库支持多个账户同时协作编辑文件
测试演示多人协作编辑的具体操作
手动解决版本冲突问题
备份版本库数据
2.2方案
使用svn客户端工具连接subversion服务器并测试多人协同工作以及如何手动解决冲突问题,账户名称分别为harry和tom,最后使用svnadmin dump指令对版本库进行备份工作。
2.3步骤
实现此案例需要按照如下步骤进行。
步骤一:多人协同工作
1)远程连接两个终端,每个人下载代码本地副本,注意web1(192.168.2.100)和web2(192.168.2.200)代表了两个不同的主机,看清楚操作是在哪一台计算机上执行!
[root@web1~]#cd /tmp
[root@web1~]#svn --username harry --password pass \
>co svn://192.168.2.100/project mycode
[root@web2~]#cd/tmp
[root@web2~]#svn --username tom --password pass \
>co svn://192.168.2.100/project mycode
[root@web1~]#cd mycode
[root@web2~]#cd mycode
2)harry和tom修改不同的文件
[root@web1 mycode]#sed -i "3a###harry modify#####" tmp.mount
[root@web1 mycode]#svn ci-m"has modified"
[root@web2 mycode]#sed -i "3a###tom modify#####" umount.target
[root@web2 mycode]#svn ci-m "has modified"
[root@web2 mycode]#svn update
[root@web1 mycode]#svn update
3)harry和tom修改相同文件的不同行
[root@srv5~]#cd harry
[root@web1 mycode]#sed -i "3a###harry modify#####" user.slice
[root@web1 mycode]#svn ci-m "modified"
[root@web2 mycode]#sed -i "6a###tom modify#####" user.slice
[root@web2 mycode]#svn ci-m "modified" //提交失败
Sending svnserve
Transmitting file data.svn:Commit failed(details follow):
svn:File'/user.slice'is out of date (过期)
[root@web2 mycode]#svn update //提示失败后,先更新再提交即可
[root@web2 mycode]#svn ci-m "modified" //提交成功
Sending user.slice
Transmitting file data.
4) harry和tom修改相同文件的相同行
[root@web1 mycode]#sed -i '1c[UNIT]' tuned.service
[root@web1 mycode]#svn ci-m "modified"
[root@web2 mycode]#sed -i '1c[unit]' tuned.service
[root@web2 mycode]#svn ci-m "modified"
Sending tuned.service
Transmitting file data.svn:Commit failed(details follow):
svn:File'/tuned.service'is out of date (过期)
[root@web2 mycode]#svn update //出现冲突,需要解决
Conflict discovered in'tuned.service'.
Select:(p)postpone,(df)diff-full,(e)edit,
(mc)mine-conflict,(tc)theirs-conflict,
(s)show all options:p //选择先标记p,随后解决
[root@web2 mycode]#ls
tuned.service tuned.service.mine tuned.service.r10 tuned.service.r9
[root@web2 mycode]#mv tuned.service.mine tuned.service
[root@web2 mycode]#rm -rf tuned.service.r10 tuned.service.r9
[root@web2 mycode]#svn ci-m "modified" / /解决冲突
步骤二:使用dump指令备份版本库数据
[root@web1~]#svnadmin dump /var/svn/project > project.bak//备份
*Dumped revision 0.
*Dumped revision 1.
*Dumped revision 2.
*Dumped revision 3.
*Dumped revision 4.
*Dumped revision 5.
*Dumped revision 6.
*Dumped revision 7.
*Dumped revision 8.
*Dumped revision 9.
*Dumped revision 10.
*Dumped revision 11.
[root@web1~]#mkdir /var/svn/project2
[root@web1~]#systemctl start php-fpm
[root@web1~]#svnadmin load/var/svn/project2 < project.bak//还原
案例3:制作nginx的RPM包
3.1问题
本案例使用nginx-1.12.2版本的源码软件,生产对应的RPM包软件,具体要求如下:
软件名称为nginx
软件版本为1.12.2
RPM软件包可以查询描述信息
RPM软件包可以安装及卸载
3.2方案
安装rpm-build软件包,编写SPEC配置文件,创建新的RPM软件包。
配置文件中的描述信息如表-2:

表-2 SPEC描述信息
3.3步骤
实现此案例需要按照如下步骤进行。
步骤一:安装rpm-build软件
1)安装rpm-build软件包
[root@web1~]#yum -y install rpm-build
2)生成rpmbuild目录结构
[root@web1~]#rpmbuild -ba nginx.spec //会报错,没有文件或目录
[root@web1~]#ls /root/rpmbuild//自动生成的目录结构
BUILD BUILDROOT RPMS SOURCES SPECS SRPMS
3)准备工作,将源码软件复制到SOURCES目录
[root@web1~]#cp nginx-1.12.2.tar.gz /root/rpmbuild/SOURCES/
4)创建并修改SPEC配置文件
[root@web1~]#vim /root/rpmbuild/SPECS/nginx.spec
[root@web1~]#ls /root/rpmbuild
[root@proxy rpmbuild]#touch /root/rpmbuild/SPECS/nginx.sh
Name:nginx
Version:1.12.2
Release:10
Summary:Nginx is a web server software.
License:GPL
URL:www.test.com
Source0:nginx-1.12.2.tar.gz
#BuildRequires:
#Requires:
%description
nginx[engine x]is an HTTP and reverse proxy server.
%prep
%setup–q
%build
./configure
make%{?_smp_mflags}
%install
make install DESTDIR=%{buildroot}
cp/root/rpmbuild/SPECS/nginx.sh%{buildroot}/usr/local/nginx/
%files
%doc
/usr/local/nginx/*
%changelog
步骤二:使用配置文件创建RPM包
1)安装依赖软件包
[root@web1~]#yum -y install gcc pcre-devel zlib-devel openssl-devel
2)rpmbuild创建RPM软件包
[root@web1~]#rpmbuild -ba /root/rpmbuild/SPECS/nginx.spec
[root@web1~]#ls /root/rpmbuild/RPMS/x86_64/nginx-1.12.2-10.x86_64.rpm
[root@web1~]#ls /root/rpmbuild
[root@web1~]#ls /root/rpmbuildm-qpiRPMS/x86_64/nginx-1.12.2-10.x86_64.rpm
Name:nginx Relocations:(not relocatable)
Version:1.12.2 Vendor:(none)
Release:10 Build Date:Mon 02 May 2016 02:30:53 AM PDT
Install Date:(not installed)Build Host:localhost
Group:Applications/Internet Source RPM:nginx-1.8.0-1.src.rpm
Size:721243 License:GPL
Signature:(none)
URL:www.nginx.org
Summary:Nginx is a web server software.
Description:
nginx[engine x]is an HTTP and reverse proxy server.
[root@web1~]#rpm-qpl nginx-1.12.2-10.x86_64.rpm
/usr
/usr/local
/usr/local/nginx
/usr/local/nginx/conf
/usr/local/nginx/conf/fastcgi.conf
/usr/local/nginx/conf/fastcgi.conf.default
/usr/local/nginx/conf/fastcgi_params
/usr/local/nginx/conf/fastcgi_params.default
/usr/local/nginx/conf/koi-utf
/usr/local/nginx/conf/koi-win
/usr/local/nginx/conf/mime.types
/usr/local/nginx/conf/mime.types.default
/usr/local/nginx/conf/nginx.conf
/usr/local/nginx/conf/nginx.conf.default
/usr/local/nginx/conf/scgi_params
/usr/local/nginx/conf/scgi_params.default
/usr/local/nginx/conf/uwsgi_params
/usr/local/nginx/conf/uwsgi_params.default
/usr/local/nginx/conf/win-utf
/usr/local/nginx/html
/usr/local/nginx/html/50x.html
/usr/local/nginx/html/index.html
/usr/local/nginx/logs
/usr/local/nginx/sbin
/usr/local/nginx/sbin/nginx
步骤三:安装、卸载软件
[root@web1~]#rpm -ivh RPMS/x86_64/nginx-1.12.2-10.x86_64.rpm
[root@web1~]#rpm -qa | grep nginx
[root@web1~]#/usr/local/nginx/sbin/nginx
[root@web1~]#curl http://127.0.0.1/
注册https://github.com/
实现:存放数据库资料
功能:可以下载和上传
注册页面:选择
Unlimited public repositories for free.
Send me updates on GitHub news,offers,and events
邮件验证注册
版本控制,svn基础,实战案例,RPM打包的更多相关文章
- CSS基础 实战案例 模拟小米官方导航栏
效果图 html结构 <ul> <li><a href="#">Xiaomi手机</a></li> <li> ...
- CSS3基础——笔记+实战案例(CSS基本用法、CSS层叠性、CSS继承性)
CSS3基础——笔记 CSS是Cascading Style Sheet的缩写,翻译为"层叠样式表" 或 "级联样式表".CSS定义如何显示HTML的标签央视, ...
- linux 版本控制及rpm打包
版本控制 subversion:是一个自由/开源的版本控制系统,在subversion管理下,文件和目录可以超越时空subversion允许你数据恢复到早期版本,或者是检查数据修改历史许多人将版本控制 ...
- iOS开发——开发实战篇&版本控制SVN和Git使用详解
版本控制SVN和Git使用详解 公司的实际开发中,在天朝使用较多的还是SVN,因为SVN是集中式的,在天朝上班你们都懂的! -----------------svn--------- ...
- 在Linux下通过rpm打包发布Java程序
这个东西涉及的内容较多,根据下面这些文章慢慢学习 一个简单的例子 http://blog.csdn.net/king_on/article/details/7169384 按照文章中的步骤来,打包之后 ...
- 部署Ambari Server实战案例
部署Ambari Server实战案例 作者:尹正杰 版权声明:原创作品,谢绝转载!否则将追究法律责任. 一.准备三台虚拟机(需要自行安装jdk环境) 1>.角色分配 NameNode节点: h ...
- Mapreduce之排序&规约&实战案例
MapReduce 排序和序列化 简单介绍 ①序列化 (Serialization) 是指把结构化对象转化为字节流②反序列化 (Deserialization) 是序列化的逆过程. 把字节流转为结构化 ...
- rpm打包过程
[需求] 接触那么久的Linux,还没有试验过怎么打rpm包 [过程] 1.rpm打包准备工作 系统默认的rpmbuild的相关路径
- RPM打包原理、示例、详解及备查
原文地址:https://blog.csdn.net/qq_16542775/article/details/80961213 RPM(Redhat Package Manager)是用于Redhat ...
随机推荐
- Numpy之数据保存与读取
在pandas使用的25个技巧中介绍了几个常用的Pandas的使用技巧,不少技巧在机器学习和深度学习方面很有用处.本文将会介绍Numpy在数据保存和读取方面的内容,这些在机器学习和深度学习方向也大 ...
- scrapy中间件中使用selenium切换ip
scrapy抓取一些需要js加载页面时一般要么是通过接口直接获取数据,要么是js加载,但是我通过selenium也可以获取动态页面 但是有个问题,容易给反爬,因为在scrapy中间件mid中使用sel ...
- 一,kubeadm初始化k8s集群
docker安装 wget https://mirrors.tuna.tsinghua.edu.cn/docker-ce/linux/centos/docker-ce.repo yum inst ...
- 我的学习笔记之node----node.js+socket.io实时聊天(1)
本想着从hello word开篇,也确实写了相关学习笔记.各种原因吧,现在又着急写出作品,便作罢. 这里将记录一个node.js+socket.io的实时聊天程序.(当然我也是跟着网上各种教程资料学习 ...
- R调用C++示例
sourceCpp {Rcpp}:Source C++ Code from a File or String sourceCpp(file = "", code = NULL, e ...
- vscode style内置auto会导致eslint格式化 对不齐报错
"files.associations": { "*.vue": "vue", // "*.js": "jav ...
- emWin模拟器Visual Studio开发时无法printf打印的问题
1.emWin模拟器 为了方便用户学习evWin框架,Segger设计了一个PC仿真的工具,可以测试绝大部分GUI的功能,除了方便使用者学习之外,还可以加速项目开发进度.毕竟在PC上用Visual S ...
- 【简说Python WEB】视图函数操作数据库
目录 [简说Python WEB]视图函数操作数据库 系统环境:Ubuntu 18.04.1 LTS Python使用的是虚拟环境:virutalenv Python的版本:Python 3.6.9 ...
- 性能测试工具LoadRuner你所不知道的内幕
谈到性能测试,大家一定会联想到Jmeter和LoadRunner,这两款工具目前在国内使用的相当广泛,主要原因是Jmeter是开源免费,LoadRunner 11在现网中存在破解版本.商用型性能测试工 ...
- 【Java】反射调用与面向对象结合使用产生的惊艳
缘起 我在看Spring的源码时,发现了一个隐藏的问题,就是父类方法(Method)在子类实例上的反射(Reflect)调用. 初次看到,感觉有些奇特,因为父类方法可能是抽象的或私有的,但我没有去怀疑 ...