Android 悬浮窗、悬浮球开发
1、权限管理
直接看我另外一篇博客吧,传送门:
https://my.oschina.net/u/1462828/blog/1933162
2、Base类BaseSuspend
import android.content.Context;

import android.graphics.PixelFormat;

import android.os.Build;

import android.view.Gravity;

import android.view.LayoutInflater;

import android.view.View;

import android.view.WindowManager;

import com.imxiaoyu.common.utils.entity.SizeEntity;

public abstract class BaseSuspend {

    private Context context;

    private View view;

    private boolean isShowing = false;

    /**

     * UI

     */

    private WindowManager.LayoutParams wmParams;//悬浮窗的布局

    /**

     * 变量

     */

    private WindowManager mWindowManager;//创建浮动窗口设置布局参数的对象

    /**

     * 接口

     */

    private OnSuspendDismissListener onSuspendDismissListener;

    public BaseSuspend(Context context) {

        this.context = context;

        view = LayoutInflater.from(context).inflate(getLayoutId(), null);

        init();

        initView();

        onCreateSuspension();

    }

    public void init() {

        if (mWindowManager == null) {

            mWindowManager = (WindowManager) context.getApplicationContext().getSystemService(Context.WINDOW_SERVICE);

        }

        wmParams = getParams();//设置好悬浮窗的参数

        // 悬浮窗默认显示以左上角为起始坐标

        wmParams.gravity = Gravity.LEFT | Gravity.TOP;

    }

    /**

     * 布局文件id,这里是用不到的,但还是建议填写,方便跳转到布局管理

     *

     * @return

     */

    protected abstract int getLayoutId();

    /**

     * 注册需要使用的控件

     */

    protected abstract void initView();

    protected abstract void onCreateSuspension();

    /**

     * 根据id快速找到控件

     *

     * @param id

     * @param <E>

     * @return

     */

    public final <E extends View> E findView(int id) {

        try {

            return (E) view.findViewById(id);

        } catch (ClassCastException ex) {

            throw ex;

        }

    }

    /**

     * 根据id快速找到控件

     *

     * @param id

     * @param onClickListener

     * @param <E>

     * @return

     */

    public final <E extends View> E findView(int id, View.OnClickListener onClickListener) {

        E e = findView(id);

        e.setOnClickListener(onClickListener);

        return e;

    }

    /**

     * 对windowManager进行设置

     *

     * @return

     */

    public WindowManager.LayoutParams getParams() {

        wmParams = new WindowManager.LayoutParams();

        //设置window type 下面变量2002是在屏幕区域显示,2003则可以显示在状态栏之上

        //wmParams.type = LayoutParams.TYPE_PHONE;

        if (Build.VERSION.SDK_INT < Build.VERSION_CODES.O) {

            wmParams.type = WindowManager.LayoutParams.TYPE_SYSTEM_ALERT;

        } else {

            wmParams.type = WindowManager.LayoutParams.TYPE_APPLICATION_OVERLAY;

        }

//        wmParams.type = WindowManager.LayoutParams.TYPE_SYSTEM_ERROR;

        //设置图片格式,效果为背景透明

        wmParams.format = PixelFormat.RGBA_8888;

        //设置浮动窗口不可聚焦(实现操作除浮动窗口外的其他可见窗口的操作)

        //wmParams.flags = LayoutParams.FLAG_NOT_FOCUSABLE;

        //设置可以显示在状态栏上

        wmParams.flags = WindowManager.LayoutParams.FLAG_NOT_FOCUSABLE | WindowManager.LayoutParams.FLAG_NOT_TOUCH_MODAL |

                WindowManager.LayoutParams.FLAG_LAYOUT_IN_SCREEN | WindowManager.LayoutParams.FLAG_LAYOUT_INSET_DECOR |

                WindowManager.LayoutParams.FLAG_WATCH_OUTSIDE_TOUCH;

        return wmParams;

    }

    /**

     * 全屏显示悬浮视图

     */

    public void showSuspend() {

        showSuspend(0, 0, true);

    }

    /**

     * 显示悬浮视图

     *

     * @param sizeEntity

     * @param isMatchParent 是否全屏显示

     */

    public void showSuspend(SizeEntity sizeEntity, boolean isMatchParent) {

        if (sizeEntity != null) {

            showSuspend(sizeEntity.getWidth(), sizeEntity.getHeight(), isMatchParent);

        }

    }

    /**

     * 显示悬浮视图

     *

     * @param width

     * @param height

     */

    public void showSuspend(int width, int height, boolean isMatchParent) {

        //设置悬浮窗口长宽数据

        if (isMatchParent) {

            wmParams.width = WindowManager.LayoutParams.MATCH_PARENT;

            wmParams.height = WindowManager.LayoutParams.MATCH_PARENT;

        } else {

            wmParams.width = WindowManager.LayoutParams.WRAP_CONTENT;

            wmParams.height = WindowManager.LayoutParams.WRAP_CONTENT;

        }

        //悬浮窗的开始位置,读取缓存

        wmParams.x = width;

        wmParams.y = height;

        if (isShowing) {

            removeView();

        }

        mWindowManager.addView(view, wmParams);

        isShowing = true;

    }

    /**

     * 更新当前视图的位置

     *

     * @param x 更新后的X轴的增量

     * @param y 更新后的Y轴的增量

     */

    public void updateSuspend(int x, int y) {

        if (view != null) {

            //必须是当前显示的视图才给更新

            WindowManager.LayoutParams layoutParams = (WindowManager.LayoutParams) view.getLayoutParams();

            layoutParams.x += x;

            layoutParams.y += y;

            mWindowManager.updateViewLayout(view, layoutParams);

        }

    }

    /**

     * 移除当前悬浮窗

     */

    public void dismissSuspend() {

        if (view != null) {

            mWindowManager.removeView(view);

            isShowing = false;

            if (onSuspendDismissListener != null) {

                onSuspendDismissListener.onDismiss();

            }

        }

    }

    public Context getContext() {

        return context;

    }

    public View getView() {

        return view;

    }

    /**

     * 是否正在显示

     *

     * @return

     */

    public boolean isShowing() {

        return isShowing;

    }

    /**

     * 移除弹窗的时候回调

     *

     * @param onSuspendDismissListener

     */

    public void setOnSuspendDismissListener(OnSuspendDismissListener onSuspendDismissListener) {

        this.onSuspendDismissListener = onSuspendDismissListener;

    }

    public interface OnSuspendDismissListener {

        public void onDismiss();

    }

}
还有里面用到的一个size类:
/**

 * 宽高实体

 * Created by 她叫我小渝 on 2016/11/4.

 */

public class SizeEntity {

    private int width;

    private int height;

    public SizeEntity(){}

    public SizeEntity(int width,int height){

        setWidth(width);

        setHeight(height);

    }

    public int getWidth() {

        return width;

    }

    public void setWidth(int width) {

        this.width = width;

    }

    public int getHeight() {

        return height;

    }

    public void setHeight(int height) {

        this.height = height;

    }

}
3、定制视图和使用
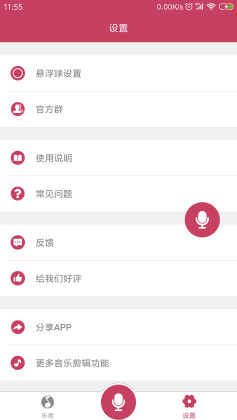
要实现的逻辑是,显示一个悬浮球,然后可以拖动移动悬浮球的位置,效果图:

然后新建一个类,LogoSuspend继承BaseSuspend,里面引用到了一些工具类就不贴出来了,用到的地方我会加上注释
/**

 * 悬浮球

 * Created by 她叫我小渝 on 2017/1/1.

 */

public class LogoSuspend extends BaseSuspend {

    /**

     * ui

     */

    private ImageView ivLogo;

    /**

     * 变量

     */

    private int width, height;

    private float mStartX, mStartY, mStopX, mStopY, touchStartX, touchStartY;

    private long touchStartTime;

    /**

     * 接口

     */

    private View.OnClickListener onClickListener;

    public LogoSuspend(Context context) {

        super(context);

    }

    @Override

    protected int getLayoutId() {

        return R.layout.suspend_logo;

    }

    @Override

    protected void initView() {

        ivLogo = findView(R.id.iv_logo);

        ivLogo.setOnTouchListener(new View.OnTouchListener() {

            @Override

            public boolean onTouch(View view, MotionEvent event) {

                final int action = event.getAction();

                mStopX = event.getRawX();

                mStopY = event.getRawY();

                switch (action) {

                    case MotionEvent.ACTION_DOWN:

                        // 以当前父视图左上角为原点

                        mStartX = event.getRawX();

                        mStartY = event.getRawY();

                        touchStartX = event.getRawX();

                        touchStartY = event.getRawY();

                        touchStartTime = DateUtil.getTimeForLong();//获取当前时间戳

                        break;

                    case MotionEvent.ACTION_MOVE:

                        width = (int) (mStopX - mStartX);

                        height = (int) (mStopY - mStartY);

                        mStartX = mStopX;

                        mStartY = mStopY;

                        updateSuspend(width, height);

                        break;

                    case MotionEvent.ACTION_UP:

                        width = (int) (mStopX - mStartX);

                        height = (int) (mStopY - mStartY);

                        updateSuspend(width, height);

                        WindowManager.LayoutParams layoutParams = (WindowManager.LayoutParams) getView().getLayoutParams();

                        SuspensionCache.setSuspendSize(getContext(), new SizeEntity(layoutParams.x + width, layoutParams.y + height));//缓存一下当前位置

                        if ((mStopX - touchStartX) < 30 && (mStartY - touchStartY) < 30 && (DateUtil.getTimeForLong() - touchStartTime) < 300) {

                            //左右上下移动距离不超过30的,并且按下和抬起时间少于300毫秒,算是单击事件,进行回调

                            if (onClickListener != null) {

                                onClickListener.onClick(view);

                            }

                        }

                        break;

                }

                return true;

            }

        });

    }

    @Override

    protected void onCreateSuspension() {

    }

    /**

     * 设置点击监听

     *

     * @param onClickListener

     */

    public void setOnClickListener(View.OnClickListener onClickListener) {

        this.onClickListener = onClickListener;

    }

}
布局文件syspend_logo.xml
<RelativeLayout xmlns:android="http://schemas.android.com/apk/res/android"

    android:id="@+id/rly_bg"

    android:layout_width="wrap_content"

    android:layout_height="wrap_content">

    <ImageView

        android:id="@+id/iv_logo"

        android:layout_width="wrap_content"

        android:layout_height="wrap_content"

        android:src="@drawable/ic_home_add_normal" />

</RelativeLayout>
因为Activity是有生命周期的,所以打开悬浮窗的Context上下文,不要用Activity的,而是用Service的
创建并注册一个Service,然后在onCreate方法中执行调用代码就好
@Override

    public void onCreate() {

        super.onCreate();

        ALog.e("服务已创建");

        if (logoSuspend == null) {

            logoSuspend = new LogoSuspend(this);

        }

        logoSuspend.showSuspend(SuspensionCache.getSuspendSize(this), false);//从缓存中提取上一次显示的位置

        logoSuspend.setOnClickListener(new View.OnClickListener() {

            @Override

            public void onClick(View view) {

                //处理单击事件

            }

        });

    }
4、废话
上面的例子,其实还是比较简单的,但一般开发对于悬浮球的需求并不算很大,Base类的话,目前只是最基础的东西,在开发的过程中,需要用到什么了再往里面加就好,问题不大。
目前代码支持同时显示多个悬浮窗、悬浮球,主要用于在于悬浮窗交互的时候,直接弹出其他的交互界面(也是以悬浮窗的状态出现),但建议每一个页面都有关闭按钮或者做返回键关闭的相关操作,毕竟是显示在最前端的,要是关不掉就点哪里都没用,只能是强制关机了…………()&@()……()@#*¥)()@*#…………@#)()*¥)()…………
Android 悬浮窗、悬浮球开发的更多相关文章
- Android 摄像头预览悬浮窗,可拖动,可显示在其他app上方
市面上常见的摄像头悬浮窗,如微信.手机QQ的视频通话功能,有如下特点: 整屏页面能切换到一个小的悬浮窗 悬浮窗能运行在其他app上方 悬浮窗能跳回整屏页面,并且悬浮窗消失 我们探讨过用CameraX打 ...
- Android 高仿UC浏览器监控剪切板弹出悬浮窗功能
UC浏览器应该是android手机里 最流行的浏览器之一了,他们有一个功能 相信大家都体验过,就是如果你复制了什么文字,(在其他app中 复制也有这个效果!,所以能猜到肯定是监控了剪切板),就会弹出一 ...
- Android 之 悬浮窗
昨天研究Android的悬浮窗,遇到一个问题,研究了一天,总算找到结症了,原因非常坑人..... 问题是这样的,我想要将悬浮窗展现在桌面或其他应用之上,我的开发机子用的是MIUI,结果发现在机子上无论 ...
- Android 悬浮窗权限各机型各系统适配大全
这篇博客主要介绍的是 Android 主流各种机型和各种版本的悬浮窗权限适配,但是由于碎片化的问题,所以在适配方面也无法做到完全的主流机型适配,这个需要大家的一起努力,这个博客的名字永远都是一个将来时 ...
- Android无需权限显示悬浮窗, 兼谈逆向分析app
前言 最近UC浏览器中文版出了一个快速搜索的功能, 在使用其他app的时候, 如果复制了一些内容, 屏幕顶部会弹一个窗口, 提示一些操作, 点击后跳转到UC, 显示这个悬浮窗不需要申请android. ...
- Android Widget和悬浮窗 原理
1.简单介绍 Android widget是桌面插件,在android系统应用开发层面有特殊用途. AppWidget是把一个进程的控件嵌入到别外一个进程的窗口里的一种方法.悬浮窗的效果与Widget ...
- android课程表控件、悬浮窗、Todo应用、MVP框架、Kotlin完整项目源码
Android精选源码 Android游戏2048 MVP Kotlin项目(RxJava+Rerotfit+OkHttp+Glide) Android基于自定义Span的富文本编辑器 android ...
- android打飞机游戏、MVP句子迷App、悬浮窗、RxJava+Retrofit、加载动画、定制计划App等源码
Android精选源码 微信打飞机 android进度设置加载效果源码 Android新手引导库EasyGuide MVP-好看又好用的句子迷客户端 XFloatView 一个简易的悬浮窗实现方案 a ...
- Android悬浮窗实现 使用WindowManager
Android悬浮窗实现 使用WindowManager WindowManager介绍 通过Context.getSystemService(Context.WINDOW_SERVICE)可以获得 ...
随机推荐
- [Nuxt] Update Vuex State with Mutations and MapMutations in Vue.js
You commit changes to state in Vuex using defined mutations. You can easily access these state mutat ...
- nodejs+express4.0+mongodb安装方法 for Linux, Mac
废话不多说 1:下载nodejs包 下载地址例如以下:http://www.nodejs.org/download/ 下载source code版本号须要解压后到其文件夹运行./configure,然 ...
- 我的前端规范——HTML篇
相关文章 简书原文:https://www.jianshu.com/p/a46ff0504982 我的前端规范——开篇:http://www.cnblogs.com/shcrk/p/9271561.h ...
- GoJS超详细入门(插件使用无非:引包、初始化、配参数(json)、引数据(json)四步)
GoJS超详细入门(插件使用无非:引包.初始化.配参数(json).引数据(json)四步) 一.总结 一句话总结:插件使用无非:引包.初始化.配参数(json).引数据(json)四步. 1.goj ...
- [NPM] Create a node script to replace a complex npm script
In this lesson we will look at pulling out complex npm script logic into an external JavaScript file ...
- PHP正则表达式怎么匹配多行
PHP正则表达式怎么匹配多行 一.总结 1.可以用匹配模式修饰符s来使点匹配所有字符,包括换行符. 二.PHP匹配多行的正则表达式分析 代码如下: <table> <tr>&l ...
- php正则怎么使用(最全最细致)
php正则怎么使用(最全最细致) 一.总结 一句话总结: 1.正则中的行定位符是什么? 解答:(^与$) 2.正则中什么时候用行定位符? 解答:如"^de",表示以de开头的字符串 ...
- SpringMVC中支持多视图解析
版权声明:本文为博主原创文章,未经博主允许不得转载. https://blog.csdn.net/suo082407128/article/details/70173301 在SpringMVC模式当 ...
- Python 库的使用 —— dis
dis:Disassembler of Python byte code into mnemonics. Java.Python.Ruby 1.9 这些语言均使用了栈机器型的 VM.因为是基于栈的实现 ...
- 小强的HTML5移动开发之路(38)——jqMobi插件ActionSheet
现在在手机客户端上Action Sheet非常常见,比如微信中的分享按钮菜单,下面我们使用jqMobi实现一个Action Sheet,如下: 首先右击上面的按钮选择审查元素(我用的是Chrome浏览 ...