
springboot从入门到精通(二)
这一节我们一起用springboot开发一个应用程序,应用程序里的核心概念是玩家获取英雄列表上的英雄信息。
1、定义实体模型:
代码如下:
package com.dota.herolist.entity;
import javax.persistence.Entity;
import javax.persistence.GeneratedValue;
import javax.persistence.GenerationType;
import javax.persistence.Id;
@Entity
public class Hero {
private Long id;
private String name;
private String type;
private Integer bloodValue;
private Integer attack;
/*AUTO主键由程序控制, 是默认选项 ,不设置就是这个
-IDENTITY 主键由数据库生成, 采用数据库自增长, Oracle不支持这种方式
-SEQUENCE 通过数据库的序列产生主键, MYSQL 不支持
-Table 提供特定的数据库产生主键, 该方式更有利于数据库的移植*/
@Id
@GeneratedValue(strategy=GenerationType.AUTO)
public Long getId() {
return id;
}
public void setId(Long id) {
this.id = id;
}
public String getName() {
return name;
}
public void setName(String name) {
this.name = name;
}
public String getType() {
return type;
}
public void setType(String type) {
this.type = type;
}
public Integer getBloodValue() {
return bloodValue;
}
public void setBloodValue(Integer bloodValue) {
this.bloodValue = bloodValue;
}
public Integer getAttack() {
return attack;
}
public void setAttack(Integer attack) {
this.attack = attack;
}
}
Hero类就是简单的java对象,@Entity注解表示它是一个JPA实体,Id属性为主键,
2、定义持久层,代码如下:
package com.dota.herolist.repository;
import java.util.List;
import org.springframework.data.jpa.repository.JpaRepository;
import com.dota.herolist.entity.Hero;
public interface HeroListRepository extends JpaRepository<Hero,Long>{
List<Hero> findByName(String name);
}
3、创建web界面:
package com.dota.herolist.controller;
import java.util.List;
import org.springframework.beans.factory.annotation.Autowired;
import org.springframework.stereotype.Controller;
import org.springframework.ui.Model;
import org.springframework.web.bind.annotation.PathVariable;
import org.springframework.web.bind.annotation.RequestMapping;
import org.springframework.web.bind.annotation.RequestMethod;
import com.dota.herolist.entity.Hero;
import com.dota.herolist.repository.HeroListRepository;
@Controller
@RequestMapping("/heroList")
public class HeroListController {
private HeroListRepository heroListRepository;
@Autowired
public HeroListController(HeroListRepository heroListRepository){
this.heroListRepository=heroListRepository;
}
@RequestMapping(value="/{name}",method=RequestMethod.GET)
public String heroList(@PathVariable("name") String name,Model model){
List<Hero> heroList=heroListRepository.findByName(name);
if(heroList!=null){
model.addAttribute("heros",heroList);
}
return "heroList";
}
@RequestMapping(value="/{name}",method=RequestMethod.POST)
public String addToHeroList(@PathVariable("name") String name,Hero hero){
heroListRepository.save(hero);
return "redirect:/heroList/{name}";
}
}
写完controller后在src/main/resources/templates里创建一个名为heroList.html的文件:
<html>
<head>
<title>Hero List</title>
<link rel="stylesheet" th:href="@{/style.css}"></link>
</head>
<body>
<h2>Dota Hero List</h2>
<div th:unless="${#lists.isEmpty(heros)}">
<dl th:each="hero : ${heros}">
<dt class="heroHeadLine">
<span th:text="${hero.name}"></span>
<span th:text="${hero.type}"></span>
</dt>
<dd class="heroDescription">
<span th:if="${hero.description}" th:text="${hero.description}">
Description
</span>
<span th:if="${hero.description eq null}">
No description !
</span>
</dd>
</dl>
</div>
<div th:if="${#lists.isEmpty(heros)}">
<p>No Hero!</p>
</div>
<hr/>
<h3>Add a hero</h3>
<form method="POST">
<label for="name">Name:</label>
<input type="text" name="name" size="50"/><br/>
<label for="type">Type:</label>
<input type="text" name="type" size="50"/><br/>
<label for="bloodValue">BloodValue:</label>
<input type="text" name="bloodValue" size="50"/><br/>
<label for="attack">Attack:</label>
<input type="text" name="attack" size="50"/><br/>
<label for="description">Description:</label>
<textarea type="text" name="description" cols="80" rows="5"/></textarea><br/>
<input type="submit"></input>
</form>
</body>
</html>
再在src/main/resources/static下创建一个css文件:
body{background-color:#cccccc;
font-family:arial,helvetica,sans-serif;
}
.heroHeadLine{font-size:12pt;font-weight:bold;
}
.heroDescription{font-size:10pt;}
label{font-weight:bold;}
然后运行程序,启动成功后,访问路径http://localhost:9090/heroList/zhangfei ,会显示如下界面:

然后可通过表单添加一些信息,如下图:

提交表单,然后访问: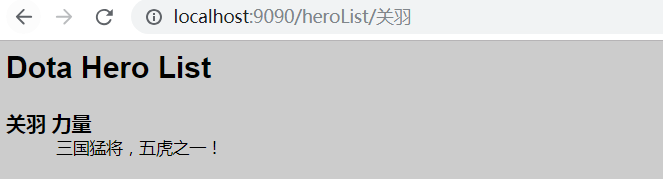
很神奇!我们这节就到这里,下节再分析!
springboot从入门到精通(二)的更多相关文章
- SpringBoot从入门到精通二(SpringBoot整合myBatis的两种方式)
前言 通过上一章的学习,我们已经对SpringBoot有简单的入门,接下来我们深入学习一下SpringBoot,我们知道任何一个网站的数据大多数都是动态的,也就是说数据是从数据库提取出来的,而非静态数 ...
- iOS开发-UI 从入门到精通(二)
iOS开发-UI 从入门到精通(二)是对 iOS开发-UI 从入门到精通(一)知识点的巩固,主要以习题练习为主,增强实战经验,为以后做开发打下坚实的基础! ※开发环境和注意事项: 1.前期iOS-UI ...
- 深入浅出!springboot从入门到精通,实战开发全套教程!
前言 之前一直有粉丝想让我出一套springboot实战开发的教程,我这边总结了很久资料和经验,在最近总算把这套教程的大纲和内容初步总结完毕了,这份教程从springboot的入门到精通全部涵盖在内, ...
- Python基本语法,python入门到精通[二]
在上一篇博客Windows搭建python开发环境,python入门到精通[一]我们已经在自己的windows电脑上搭建好了python的开发环境,这篇博客呢我就开始学习一下Python的基本语法.现 ...
- PHP从入门到精通(二)
PHP从入门到精通 之PHP中的函数 各位开发者朋友大家好,自上次更新PHP的相关知识,得到了大家的广泛支持.PHP的火爆程度不言而喻,函数作为PHP中极为重要的部分,应诸位的支持,博主继续跟进更新 ...
- MyBatis从入门到精通(二):MyBatis XML方式的基本用法之Select
最近在读刘增辉老师所著的<MyBatis从入门到精通>一书,很有收获,于是将自己学习的过程以博客形式输出,如有错误,欢迎指正,如帮助到你,不胜荣幸! 1. 明确需求 书中提到的需求是一个基 ...
- SpringBoot从入门到精通教程(二)
SpringBoot 是为了简化 Spring 应用的创建.运行.调试.部署等一系列问题而诞生的产物,自动装配的特性让我们可以更好的关注业务本身而不是外部的XML配置,我们只需遵循规范,引入相关的依赖 ...
- SpringBoot从入门到精通一(idea优雅搭建SpringBoot项目)
前言 在没有SpringBoot之前,我们搭建的是SSM(SpingMVC+Spring+Mybatis)项目,在搭建SSM项目的时候,我们要经过一系列的繁琐配置,例如:application,web ...
- SpringBoot从入门到精通教程(七)
今天,我们继续讲SpringBoot整合Redis ,也就缓存,它将与我们的Springboot整合 Redis 简介 Redis 是当前比较热门的NOSQL系统之一,它是一个开源的使用ANSI c语 ...
随机推荐
- 使用Eclipse的几个必须掌握的快捷方式
“工若善其事,必先利其器”,感谢Eclipse,她 使我们阅读一个大工程的代码更加容易,在阅读的过程中,我发现掌握几个Eclipse的快捷键会使阅读体验更加流畅,写出来与诸君分享,欢迎补充. 1. C ...
- 洛谷P4495 [HAOI2018]奇怪的背包(数论)
题面 传送门 题解 好神仙的思路啊--orzyyb 因为不限次数,所以一个体积为\(V_i\)的物品可以表示出所有重量为\(\gcd(V_i,P)\)的倍数的物品,而所有物品的总和就是这些所有的\(\ ...
- Shell脚本——初识
1.在一般情况下,人们并不区分 Bourne Shell 和 Bourne Again Shell,所以,像 #!/bin/sh,它同样也可以改为 #!/bin/bash. #! 告诉系统其后路径所指 ...
- Python3之时间模块time & datetime & calendar
一. 简介 python 提供很多方式处理日期与时间,转换日期格式是一个常见的功能. 时间元组:很多python函数用一个元组装起来的9组数字处理时间. python中时间日期格式化符号: %y 两位 ...
- P2252 取石子游戏 威佐夫博弈
$ \color{#0066ff}{ 题目描述 }$ 有两堆石子,数量任意,可以不同.游戏开始由两个人轮流取石子.游戏规定,每次有两种不同的取法,一是可以在任意的一堆中取走任意多的石子:二是可以在两堆 ...
- 消息队列 简单demo
可以使用Windows自带计划任务执行Receive操作. 控制面板=>管理工具 计划任务 =>创建计划任务 step : http://www.2cto.com/kf/201402/27 ...
- Rails应用系列(1):初识Rails
第一个Rails应用 Rails是一个"模型-视图-控制器"框架(MVC).是用Ruby写的,所以要对Ruby要有一定的了解才能对rails框架深入学习.其实Ruby与Rails就 ...
- scrapy的 安装 及 流程 转
安装 linux 和 mac 直接 pip install scrapy 就行 windows 安装步骤 a. pip3 install wheel b. 下载twist ...
- C++_类和动态内存分配2-改进后的String类
添加前面介绍过的复制构造函数和赋值运算符,使类能够正确管理类对象使用的内存. 知道对象何时被创建和释放. =================================== 修订后的默认构造函数 ...
- Magic Odd Square (思维+构造)
Find an n × n matrix with different numbers from 1 to n2, so the sum in each row, column and both ma ...