学习狂神Spring5_课堂笔记(更新中)
Spring
简介
spring,英文单词为春天,表示为软件行业带来了春天。
2002年,首次推出了Spring框架的雏形:interface21框架。官网为:www.interface21.io但是现在进去时间略长。
Spring框架是以上面这个框架为基础重新设计,并不断对其进行改进丰富其内涵,在2004年3月24日发布了1.0正式版本。
框架的创始人是Rod Johnson,此人原先是悉尼大学音乐学的博士,让人大吃一惊。
Spring的理念:从官网进入顶部导航栏projectsSpring frameworkLearn手册历史设计理念
When you learn about a framework, it’s important to know not only what it does but what principles it follows. Here are the guiding principles of the Spring Framework:

Provide choice at every level. Spring lets you defer design decisions as late as possible. For example, you can switch persistence providers through configuration without changing your code. The same is true for many other infrastructure concerns and integration with third-party APIs.

Accommodate diverse perspectives. Spring embraces flexibility and is not opinionated about how things should be done. It supports a wide range of application needs with different perspectives.

Maintain strong backward compatibility. Spring’s evolution has been carefully managed to force few breaking changes between versions. Spring supports a carefully chosen range of JDK versions and third-party libraries to facilitate maintenance of applications and libraries that depend on Spring.

Care about API design. The Spring team puts a lot of thought and time into making APIs that are intuitive and that hold up across many versions and many years.

Set high standards for code quality. The Spring Framework puts a strong emphasis on meaningful, current, and accurate javadoc. It is one of very few projects that can claim clean code structure with no circular dependencies between packages.
这是官网上说的自身的特点:

导包
搜索spring maven
到maven spring 搜索web mvc,现在也搜索不到,直接网站送上:
www.mvnrepository.com,进入网站后搜索web mvc,接着是点击第一个,点击最新的版本,里面有几行代码,复制到配置文件中就可以。
除了这个包,还需要一个jdbc,
http://www.java2s.com/Open-Source/Maven_Repository/Spring/spring-webmvc/spring_webmvc_2_5_1.htm
<dependency>

   <groupId>org.springframework</groupId>

   <artifactId>spring-webmvc</artifactId>

   <version>2.5.1</version>

</dependency>

<dependency>

   <groupId>org.springframework</groupId>

   <artifactId>spring-jdbc</artifactId>

   <version>2.5.1</version>

</dependency>
介绍
官网:https://spring.io/projects/spring-framework
https://spring.io/projects/spring-framework#overview
官方下载地址:https://repo.spring.io/ui/native/release/org/springframework/spring
进入官网之后,https://docs.spring.io/spring-framework/docs/4.3.9.RELEASE/spring-framework-reference/html/
进入路径没理清楚。进入该网站后,寻找Distribution Zip Files,找到它的网站说明,就可以。
GitHub:https://github.com/spring-projects/spring-framework
优点
- Spring是一个开源的免费的框架(容器)
- Spring是一个轻量级的、非入侵式的框架
- 控制反转(IOC),面向切面编程(AOP)(面试肯定会问)
- 支持事务的处理,对框架整合的支持,几乎市面上所有的框架都支持。
总结:Spring是一个轻量级的控制反转(IOC)和面向切面编程(AOP)的框架
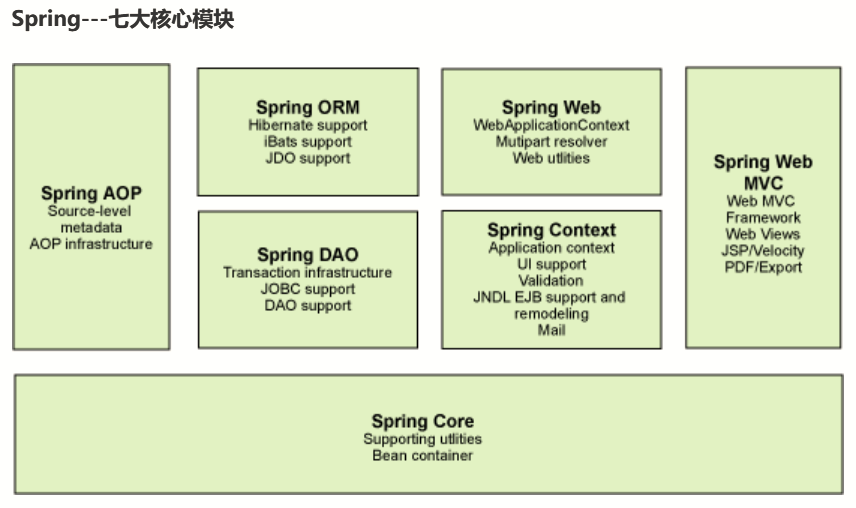
组成
拓展
官网介绍说,现代化的Java开发,说白就是基于spring的开发。
Spring Boot
- 一个快速开发的脚手架,用了之后,只需要做一些简单的配置,便可以快速开发一个网站
- 基于SpringBoot可以快速开发单个微服务
- 约定>配置
- Spring Cloud
- SpringCloud是基于SpringBoot实现的
因为现在大多数公司都在使用SpringBoot进行快速开发,学习SpringBoot的前提,需要完全掌握Spring及SpringMVC——这两者具有承上启下的作用。
缺点:发展过久,违背最初理念。配置繁琐,直到SpringBoot才解放,人称“配置地狱”。
IOC 理论指导
UserDao接口(在com.kuang.dao包中新建UserDao接口)
public interface UserDao {

    void GetUser();

}
UserDaoImpl实现类(在com.kuang.dao包中新建UserDaoImpl实现类)
public class UserDaoImpl implements UserDao{

    public void GetUser(){

        System.out.println("默认获取用户数据");

    }

}
UserService接口(在com.kuang.service包中新建UserService接口)
public interface UserService {

    void GetUser();

    void setUserDao(UserDao userdao);

}
UserServiceImpl业务实现类(在com.kuang.service包中新建UserServiceImpl接口)
public class UserServiceImpl implements UserService {

//    业务层调Dao层,Java中除了继承还有个组合的概念。用的话直接放过来就行。

//    下面这一行代码,能不能解决这个问题,使得有不同的类,也可以用不同的方法。虽然是同一个名字。

    private UserDao userDao;

//    利用Set动态进行值的注入

    public void setUserDao( UserDao userDao){

        this.userDao = userDao;

    }

//    像这样就是写死的,真正调用的是业务层调Dao层。

    public void GetUser(){

        userDao.GetUser();

    }

}
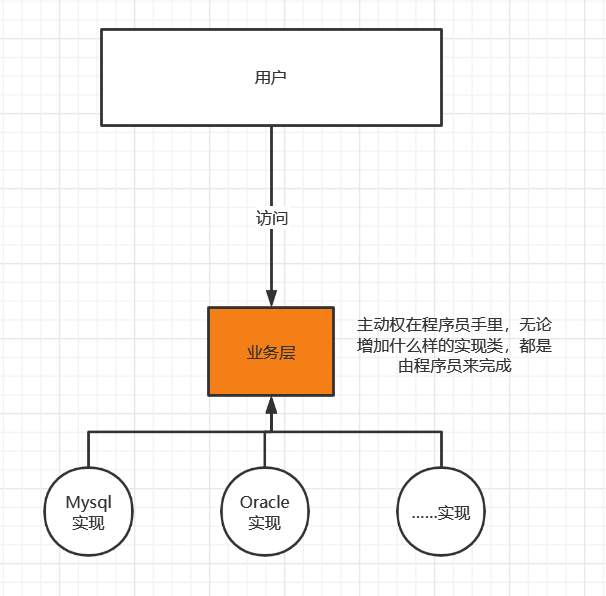
在我们之前的业务中,用户的需求可能会影响我们原来的代码,我们需要根据用户的需求不停地修改代码。如果程序代码量十分大,修改一次的成本代价十分昂贵。
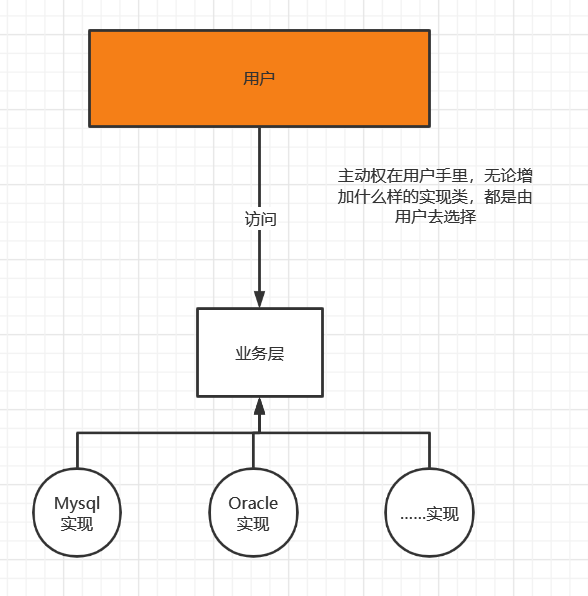
但是使用一个set接口实现,会实现控制反转的效果。原先是我们来控制是使用哪个类执行,现在用户只需要传个参数,就可以动态的控制使用哪个类执行。
代码:(同时接口也得声明,否则没法调用。)
 private UserDao userDao;

//    利用Set动态进行值的注入

    public void setUserDao( UserDao userDao){

        this.userDao = userDao;

    }
- 之前程序是主动创建对象,控制权在程序员手上,所以用户的每个需求都会让程序员改变代码,利用set注入后,程序没有主动性。而是变成被动的接收对象。
- 这种思想,从本质上解决了问题,程序员不必再管理对象的创建。系统的耦合性大大降低,可以更加专注的在业务的实现上。
- 业务层调用dao层,service调用的是dao层。
IOC本质
控制反转(Inversion of Control)是一种设计思想,依赖注入是实现IOC的一种方法,也有人认为DI(依赖注入)只是IOC的另一种说法。没有IOC的程序中(就是没有控制反转这样一个概念),我们使用面向对象编程,对象的创建与对象间的依赖关系完全硬编码在程序中,对象的创建由程序自己控制,控制反转后将对象转移给第三方,个人认为所谓控制反转就是,获得依赖对象的方式反转了。
IOC是Spring框架的核心内容,使用多种方式完美的实现了IOC,可以使用XML配置,也可以使用注解,新版本的Spring也可以零配置实现IOC。
Spring容器在初始化时先读取配置文件,根据配置文件或者元数据创建或者组织对象存入容器中,程序使用时再从IOC容器中取出需要的对象。
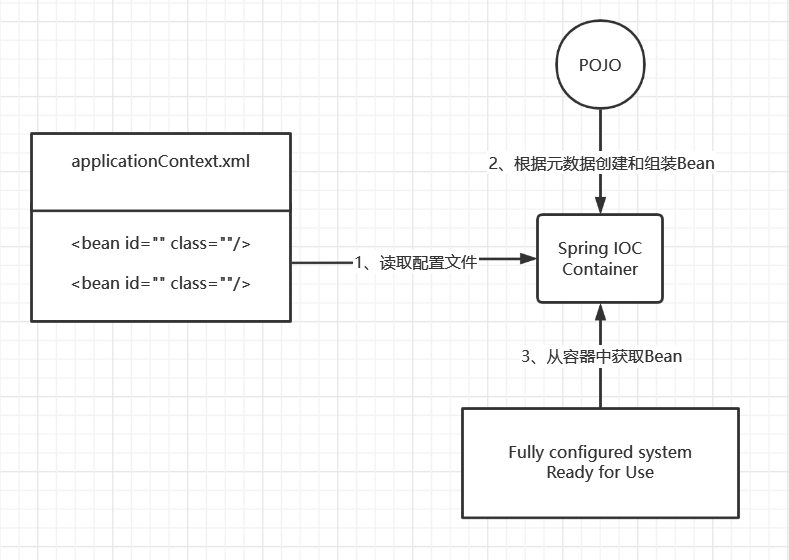
采用XML方式配置Bean时,Bean的定义信息和实现是分离的,而采用注解的方式可以把两者合为一体,Bean的定义信息直接以注解的形式定义在实现类中,从而达到了零配置的目的。
控制反转是一种通过描述(XML或者注解)并通过第三方去生产或者获取特定对象的方式。在Spring中实现控制反转的是IOC容器,其实现方式是依赖注入。(Dependency Injection,DI)
HelloSpring
xml注解来源:https://www.docs4dev.com/docs/zh/spring-framework/5.1.3.RELEASE/reference/core.html#beans
Spring-02-helloSPring流程
如何实现流程:
创建一个新的模块,spring-02-hellospring,接着创建com.kuang.dao包,新建hello类:
package com.kuang.pojo;

public class Hello {

    private String str;

    public String getStr() {

        return str;

    }

    public void setStr(String str) {

        this.str = str;

    }

    @Override

    public String toString() {

        return "Hello{" +

                "str='" + str + '\'' +

                '}';

    }

}
再新建beans.xml文件,文件中的内容由来:https://www.docs4dev.com/docs/zh/spring-framework/5.1.3.RELEASE/reference/core.html#beans
以下示例显示了基于 XML 的配置元数据的基本结构:
中间的bean标签删除,要自己写。
<?xml version="1.0" encoding="UTF-8"?>

<beans xmlns="http://www.springframework.org/schema/beans"

    xmlns:xsi="http://www.w3.org/2001/XMLSchema-instance"

    xsi:schemaLocation="http://www.springframework.org/schema/beans

        http://www.springframework.org/schema/beans/spring-beans.xsd">

<bean id="..." class="...">  (1) (2)

    <!-- collaborators and configuration for this bean go here -->

</bean>

<bean id="..." class="...">

    <!-- collaborators and configuration for this bean go here -->

</bean>

<!-- more bean definitions go here -->

</beans>
这是自己写的内容:
<!--    使用Spring来创建对象,在Spring中这些都称为Bean-->

<!--  原先:类型   变量名 = new 类型();

           Hello hello = new Hello();

     现在:bean = 对象 new Hello();

     id = 对象名;

     class = new 的对象;

	这里的str是普通属性,用value即可。

	当属性标签中,不是普通属性,而是一个类属性时,需要用到ref引用。

 -->

    <bean id="hello" class="com.kuang.pojo.Hello">

        <property name="str" value="Spring"/>

    </bean>
此时,类就映射为bean,id为hello,类中的属性也随之映射为value。
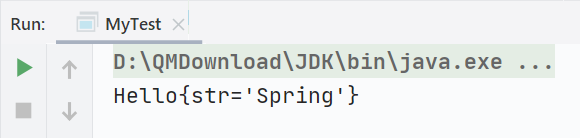
在测试包中新建MyTest.java测试:
第9行代码是官方文档指定,不能更改。
import com.kuang.pojo.Hello;

import org.springframework.context.ApplicationContext;

import org.springframework.context.support.ClassPathXmlApplicationContext;

public class MyTest {

    public static void main(String[] args) {

//        获取Spring中的上下文对象

        ApplicationContext context = new ClassPathXmlApplicationContext("beans.xml");

//我们的对象现在都在Spring中的管理了,要使用,直接取出即可。

        Hello hello = (Hello) context.getBean("hello");

        System.out.println(hello.toString());

    }

}
测试结果:
根据这篇文章所说,Spring是一个将类放到容器中,映射为对应的bean,随用随取的框架。加深理解:https://blog.csdn.net/Yang_Hui_Liang/article/details/88977548
Spring-ioc-01流程
根据以上的Spring容器框架使用,现对之前的项目进行改动。
新建beans.xml,文件中内容来源:https://www.docs4dev.com/docs/zh/spring-framework/5.1.3.RELEASE/reference/core.html#beans
把bean标签删除,填为自己的内容:
<bean id="mysqlImpl" class="com.kuang.dao.UserDaoMySQLImpl">

</bean>

<bean id="oracleImpl" class="com.kuang.dao.UserDaoOracleImpl">

</bean>

<bean id="userImpl" class="com.kuang.dao.UserDaoImpl">

</bean>

<!--当属性标签中,不是普通属性,而是一个类属性时,需要用到ref引用。-->

<bean id="UserServiceImpl" class="com.kuang.service.UserServiceImpl">

    <property name="userDao" ref="oracleImpl"/>

</bean>
在测试类中进行测试,其中,第9行代码是官网指定,不能更改。
import com.kuang.service.UserServiceImpl;

import org.springframework.context.ApplicationContext;

import org.springframework.context.support.ClassPathXmlApplicationContext;

public class MTest {

    public static void main(String[] args) {

//        获取ApplicationContext,拿到Spring的容器

        ApplicationContext context = new ClassPathXmlApplicationContext("beans.xml");

//        方法中获取的是id

//        有了容器之后,为所欲为。

        UserServiceImpl userServiceImpl = (UserServiceImpl) context.getBean("UserServiceImpl");

        userServiceImpl.GetUser();

    }

}
测试结果:
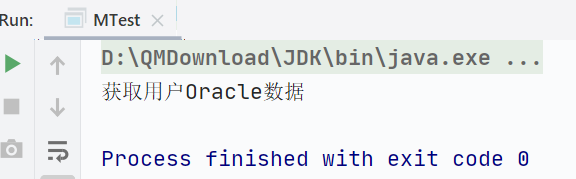
在beans.xml文件中更改不同的引用:测试结果也会有不同
<bean id="UserServiceImpl" class="com.kuang.service.UserServiceImpl">

    <property name="userDao" ref="userImpl"/>
结果:

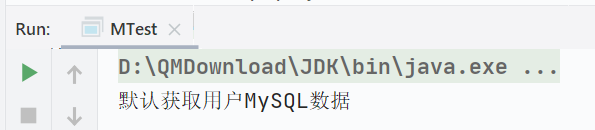
更改:
<bean id="UserServiceImpl" class="com.kuang.service.UserServiceImpl">

    <property name="userDao" ref="mysqlImpl"/>
结果:
思考问题
hello对象是由谁创建的?
hello对象是由Spring创建的
Hello对象是怎么设置的?
hello 对象是由Spring容器设置的
这个过程就叫控制反转。我的理解是,本来用户提出需求,程序员更改代码完成需求。现在程序员先把代码写好,由用户自己决定需求,直接在配置文件中进行修改即可。程序员不必每次在更换需求时更改大量代码。
如果上述不理解,举个例子去饭馆吃饭,原先没有控制反转时,食客(用户)想吃什么菜(需求),厨师(程序员)就做什么菜(改动对应的代码)。有了控制反转后,现在饭馆变成了自助餐厅,食客想吃什么,自取即可,厨师只需要提供食客想吃的菜品即可。把选择权交给了食客,厨师就不必根据不同的食客点菜来单独的炒菜。
如果还是不理解控制反转,建议先多读几遍,争取记住它的内容,接着实战编程,相信会理解的。
以下是狂神的笔记,有一定的抽象性,结合例子来看更易理解。
控制:谁来控制对象的创建,传统应用程序的对象是由程序本身控制创建的,使用Spring后,对象是由Spring来创建的。
反转:程序本身不创建对象,而变成被动的接收对象。
依赖注入:就是利用set方法来进行注入。
IOC是一种编程思想,由主动地编程变成被动地接收。
可以通过newClassPathXmlApplicaitonContext去浏览一下底层源码。
至此,我们已不必再去程序中进行改动,需要实现不同的操作,只需要在xml配置文件中进行修改。总结IOC就是对象由Spring来创建、管理和装配。
IOC创建文件方式
准备:创建对象,写入beans.xml,创建测试类
创建User对象
package com.kuang.pojo;
public class User {
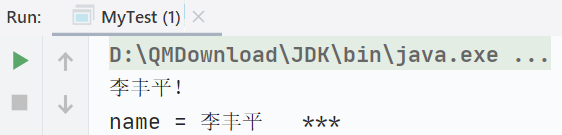
public User() {
System.out.println("李丰平!");
}
public User(String name) {
this.name = name;
}
private String name;
public String getName() {
return name;
}
public void setName(String name) {
this.name = name;
}
public void show(){
System.out.println("name = " + name+" ***");
}
}
写入beans.xml
<?xml version="1.0" encoding="UTF-8"?>

<beans xmlns="http://www.springframework.org/schema/beans"

       xmlns:xsi="http://www.w3.org/2001/XMLSchema-instance"

       xsi:schemaLocation="http://www.springframework.org/schema/beans http://www.springframework.org/schema/beans/spring-beans.xsd">

    <bean id="user" class="com.kuang.pojo.User">

        <property name="name" value="李丰平"/>

    </bean>

</beans>
编写测试类
import com.kuang.pojo.User;

import org.springframework.context.ApplicationContext;

import org.springframework.context.support.ClassPathXmlApplicationContext;

public class MyTest {

    public static void main(String[] args) {

        ApplicationContext context = new ClassPathXmlApplicationContext("beans.xml");

//        在getBean时,对象已经被创建。

        User user = (User) context.getBean("user");

        user.show();

    }

}
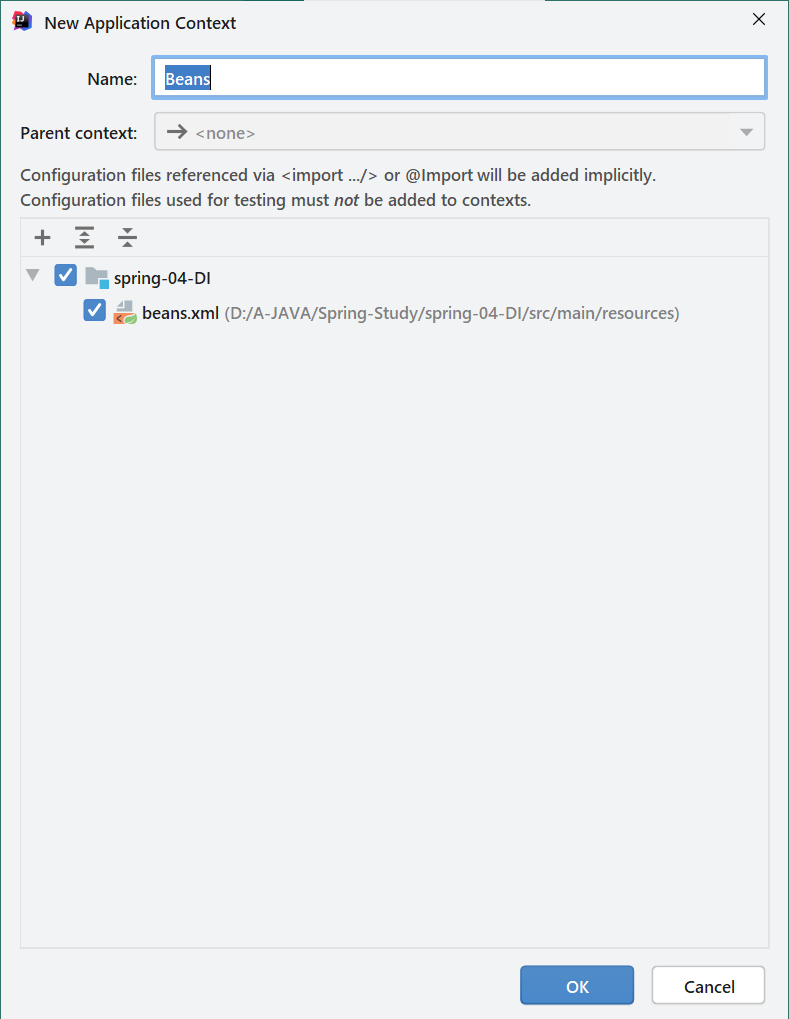
新建beans.xml后顶部有一行提示,”Application context not configured for this file“,点击提示最右方”Configure application context "即可。以下三步


1、使用无参构造创建对象,默认!
2、使用有参构造创建对象,
通过下标赋值
<!--    使用下标来构造有参对象-->

    <bean id="user" class="com.kuang.pojo.User">

        <constructor-arg index="0" value="李丰平"/>

    </bean>
测试结果如下
通过参数的类型匹配
基本类型如int可以直接用,引用类型如string,必须用以下方式
<!--    通过参数类型类匹配有参对象-->

    <bean id="user" class="com.kuang.pojo.User">

        <constructor-arg type="java.lang.String" value="李丰平"/>

    </bean>
但如果两种或者以上参数都是String,容易混乱,也不建议使用。
测试结果如下

直接通过参数名来设置
<!--    通过参数名来配置-->

    <bean id="user" class="com.kuang.pojo.User">

        <constructor-arg name="name" value="李丰平"/>

    </bean>
测试结果如下

测试一个好玩的:
一个无参的其他类——创建一个兄弟对象。在beans.xml文件中注册。再到测试文件中测试,结果是无论是否用该对象,该对象都会自动创建。且同一次只能有一个实例对象被创建。
流程
新建UserTwo
package com.kuang.pojo;

public class UserTwo {

    private String name;

    public UserTwo() {

        System.out.println("UserTwo 被创建了。");

    }

    public UserTwo(String name) {

        this.name = name;

    }

    public String getName() {

        return name;

    }

    public void setName(String name) {

        this.name = name;

    }

}
写入bean.xml
<bean id="usertwo" class="com.kuang.pojo.UserTwo">

</bean>
在测试案例中测试
import com.kuang.pojo.User;

import com.kuang.pojo.UserTwo;

import org.springframework.context.ApplicationContext;

import org.springframework.context.support.ClassPathXmlApplicationContext;

public class MyTest {

    public static void main(String[] args) {

        ApplicationContext context = new ClassPathXmlApplicationContext("beans.xml");

//        在getBean时,对象已经被创建。

        User user = (User) context.getBean("user");

        User user2 = (User) context.getBean("user");

        user.show();

        System.out.println(user == user2);

    }

}
测试结果
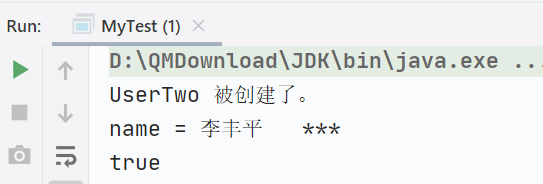
总结:在配置文件加载时,容器中所管理对象已经初始化。
Spring配置
Alias别名
无论是之前的,还是起的别名,在getBean时都可以使用。
将下面的代码放入Beans.xml中
<!--    如果添加了别名,我们也可以使用别名获取到该对象-->

    <alias name="user" alias="USER"/>
测试文件中下面两种获取对象方式等同
import com.kuang.pojo.User;
import com.kuang.pojo.UserTwo;
import org.springframework.context.ApplicationContext;
import org.springframework.context.support.ClassPathXmlApplicationContext;
public class MyTest {
public static void main(String[] args) {
ApplicationContext context = new ClassPathXmlApplicationContext("beans.xml");
// 在getBean时,对象已经被创建。
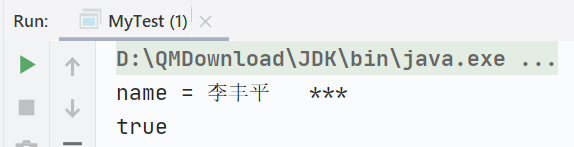
User user = (User) context.getBean("user");
User user2 = (User) context.getBean("USER");
user.show();
System.out.println(user == user2);
}
}
执行结果
Bean配置
<!--id : bean 的唯一标识符,也就是相当于我们学过的对象名

    class : bean对象所对应的全限定名(包名+类名);必须这么写

    name : 也是别名,而且name可以同时取多个别名,可以通过空格分割,也可以通过“,”或者“;”分割

-->

    <bean id="usertwo" class="com.kuang.pojo.UserTwo" name="usert ut,u2;utwo">

    <constructor-arg name="name" value="李丰平的别名"/>

    </bean>
import导入
一般用于团队开发,该配置标签可以将多个配置文件导入合并为一个。
假设项目中有多个人开发,ABC,三人分别负责不同的类开发,不同的类需要注册在不同的bean中,此时就可以利用import标签,将所有人的bean.xml文件合并成一个bean.xml文件,使用时使用一个总的ApplicationContext.xml文件(名字随意)即可。便于管理,合作开发使用。
<?xml version="1.0" encoding="UTF-8"?>

<beans xmlns="http://www.springframework.org/schema/beans"

       xmlns:xsi="http://www.w3.org/2001/XMLSchema-instance"

       xsi:schemaLocation="http://www.springframework.org/schema/beans http://www.springframework.org/schema/beans/spring-beans.xsd">

<!--导入之后,相当于三者文件合并,可以直接通过本文件获取所有配置文件中的内容。-->

    <import resource="beans.xml"/>

    <import resource="beans2.xml"/>

    <import resource="beans3.xml"/>

</beans>
依赖注入
构造器注入
Set方式注入【重点】
- 依赖注入:Set注入
- 依赖(依赖什么)bean对象的创建依赖于容器
- 注入(注入什么)bean对象中的所有属性由容器来注入
【环境搭建】
复杂类型
Address
package com.kuang.pojo;

public class Address {

    private String address;

    public Address(String address) {

        this.address = address;

    }

    public String getAddress() {

        return address;

    }

    public void setAddress(String address) {

        this.address = address;

    }

}
真实测试对象Student
package com.kuang.pojo;

public class Student {

//    尽量涵盖所有类型

    private String name;

    private Address address;

    private String[] books;

    private List<String> hobbys;

    private Map<String , String > card;

    private Set<String> games;

    private String wife;

    private Properties info;

    public String getName() {

        return name;

    }

    public void setName(String name) {

        this.name = name;

    }

    public Address getAddress() {

        return address;

    }

    public void setAddress(Address address) {

        this.address = address;

    }

    public String[] getBooks() {

        return books;

    }

    public void setBooks(String[] books) {

        this.books = books;

    }

    public List<String> getHobbys() {

        return hobbys;

    }

    public void setHobbys(List<String> hobbys) {

        this.hobbys = hobbys;

    }

    public Map<String, String> getCard() {

        return card;

    }

    public void setCard(Map<String, String> card) {

        this.card = card;

    }

    public Set<String> getGames() {

        return games;

    }

    public void setGames(Set<String> games) {

        this.games = games;

    }

    public String getWife() {

        return wife;

    }

    public void setWife(String wife) {

        this.wife = wife;

    }

    public Properties getInfo() {

        return info;

    }

    public void setInfo(Properties info) {

        this.info = info;

    }

    @Override

    public String toString() {

        return "Student{" +

                "name='" + name + '\'' +

                ", address=" + address +

                ", books=" + Arrays.toString(books) +

                ", hobbys=" + hobbys +

                ", card=" + card +

                ", games=" + games +

                ", wife='" + wife + '\'' +

                ", info=" + info +

                '}';

    }

}
beans.xml
<?xml version="1.0" encoding="UTF-8"?>

<beans xmlns="http://www.springframework.org/schema/beans"

       xmlns:xsi="http://www.w3.org/2001/XMLSchema-instance"

       xsi:schemaLocation="http://www.springframework.org/schema/beans http://www.springframework.org/schema/beans/spring-beans.xsd">

    <bean id="address" class="com.kuang.pojo.Address">

        <constructor-arg name="address" value=""/>

    </bean>

<!--第一种,普通值注入,value-->

    <bean id="student" class="com.kuang.pojo.Student">

        <property name="address" ref="address"/>

        <!--第一种,普通值注入,value-->

<!--        <property name="name" value="李丰平"/>-->

        <!--        也可以用下面的-->

        <property name="name" >

            <value>李丰平</value>

        </property>

    </bean>

</beans>
测试类
import com.kuang.pojo.Student;

import org.springframework.context.support.ClassPathXmlApplicationContext;

public class MyTest {

    public static void main(String[] args) {

        ClassPathXmlApplicationContext context = new ClassPathXmlApplicationContext("beans.xml");

        Student student = (Student) context.getBean("student");

        System.out.println(student.getName());

    }

}
运行效果

拓展方式注入
学习狂神Spring5_课堂笔记(更新中)的更多相关文章
- Python3学习笔记-更新中
1.Python概况 2.Anaconda安装及使用 3.Pycharm安装及使用 4.Hello World!!! 5.数据类型及类型转换 6.分支结构 7.循环语句 8.异常
- Python学习 - 入门篇2(更新中)
前言 学习渠道:慕课网:Python进阶 记录原因:我只是想边上课边做笔记而已,呵呵哒 食用提示:教程环境基于Python 2.x,有些内容在Python 3.x中已经改变 函数式编程 定义:一种抽象 ...
- Go语言学习之路(持续更新中)
菜鸟 Go语言教程 教程(RUNOOB.COM):http://www.runoob.com/go/go-tutorial.html Go全球官网:https://golang.org/ (2018- ...
- 北理工机器人队RM视觉组学习参考汇总(持续更新中)
欢迎大家有意加入北理工机器人队参与到视觉组的工作中.在大家能够正式作为队员参与到视觉组的准备工作之前,北理机器人队需要对各位进行培训.这篇文章主要面向有志于参加机器人队视觉组的同学.同时,欢迎所有对相 ...
- Java编程思想—读书笔记(更新中)
第1章 对象导论 1.4 被隐藏的具体实现 访问控制的原因: 让客户端程序员无法触及他们不应该触及的部分(不是用户解决特定问题所需的接口的一部分) 允许库设计者可以改变类内容的工作方式而不用担心会影响 ...
- [Unity3D]引擎学习之注意事项(持续更新中)
调试相关 如果是想在触发粒子系统效果的时候播放声音(比如爆炸的特殊发生时也播放声音),则需要将爆炸效果的粒子系统保持为Prefab后,添加Audio Source组件,在组件中添加声音文件并且确保pl ...
- SQL手工注入入门级笔记(更新中)
一.字符型注入 针对如下php代码进行注入: $sql="select user_name from users where name='$_GET['name']'"; 正常访问 ...
- 一个C语言萌新的学习之旅(持续更新中...)
三:计算和类型 一:隐式转换和显示转换 隐式转换:隐式转换指的是自动类型转换,自动向精确,大范围类型转换. 显示转换:例如:(int)3.5*6.0f=18.0f (int)(3.5*6.0f)=21 ...
- Linux 系统化学习系列文章总目录(持续更新中)
本页内容都是本人系统化学习Linux 时整理出来的.这些文章中,绝大多数命令类内容都是翻译.整理man或info文档总结出来的,所以相对都比较完整. 本人的写作方式.风格也可能会让朋友一看就恶心到直接 ...
- FPGA_VHDL 学习课堂笔记001
FPGA_VHDL 学习课堂笔记 记录说明:本文档主要记录大学期间,老师FPGA授课课堂笔记. 代码语言:VHDL 编程软件:MAX+plus II FPGA硬件:FLE-843 03月05日 ...
随机推荐
- Appweb交叉编译
Appweb交叉编译 编译环境:ubuntu-12.04 x64 开发平台:Hi3535 arm版 编译版本:appweb-6.1.1.zip 下载地址=> Appweb web site: h ...
- 文心一言 VS chatgpt (2)-- 算法导论1.2
一.给出在应用层需要算法内容的应用的一个例子,并讨论涉及的算法的功能. 文心一言: 在应用层需要算法内容的应用的一个例子是无人机自主飞行控制.无人机自主飞行控制需要算法来确定无人机的位置.速度和方向, ...
- 2021-03-31:给定一个数组arr,给定一个值v。求子数组平均值小于等于v的最长子数组长度。
2021-03-31:给定一个数组arr,给定一个值v.求子数组平均值小于等于v的最长子数组长度. 福大大 答案2021-03-31: 这道题是昨天每日一题的变种.数组每个元素减v,然后求<=0 ...
- 2022-01-30:最小好进制。 对于给定的整数 n, 如果n的k(k>=2)进制数的所有数位全为1,则称 k(k>=2)是 n 的一个好进制。 以字符串的形式给出 n, 以字符串的形式返回 n 的
2022-01-30:最小好进制. 对于给定的整数 n, 如果n的k(k>=2)进制数的所有数位全为1,则称 k(k>=2)是 n 的一个好进制. 以字符串的形式给出 n, 以字符串的形式 ...
- var,let,const的区别
JS中变量的定义方式有四种 不写var,let,const--直接定义变量 a = 10; 使用var关键字定义 var a = 10; 使用let关键字定义 let a = 10; 使用const关 ...
- 【Linux】详解Centos7的下载安装配置
本文时间 2023-05-17 作者:sugerqube漆瓷 为什么是Centos7 centos8已经停止维护,centos7将在2024-06-30停止维护(所以暂时选7) 未来替代品参考: Al ...
- ✗ CocoaPods not installed.
mac 配置 flutter 会提示许多 关于xcode的 如图 显示 ✗ CocoaPods installed but not initialized. 其实最开始提示的是 ✗ CocoaPods ...
- 《最新出炉》系列初窥篇-Python+Playwright自动化测试-1-环境准备与搭建
1.简介 有很多人私信留言宏哥问能不能介绍一下Playwright这款自动化神器的相关知识,现在网上的资料太少了.其实在各大博客和公众号也看到过其相关的介绍和讲解.要不就是不全面.不系统,要不就是系统 ...
- IntelliJ IDEA 的初次使用--/护头
IntelliJ IDEA 的使用 使用前先完成以下两点 环境配置 Win10环境配置(二) --Java篇 软件安装 IntelliJ IDEA 的安装 在完成软件安装,打开软件的瞬间,我是懵逼的. ...
- 理解ASP.NET Core - 全球化&本地化&多语言(Globalization and Localization)
注:本文隶属于<理解ASP.NET Core>系列文章,请查看置顶博客或点击此处查看全文目录 概述 在众多知名品牌的网站中,比如微软官网.YouTube等,我们经常可以见到"切换 ...