WPF 入门笔记 - 07 - MVVM示例
滴咚,大家好久不见。好就没写东西了,鸽着鸽着就无了。。。
回到正题,上篇文章说完命令提了一嘴MVVM模式直接就上MVVMLight这些程序的框架了,虽然也没说多少,但还是有点不好过渡,这篇对MVVM做一些系统学习,同时复习一下前几篇博文中的内容,完成一个采用MVVM模式的示例Demo。
小插曲
给N早之前文章中的可能混淆的内容做下说明 - 关于WPF 入门笔记 - 04 - 数据绑定 - OneWayToSource 文本框爆红现象:
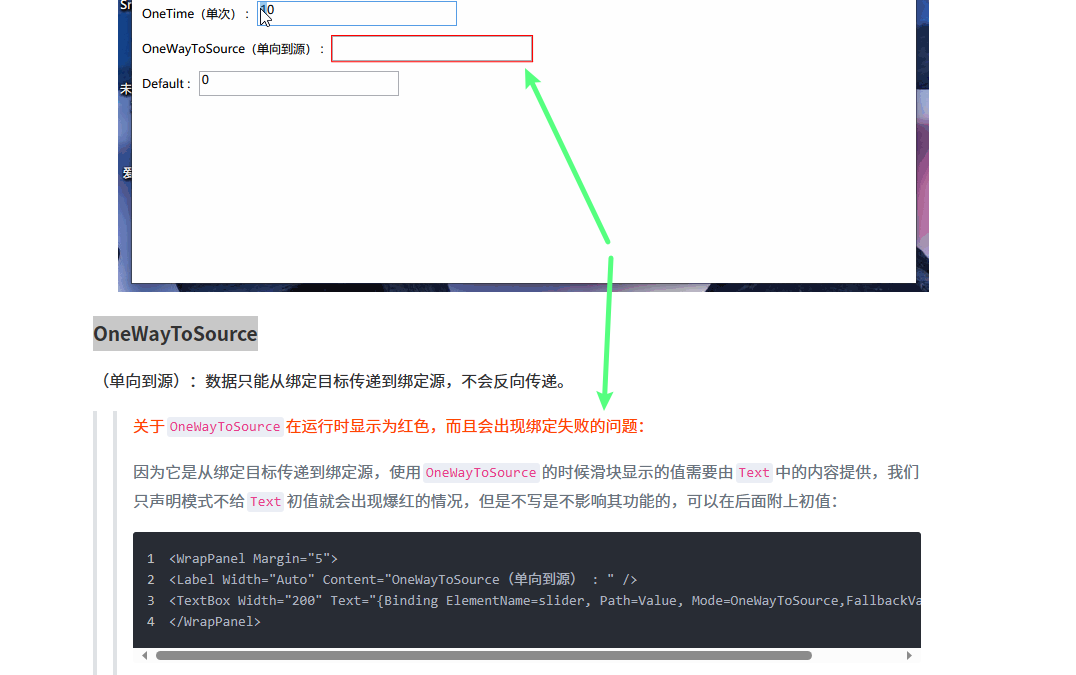
- 在那篇文章一开始给初值是没问题的,因为
OneWayToSource是将数据从绑定目标传递到绑定源,所以不给初值一定会出现绑定失败的问题 - 文本框爆红我觉得和绑定模式没有关系,我猜测和文本框绑定的数据类型有关,假设文本框绑定的是支持为空的
string类型的字符串,它是空的话是不会爆红的,因为空会转化成"",但如果绑定的数据类型是不能为空的int类型,就会在文本框没有内容时出现爆红现象,同时会出现绑定失败
应该是这样,不对的话记得在评论区实现INotifyPropertyChanged接口教教我噢
什么是MVVM
MVVM 是 Model-View-ViewModel 的缩写,是一种用于构建用户界面的设计模式,由微软 WPF 和 Silverlight 的架构师 Ken Cooper 和 Ted Peters 开发,是一种简化用户界面的事件驱动编程方式。它在 WPF 和其他 XAML-based 技术中广泛应用,比如UWP、采用XAML的MAUI APP,在前端开发也比较常见。MVVM 的目标是实现用户界面和业务逻辑之间的彻底分离,以便更好地管理和维护应用程序,并提供更好的可测试性和可扩展性。
MVVM 模式包含以下三个核心组件:
Model(模型):Model代表应用程序的数据和业务逻辑。它负责存储和管理数据,并且通常不包含任何与用户界面相关的代码。Model可以是数据实体、数据库访问类、服务类等。View(视图):View是用户界面的可视化表示,通常由XAML文件定义。它负责展示数据给用户,并捕获用户输入。View并不处理业务逻辑,而是通过绑定和命令将用户操作传递给ViewModel。ViewModel(视图模型):ViewModel是View和Model之间的桥梁,负责处理View与Model之间的交互。它将Model中的数据转换为View所需的数据,并处理用户输入、命令和其他交互逻辑。ViewModel通常实现了INotifyPropertyChanged接口,用于通知View当数据发生变化时进行更新。
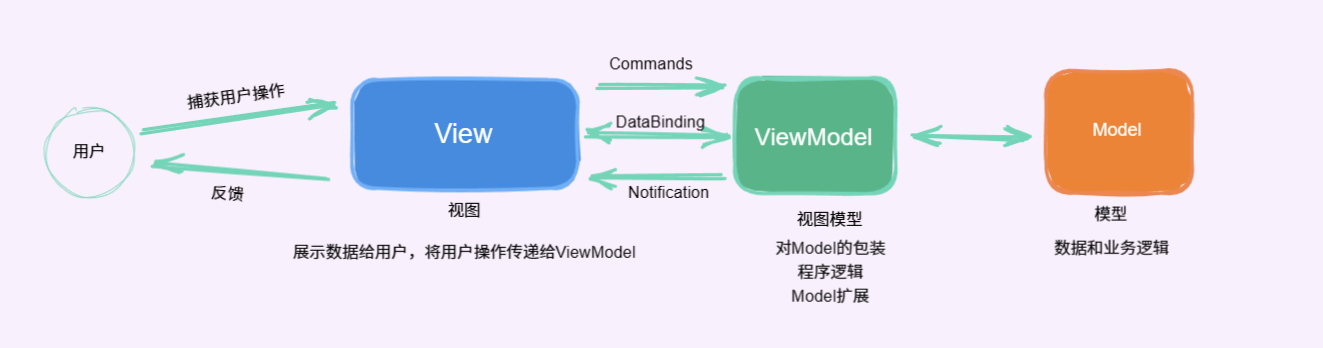
MVVM 的基本原则是让 View 和 Model 完全解耦,它们之间通过 ViewModel 进行通信。View 通过数据绑定将 ViewModel 中的数据展示给用户,通过命令绑定将用户的操作传递给 ViewModel。ViewModel 则通过数据绑定和命令绑定将用户输入转换为对 Model 的操作,从而实现业务逻辑的处理。
回到 WPF 里,View就是用xaml描绘的页面,负责与用户交互,响应用户操作,展示数据给用户;ViewModel负责收集需要绑定的数据和命令,通过 View 的 DataContext 属性绑定到 View,同时处理UI逻辑;Model 就作为系统中的对象,包含数据对象。
一个 View 对应一个 ViewModel ,一个 ViewModel 可以聚合多个 Model,ViewModel 可以对应多个 View,在 MVVM 下,所有事件和动作都转换成命令,如按钮的点击操作,不在是触发点击事件,而是绑定到命令,由命令去执行对应的逻辑。
MVVM 模式的优势包括:
- 分离关注点:
MVVM将用户界面逻辑和业务逻辑彻底分开,使代码结构更清晰,易于理解和维护。 - 可测试性:由于
View和ViewModel之间的解耦,可以更轻松地对ViewModel进行单元测试,而无需涉及到用户界面的操作。 - 可扩展性:
MVVM支持模块化开发,不同的View和ViewModel可以独立开发和组合,使应用程序更易于扩展。 - 可重用性:
ViewModel可以与不同的View进行重用,从而减少了重复编写代码的工作。
简单MVVM
学习一下 MSDN - .NET MAUI 数据绑定和 MVVM 中的 简单MVVM 章节,是一个.NET MAUI的 ContentPage,用来显示时间,Maui 和 WPF 在命名空间上是有点不一样的:
Part 1
<Window x:Class="OneShotDateTimeDemo.MainWindow"

        xmlns="http://schemas.microsoft.com/winfx/2006/xaml/presentation"

        xmlns:x="http://schemas.microsoft.com/winfx/2006/xaml"

        xmlns:d="http://schemas.microsoft.com/expression/blend/2008"

        xmlns:local="clr-namespace:OneShotDateTimeDemo"

        xmlns:mc="http://schemas.openxmlformats.org/markup-compatibility/2006"

        xmlns:sys="clr-namespace:System;assembly=mscorlib"

        Title="One-Shot DateTime Page"

        Width="800"

        Height="450"

        WindowStartupLocation="CenterScreen"

        mc:Ignorable="d">

    <Grid>

        <StackPanel HorizontalAlignment="Center" VerticalAlignment="Center"

                    DataContext="{x:Static sys:DateTime.Now}">

            <TextBlock Text="{Binding Year, StringFormat='The year is {0}'}" />

            <TextBlock Text="{Binding StringFormat='The month is {0:MMMM}'}" />

            <TextBlock Text="{Binding Day, StringFormat='The day is {0}'}" />

            <TextBlock Text="{Binding StringFormat='The time is {0:T}'}" />

        </StackPanel>

    </Grid>

</Window>
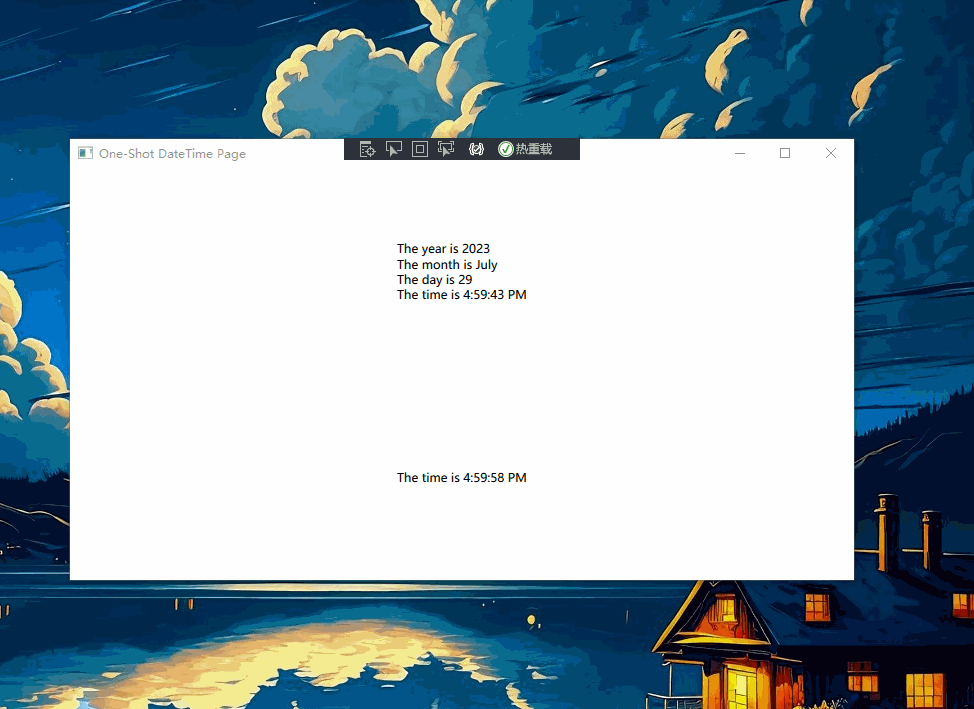
这段 Xaml 在 StackPanel 的 DataContext 中设置了一个绑定到当前日期和时间的 DateTime 对象,然后通过数据绑定将 DateTime 对象的各个属性显示在不同的子元素 TextBlock 中,同时对显示内容进行了格式化。
运行程序,文本中的日期和时间只会在构造和初始化的时候设置一次,不会随时间的变化而变化。
示例中是
Label,我这里换成了TextBlock,因为Label在Binding中使用StringFormat不生效【哦,我用的方法不对,Label不能用StringFormat】:

Part 2
上面的页面写出来显然是没有意义的,我们想让它实时显示当前时间,这就需要有个东西在时间发生变化时一直更新页面上的时间,这个过程一般会通过后台代码完成,当然可以通过一个 Timer 搞定,但就和这篇文章的内容没关系了,用 MVVM 的模式怎么实现呢?
首先从 MVVM 三部分来看,View 就是标题为 One-Shot DateTime Page 的窗体,Model 是 DateTime 对象,需要 ViewModel 来处理时间数据同时通知页面响应更改。
创建一个ClockViewModel.cs类:
using System;

using System.ComponentModel;

using System.Runtime.CompilerServices;

using System.Threading;

namespace OneShotDateTimeDemo

{

    public class ClockViewModel : INotifyPropertyChanged

    {

        public event PropertyChangedEventHandler PropertyChanged;

        private DateTime _dateTime;

        private Timer _timer;

        public DateTime DateTime

        {

            get => _dateTime;

            set

            {

                if (_dateTime != value)

                {

                    _dateTime = value;

                    OnPropertyChanged();

                }

            }

        }

        public ClockViewModel()

        {

            DateTime = DateTime.Now;

            _timer = new Timer(new TimerCallback((s) => DateTime = DateTime.Now),

                               null, TimeSpan.Zero, TimeSpan.FromSeconds(1));

        }

        ~ClockViewModel() =>

            _timer.Dispose();

        public void OnPropertyChanged([CallerMemberName] string name = "")

        {

            PropertyChanged?.Invoke(this, new PropertyChangedEventArgs(name));

        }

    }

}
ClockViewModel 类实现了 INotifyPropertyChanged 接口,并通过 Timer 定时更新时间并触发属性更改通知,提供实时的系统时间。完成 ViewModel 部分以后,将 ViewModel 绑定到视图 View - MainWindow 上:
<Window x:Class="OneShotDateTimeDemo.MainWindow"

        xmlns="http://schemas.microsoft.com/winfx/2006/xaml/presentation"

        xmlns:x="http://schemas.microsoft.com/winfx/2006/xaml"

        xmlns:d="http://schemas.microsoft.com/expression/blend/2008"

        xmlns:local="clr-namespace:OneShotDateTimeDemo"

        xmlns:mc="http://schemas.openxmlformats.org/markup-compatibility/2006"

        xmlns:sys="clr-namespace:System;assembly=mscorlib"

        Title="One-Shot DateTime Page"

        Width="800"

        Height="450"

        WindowStartupLocation="CenterScreen"

        mc:Ignorable="d">

    <Window.DataContext>

        <local:ClockViewModel />

    </Window.DataContext>

    <Grid>

        <Grid.RowDefinitions>

            <RowDefinition />

            <RowDefinition />

        </Grid.RowDefinitions>

        <StackPanel HorizontalAlignment="Center" VerticalAlignment="Center"

                    DataContext="{x:Static sys:DateTime.Now}">

            <TextBlock Text="{Binding Year, StringFormat='The year is {0}'}" />

            <TextBlock Text="{Binding StringFormat='The month is {0:MMMM}'}" />

            <TextBlock Text="{Binding Day, StringFormat='The day is {0}'}" />

            <TextBlock Text="{Binding StringFormat='The time is {0:T}'}" />

        </StackPanel>

        <StackPanel Grid.Row="1" HorizontalAlignment="Center" VerticalAlignment="Center">

            <TextBlock Text="{Binding DateTime, StringFormat='The time is {0:T}'}" />

        </StackPanel>

    </Grid>

</Window>
这样就可以得到一个 MVVM 模式下的时钟了:
以上就是一个简单的MVVM的示例,功能比较简单,只涉及到了属性变动,无关乎用户操作。【时间更新肉眼可见的有问题】
完整MVVM
接下来完成一个完整的MVVM示例,内容参考自博主丑萌气质狗在B站发布的WPF入门视频,大家可以取搜一下找来看看。内容比较基础,但同时讲解也非常细腻,碎碎念教学,哈哈哈。有些基础但不多的小伙伴可以去看一下
登录页面UI
回到正题,示例是一个简单的登录页面的MVVM实现,用界面部分来回顾下之前学习的内容:
MainView.xaml -为了方便区分每部分扮演的角色,给MainWindow.xaml改了个名:
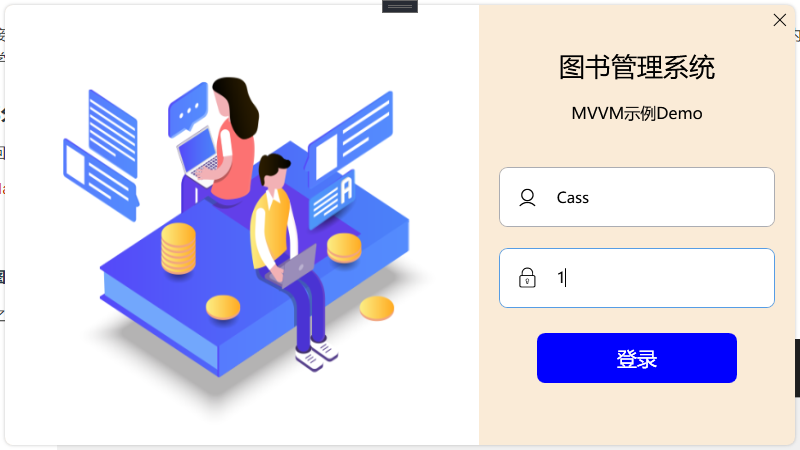
登录页面是这样设计的,窗体取消了默认的标题栏,调整为带阴影的圆角窗体,左侧放一张登录背景图,右边自绘了一个关闭按钮,文本框和按钮也做了美化。快速来看一下如何实现的。
窗体设置
窗口样式调整为None,不允许调整窗口大小,用Border包裹整个窗体实现圆角以及阴影效果,整体分两部分 - 左侧图片、右侧背景图:
<Window x:Class="MVVMDemo.MainView"

        xmlns="http://schemas.microsoft.com/winfx/2006/xaml/presentation"

        xmlns:x="http://schemas.microsoft.com/winfx/2006/xaml"

        xmlns:d="http://schemas.microsoft.com/expression/blend/2008"

        xmlns:local="clr-namespace:MVVMDemo"

        xmlns:mc="http://schemas.openxmlformats.org/markup-compatibility/2006"

        Title="MainView"

        Width="800"

        Height="450"

        AllowsTransparency="True"

        Background="{x:Null}"

        ResizeMode="NoResize"

        WindowStartupLocation="CenterScreen"

        WindowStyle="None"

        mc:Ignorable="d">

    <Border Margin="5" Background="AntiqueWhite" CornerRadius="8">

        <Border.Effect>

            <DropShadowEffect BlurRadius="5"

                              Direction="0"

                              Opacity="0.3"

                              ShadowDepth="0"

                              Color="Gray" />

        </Border.Effect>

        <Grid>

            <Grid.ColumnDefinitions>

                <ColumnDefinition Width="6*" />

                <ColumnDefinition Width="4*" />

            </Grid.ColumnDefinitions>

            <Border CornerRadius="8,0,0,8">

                <Border.Background>

                    <ImageBrush ImageSource="./Assets/Images/LoginBackground.png" Stretch="Fill" />

                </Border.Background>

            </Border>

            <Border Grid.Column="1" CornerRadius="0,8,0,8">

               ...	// 内容部分

            </Border>

        </Grid>

    </Border>

</Window>
字体图标
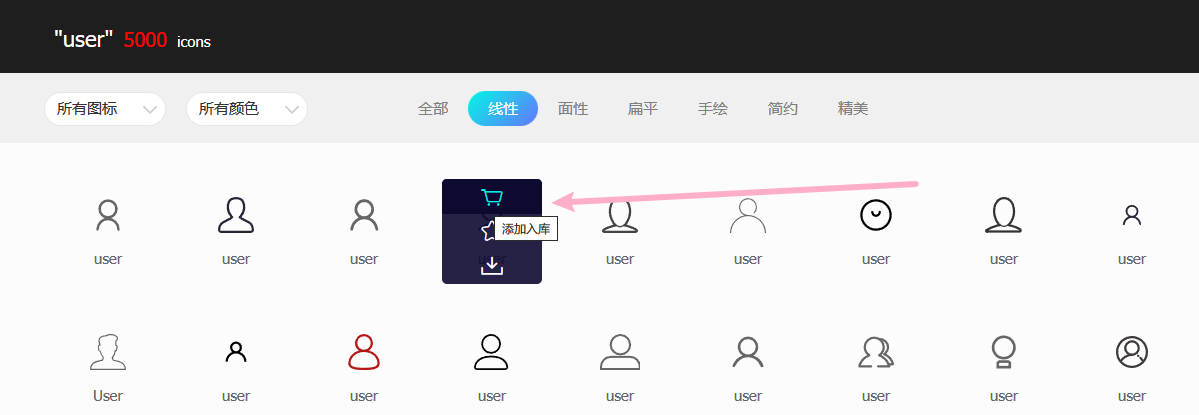
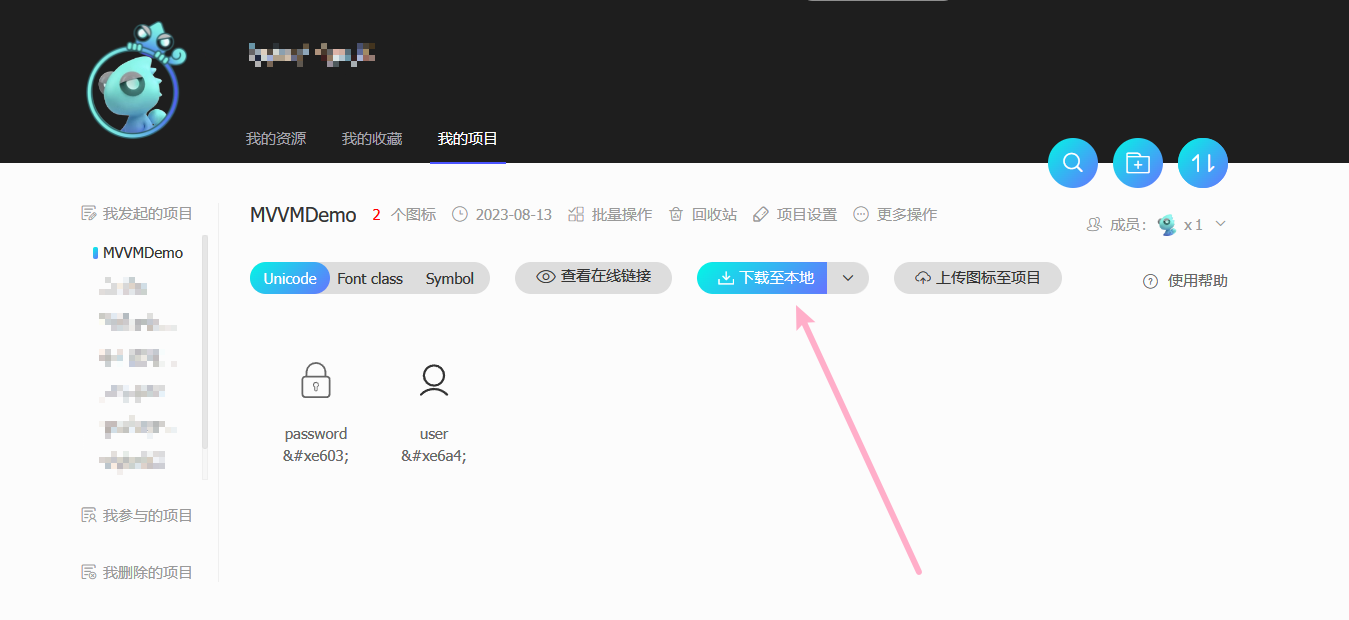
之前笔记中有说,这里复习以下。去阿里巴巴矢量图标库选好要用的图标,添加入库,然后从库里添加至项目:
下载到本地:
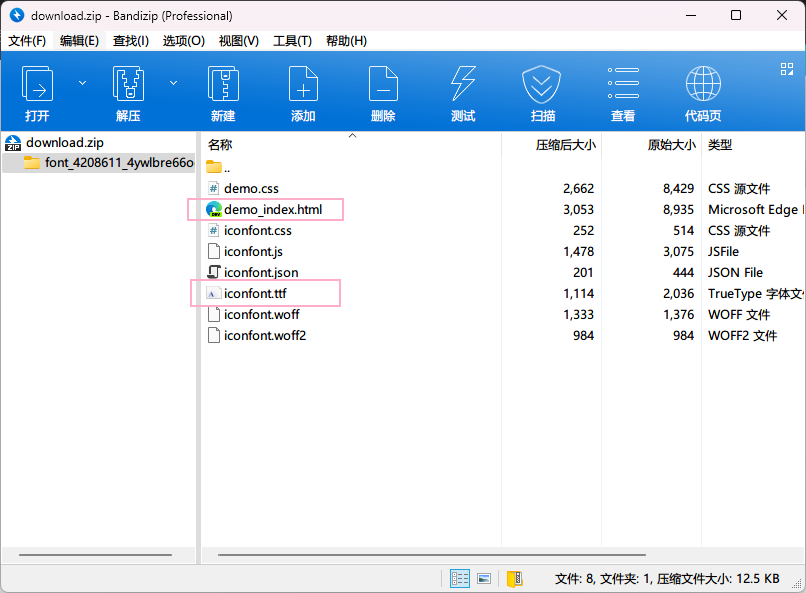
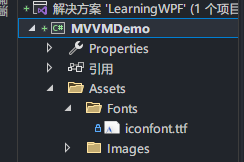
主要用上面勾选的两个文件,html文件是下载的图标演示,tff是程序中用到的字体文件了,把它放到新建的Assets资源文件夹下边:
之后就可以用了,Text内容可以从演示的html中找到,也可以在矢量图项目里面复制代码:
<TextBox Text="" FontFamily="./Assets/Fonts/#iconfont"/>

控件模板
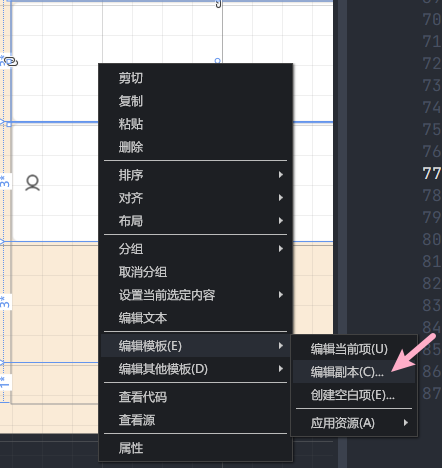
模板内容因为只在这一个登录窗体上使用,就都定义在车Window.Resources窗体资源里了,所以看上去页面内容有点多,大家也可以单独定义资源文件。先说按钮,两个按钮都是通过自定义控件模板来完成的,关闭按钮主要是定义了一个 Path 控件,用于绘制一个 "X" 形状,类似于关闭按钮的图标,等率按钮就直接用 TextBlock 代替的:
<ControlTemplate x:Key="CloseButton" TargetType="Button">

    <Border Name="back" Background="Transparent" CornerRadius="0,8,0,0">

        <Path HorizontalAlignment="Center"

              VerticalAlignment="Center"

              Data="M0 0 12 12M0 12 12 0"

              Stroke="Black"

              StrokeThickness="1" />

    </Border>

    <ControlTemplate.Triggers>

        <Trigger Property="IsMouseOver" Value="true">

            <Setter TargetName="back" Property="Background" Value="red" />

        </Trigger>

    </ControlTemplate.Triggers>

</ControlTemplate>

<ControlTemplate x:Key="LoginButton" TargetType="Button">

    <Border Name="back" Background="{TemplateBinding Background}" CornerRadius="8">

        <TextBlock Text="登录" VerticalAlignment="Center" HorizontalAlignment="Center"/>

    </Border>

    <ControlTemplate.Triggers>

        <Trigger Property="IsMouseOver" Value="true">

            <Setter TargetName="back" Property="Background" Value="red"/>

        </Trigger>

    </ControlTemplate.Triggers>

</ControlTemplate>
文本框也是通过自定义控件模板来完成的,只不过自己写东西有点多,所以是通过编辑模板给文本库框加的图标:

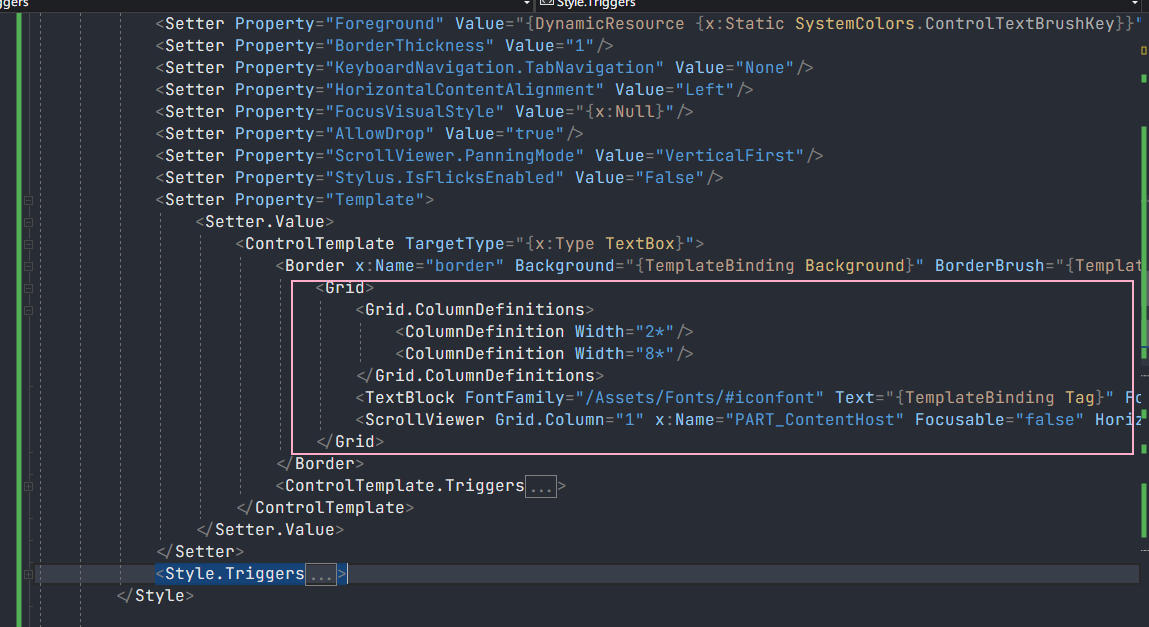
<Border x:Name="border" Background="{TemplateBinding Background}" BorderBrush="{TemplateBinding BorderBrush}" 	BorderThickness="{TemplateBinding BorderThickness}" SnapsToDevicePixels="True" CornerRadius="8">

    <Grid>

        <Grid.ColumnDefinitions>

            <ColumnDefinition Width="2*"/>

            <ColumnDefinition Width="8*"/>

        </Grid.ColumnDefinitions>

        <TextBlock FontFamily="/Assets/Fonts/#iconfont" Text="{TemplateBinding Tag}" FontSize="20" VerticalAlignment="Center" HorizontalAlignment="Center" />

        <ScrollViewer Grid.Column="1" x:Name="PART_ContentHost" Focusable="false" HorizontalScrollBarVisibility="Hidden" VerticalScrollBarVisibility="Hidden" VerticalAlignment="Center"/>

    </Grid>

</Border>
图标属性因为Text属性要获取输入的文本,所以改成了通过文本框的 Tag 属性绑定内容。
而后的控件布局就不解释了吧,直接看代码吧:
MainView.xaml
<Window x:Class="MVVMDemo.MainView"
xmlns="http://schemas.microsoft.com/winfx/2006/xaml/presentation"
xmlns:x="http://schemas.microsoft.com/winfx/2006/xaml"
xmlns:d="http://schemas.microsoft.com/expression/blend/2008"
xmlns:local="clr-namespace:MVVMDemo"
xmlns:mc="http://schemas.openxmlformats.org/markup-compatibility/2006"
Title="MainView"
Width="800"
Height="450"
AllowsTransparency="True"
Background="{x:Null}"
ResizeMode="NoResize"
WindowStartupLocation="CenterScreen"
WindowStyle="None"
mc:Ignorable="d">
<Window.Resources>
<ControlTemplate x:Key="CloseButton" TargetType="Button">
<Border Name="back" Background="Transparent" CornerRadius="0,8,0,0">
<Path HorizontalAlignment="Center"
VerticalAlignment="Center"
Data="M0 0 12 12M0 12 12 0"
Stroke="Black"
StrokeThickness="1" />
</Border>
<ControlTemplate.Triggers>
<Trigger Property="IsMouseOver" Value="true">
<Setter TargetName="back" Property="Background" Value="red" />
</Trigger>
</ControlTemplate.Triggers>
</ControlTemplate>
<ControlTemplate x:Key="LoginButton" TargetType="Button">
<Border Name="back" Background="{TemplateBinding Background}" CornerRadius="8">
<TextBlock Text="登录" VerticalAlignment="Center" HorizontalAlignment="Center"/>
</Border>
<ControlTemplate.Triggers>
<Trigger Property="IsMouseOver" Value="true">
<Setter TargetName="back" Property="Background" Value="red"/>
</Trigger>
</ControlTemplate.Triggers>
</ControlTemplate>
<SolidColorBrush x:Key="TextBox.Static.Border" Color="#FFABAdB3"/>
<SolidColorBrush x:Key="TextBox.MouseOver.Border" Color="#FF7EB4EA"/>
<SolidColorBrush x:Key="TextBox.Focus.Border" Color="#FF569DE5"/>
<Style x:Key="IconTextBoxStyle" TargetType="{x:Type TextBox}">
<Setter Property="Background" Value="{DynamicResource {x:Static SystemColors.WindowBrushKey}}"/>
<Setter Property="BorderBrush" Value="{StaticResource TextBox.Static.Border}"/>
<Setter Property="Foreground" Value="{DynamicResource {x:Static SystemColors.ControlTextBrushKey}}"/>
<Setter Property="BorderThickness" Value="1"/>
<Setter Property="KeyboardNavigation.TabNavigation" Value="None"/>
<Setter Property="HorizontalContentAlignment" Value="Left"/>
<Setter Property="FocusVisualStyle" Value="{x:Null}"/>
<Setter Property="AllowDrop" Value="true"/>
<Setter Property="ScrollViewer.PanningMode" Value="VerticalFirst"/>
<Setter Property="Stylus.IsFlicksEnabled" Value="False"/>
<Setter Property="Template">
<Setter.Value>
<ControlTemplate TargetType="{x:Type TextBox}">
<Border x:Name="border" Background="{TemplateBinding Background}" BorderBrush="{TemplateBinding BorderBrush}" BorderThickness="{TemplateBinding BorderThickness}" SnapsToDevicePixels="True" CornerRadius="8">
<Grid>
<Grid.ColumnDefinitions>
<ColumnDefinition Width="2*"/>
<ColumnDefinition Width="8*"/>
</Grid.ColumnDefinitions>
<TextBlock FontFamily="/Assets/Fonts/#iconfont" Text="{TemplateBinding Tag}" FontSize="20" VerticalAlignment="Center" HorizontalAlignment="Center" />
<ScrollViewer Grid.Column="1" x:Name="PART_ContentHost" Focusable="false" HorizontalScrollBarVisibility="Hidden" VerticalScrollBarVisibility="Hidden" VerticalAlignment="Center"/>
</Grid>
</Border>
<ControlTemplate.Triggers>
<Trigger Property="IsEnabled" Value="false">
<Setter Property="Opacity" TargetName="border" Value="0.56"/>
</Trigger>
<Trigger Property="IsMouseOver" Value="true">
<Setter Property="BorderBrush" TargetName="border" Value="{StaticResource TextBox.MouseOver.Border}"/>
</Trigger>
<Trigger Property="IsKeyboardFocused" Value="true">
<Setter Property="BorderBrush" TargetName="border" Value="{StaticResource TextBox.Focus.Border}"/>
</Trigger>
</ControlTemplate.Triggers>
</ControlTemplate>
</Setter.Value>
</Setter>
<Style.Triggers>
<MultiTrigger>
<MultiTrigger.Conditions>
<Condition Property="IsInactiveSelectionHighlightEnabled" Value="true"/>
<Condition Property="IsSelectionActive" Value="false"/>
</MultiTrigger.Conditions>
<Setter Property="SelectionBrush" Value="{DynamicResource {x:Static SystemColors.InactiveSelectionHighlightBrushKey}}"/>
</MultiTrigger>
</Style.Triggers>
</Style>
</Window.Resources>
<Border Margin="5" Background="AntiqueWhite" CornerRadius="8">
<Border.Effect>
<DropShadowEffect BlurRadius="5"
Direction="0"
Opacity="0.3"
ShadowDepth="0"
Color="Gray" />
</Border.Effect>
<Grid>
<Grid.ColumnDefinitions>
<ColumnDefinition Width="6*" />
<ColumnDefinition Width="4*" />
</Grid.ColumnDefinitions>
<Border CornerRadius="8,0,0,8">
<Border.Background>
<ImageBrush ImageSource="./Assets/Images/LoginBackground.png" Stretch="Fill" />
</Border.Background>
</Border>
<Border Grid.Column="1" CornerRadius="0,8,0,8">
<Grid>
<Grid.RowDefinitions>
<RowDefinition Height="3*" />
<RowDefinition Height="7*" />
</Grid.RowDefinitions>
<StackPanel>
<Button Width="30" Height="30" HorizontalAlignment="Right" Template="{StaticResource ResourceKey=CloseButton}" />
<TextBlock Margin="15"
HorizontalAlignment="Center"
VerticalAlignment="Center"
FontSize="26"
Foreground="Black"
Text="图书管理系统" />
<TextBlock Margin="5"
HorizontalAlignment="Center"
FontSize="16"
Text="MVVM示例Demo" />
</StackPanel>
<Grid Grid.Row="1" Margin="20,20">
<Grid.RowDefinitions>
<RowDefinition Height="3*" />
<RowDefinition Height="3*" />
<RowDefinition Height="3*" />
<RowDefinition Height="1*" />
</Grid.RowDefinitions>
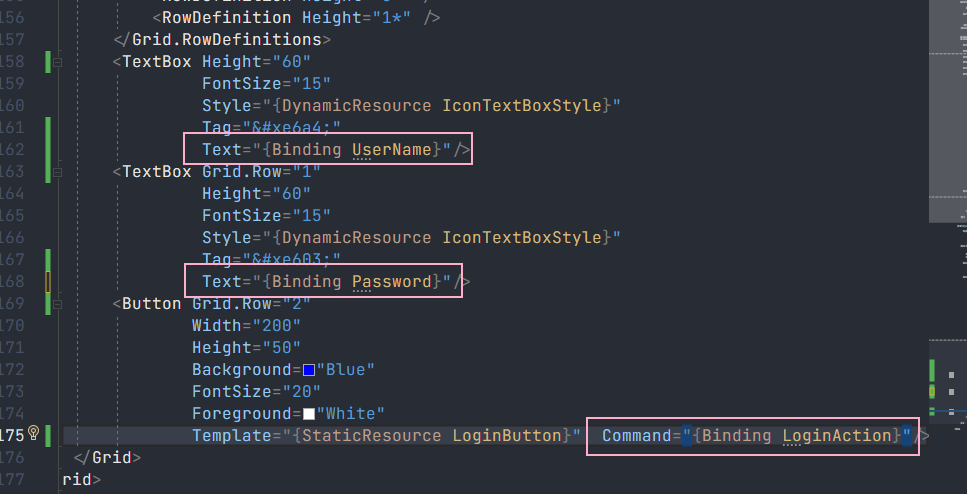
<TextBox Style="{DynamicResource IconTextBoxStyle}" Tag="" Height="60" FontSize="15"/>
<TextBox Grid.Row="1" Style="{DynamicResource IconTextBoxStyle}" Tag="" Height="60" FontSize="15" />
<Button Grid.Row="2" Width="200" Height="50" Template="{StaticResource LoginButton}" Background="Blue" Foreground="White" FontSize="20"/>
</Grid>
</Grid>
</Border>
</Grid>
</Border>
</Window>
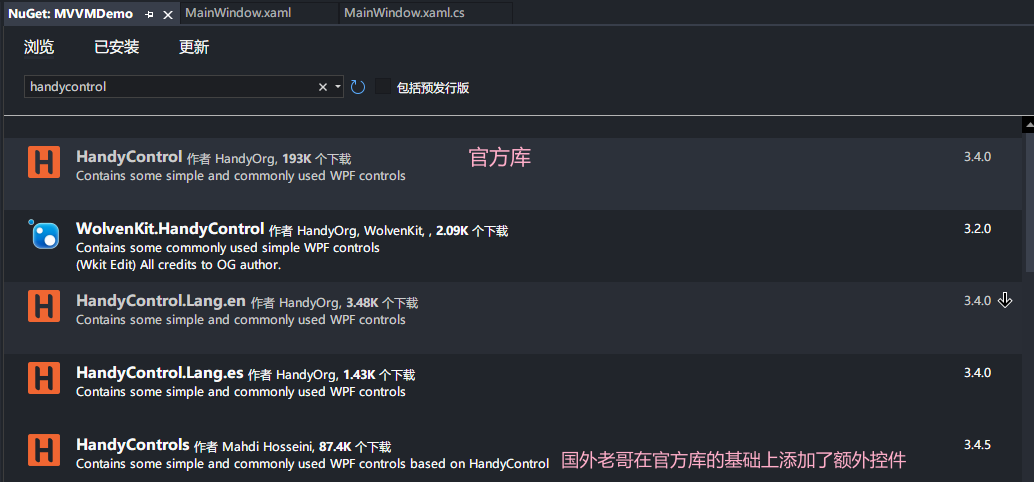
这是登录页面,登录成功后的页面随便写个吧:handyControlView,尝鲜一下HandyControl:
先安装HandyControl:
在App.xaml中添加HandyControl资源字典:
<Application.Resources>

    <ResourceDictionary>

            <ResourceDictionary.MergedDictionaries>

                <ResourceDictionary Source="pack://application:,,,/HandyControl;component/Themes/SkinDefault.xaml"/>

                <ResourceDictionary Source="pack://application:,,,/HandyControl;component/Themes/Theme.xaml"/>

            </ResourceDictionary.MergedDictionaries>

        </ResourceDictionary>

    </Application.Resources>

</Application>
引入命名空间: xmlns:hc="https://handyorg.github.io/handycontrol",之后使用引用对应样式就可以了:

HandyControl分原生控件和拓展控件,原生控件是在WPF原生控件的基础上做了美化,本质功能是一样的,拓展控件则是原生控件中没有的,比如可以播放Gif动图的GifImage,我就看看原生控件了,扩展控件等专门用的时候再研究:
<Window x:Class="MVVMDemo.handyControlView"

        xmlns="http://schemas.microsoft.com/winfx/2006/xaml/presentation"

        xmlns:x="http://schemas.microsoft.com/winfx/2006/xaml"

        xmlns:d="http://schemas.microsoft.com/expression/blend/2008"

        xmlns:mc="http://schemas.openxmlformats.org/markup-compatibility/2006"

       xmlns:controls="https://handyorg.github.io/handycontrol"

        xmlns:local="clr-namespace:MVVMDemo"

        mc:Ignorable="d"

        Title="handyControlView" Height="450" Width="800">

    <Grid>

        <StackPanel>

            <Label Content="LabelDanger样式" Margin="10" Style="{DynamicResource LabelDanger}"></Label>

            <Button Content="Button" Style="{StaticResource ButtonPrimary}"/>

            <Button Content="这是一个按钮" Margin="10,0,0,0" controls:BorderElement.CornerRadius="15"/>

            <CheckBox Content="CheckBox" IsChecked="True"/>

            <CheckBox Margin="0,16,0,0" Content="CheckBox" IsChecked="True" IsEnabled="False"/>

            <CheckBox Margin="0,16,0,0" Content="CheckBox" IsChecked="{x:Null}"/>

            <Slider VerticalAlignment="Center" Width="400" Value="40" Maximum="100"/>

            <TextBox Width="200" VerticalAlignment="Center"/>

            <RadioButton Content="默认样式"/>

            <RadioButton Margin="0,16,0,0" Content="不可编辑" IsChecked="True" IsEnabled="False"/>

            <StackPanel Margin="20">

                <TextBlock Text="ProgressBarSuccess"></TextBlock>

                <ProgressBar Style="{DynamicResource ProgressBarSuccess}" Value="40"></ProgressBar>

            </StackPanel>

            <StackPanel Margin="20">

                <TextBlock Text="ProgressBarInfo"></TextBlock>

                <ProgressBar Style="{DynamicResource ProgressBarInfo}" Value="40"></ProgressBar>

            </StackPanel>

        </StackPanel>

    </Grid>

</Window>

页面逻辑
不使用MVVM
在不使用MVVM情况下实现点击登录:点击登录按钮获取输入的用户名密码,验证是否正确,正确则创建页面隐藏当前页:
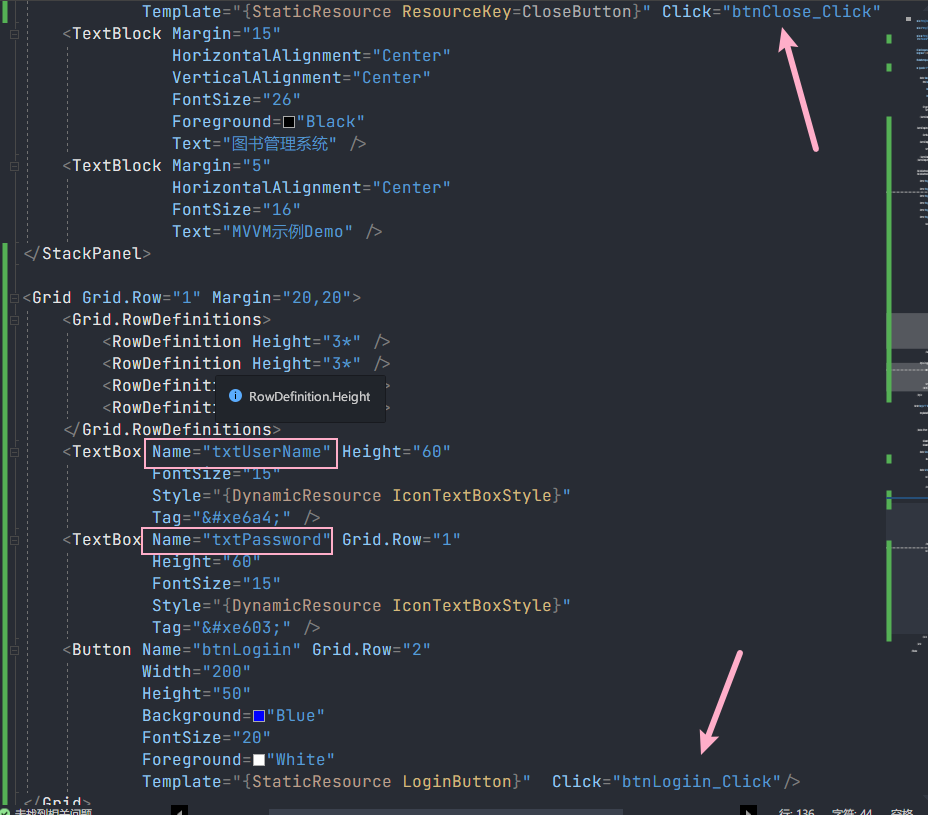
private void btnLogiin_Click(object sender, RoutedEventArgs e)

{

    if (txtUserName.Text == "Cass" && txtPassword.Text == "12136")

    {

        handyControlView handyControlView = new handyControlView();

        handyControlView.Show();

        this.Close();

    }

    else

    {

        MessageBox.Show("用户名或密码错误。");

    }

}

private void btnClose_Click(object sender, RoutedEventArgs e)

{

    this.Close();

}

现在所有东西是耦合在一起的,虽然这样看起来实现起来比较快,但是在后期维护起来是非常麻烦的,尤其是⛰️工程,假如其中任何一个环节发生了变化,程序就会出问题,简而言之就是牵一发而动全身。
接下来看一下MVVM模式下的实现:

Model部分
这部分主要是登录页面的数据部分,涉及两个字段,用户名和密码:
LoginModel.cs:
namespace MVVMDemo

{

    public class LoginModel

    {

        private string _UserName;

        public string UserName

        {

            get { return _UserName; }

            set { _UserName = value; }

        }

        private string _Password;

        public string Password

        {

            get { return _Password; }

            set { _Password = value; }

        }

    }

}
View部分
视图部分主要做数据的呈现,通过绑定和命令解耦图形界面和数据以及执行动作之间的关系,数据之间的交互在用户名和密码文本框:
动作有两个,一个是关闭按钮,另一个是登录按钮。关闭按钮只是关闭当前窗体,不涉及业务交互,所以保留之前的Click事件即可,登录按钮就涉及到视图、数据以及业务逻辑了,这就需要通过命令来完成。
ViewModel部分
在这之前需要完成命令接口的定义,新建一个文件:RelayCommand.cs实现ICommand接口:
using System;

using System.Windows.Input;

namespace MVVMDemo

{

    public class RelayCommand : ICommand

    {

        private readonly Action _execute;   // 需要执行的操作(命令体)

        private readonly Func<bool> _canExecute;    // 命令是否可以执行的逻辑

        public RelayCommand(Action action, Func<bool> canExecute)

        {

            _execute = action;

            _canExecute = canExecute;

        }

        public bool CanExecute(object parameter)    // ICommand接口方法之一,用于判断命令是否可以执行

        {

            if (_canExecute == null)

            {

                return true;	// 命令始终可以执行

            }

            else

            {

                return _canExecute();	// 调用 _canExecute() 获取判断结果

            }

        }

        public void Execute(object parameter)   // ICommand接口方法之一 用于执行命令体,调用 _execute 所存储的操作

        {

            _execute?.Invoke();

        }

        public event EventHandler CanExecuteChanged	// ICommad接口中的事件,当命令的可执行状态发生变化时,触发此事件来通知界面元素更新

        {

            add

            {

                if (_canExecute != null) { CommandManager.RequerySuggested += value; }

            }

            remove

            {

                if (_canExecute != null) { CommandManager.RequerySuggested -= value; }

            }

        }

    }

}
这样就完成了命令接口的实现,接着来看ViewModel视图模型,视图模型作为沟通数据Model和视图View之间的桥梁,就得多干一些活了。首先是数据部分,为了更好的解耦,不让图形界面与数据产生直接交互,在ViewModel里嵌套一层在获取Model以及View部分的数据并完成验证处理、数据更新还有命令操作:
LoginViewModel.cs:
using System.ComponentModel;

using System.Runtime.CompilerServices;

using System.Windows;

using System.Windows.Input;

namespace MVVMDemo

{

    public class LoginViewModel : INotifyPropertyChanged

    {

        public event PropertyChangedEventHandler PropertyChanged;	// INotifyPropertyChanged接口事件,用于在属性更改时发出通知

        private LoginModel _loginModel;

        private MainView _mainView;

        public LoginViewModel(MainView mainView)

        {

            _loginModel = new LoginModel();

            _mainView = mainView;

        }

        // 绑定到登录界面文本框的属性,用于获取和设置用户名和密码

        public string UserName

        {

            get { return _loginModel.UserName; }

            set

            {

                _loginModel.UserName = value;

                OnPropertyChanged(UserName);

            }

        }

        public string Password

        {

            get { return _loginModel.Password; }

            set

            {

                _loginModel.Password = value;

                OnPropertyChanged(Password);

            }

        }

        protected virtual void OnPropertyChanged([CallerMemberName] string propertyName = null)	// 触发属性更改通知的方法

        {

            PropertyChanged?.Invoke(this, new PropertyChangedEventArgs(propertyName));

        }

        private void LoginFunc()	// 处理登录操作

        {

            if (UserName == "Cass" && Password == "12136")

            {

                handyControlView handyControlView = new handyControlView();

                handyControlView.Show();

                _mainView.Close();

            }

            else

            {

                MessageBox.Show("用户名或密码错误");

                UserName = "";

                Password = "";

            }

        }

        private bool CanLoginExecute()

        {

            return true;

        }

        public ICommand LoginAction	// 绑定到登录按钮的命令属性

        {

            get

            {

                return new RelayCommand(LoginFunc, CanLoginExecute);	//(执行体,判断条件)

            }

        }

    }

}
完成了沟通部分的桥梁怎样,和其他两部分取得练习呢?数据部分,通过属性更新已经通知到了,视图部分就需要通过绑定数据上下文来完成了:
Mainview.xaml.cs
using System.Windows;

namespace MVVMDemo

{

    /// <summary>

    /// MainWindow.xaml 的交互逻辑

    /// </summary>

    public partial class MainView : Window

    {

        public MainView()

        {

            InitializeComponent();

            this.DataContext = new LoginViewModel(this);

        }

        private void btnClose_Click(object sender, RoutedEventArgs e)

        {

            this.Close();

        }

    }

}
完结撒花
以上一个简单的MVVM示例就完成了,怎么说呢,虽然看着很简单,代码也没多少,但是对初学者来说绝非易事。还有一件事想要告诉大家,学习过程中一定不要只看不写,在学习过程中,实践是非常重要的。阅读和理解代码的同时,动手编写代码是巩固知识的关键部分。即使在完成这篇博文的过程中,我仍有新的收获在里面,所以大家千万不要只看,纸上谈兵永远都是空谈。
希望可以给大家一点参考,有错误的部分还请在评论区指出。
WPF 入门笔记 - 07 - MVVM示例的更多相关文章
- (ZZ)WPF经典编程模式-MVVM示例讲解
http://www.cnblogs.com/xjxz/archive/2012/11/14/WPF.html 本篇从两个方面来讨论MVVM模式: MVVM理论知识 MVVM示例讲解 一,MVVM理论 ...
- WPF学习笔记:MVVM模式下,ViewModel如何关闭View?
原文:http://blog.csdn.net/leftfist/article/details/32349731 矫枉过正,从一个极端走向另一个极端.MVVM模式,View只负责呈现,虽然也有后台代 ...
- WPF 入门笔记之控件内容控件
一.控件类 在WPF中和用户交互的元素,或者说.能够接受焦点,并且接收键盘鼠标输入的元素所有的控件都继承于Control类. 1. 常用属性: 1.1 Foreground:前景画刷/前景色(文本颜色 ...
- WPF 入门笔记之事件
一.事件路由 1. 直接路由事件 起源于一个元素,并且不能传递给其他元素 MouserEnter 和MouserLeave 就是直接事件路由 2. 冒泡路由事件 在包含层次中向上传递,首先由引发的元素 ...
- WPF 入门笔记之布局
一.布局原则: 1. 不应显示的设定元素的尺寸,反而元素可以改变它的尺寸,并适应它们的内容 2. 不应使用平布的坐标,指定元素的位置. 3. 布局容器和它的子元素是共享可以使用的空间 4. 可以嵌套的 ...
- WPF 入门笔记之基础
一.创建WPF程序 1. App.xaml 相当于窗体的配置文件 2. xmlns:xml名称空间的缩写 xmlns="http://schemas.microsoft.com/winfx/ ...
- WPF经典编程模式-MVVM示例讲解
https://www.cnblogs.com/lvdongjie/p/5515962.html
- WPF入门教程系列二十三——DataGrid示例(三)
DataGrid的选择模式 默认情况下,DataGrid 的选择模式为“全行选择”,并且可以同时选择多行(如下图所示),我们可以通过SelectionMode 和SelectionUnit 属性来修改 ...
- WPF快速入门系列(8)——MVVM快速入门
一.引言 在前面介绍了WPF一些核心的内容,其中包括WPF布局.依赖属性.路由事件.绑定.命令.资源样式和模板.然而,在WPF还衍生出了一种很好的编程框架,即WVVM,在Web端开发有MVC,在WPF ...
- [R语言] ggplot2入门笔记4—前50个ggplot2可视化效果
文章目录 通用教程简介(Introduction To ggplot2) 4 ggplot2入门笔记4-前50个ggplot2可视化效果 1 相关性(Correlation) 1.1 散点图(Scat ...
随机推荐
- 2023-04-14:n对情侣坐在连续排列的 2n 个座位上,想要牵到对方的手, 人和座位由一个整数数组 row 表示,其中 row[i] 是坐在第 i 个座位上的人的ID, 情侣们按顺序编号,第一对
2023-04-14:n对情侣坐在连续排列的 2n 个座位上,想要牵到对方的手, 人和座位由一个整数数组 row 表示,其中 row[i] 是坐在第 i 个座位上的人的ID, 情侣们按顺序编号,第一对 ...
- 2021-05-13:数组中所有数都异或起来的结果,叫做异或和。给定一个数组arr,返回arr的最大子数组异或和。
2021-05-13:数组中所有数都异或起来的结果,叫做异或和.给定一个数组arr,返回arr的最大子数组异或和. 前缀树.一个数,用二进制表示,0走左边分支,1走右边分支. 时间复杂度:O(N). ...
- vue核心
VUE简介 vue--一套用于构建用户界面的渐进式JavaScript框架 vue特点 采用组件化模式--提高代码复用率--让代码更好维护 声明式编程--让编码人员无需直接操作DOM--提高开发效率 ...
- vue全家桶进阶之路24:Mock
Mock 是一个 JavaScript 库,用于生成随机数据或模拟 HTTP 请求响应,用于前端开发中的单元测试.功能测试.集成测试等场景. Mock 可以生成各种类型的数据,包括字符串.数字.布尔值 ...
- 一些JS过滤方法
一般过滤器我们都会卸载过滤filter文件内 本文这里就直接写正常methods格式的 //过滤空格 filterSpaces(data) { return data.replace(/\s+/g, ...
- ICLR 2018-A Simple Neural Attentive Meta-Learner
Key 时序卷积+注意力机制(前者从过去的经验中收集信息,而后者则精确定位具体的信息.) 解决的主要问题 手工设计的限制:最近的许多元学习方法都是大量手工设计的,要么使用专门用于特定应用程序的架构,要 ...
- 使用 StarCoder 创建一个编程助手
如果你是一个软件开发者,你可能已经使用过 ChatGPT 或 GitHub 的 Copilot 去解决一些写代码过程中遇到的问题,比如将代码从一种语言翻译到另一种语言,或者通过自然语言,诸如" ...
- 《HTML入门笔记2》
HTML常用标签 分别有:a 标签.img 标签.table 标签.form 标签.input 标签等. a 标签(特别常用) a 标签即超级链接,又叫超链接.一个网站通常由多个页面构成,进入网站时首 ...
- Mysql DDL执行方式-pt-osc介绍 | 京东云技术团队
1 引言 大家好,接着上次和大家一起学习了<MySQL DDL执行方式-Online DDL介绍>,那么今天接着和大家一起学习另一种MySQL DDL执行方式之pt-soc. 在MySQL ...
- 解读与用户一起“跳动”的开源实时监控工具 HertzBeat
摘要:开源项目遇上华为云,会擦出怎样的火花? 在本期<开源实时监控工具HertzBeat如何与用户一起"跳动?>的主题直播中,HertzBeat & TanCloud 创 ...