
快速搭建ssh项目
环境:oracle11g、myeclipse2014
首先在web项目中添加spring框架
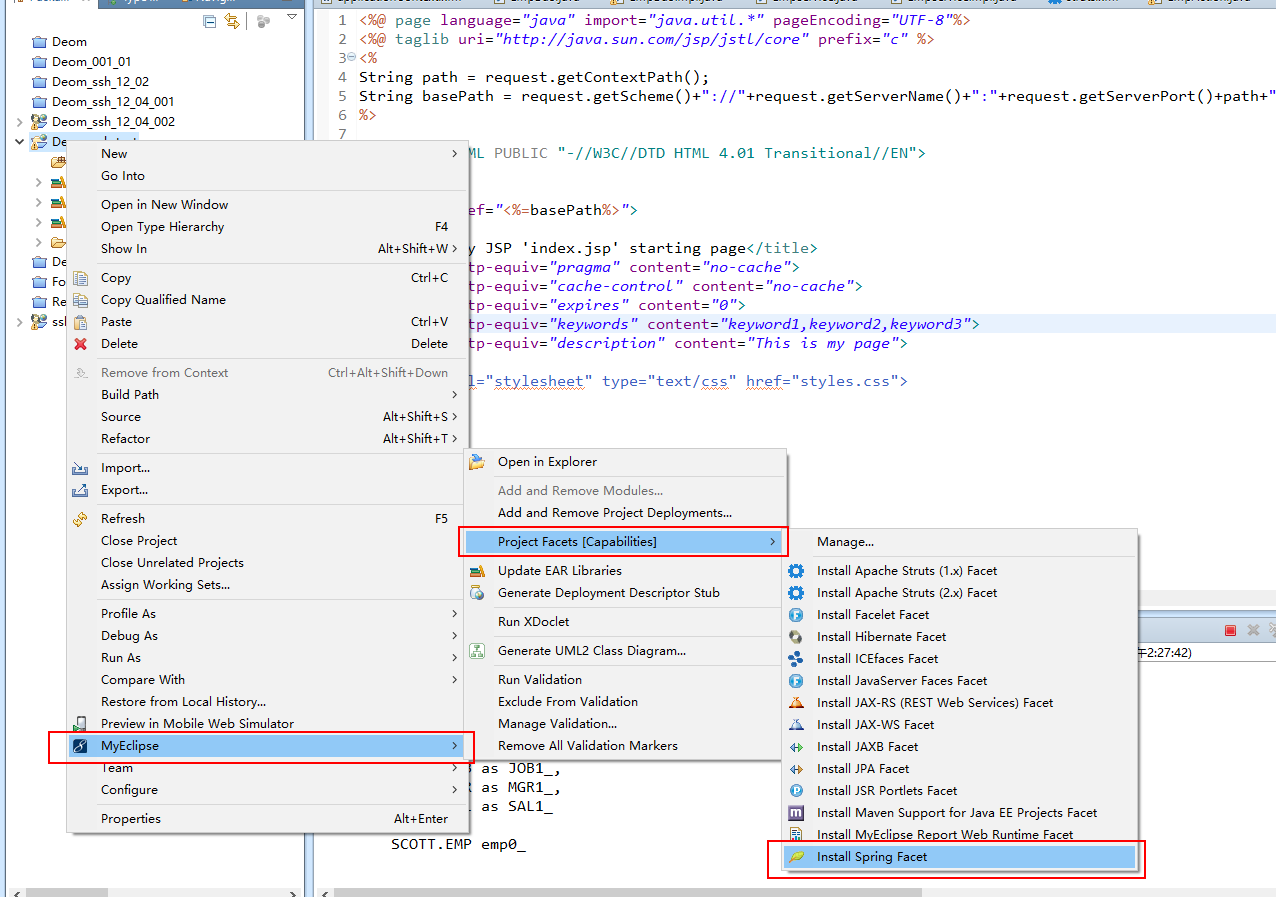
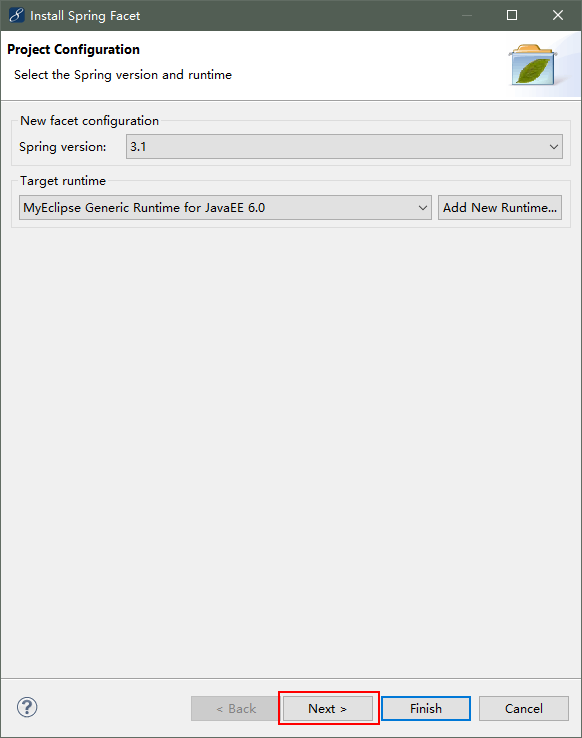
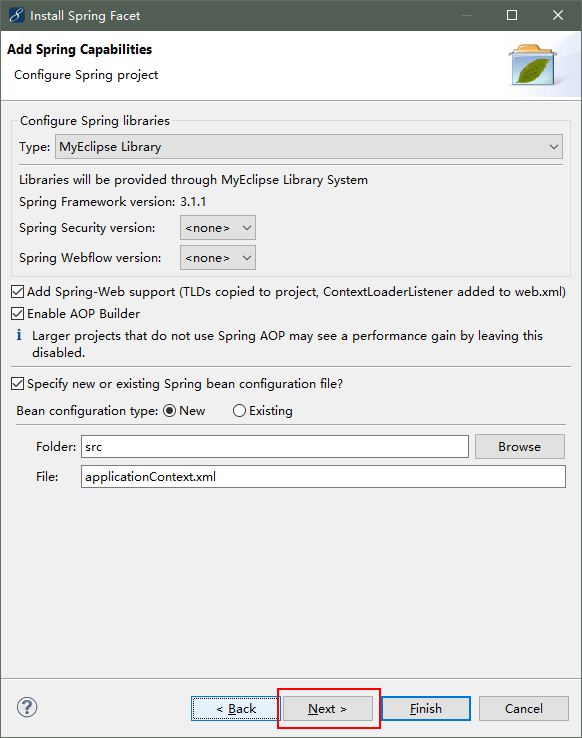
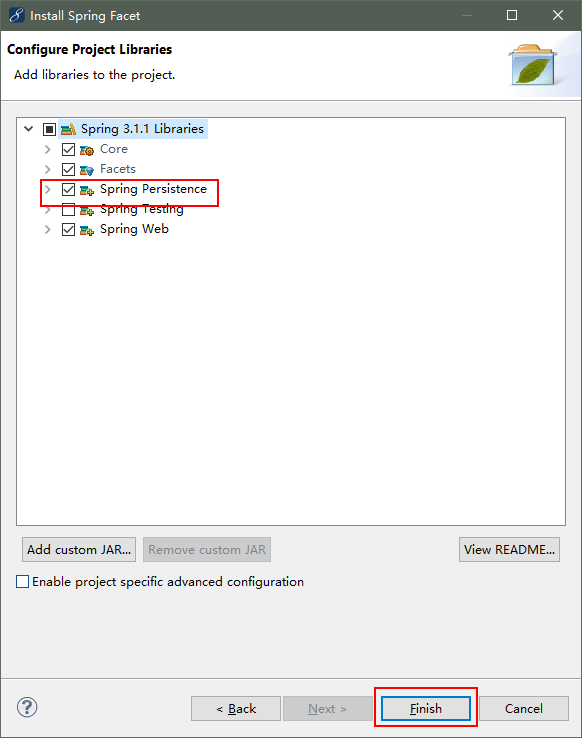
现在已经添加完spring框架了
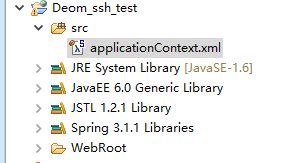
然后我们开始添加Hibernate框架
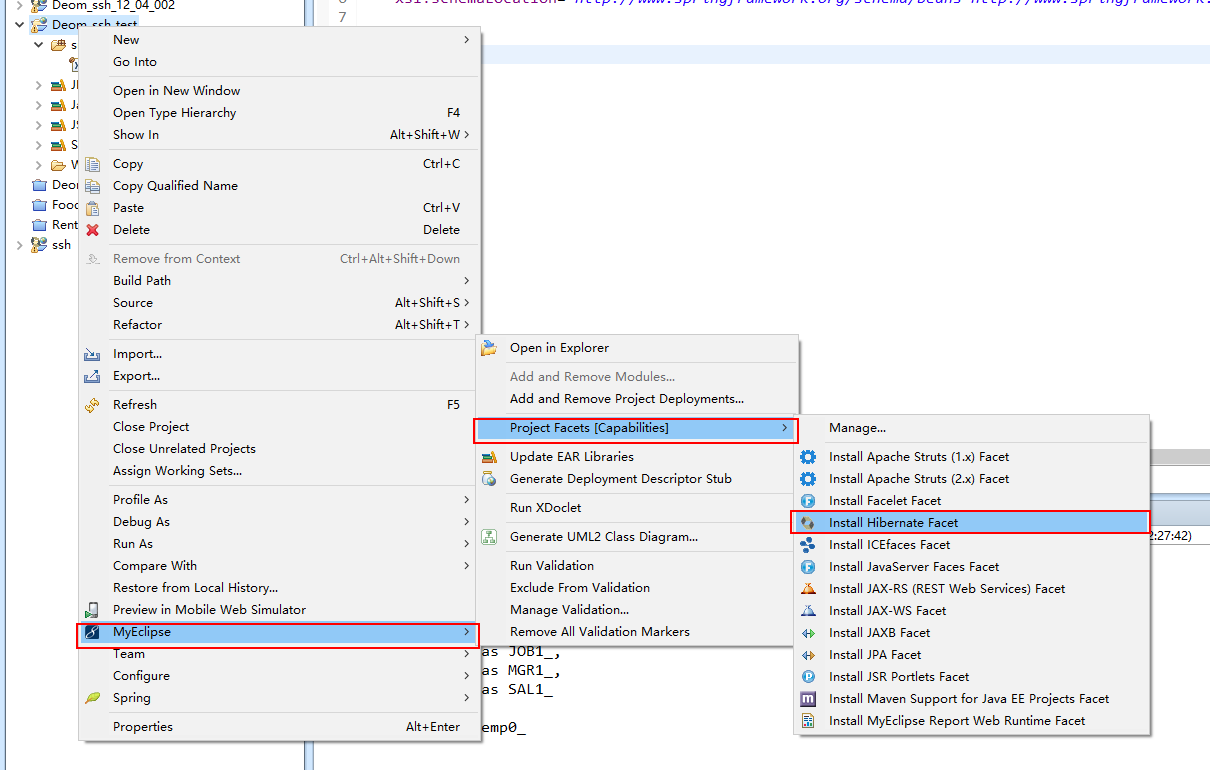
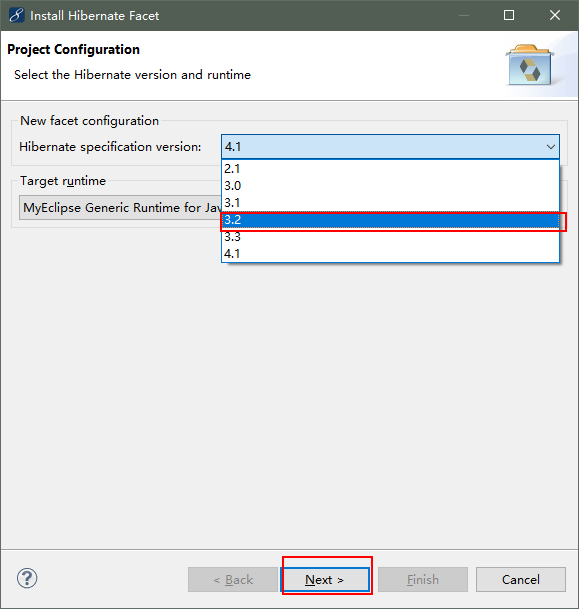
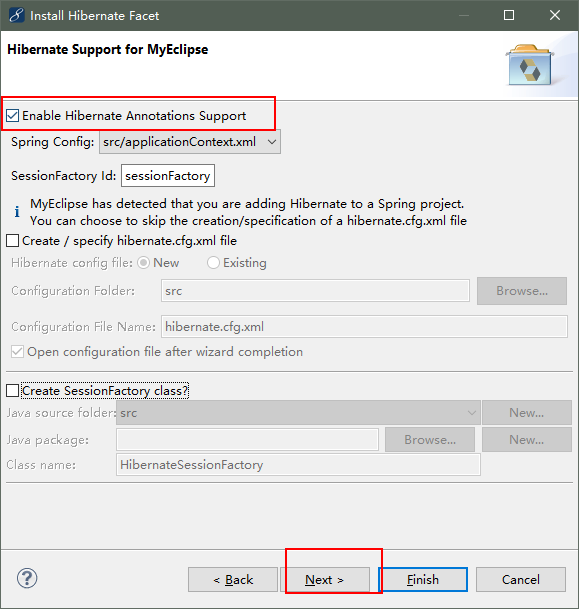
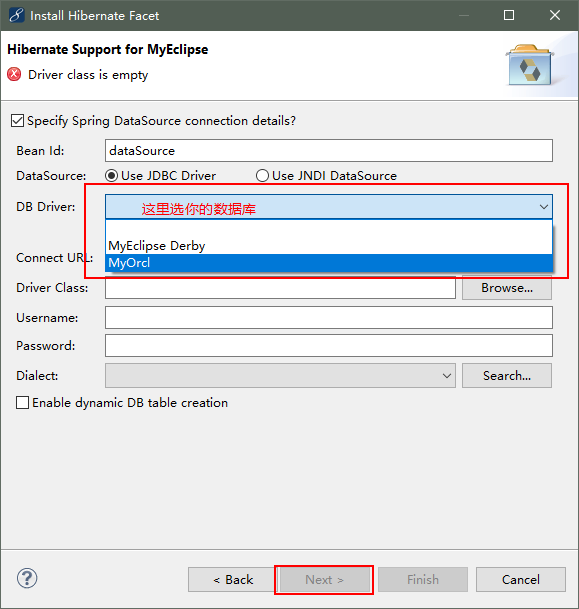
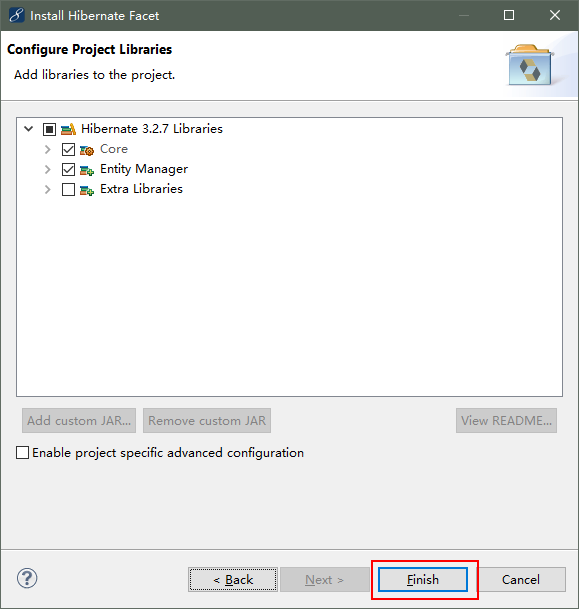
到这一步Hibernate框架就添加完成了
applicationContext.xml配置文件
<?xml version="1.0" encoding="UTF-8"?>

<beans xmlns="http://www.springframework.org/schema/beans"

    xmlns:xsi="http://www.w3.org/2001/XMLSchema-instance" xmlns:p="http://www.springframework.org/schema/p"

    xmlns:context="http://www.springframework.org/schema/context" xmlns:tx="http://www.springframework.org/schema/tx"

    xsi:schemaLocation="http://www.springframework.org/schema/beans http://www.springframework.org/schema/beans/spring-beans-3.1.xsd

        http://www.springframework.org/schema/tx http://www.springframework.org/schema/tx/spring-tx-3.1.xsd

        http://www.springframework.org/schema/context http://www.springframework.org/schema/context/spring-context-3.1.xsd">

    <bean id="dataSource" class="org.apache.commons.dbcp.BasicDataSource">

        <property name="url" value="jdbc:oracle:thin:@127.0.0.1:1521:orcl">

        </property>

        <property name="username" value="system"></property>

        <property name="password" value=""></property>

        <property name="driverClassName" value="oracle.jdbc.driver.OracleDriver"></property>

    </bean>

    <bean id="sessionFactory"

        class="org.springframework.orm.hibernate3.annotation.AnnotationSessionFactoryBean">

        <property name="dataSource">

            <ref bean="dataSource" />

        </property>

        <property name="hibernateProperties">

            <props>

                <prop key="hibernate.dialect">

                    org.hibernate.dialect.Oracle9Dialect

                </prop>

                <prop key="hibernate.show_sql">true</prop>

                <prop key="hibernate.format_sql">true</prop>

            </props>

        </property>

        <!-- <property name="annotatedClasses"> <list> <value>com.bdqn.pojo.Dept</value>

            <value>com.bdqn.pojo.Emp</value> </list> </property> -->

        <property name="packagesToScan" value="com.bdqn.pojo"></property>

    </bean>

    <context:component-scan base-package="com.bdqn" />

    <bean id="txManager"

        class="org.springframework.orm.hibernate3.HibernateTransactionManager">

        <property name="sessionFactory" ref="sessionFactory"></property>

    </bean>

    <tx:annotation-driven transaction-manager="txManager" />

</beans>
然后开始配置struts2框架
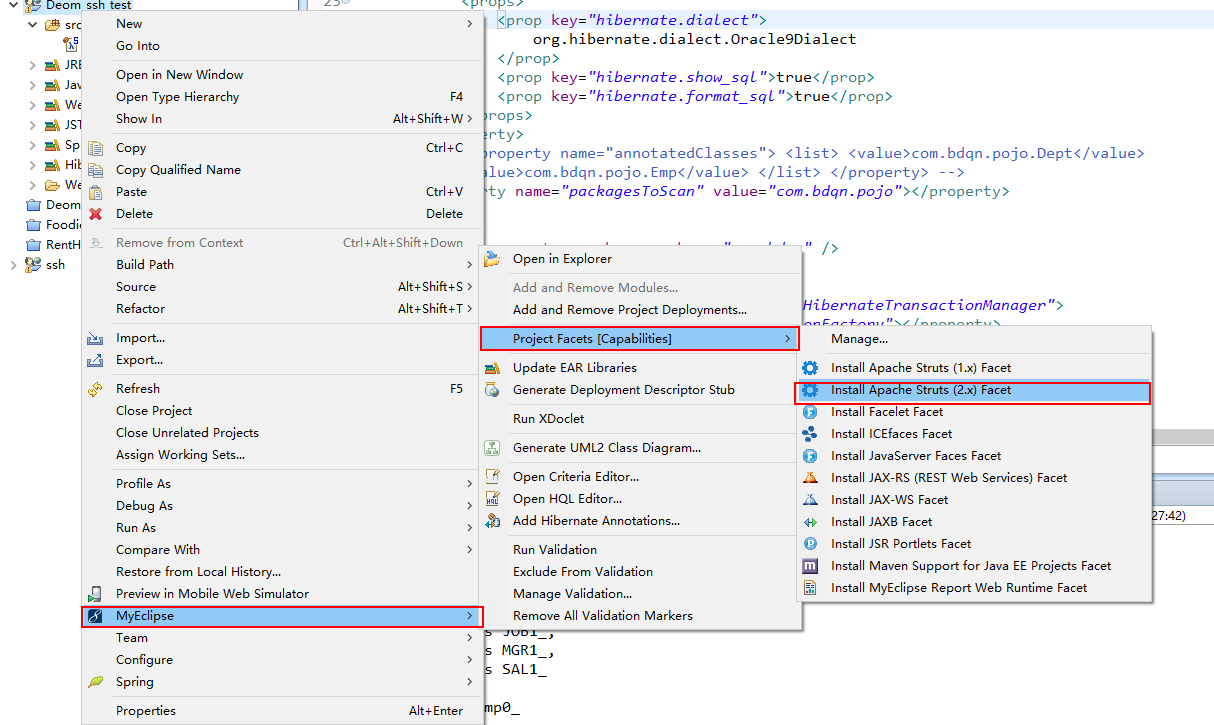
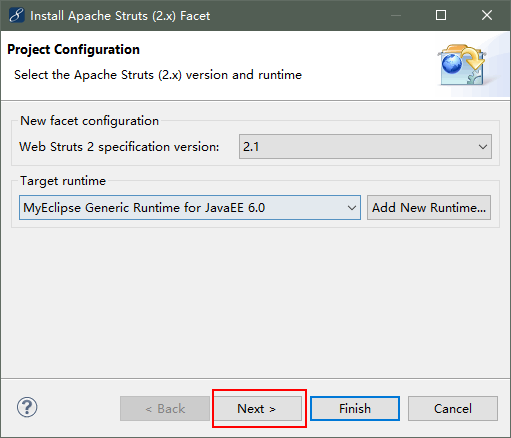
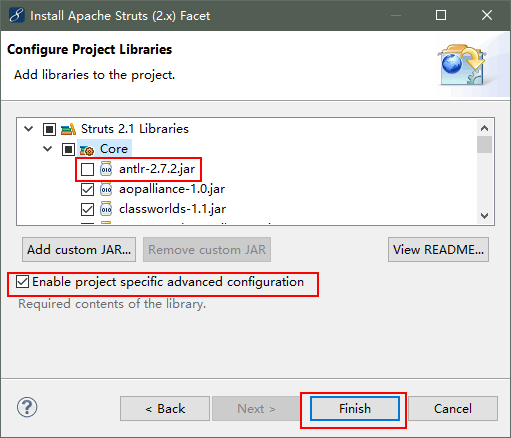
到现在struts2框架也整合进来了
然后使用Hibernate的反向工程创建实体类
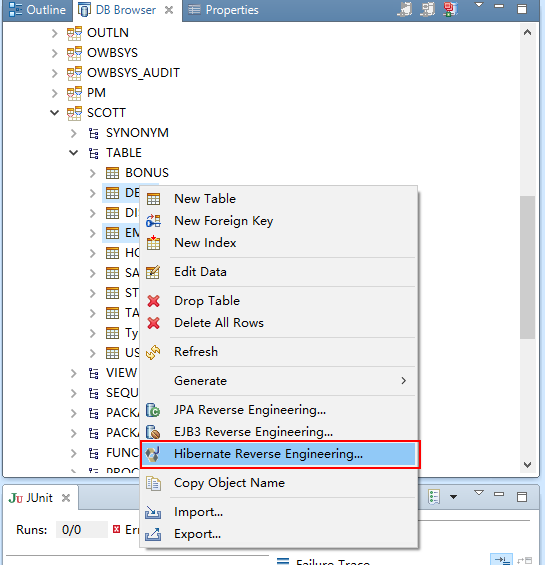
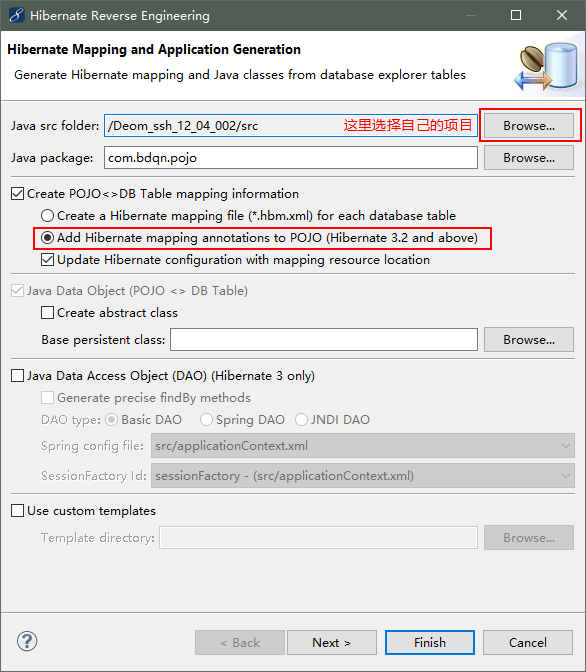
点击finish,然后实体类就创建好了,接下来就可以开始写代码了
dao层接口
package com.bdqn.dao;

import java.util.List;

import com.bdqn.pojo.Emp;

public interface EmpDao {

    public List<Emp> findAll();

}
dao层实现
package com.bdqn.dao.impl;

import java.util.List;

import org.hibernate.SessionFactory;

import org.springframework.beans.factory.annotation.Autowired;

import org.springframework.beans.factory.annotation.Qualifier;

import org.springframework.orm.hibernate3.support.HibernateDaoSupport;

import org.springframework.stereotype.Repository;

import com.bdqn.dao.EmpDao;

import com.bdqn.pojo.Emp;

@Repository("empDao")

public class EmpDaoImpl extends HibernateDaoSupport implements EmpDao {

    @Autowired

    public EmpDaoImpl(@Qualifier("sessionFactory") SessionFactory sessionFactory) {

          this.setSessionFactory(sessionFactory);

    }

    public EmpDaoImpl() {

    }

    @Override

    public List<Emp> findAll() {

        // TODO Auto-generated method stub

        return this.getHibernateTemplate().find("from Emp");

    }

}
service层接口
package com.bdqn.service;

import java.util.List;

import com.bdqn.pojo.Emp;

public interface EmpService {

    public List<Emp> findAll();

}
service层实现
package com.bdqn.service.impl;

import java.util.List;

import org.springframework.beans.factory.annotation.Autowired;

import org.springframework.stereotype.Service;

import org.springframework.transaction.annotation.Transactional;

import com.bdqn.dao.EmpDao;

import com.bdqn.pojo.Emp;

import com.bdqn.service.EmpService;

@Service("empService")

@Transactional

public class EmpServiceImpl implements EmpService {

    @Autowired

    private EmpDao empDao;

    public EmpDao getEmpDao() {

        return empDao;

    }

    public void setEmpDao(EmpDao empDao) {

        this.empDao = empDao;

    }

    @Override

    @Transactional(readOnly = true)

    public List<Emp> findAll() {

        // TODO Auto-generated method stub

        return empDao.findAll();

    }

}
Action(web):
package com.bdqn.web;

import java.util.List;

import java.util.Map;

import org.springframework.beans.factory.annotation.Autowired;

import org.springframework.stereotype.Controller;

import com.bdqn.pojo.Emp;

import com.bdqn.service.EmpService;

import com.opensymphony.xwork2.ActionContext;

import com.opensymphony.xwork2.ActionSupport;

@Controller

public class EmpAction extends ActionSupport {

    @Autowired

    private EmpService empService;

    public EmpService getEmpService() {

        return empService;

    }

    public void setEmpService(EmpService empService) {

        this.empService = empService;

    }

    public String execute(){

        Map<String, Object> request = (Map<String, Object>) ActionContext.getContext().get("request");

        List<Emp> emps = empService.findAll();

        request.put("emps", emps);

        return SUCCESS;

    }

}
struts.xml配置文件
<?xml version="1.0" encoding="UTF-8" ?>

<!DOCTYPE struts PUBLIC "-//Apache Software Foundation//DTD Struts Configuration 2.1//EN" "http://struts.apache.org/dtds/struts-2.1.dtd">

<struts>

    <package name="def" namespace="/" extends="struts-default">

        <action name="empAction" class="com.bdqn.web.EmpAction">

            <result>/index.jsp</result>

        </action>

    </package>

</struts>
jsp页面:
<%@ page language="java" import="java.util.*" pageEncoding="UTF-8"%>

<%@ taglib uri="http://java.sun.com/jsp/jstl/core" prefix="c" %>

<%

String path = request.getContextPath();

String basePath = request.getScheme()+"://"+request.getServerName()+":"+request.getServerPort()+path+"/";

%>

<!DOCTYPE HTML PUBLIC "-//W3C//DTD HTML 4.01 Transitional//EN">

<html>

  <head>

    <base href="<%=basePath%>">

    <title>My JSP 'index.jsp' starting page</title>

    <meta http-equiv="pragma" content="no-cache">

    <meta http-equiv="cache-control" content="no-cache">

    <meta http-equiv="expires" content="0">

    <meta http-equiv="keywords" content="keyword1,keyword2,keyword3">

    <meta http-equiv="description" content="This is my page">

    <!--

    <link rel="stylesheet" type="text/css" href="styles.css">

    -->

  </head>

  <body>

    <c:forEach items="${emps}"  var="emp">

        ${emp.ename }<br/>

    </c:forEach>

  </body>

</html>
到这一步恭喜,你的ssh项目搭建完了
然后部署项目发布
在浏览器上输入http://localhost:8080/你的项目命/empAction.action就可以访问项目了
快速搭建ssh项目的更多相关文章
- MyEclipse8.5快速搭建SSH框架
来源于:http://jingyan.baidu.com/article/a378c960a78125b3282830cc.html MyEclipse8.5快速搭建SSH框架 使用版本: Strut ...
- Myeclipse插件快速生成ssh项目并配置注解 在action层注入service的超详细过程
最近发现,我对于ssh的 自动注入配置 还是不熟悉,于是整理了一下 终于做了一个 简单的 注入配置出来. 以前都是在applicationContext.xml 里面这样配 <bean id=& ...
- Spring Boot入门-快速搭建web项目
Spring Boot 概述: Spring Boot makes it easy to create stand-alone, production-grade Spring based Appli ...
- 快速搭建Vue项目
快速搭建Vue项目 第一次安装vue项目Vue推荐开发环境Node.js 6.2.0.npm 3.8.9.webpack 1.13.vue-cli 2.5.1.webstrom2016 安装环境: 安 ...
- 在线官网Spring Initializr 或 IntelliJ IDEA 快速搭建springboot项目
Spring Boot是由Pivotal团队提供的全新框架,设计目的是用来简化新Spring应用的初始搭建以及开发过程.它主要推崇的是'消灭配置’,实现零配置. 那么,如何快速新建一个一个spring ...
- (05节)快速搭建SSM项目
1.1 快速搭建Web项目 注意点:name:archetypeCatalog,value:internal 原因:Intellij IDEA根据maven archetype的本质,执行mvn a ...
- 小D课堂-SpringBoot 2.x微信支付在线教育网站项目实战_2-2.快速搭建SpringBoot项目,采用IDEA
笔记 2.快速搭建SpringBoot项目,采用IDEA 简介:使用SpringBoot start在线生成项目基本框架并导入到IDEA中 参考资料: IDEA使用文档 ...
- 小D课堂-SpringBoot 2.x微信支付在线教育网站项目实战_2-1.快速搭建SpringBoot项目,采用Eclipse
笔记 1.快速搭建SpringBoot项目,采用Eclipse 简介:使用SpringBoot start在线生成项目基本框架并导入到eclipse中 1.站点地址:http://start. ...
- 使用IDEA快速搭建Springboot项目
Spring Boot是由Pivotal团队提供的全新框架,设计目的是用来简化新Spring应用的初始搭建以及开发过程.它主要推崇的是'消灭配置’,实现零配置. 下面就介绍一下如何使用idea快速搭建 ...
随机推荐
- 独立成分分析 ICA 原理及公式推导 示例
独立成分分析(Independent component analysis) 前言 独立成分分析ICA是一个在多领域被应用的基础算法.ICA是一个不定问题,没有确定解,所以存在各种不同先验假定下的求解 ...
- 优雅地使用eruda在移动端上调试网页
注:本文有一小部分截图为桌面端,但所有内容都亲测在移动端上可用. 你曾否在洛谷上用<F12>把错的数据点改成AC?是否有过自己尝试搭建网站,在移动端上js代码运行出错?如果你的回答是肯定的 ...
- 第06组 团队Git现场编程实战
一.组员职责分工 队员姓名 主要分工 朱庆章 测评福州最受欢迎的商圈(参考人气) 陈梦雪 测评福州最受欢迎的商圈(参考人气) 关文涛 分别测评福州人均消费50以下,50-100.100-200.200 ...
- 深度学习面试题24:在每个深度上分别卷积(depthwise卷积)
目录 举例 单个张量与多个卷积核在深度上分别卷积 参考资料 举例 如下张量x和卷积核K进行depthwise_conv2d卷积 结果为: depthwise_conv2d和conv2d的不同之处在于c ...
- mysql innodb与myisam存储文件的区别
myisam: .frm: 存储表定义 .myd(MYData):存储数据 .MYI(MYindex):存储引擎 innodb: .frm:存储表定义 .idb:存储数据和索引,在同一个文件中
- 根据udev的信息判断设备物理路径
udev会生成by-path路径,根据这个就可以判断 dev目录下 [toybrick@localhost dev]$ find | grep platform-fe3c0000 ./disk/by- ...
- springboot rabbitMQ 死信对列 实现消息的可靠消费
1 引入 maven 依赖 <dependency> <groupId>org.springframework.boot</groupId> <artifac ...
- [转]浅谈HTTP中GET、POST用法以及它们的区别
HTTP定义了与服务器交互的不同方法,最基本的方法有4种,分别是GET,POST,PUT,DELETE.URL全称是资源描述符.我们可以这样认为: 一个URL地址,它用于描述一个网络上的资源,而HTT ...
- 使用 ASP.NET Core 创建 Web API及链接sqlserver数据库
创建 Web API https://docs.microsoft.com/zh-cn/aspnet/core/tutorials/first-web-api?view=aspnetcore-3.0& ...
- Flutter Offstage、Visibility隐藏/可见
Offstage是控制组件隐藏/可见的组件,如果感觉有些单调功能不全,我们可以使用Visibility,Visibility也是控制子组件隐藏/可见的组件.不同是的Visibility有隐藏状态是否留 ...