
Android-----Intent通过startActivityForResult(Intent intent , int 标志符)启动新的Activity
我们都了解使用 startActivity(intent) 新的activity只能传递数据,却无法返回数据,返回新activity返回的数据我们可以替换startActivityForResult(Intent intent , int 标志符)
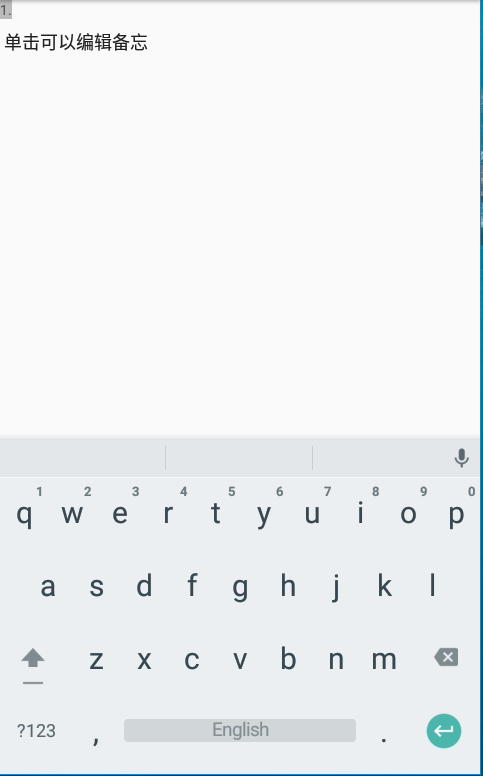
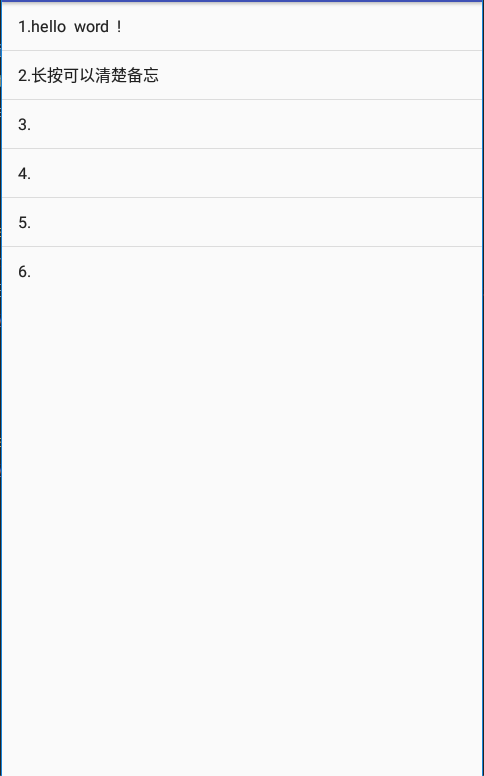
做个备忘录的例子,两个activity: IntentDemo 和 IntentSecend:
activity_intent_demo.xml代码如下:
 <LinearLayout

     xmlns:android="http://schemas.android.com/apk/res/android"

     xmlns:app="http://schemas.android.com/apk/res-auto"

     xmlns:tools="http://schemas.android.com/tools"

     android:layout_width="match_parent"

     android:layout_height="match_parent"

     android:orientation="vertical"

     tools:context="com.hs.example.exampleapplication.IntentDemo">

     <ListView

         android:id="@+id/intent_listView"

         android:layout_width="match_parent"

         android:layout_height="wrap_content"/>

 </LinearLayout>
IntentDemo 代码如下:
 public class IntentDemo extends AppCompatActivity implements AdapterView.OnItemClickListener ,

         AdapterView.OnItemLongClickListener{

     String [] aMemo = {"1.单击可以编辑备忘" , "2.长按可以清楚备忘" , "3." , "4." , "5." , "6."};

     ArrayAdapter<String> arrayAdapter;

     ListView intent_listView ;

     @Override

     protected void onCreate(Bundle savedInstanceState) {

         super.onCreate(savedInstanceState);

         setContentView(R.layout.activity_intent_demo);

         intent_listView  = this.findViewById(R.id.intent_listView);

         arrayAdapter = new ArrayAdapter<>(this,android.R.layout.simple_list_item_1,aMemo);

         intent_listView.setAdapter(arrayAdapter);           //设置list view的内容

         intent_listView.setOnItemClickListener(this);       //绑定单击监听

         intent_listView.setOnItemLongClickListener(this);   //绑定长按监听

     }

     @Override

     public void onItemClick(AdapterView<?> adapterView, View view, int pos, long l) {

         Intent intent = new Intent(this,IntentSecend.class);

         //intent.putExtra("编号",pos + 1);       //传递编号

         intent.putExtra("备忘",aMemo[pos]);            //传递备忘内容

         startActivityForResult(intent , pos); //跳转到编辑内容activity,并以选项位置pos为标志符

     }

     @Override

     public boolean onItemLongClick(AdapterView<?> adapterView, View view, int i, long l) {

         aMemo[i] = (i+1) + ".";                             //清楚内容,只剩编号

         arrayAdapter.notifyDataSetChanged();                //通知list view更新要显示的内容

         return true;

     }

     @Override

     protected void onActivityResult(int requestCode , int resultCode , Intent intent){

         if(resultCode == RESULT_OK){

             aMemo[requestCode] = intent.getStringExtra("备忘");

             Toast.makeText(this,aMemo[requestCode].toString(),Toast.LENGTH_SHORT).show();

             arrayAdapter.notifyDataSetChanged();

         }

     }

 }
activity_intent_secend.xml代码如下:
 <?xml version="1.0" encoding="utf-8"?>

 <LinearLayout

     xmlns:android="http://schemas.android.com/apk/res/android"

     xmlns:app="http://schemas.android.com/apk/res-auto"

     xmlns:tools="http://schemas.android.com/tools"

     android:layout_width="match_parent"

     android:layout_height="match_parent"

     android:orientation="vertical"

     tools:context="com.hs.example.exampleapplication.IntentSecend">

     <TextView

         android:id="@+id/text_view"

         android:layout_width="wrap_content"

         android:layout_height="wrap_content"

         android:background="#FBBB"

         android:gravity="top"

         android:text="1."

         />

     <EditText

         android:id="@+id/edit_Text"

         android:layout_width="match_parent"

         android:layout_height="0dp"

         android:layout_weight="1"

         android:gravity="top"/>

     <LinearLayout

         android:layout_width="match_parent"

         android:layout_height="wrap_content"

         android:gravity="center"

         android:orientation="horizontal">

         <Button

             android:layout_width="wrap_content"

             android:layout_height="wrap_content"

             android:onClick="onCancel"

             android:text="取消"/>

         <Button

             android:layout_width="wrap_content"

             android:layout_height="wrap_content"

             android:onClick="onSave"

             android:text="保存"/>

     </LinearLayout>

 </LinearLayout>
IntentSecend代码如下:
 public class IntentSecend extends AppCompatActivity {

     TextView tv ;

     EditText et ;

     @Override

     protected void onCreate(Bundle savedInstanceState) {

         super.onCreate(savedInstanceState);

         setContentView(R.layout.activity_intent_secend);

         Intent intent = getIntent();

         String str = intent.getStringExtra("备忘");             //读取传过来的备注数据

         tv = this.findViewById(R.id.text_view);

         tv.setText(str.substring(0,2));                             //text view的值

         et = this.findViewById(R.id.edit_Text);

         if(str.length()>2){                                             //将传过来的数据去除前两个字符,然后填入edittext

             et.setText(str.substring(2));

         }

     }

     public void onSave(View view) {

         Intent intent2 = new Intent();

         intent2.putExtra("备忘",tv.getText() + "" + et.getText());

         setResult(RESULT_OK , intent2);

         finish();

     }

     public void onCancel(View view) {

         setResult(RESULT_CANCELED);

         finish();

     }

 }
运行效果:

Android-----Intent通过startActivityForResult(Intent intent , int 标志符)启动新的Activity的更多相关文章
- Android-----Intent中通过startActivity(Intent intent )显式启动新的Activity
Intent:即意图,一般是用来启动新的Activity,按照启动方式分为两类:显式Intent 和 隐式Intent 显示Intent就是直接以“类名称”来指定要启动哪一个Activity:Inte ...
- Android-----Intent中通过startActivity(Intent intent )隐式启动新的Activity
显式Intent我已经简单使用过了,也介绍过概念,现在来说一说隐式Intent: 隐式Intent:就是只在Intent中设置要进行的动作,可以用setAction()和setData()来填入要执行 ...
- Android - 和其他APP交互 - 让其他app启动你的activity
前面的两篇文章主要讲了一个方面:从app中启动其他app.但是如果你的app可以处理对其他app有用的操作,你的app也应该响应其他app的操作请求.例如,如果你创建了一个社交app可以分享信息和图片 ...
- 【Android Developers Training】 30. 允许其它应用启动你的Activity
注:本文翻译自Google官方的Android Developers Training文档,译者技术一般,由于喜爱安卓而产生了翻译的念头,纯属个人兴趣爱好. 原文链接:http://developer ...
- android开发里跳过的坑——onActivityResult在启动另一个activity的时候马上回调
该问题是由于被启动的activity的launchMode为singleTask模式,该模式下不可以使用onActivityResult,要使用onActivityResult,被启动的activit ...
- [android开发篇] [应用组件]Intent 和 Intent 过滤器
https://developer.android.com/guide/components/intents-filters.html Intent 是一个消息传递对象,您可以使用它从其他应用组件请求 ...
- 我的Android 4 学习系列之Intent 和 Broadcast Reciever
目录 Intent 简介 使用隐式和显式Intent启动Activity.子Acitivity和Service 使用Linkify 使用Broadcast Intent 广播事件 使用 Pending ...
- [android]Intent跳转新的Activity可以传递数据过去
两种方式: 一,直接通过Bundle对象来传递: 如果我们想要给“收件人”Activity说点什么的话,那么可以通过下面这封“E-mail”来将我们的消息传递出去 Intent intent=new ...
- 【Android】12.2 利用Intent启动和关闭Activity
分类:C#.Android.VS2015: 创建日期:2016-02-23 一.简介 Android应用程序中一般都有多个Activity,在Activity中,通过调用StartActivity方法 ...
随机推荐
- i系列标准-互联网周刊
原文:http://www.enet.com.cn/article/2019/0429/A20190429062899.html 传统意义上的规模.现代意义上的工具时代感.永远不会改变的最高意义上的使 ...
- [转]vscodesvn安装和使用
原文链接:https://blog.csdn.net/wzh66888/article/details/90145340 1.安装svn插件 2.安装成功后会出现这样的图标 如果没有安装之后不能使用, ...
- C# IL 生成EXE
C:\Windows\Microsoft.NET\Framework64\v4.0.30319\ilasm /exe /output=C:\datacapture.exe /Resource=data ...
- Photoshop 7.0 安装及注册方法
参照:https://jingyan.baidu.com/article/e75057f2e51ac9ebc91a8989.html
- python:将时间戳格式化为yyyyMMdd hh:mm:ss
import time #将10位时间戳或者13位转换为时间字符串,默认为2017-10-01 13:37:04格式 def timestamp_to_date(time_stamp, format_ ...
- vs2015下C4819该文件包含不能在当前代码页(936)中表示的字符问题解决
今天编译IfcOpenshell出现很多warning如下: C4819 该文件包含不能在当前代码页(936)中表示的字符.请将该文件保存为 Unicode 格式以防止数据丢失 解决方案: 文件——& ...
- Mac多SSH Key配置
多SSH key配置 工作的时候碰到SSH配置的问题,就是公司用的是gittea的仓库,而本人的github平常也要使用,这个时候就需要配置不同的SSH key了.将同一个公钥分配配置给github和 ...
- layui switch 确定之后才变更状态
let x = data.elem.checked; data.elem.checked = !x; form.render(); 完整代码 form.on('switch(is_enable)', ...
- C++的菱形继承会发生什么问题?如何解决?画出其内存布局图
菱形继承问题样例: #include <iostream> using namespace std; class A { public: ; virtual int getx() { re ...
- 030 SSM综合练习06--数据后台管理系统--SSM权限操作及Spring Security入门
1.权限操作涉及的三张表 (1)用户表信息描述users sql语句: CREATE TABLE users ( id ) DEFAULT SYS_GUID () PRIMARY KEY, email ...