Linux自动化安装cobbler
1介绍
1.1 PXE
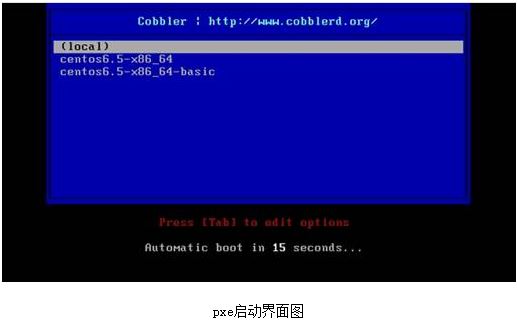
PXE技术与RPL技术不同之处为RPL是静态路由,PXE是动态路由。RPL是根据网卡上的ID号加上其他记录组成的一个Frame(帧)向服务器发出请求。而服务器中已有这个ID数据,匹配成功则进行远程启动。PXE则是根据服务器端收到的工件站MAC地址,使用DHCP服务为这个MAC地址指定个IP地址。每次启动可能同一台工作站有与上次启动有不同的IP,即动态分配地址。下以客户端引导过程说明PXE的原理:
客户端开机后,PXE BootROM(自启动芯片)获得控制权之前执行自我测试,然后以广播形式发出一个请求FIND帧。如果服务器收到客户端所送出的要求,就会送回DHCP回应,包括用户端的IP地址、预设通信通道,以及开机映像文件;否则服务器会忽略这个要求。
客户端收到服务器发回的响应后则会回应一个帧,以请求传送启动所需文件,并把自己的MAC地址写到服务器端的Netnames.db文件中。将有更多的消息在客户端与服务器之间应答,用于决定启动参数。
BootROM由TFTP通信协议从服务器下载开机映像文档。
客户端使用TFTP协议接收启动文件后,将控制权转交启动块以引导操作系统,完成远程启动。
1.2 KickStart
KickStart是一种无人职守安装方式。KickStart的工作原理是通过记录典型的安装过程中所需人工干预填写的各种参数,并生成一个名为ks.cfg的文件;在其后的安装过程中(不只局限于生成KickStart安装文件的机器)当出现要求填写参数的情况时,安装程序会首先去查找KickStart生成的文件,当找到合适的参数时,就采用找到的参数,当没有找到合适的参数时,才需要安装者手工干预。这样,如果KickStart文件涵盖了安装过程中出现的所有需要填写的参数时,安装者完全可以只告诉安装程序从何处取ks.cfg文件,然后去忙自己的事情。等安装完毕,安装程序会根据ks.cfg中设置的重启选项来重启系统,并结束安装。

1.3 Cobbler
Cobbler是一个快速网络安装linux的服务,而且在经过调整也可以支持网络安装windows。该工具使用python开发,小巧轻便(才15k行python代码),使用简单的命令即可完成PXE网络安装环境的配置,同时还可以管理DHCP、DNS、以及yum仓库、构造系统ISO镜像。
Cobbler支持命令行管理,web界面管理,还提供了API接口,可以方便二次开发使用。
Cobbler客户端Koan支持虚拟机安装和操作系统重新安装,使重装系统更便捷。
Cobbler提供以下服务集成:
* PXE服务支持
* DHCP服务管理
* DNS服务管理
* 电源管理
* Kickstart服务支持
* yum仓库管理
2 安装部署
2.1相关文件
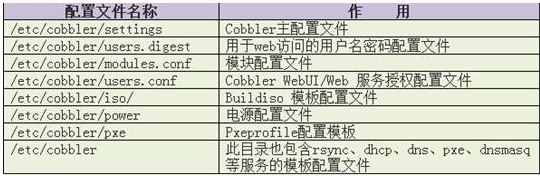
1.Cobbler配置文件目录:/etc/cobbler
/etc/cobbler/settings #cobbler主配置文件
/etc/cobbler/dhcp.template #DHCP服务的配置模板
/etc/cobbler/tftpd.template #tftp服务的配置模板
/etc/cobbler/rsync.template #rsync服务的配置模板
/etc/cobbler/iso #iso模板配置文件
/etc/cobbler/pxe #pxe模板文件
/etc/cobbler/power #电源的配置文件
/etc/cobbler/users.conf #Web服务授权配置文件
/etc/cobbler/users.digest #用于web访问的用户名密码配置文件
/etc/cobbler/dnsmasq.template #DNS服务的配置模板
/etc/cobbler/modules.conf #Cobbler模块配置文件
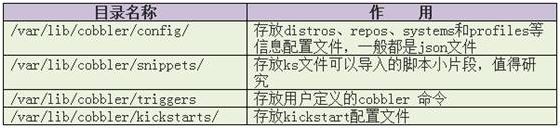
2.Cobbler数据目录:/var/lib/cobbler
/var/lib/cobbler/config #配置文件
/var/lib/cobbler/triggers #Cobbler命令
/var/lib/cobbler/kickstarts #默认存放kickstart文件
/var/lib/cobbler/loaders #存放的各种引导程序
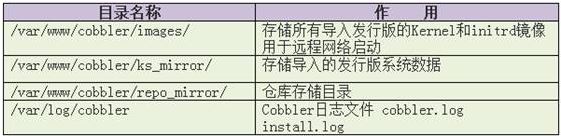
3.系统安装镜像目录:/var/www/cobbler
/var/www/cobbler/ks_mirror #导入的系统镜像列表
/var/www/cobbler/images #导入的系统镜像启动文件
/var/www/cobbler/repo_mirror #yum源存储目录
4.日志目录:/var/log/cobbler
/var/log/cobbler/install.log #客户端系统安装日志
/var/log/cobbler/cobbler.log #cobbler日志
2.2 Cobbler安装
2.2.1安装EPEL源
yum install epel-release
2.2.2安装cobbler
yum install cobbler httpd rsync tftp-server xinetd dhcp python-ctypes cman pykickstart –y
2.2.3配置cobbler
vim /etc/cobbler/settings #Cobbler主配置文件
sed -i 's/manage_dhcp: 0/manage_dhcp: 1/g' /etc/cobbler/settings
sed -i 's/manage_rsync: 0/manage_rsync: 1/g' /etc/cobbler/settings
# set to 1 to enable Cobbler's DHCP management features.
# the choice of DHCP management engine is in /etc/cobbler/modules.conf
manage_dhcp: 1
# set to 1 to enable Cobbler's RSYNC management features.
manage_rsync: 1
# if using cobbler with manage_dhcp, put the IP address
# of the cobbler server here so that PXE booting guests can find it
# if you do not set this correctly, this will be manifested in TFTP open timeouts.
next_server: 192.168.56.6
# this is the address of the cobbler server -- as it is used
# by systems during the install process, it must be the address
# or hostname of the system as those systems can see the server.
# if you have a server that appears differently to different subnets
# (dual homed, etc), you need to read the --server-override section
# of the manpage for how that works.
server: 192.168.56.6
2.2.4关闭SELinux、iptables
getsebool
service iptables stop
chkconfig iptables off
2.2.5配置tftp、rsync
设置 'disable' 为 'no'
sed -i '/disable/c\\tdisable\t\t\t= no' /etc/xinetd.d/tftp
sed -i 's/\=\ yes/\=\ no/g' /etc/xinetd.d/rsync
2.2.6启用wsgi模块
sed -i 's@#LoadModule@LoadModule@g' /etc/httpd/conf.d/wsgi.conf
2.2.7生成密码
这里生成密钥和配置默认密钥,ks文件引用
openssl passwd -1 -salt 'random-phrase-here' 'wq'
$1$random-p$29HCOY0msGT.4xVuIl6Gp.
加入cobbler配置
vim /etc/cobbler/settings
grep default_password_crypted /etc/cobbler/settings#修改为如下配置
default_password_crypted: "$1$random-p$29HCOY0msGT.4xVuIl6Gp."
2.2.8配置DHCP
vim /etc/cobbler/dhcp.template
allow booting;
allow bootp;
ddns-update-style interim;
ignore client-updates;
subnet 192.168.56.0 netmask 255.255.255.0 {
range dynamic-bootp 192.168.56.100 192.168.56.254;
option domain-name-servers 192.168.0.1;
option routers 192.168.56.1;
option subnet-mask 255.255.255.0;
default-lease-time 1800;
max-lease-time 3600;
next-server 192.168.56.6;
filename "pxelinux.0";
}
2.2.9配置服务
/sbin/service httpd start
/sbin/service dhcpd start
/sbin/service xinetd start
/sbin/service cobblerd start
/sbin/chkconfig httpd on
/sbin/chkconfig dhcpd on
/sbin/chkconfig xinetd on
/sbin/chkconfig tftp on
/sbin/chkconfig cobblerd on
2.2.10引导系统文件
cobbler get-loaders
2.2.11配置debmiror(可选)
yum -y install debmirror
修改 /etc/debmirror.conf 配置文件,注释掉 @dists 和 @arches 两行
sed -i 's|@dists=.*|#@dists=|' /etc/debmirror.conf
sed -i 's|@arches=.*|#@arches=|' /etc/debmirror.conf
2.2.12检查配置
cobbler check
The following are potential configuration items that you may want to fix:无需处理
1 : reposync is not installed, need for cobbler reposync, install/upgrade yum-utils?
2 : debmirror package is not installed, it will be required to manage debian deployments and repositories
Restart cobblerd and then run 'cobbler sync' to apply changes.
2.2.13同步配置
cobbler sync
2.3 Cobbler管理
2.3.1命令说明

命令参考
cobbler --help
cobbler distro --help
cobbler distro add --help
2.3.2配置文件说明
Cobbler配置文件存放在/etc/cobbler下
2.3.3镜像数据目录
导入的系统发行版,repos镜像和kickstart文件都放置在/var/www/cobbler
目录下。确保/var目录有足够的空间来存储这些文件。
2.3.4数据目录
此目录存储和Cobbler profiles、systems、distros相关的配置。
2.3.5日志文件
web日志存放点:
/var/log/httpd/access_log
/var/log/httpd/error_log
/var/log/httpd/ssl_access_log
/var/log/httpd/ssl_error_log
Cobbler日志:
/var/log/cobbler/cobbler.log
/var/log/cobbler/install.log
通过Cobbler日志可以获取系统的安装状态
2.3.6导入镜像
1. 注意下载的ISO文件要核对文件的md5值,确保数据完整性
md5sum xx.iso
2.创建目录
mkdir -p /var/os/Linux/Centos/x86_64/Centos6.7/dvd
3.挂载
mount -o loop/var/iso/Linux/Centos/x86_64/xx.iso
/var/os/Linux/Centos/x86_64/Centos6.7/dvd
2.3.7导入数据
cobbler import --path=/xx --name=centos6.7 --arch=x86_64
cobbler list 列出配置
cobbler report 详细
cobbler profile find --distro=centos6.7-x86_64 #查看配置是否存在
cobbler profile remove --name=centos6.7-x86_64 #删除配置文件
cobbler distro remove --name=centos6.7-x86_64 #删除distro
cobbler profile find --distro=centos6.7-x86_64 #再查看配置已无
2.3.8自定义ks
ks目录位置
/var/lib/cobbler/kickstarts/
默认的ks位置
/var/lib/cobbler/kickstarts/sample.ks
更改指定系统版本对应的ks配置文件
cp /var/lib/cobbler/kickstarts/ sample.ks centos6.7-x86_64.ks
cobbler profile add --name=centos6.7 --distro= centos6.7-x86_64 --kickstart=/var/lib/cobbler/kickstarts/centos6.7-x86_64.ks
cobbler check
cobbler sync
KS示例:
#platform=x86, AMD64, or Intel EM64T
# Firewall configuration
firewall --disabled
# Install OS instead of upgrade
install
# Use network installation
url --url=$tree
#Root password
rootpw root
# System authorization information
auth --useshadow--enablemd5
# Use graphical mode install
graphical
# Run the Setup Agent on first boot
firstboot --disable
# System keyboard
keyboard us
# System language
lang en_US
# SELinux configuration
selinux --disabled
# Installation logging level
logging --level=info
# System timezone
timezone Asia/Shanghai
# Network information
network --bootproto=static --device=eth0 --gateway=192.168.56.1 --ip=192.168.56.99 --nameserver=192.168.56.99 --netmask=255.255.255.0 --hostname=host99 --onboot=on
# System bootloader configuration
bootloader --location=mbr
# Partition clearing information
clearpart --all --initlabel
# Disk partitioning information
part / --fstype="ext4" --ondisk=sda --size=8000
part /boot --fstype="ext4" --ondisk=sda --size=200
part swap --fstype="swap" --size=1000
# Reboot after installation
reboot
# Clear the Master Boot Record
zerombr
%packages
@ X Window System
@ Desktop
@ Development tools
gcc*
%end
3 Web管理
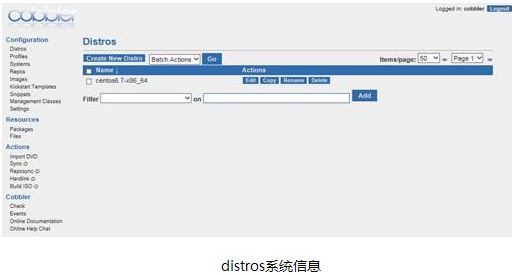
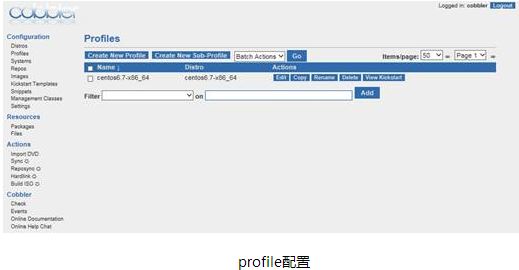
Cobbler web界面是一个很好的前端,非常容易管理Cobbler。可以添加和删除system、distro、profile,可以查看、编辑distros、profiles、subprofiles、systems、repos、kickstart文件。
3.1cobbler web管理
3.1.1安装
yum -y install cobbler-web
3.1.2设置用户密码
为已存在的用户cobbler重置密码:
htdigest /etc/cobbler/users.digest "Cobbler" cobbler
添加新用户:
htdigest /etc/cobbler/users.digest "Cobbler" newname
3.1.3配置登录
sed -i 's/authn_denyall/authn_configfile/g'
/etc/cobbler/modules.conf
/etc/init.d/cobblerd restart
/etc/init.d/httpd restart
3.1.4访问web
浏览器访问登录页面https://192.168.xx.xx/cobbler_web
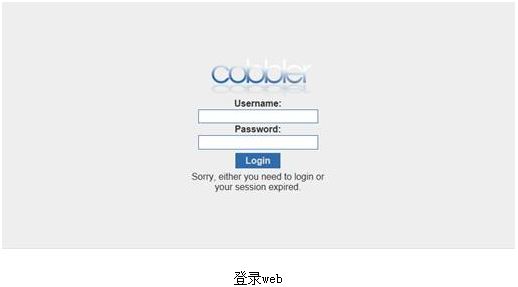
3.1.5登录web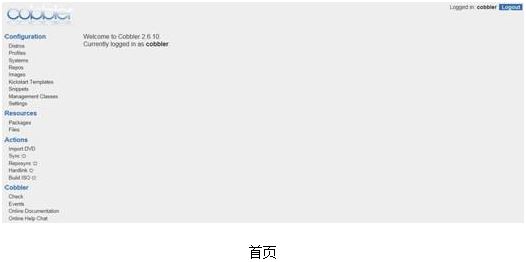
3.1.6管理web
cobbler system add --name=xx --hostname=xx --mac=xx
--interface=ethx --ip-address=xx --subnet=xx --gateway=xx
--static=1 --profile=xx
yum install cman ipmitool -y 电源管理(需要硬件支持)

Linux自动化安装cobbler的更多相关文章
- Linux自动化之Cobbler补鞋匠安装
cobbler介绍: 快速网络安装linux操作系统的服务,支持众多的Linux发行版:Red Hat. Fedora.CentOS.Debian.Ubuntu和SuSE,也可以支持网络安装w ...
- linux 自动化安装系统 -KS文件
# Kickstart file automatically generated by anaconda. installharddrive --partition=sdb2 --dir=lang e ...
- Cobbler自动化安装
# Cobbler自动化安装 [Cobbler官网](http://cobbler.github.io) :Linux下安装jenkins
jenkins是一个Java开发的开源持续集成工具,广泛用于项目开发,具有自动化构建.测试和部署等功能,它的运行需要Java环境. 上篇博客介绍了Linux下安装JDK的步骤,这篇博客,介绍下Linu ...
- cobbler实现系统自动化安装centos
cobbler [epel] cobbler服务集成 PXE DHCP rsync Http DNS Kickstart IPMI[电源管理] 1.软件安装 yum install cobbler d ...
随机推荐
- java: org.luaj.vm2.LuaError:XXX module not found lua脚本初始化出错
我遇到这个错误是因为在引用脚本目录时,设置错了位置.设置成脚本所在目录的上级目录. lua使用和加载初始化方法 在java中使用lua,使用需要引用 luaj-jse-2.0.2.jar 同时需要使用 ...
- java 中文 乱码 问号
在基于Java的编程中,经常会碰到汉字的处里及显示的问题,比如一大堆乱码或问号. 这是因为JAVA中默认的编码方式是UNICODE,而中国人通常使用的文件和DB都是基于GB2312或者BIG5等编码, ...
- OAF_EO系列4 - Create详解和实现(案例)
2014-06-02 Created By BaoXinjian
- 用widthStep的方法来增加某范围的像素----与imageROI对比
//用widthStep的方法来增加某范围的像素 //作者:sandy //时间:2015-10-5 #include <cv.h> #include <highgui.h> ...
- Linux命令(14)文件和文件夹权限管理:chmod
linux文件和文件夹权限简介: chmod命令用于改变linux系统文件或目录的访问权限.用它控制文件或目录的访问权限. Linux系统中的每个文件和目录都有访问许可权限,用它来确定谁可以通过何种方 ...
- KVC , KVO , KVB
来源:http://www.cnblogs.com/jay-dong/archive/2012/12/13/2815778.html 熟悉oc语法的同学也许都会懂得这么一点:在oc中,类的成员变量或是 ...
- Varnish 4.0 实战(转)
简介 Varnish 是一款高性能且开源的反向代理服务器和 HTTP 加速器,其采用全新的软件体系机构,和现在的硬件体系紧密配合,与传统的 squid 相比,varnish 具有性能更高.速度更快.管 ...
- 服务器安装MongoDB
1.下载MongoDB安装包,如:mongodb-win32-i386-1.8.1.zip: 2.新建目录“D:\MongoDB”,将安装中的bin目录下全部.exe文件复制到“D:\MongoDB” ...
- C++学习36 string类和字符串
C++大大增强了对字符串的支持,除了可以使用C风格的字符串,还可以使用内置的数据类型 string.string 类处理起字符串来会方便很多,完全可以代替C语言中的 char 数组或 char 指针. ...
- JAVA继承时this和super关键字
JAVA继承时this和super关键字 本文主要讨论在方法前使用this或super关键字时,编译器在什么地方查找对应的函数. 在子类中指定this关键字.首先在本类中查找,如果本类中找不到,再在父 ...