Netty Nio启动全流程
Netty Nio启动全流程
1. 各组件之间的关系
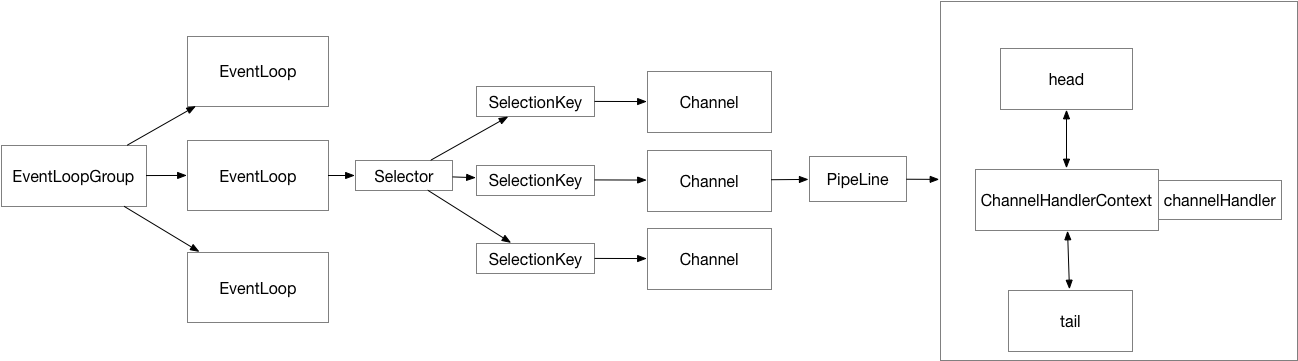
说明:EventLoopGroup类似线程池,EventLoop为单线程,每个EventLoop关联一个Nio Selector,用于注册Channel,形成一个EventLoop被多个channel公用。在EventLoop会执行通道Io选择操作,以及非Io任务。在Channel初始化后会创建pipeline,是handler的链表结构。
2. 服务端vs客户端启动
// 服务端启动

private ChannelFuture doBind(final SocketAddress localAddress) {

    final ChannelFuture regFuture = initAndRegister();

    final Channel channel = regFuture.channel();

    if (regFuture.cause() != null) {

        return regFuture;

    }

    if (regFuture.isDone()) {

        // At this point we know that the registration was complete and successful.

        ChannelPromise promise = channel.newPromise();

        doBind0(regFuture, channel, localAddress, promise);

        return promise;

    } else {

        // Registration future is almost always fulfilled already, but just in case it's not.

        final PendingRegistrationPromise promise = new PendingRegistrationPromise(channel);

        regFuture.addListener(new ChannelFutureListener() {

            @Override

            public void operationComplete(ChannelFuture future) throws Exception {

                Throwable cause = future.cause();

                if (cause != null) {

                    // Registration on the EventLoop failed so fail the ChannelPromise directly to not cause an

                    // IllegalStateException once we try to access the EventLoop of the Channel.

                    promise.setFailure(cause);

                } else {

                    // Registration was successful, so set the correct executor to use.

                    // See https://github.com/netty/netty/issues/2586

                    promise.registered();

                    doBind0(regFuture, channel, localAddress, promise);

                }

            }

        });

        return promise;

    }

}
//客户端启动

private ChannelFuture doResolveAndConnect(final SocketAddress remoteAddress, final SocketAddress localAddress) {

    final ChannelFuture regFuture = initAndRegister();

    final Channel channel = regFuture.channel();

    if (regFuture.isDone()) {

        if (!regFuture.isSuccess()) {

            return regFuture;

        }

        return doResolveAndConnect0(channel, remoteAddress, localAddress, channel.newPromise());

    } else {

        // Registration future is almost always fulfilled already, but just in case it's not.

        final PendingRegistrationPromise promise = new PendingRegistrationPromise(channel);

        regFuture.addListener(new ChannelFutureListener() {

            @Override

            public void operationComplete(ChannelFuture future) throws Exception {

                // Directly obtain the cause and do a null check so we only need one volatile read in case of a

                // failure.

                Throwable cause = future.cause();

                if (cause != null) {

                    // Registration on the EventLoop failed so fail the ChannelPromise directly to not cause an

                    // IllegalStateException once we try to access the EventLoop of the Channel.

                    promise.setFailure(cause);

                } else {

                    // Registration was successful, so set the correct executor to use.

                    // See https://github.com/netty/netty/issues/2586

                    promise.registered();

                    doResolveAndConnect0(channel, remoteAddress, localAddress, promise);

                }

            }

        });

        return promise;

    }

}
一言以蔽之,首先做初始化channel和channel注册操作,然后服务器启动做绑定操作,客户端启动做连接操作。而初始化channel和channel注册都是通过initAndRegister()实现。最大化重用代码。
3. 初始化创建通道以及通道注册
3.1 模板方法的创建通道->初始化通道->通道注册
final ChannelFuture initAndRegister() {

    Channel channel = null;

    try {

      // 创建通道

        channel = channelFactory.newChannel();

     // 初始化通道

        init(channel);

    } catch (Throwable t) {

        if (channel != null) {

            // channel can be null if newChannel crashed (eg SocketException("too many open files"))

            channel.unsafe().closeForcibly();

            // as the Channel is not registered yet we need to force the usage of the GlobalEventExecutor

            return new DefaultChannelPromise(channel, GlobalEventExecutor.INSTANCE).setFailure(t);

        }

        // as the Channel is not registered yet we need to force the usage of the GlobalEventExecutor

        return new DefaultChannelPromise(new FailedChannel(), GlobalEventExecutor.INSTANCE).setFailure(t);

    }

    // 通道注册

    ChannelFuture regFuture = config().group().register(channel);

    if (regFuture.cause() != null) {

        if (channel.isRegistered()) {

            channel.close();

        } else {

            channel.unsafe().closeForcibly();

        }

    }

    return regFuture;

}
3.2 创建通道
- 构造channel
protected AbstractNioChannel(Channel parent, SelectableChannel ch, int readInterestOp) {

    super(parent);

    this.ch = ch;

    this.readInterestOp = readInterestOp;

    try {

        ch.configureBlocking(false);

    } catch (IOException e) {

        try {

            ch.close();

        } catch (IOException e2) {

            if (logger.isWarnEnabled()) {

                logger.warn(

                        "Failed to close a partially initialized socket.", e2);

            }

        }

        throw new ChannelException("Failed to enter non-blocking mode.", e);

    }

}
protected AbstractChannel(Channel parent) {

    this.parent = parent;

    id = newId();

    unsafe = newUnsafe();

    pipeline = newChannelPipeline();

}
NioChannel将java SelectableChannel包装了一把,并添加了pipeline和unsafe操作,默认的pipeline是一个双向链表结构,只包含head和tail两个节点。
2. 初始化channel
对于客户端而言,直接向pipeline中添加builder方法的handler,以及一些nio操作的通用属性,对于服务端创建而言,除了一些基本nio属性外,只添加了一个初始化的handler
// 客户端创建

ChannelPipeline p = channel.pipeline();

p.addLast(config.handler());
//服务端创建

p.addLast(new ChannelInitializer<Channel>() {

    @Override

    public void initChannel(final Channel ch) throws Exception {

        final ChannelPipeline pipeline = ch.pipeline();

        ChannelHandler handler = config.handler();

        if (handler != null) {

            pipeline.addLast(handler);

        }

        ch.eventLoop().execute(new Runnable() {

            @Override

            public void run() {

                pipeline.addLast(new ServerBootstrapAcceptor(

                        ch, currentChildGroup, currentChildHandler, currentChildOptions, currentChildAttrs));

            }

        });

    }

});
注:ChannelInitializer的initChannnel会在注册成功之后调用,以此实现动态扩展。
客户端创建时候pipeline中没有ChannelInitializer,需要自己添加。
3. 通道注册
主要将channel绑定到EventLoop上面,然后在eventLoop单线程中执行注册操作
@Override

public final void register(EventLoop eventLoop, final ChannelPromise promise) {

    if (eventLoop == null) {

        throw new NullPointerException("eventLoop");

    }

    if (isRegistered()) {

        promise.setFailure(new IllegalStateException("registered to an event loop already"));

        return;

    }

    if (!isCompatible(eventLoop)) {

        promise.setFailure(

                new IllegalStateException("incompatible event loop type: " + eventLoop.getClass().getName()));

        return;

    }

    AbstractChannel.this.eventLoop = eventLoop;

    // 此时在主线程中,不知eventLoop线程池中

    if (eventLoop.inEventLoop()) {

        register0(promise);

    } else {

        try {

            eventLoop.execute(new Runnable() {

                @Override

                public void run() {

                    register0(promise);

                }

            });

        } catch (Throwable t) {

            logger.warn(

                    "Force-closing a channel whose registration task was not accepted by an event loop: {}",

                    AbstractChannel.this, t);

            closeForcibly();

            closeFuture.setClosed();

            safeSetFailure(promise, t);

        }

    }

}
register0主要干三件事,注册->调用ChannelInitializer的initChannnel完成添加handler->注册channel关心的操作
3.1 java channel注册,0表示只注册,不执行任何操作
selectionKey = javaChannel().register(eventLoop().unwrappedSelector(), 0, this);
3.2 pipeline.fireChannelRegistered()
此时,pipeline中包含三个handler,其中一个是ChannelInitializer。
public final void channelRegistered(ChannelHandlerContext ctx) throws Exception {

    if (initChannel(ctx)) {

        ctx.pipeline().fireChannelRegistered();

    } else {

        ctx.fireChannelRegistered();

    }

}
3.2 beginRead();
@Override

protected void doBeginRead() throws Exception {

    // Channel.read() or ChannelHandlerContext.read() was called

    final SelectionKey selectionKey = this.selectionKey;

    if (!selectionKey.isValid()) {

        return;

    }

    readPending = true;

    final int interestOps = selectionKey.interestOps();

    if ((interestOps & readInterestOp) == 0) {

        selectionKey.interestOps(interestOps | readInterestOp);

    }

}
注意,此时才会真实注册关系的事件,对服务端而言为Accept,对客户端创建,就是connect
public NioServerSocketChannel(ServerSocketChannel channel) {

     super(null, channel, SelectionKey.OP_ACCEPT);

     config = new NioServerSocketChannelConfig(this, javaChannel().socket());

 }
protected AbstractNioByteChannel(Channel parent, SelectableChannel ch) {

     super(parent, ch, SelectionKey.OP_READ);

 }
至此,客户端与服务端完成了初始化channel以及注册channel操作。
4. 服务端绑定到指定端口
private static void doBind0(

        final ChannelFuture regFuture, final Channel channel,

        final SocketAddress localAddress, final ChannelPromise promise) {

    channel.eventLoop().execute(new Runnable() {

        @Override

        public void run() {

            if (regFuture.isSuccess()) {

                channel.bind(localAddress, promise).addListener(ChannelFutureListener.CLOSE_ON_FAILURE);

            } else {

                promise.setFailure(regFuture.cause());

            }

        }

    });

}
在eventLoop中执行绑定端口操作
@Override

public void bind(

        ChannelHandlerContext ctx, SocketAddress localAddress, ChannelPromise promise)

        throws Exception {

    unsafe.bind(localAddress, promise);

}
最后都是会调用unsafe的bind方法完成端口绑定操作。
5. 客户端连接远程服务端
private static void doConnect(

        final SocketAddress remoteAddress, final SocketAddress localAddress, final ChannelPromise connectPromise) {

    final Channel channel = connectPromise.channel();

    channel.eventLoop().execute(new Runnable() {

        @Override

        public void run() {

            if (localAddress == null) {

                channel.connect(remoteAddress, connectPromise);

            } else {

                channel.connect(remoteAddress, localAddress, connectPromise);

            }

            connectPromise.addListener(ChannelFutureListener.CLOSE_ON_FAILURE);

        }

    });

}
连接服务端最终也是在eventLoop中执行,最终调用unsafe的connect方法。
protected boolean doConnect(SocketAddress remoteAddress, SocketAddress localAddress) throws Exception {

    if (localAddress != null) {

        doBind0(localAddress);

    }

    boolean success = false;

    try {

        boolean connected = SocketUtils.connect(javaChannel(), remoteAddress);

        if (!connected) {

            selectionKey().interestOps(SelectionKey.OP_CONNECT);

        }

        success = true;

        return connected;

    } finally {

        if (!success) {

            doClose();

        }

    }

}
connect有三种结果,成功,直接返回true,失败则暂时不知道结果,检测OP_CONNECT,异常直接关闭链路。
值得说明的是jdk默认不支持连接超时,netty添加了超时机制:在EventLoop中添加超时任务,触发超时时间后会关闭连接,连接成功会删除该超时任务。
// Schedule connect timeout.

int connectTimeoutMillis = config().getConnectTimeoutMillis();

if (connectTimeoutMillis > 0) {

    connectTimeoutFuture = eventLoop().schedule(new Runnable() {

        @Override

        public void run() {

            ChannelPromise connectPromise = AbstractNioChannel.this.connectPromise;

            ConnectTimeoutException cause =

                    new ConnectTimeoutException("connection timed out: " + remoteAddress);

            if (connectPromise != null && connectPromise.tryFailure(cause)) {

                close(voidPromise());

            }

        }

    }, connectTimeoutMillis, TimeUnit.MILLISECONDS);

}

promise.addListener(new ChannelFutureListener() {

    @Override

    public void operationComplete(ChannelFuture future) throws Exception {

        if (future.isCancelled()) {

            if (connectTimeoutFuture != null) {

                connectTimeoutFuture.cancel(false);

            }

            connectPromise = null;

            close(voidPromise());

        }

    }

});
6.EventLooop 处理IO事件
if ((readyOps & SelectionKey.OP_CONNECT) != 0) {

    // remove OP_CONNECT as otherwise Selector.select(..) will always return without blocking

    // See https://github.com/netty/netty/issues/924

    int ops = k.interestOps();

    ops &= ~SelectionKey.OP_CONNECT;

    k.interestOps(ops);

    unsafe.finishConnect();

}

// Process OP_WRITE first as we may be able to write some queued buffers and so free memory.

if ((readyOps & SelectionKey.OP_WRITE) != 0) {

    // Call forceFlush which will also take care of clear the OP_WRITE once there is nothing left to write

    ch.unsafe().forceFlush();

}

// Also check for readOps of 0 to workaround possible JDK bug which may otherwise lead

// to a spin loop

if ((readyOps & (SelectionKey.OP_READ | SelectionKey.OP_ACCEPT)) != 0 || readyOps == 0) {

    unsafe.read();

}
Netty Nio启动全流程的更多相关文章
- 详细图解 Netty Reactor 启动全流程 | 万字长文 | 多图预警
本系列Netty源码解析文章基于 4.1.56.Final版本 大家第一眼看到这幅流程图,是不是脑瓜子嗡嗡的呢? 大家先不要惊慌,问题不大,本文笔者的目的就是要让大家清晰的理解这幅流程图,从而深刻的理 ...
- 一张图轻松掌握 Flink on YARN 应用启动全流程(上)
Flink 支持 Standalone 独立部署和 YARN.Kubernetes.Mesos 等集群部署模式,其中 YARN 集群部署模式在国内的应用越来越广泛.Flink 社区将推出 Flink ...
- 一文搞懂 Netty 发送数据全流程 | 你想知道的细节全在这里
欢迎关注公众号:bin的技术小屋,如果大家在看文章的时候发现图片加载不了,可以到公众号查看原文 本系列Netty源码解析文章基于 4.1.56.Final版本 在<Netty如何高效接收网络数据 ...
- Apache DolphinScheduler 2.X保姆级源码解析,中国移动工程师揭秘服务调度启动全流程
2022年1月,科学技术部高新技术司副司长梅建平在"第六届中国新金融高峰论坛"上表示,当前数据量已经大大超过了处理能力的上限,若信息技术仍然是渐进式发展,则数据处理能力的提升将远远 ...
- 【Netty之旅四】你一定看得懂的Netty客户端启动源码分析!
前言 前面小飞已经讲解了NIO和Netty服务端启动,这一讲是Client的启动过程. 源码系列的文章依旧还是遵循大白话+画图的风格来讲解,本文Netty源码及以后的文章版本都基于:4.1.22.Fi ...
- 【Heritrix基础教程之4】开始一个爬虫抓取的全流程代码分析
在创建一个job后,就要开始job的运行,运行的全流程如下: 1.在界面上启动job 2.index.jsp 查看上述页面对应的源代码 <a href='"+request.getCo ...
- CentOS7+CDH5.14.0安装全流程记录,图文详解全程实测-总目录
CentOS7+CDH5.14.0安装全流程记录,图文详解全程实测-总目录: 0.Windows 10本机下载Xshell,以方便往Linux主机上上传大文件 1.CentOS7+CDH5.14.0安 ...
- FFmpeg编解码处理1-转码全流程简介
本文为作者原创,转载请注明出处:https://www.cnblogs.com/leisure_chn/p/10584901.html FFmpeg编解码处理系列笔记: [0]. FFmpeg时间戳详 ...
- CentOS6.6服务器系统配置(LAMP+phpMyAdmin)全流程
CentOS6.6服务器系统配置(LAMP+phpMyAdmin)全流程 昨天在腾讯云上买了个服务器,是CentOS6.6操作系统的裸机,里面什么都没,然后开始了一天一夜的LAMP(Apache+My ...
随机推荐
- null id in entry (don't flush the Session after an exception occurs)
null id in entry (don't flush the Session after an exception occurs) 遇到这个异常实属不小心所致,最初看到异出的错误信息时我误认为是 ...
- js正则表达使用实例
(1)替换掉htmlStr中所有的<font..>和</font> var htmlstr='<font color="#fff">ABC< ...
- C#实现二维码生成与解码
前几天公司内部分享了一个关于二维码的例子,觉得挺好玩的,但没有提供完整的源码.有时候看到一个好玩的东西,总想自己Demo一个,于是抽空就自己研究了一下. 一.二维码的原理 工欲善其事,必先利其器.要生 ...
- 吴裕雄 实战python编程(1)
import sqlite3 conn = sqlite3.connect('E:\\test.sqlite') # 建立数据库联接cursor = conn.cursor() # 建立 cursor ...
- 获取iframe内的元素
$("#iframeID").contents().find("#index_p") 2获取父窗体的值 $('#father', parent.document ...
- dom node 查找父级parentNode
var o = document.querySelectorAll("a[href='baidu.com']"); var p = o[o.length-1];console.lo ...
- FP真验货客户的成品和半成品编码部分没有带尾续,导致FP规划错误 IN_SALES_ORDER数据不带CZ
错误描述:真验货客户的成品和半成品编码部分没有带尾续,导致FP规划错误 IT角度: IN_SALES_ORDER数据不带CZ 现时前台页面数据: 现时后台数据: 一.跟进情况 1.执行SAP_SALE ...
- html标签对应的英文原文(转载)
标签 对应英文 说明 <!--> / 注释 <!DOCTYPE> document type 文档类型 <a> anchor 超链接 <abbr> a ...
- 运行php网站需要安装什么
php的运行环境: 为了能够运行php,有以下两种方法: 1. 使用支持php和MySQL的web主机(): 2. 本机(自己电脑)安装web服务器,然后安装MySQL和php. web虚拟主机: 大 ...
- win 下 nginx 与 php的配置
1.下载需要的软件包 php的windows版本(*注意这里下载非线程安全的,nginx使用的是cgi) http://windows.php.net/download/ nginx的window ...