
【maven】私服搭建
转自:https://www.cnblogs.com/likehua/p/4552620.html
一、软件安装
地址:http://www.sonatype.org/nexus/thank-you-for-downloading/?dl=tgz
解压:
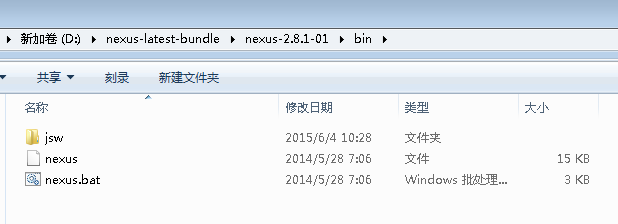
启动:
>> nexus start
打开:http://192.9.104.17:8081/nexus/#welcome
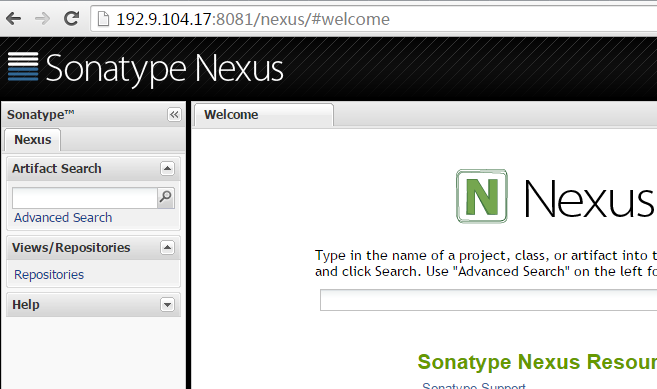
点击右上角,使用admin/admin123(默认管理员)登陆。
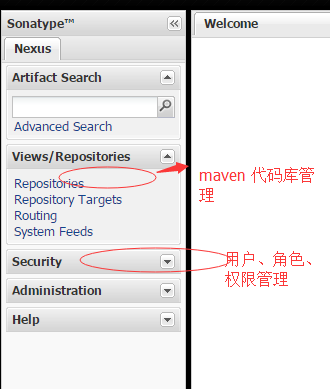
管理操作面板(修改代码库、镜像、用户权限管理等):
二、系统配置
默认的nexus 配置的镜像是无法使用的,需要我们把它设置为可行的,重新构建索引。

重新构建索引:
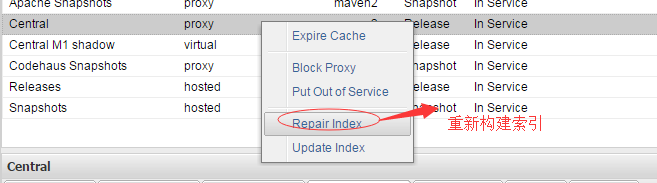
需要修改的仓库有三处:Central、Apache Snapshots、Codehaus Snapshots
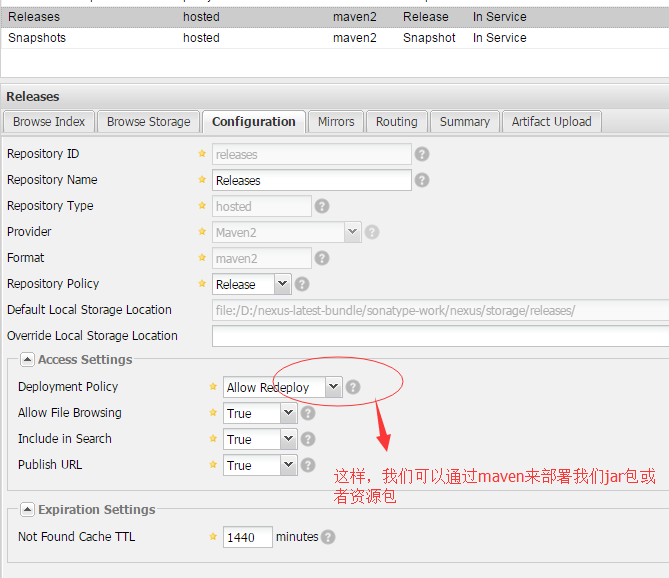
另外,releases和snapshots两处的可以自动部署属性必须勾上,如下图:
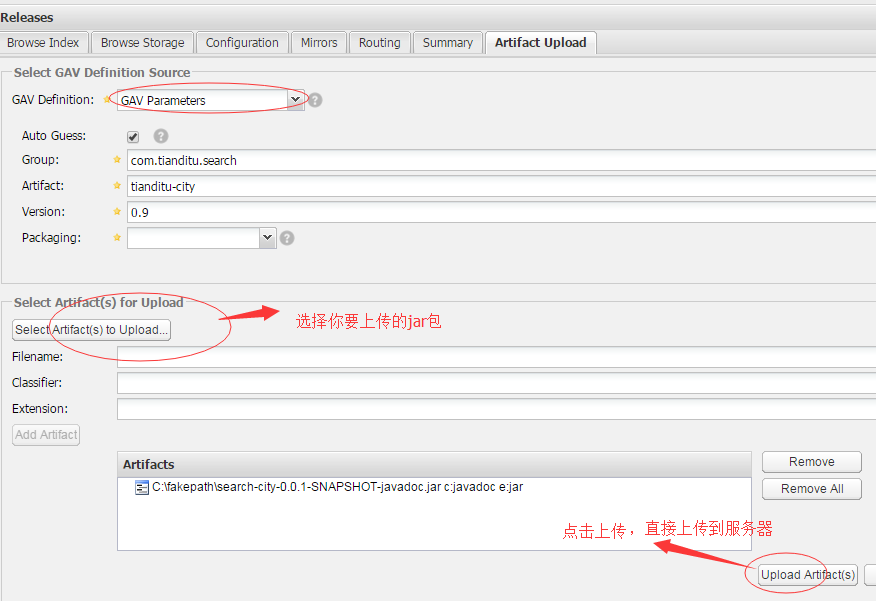
当然,你也可以通过界面来上传jar包。
三、maven环境配置
1、确保你的环境中已经部署和正确配置了maven环境,具体如果安装maven不在此教程范畴之内。
2、到你当前登录的用户下的.m2目录下,创建一个setting.xml,内容如下:
主要注意修改:servers和mirrors两处,如本例所示:
servers:
|
1
2
3
4
5
6
7
8
9
10
11
12
13
14
15
16
17
18
19
20
21
22
23
24
25
26
27
28
29
30
31
32
33
34
35
36
37
38
39
|
<servers> <!-- server | Specifies the authentication information to use when connecting to a particular server, identified by | a unique name within the system (referred to by the 'id' attribute below). | | NOTE: You should either specify username/password OR privateKey/passphrase, since these pairings are | used together. | <server> <id>deploymentRepo</id> <username>repouser</username> <password>repopwd</password> </server> --> <!-- Another sample, using keys to authenticate. <server> <id>siteServer</id> <privateKey>/path/to/private/key</privateKey> <passphrase>optional; leave empty if not used.</passphrase> </server> --> <server> <id>snapshots</id> <username>likehua</username> <password>likehua</password> </server> <server> <id>releases</id> <username>likehua</username> <password>likehua</password> </server> <server> <id>tomcat-remote-deploy</id> <username>tomcat</username> <password>tomcat123</password> </server> </servers> |
注意此处的用户名和密码,是你nexus上创建的用户名,一般付给部署的权限。
另外就是镜像地址的配置:

 1   <mirrors>

 2     <!-- mirror

 3      | Specifies a repository mirror site to use instead of a given repository. The repository that

 4      | this mirror serves has an ID that matches the mirrorOf element of this mirror. IDs are used

 5      | for inheritance and direct lookup purposes, and must be unique across the set of mirrors.

 6      |

 7     <mirror>

 8       <id>mirrorId</id>

 9       <mirrorOf>repositoryId</mirrorOf>

10       <name>Human Readable Name for this Mirror.</name>

11       <url>http://my.repository.com/repo/path</url>

12     </mirror>

13      -->

14       <mirror>

15         <id>nexus</id>

16         <mirrorOf>*</mirrorOf>

17         <name>A Local Nexus Server</name>

18         <url>http://192.9.104.17:8081/nexus/content/groups/public/</url>

19     </mirror>

20   </mirrors>
ok,maven私服搭建配置完成。
【maven】私服搭建的更多相关文章
- maven私服搭建
一.软件安装 地址:http://www.sonatype.org/nexus/thank-you-for-downloading/?dl=tgz 解压: 启动: >> nexus sta ...
- maven私服搭建(centOS6.5)
maven的好处和私服的应用本文不赘述,私服搭建如下: MAVEN 私服搭建(centOS 6.5 环境) 1. 准备环境,搭建centOS6.5系统环境,略 2. 准备对应的软件包如下: A. ...
- maven仓库总结,maven私服搭建
配置pom.xml依赖包时在这里找包的描述: http://search.maven.org/#browse 以java为根目录. mvn archtype:generate -DgroupId=zt ...
- window Maven私服搭建——nexus
注:本文来源于 <window Maven私服搭建--nexus> Maven私服搭建--nexus 1.下载nexus https://www.sonatype.com/downlo ...
- maven仓库总结,maven私服搭建,批量mvn eclipse:eclipse
配置pom.xml依赖包时在这里找包的描述: http://search.maven.org/#browse 以java为根目录. mvn archtype:generate -DgroupId=zt ...
- maven私服搭建&使用
Maven私服搭建教程 一.nexus安装 1,解压安装包 安装包下载地址 2,以管理员身份打开cmd 3,进入到nexus的bin目录 (1) 安装:nexus install (2) 启动:nex ...
- linux7下nenux3.14的maven私服搭建和配置使用
为什么用私服,各种帖子很多,话不多说,直接奉上本博主的搭建过程. 一.环境准备:确保jdk和maven安装完成 二.下载nenux:地址:https://www.sonatype.com/downlo ...
- Nexus Maven 私服搭建
1.下载Nexus安装文件:http://www.sonatype.org/nexus/go ,目前是nexus-2.13.0-01-bundle.tar.zip这个最新版本: 2.解压到任意目录,我 ...
- linux环境下jdk 安装以及maven私服搭建
1:准备资源 linux服务器,jdk和nexus 安装包 2:网络通畅,保持windows端和linux服务器端网络通畅. 3: 安装jdk和配置环境变量 进入到 ...
- maven私服搭建nexus/windows/linux(一)
为什么要搭建nexus私服,原因很简单,有些公司都不提供外网给项目组人员,因此就不能使用maven访问远程的仓库地址,还有就是公司内部开发的一些版本的jar包,如果没有私服需要一人拷贝一份然后再自己安 ...
随机推荐
- Caffeine缓存的简单介绍
1.简介 在本文中,我们将了解Caffeine,一个用于Java的高性能缓存库. 缓存和Map之间的一个根本区别是缓存会清理存储的项目. 一个清理策略会决定在某个给定时间哪些对象应该被删除,这个策略直 ...
- IE浏览器查看星号密码
用CHROME打开保存密码的网页,F12,右击"密码框"检查,编辑属性:password改为passw(只要不是password即可)即可显示密码
- Scala学习——简介
一.Scala简介 Scala 是 Scalable Language 的简写,是一门多范式的编程语言,设计初衷是实现可伸缩的语言并集成面向对象编程和函数式编程的各种特性. 二.Scala 环境搭建 ...
- unar命令解压zip文件,解决中文乱码。
unzip解压时,常出现中文乱码.可用unar来代替.
- 1java基础
1.java特性 详细解读 Java语言_小沐CA-CSDN博客 (1)Easy:Java的语法比C++的相对简单,另一个方面就是Java能使软件在很小的机器上运行,基础解释其和类库的支持的大小约为4 ...
- 莫比乌斯反演&整除分块学习笔记
整除分块 用于计算$\sum_{i=1}^n f(\lfloor{n/i} \rfloor)*i$之类的函数 整除的话其实很多函数值是一样的,对于每一块一样的商集中处理即可 若一个商的左边界为l,则右 ...
- 【洛谷 P2388 阶乘之乘】模拟
分析 求因数5的个数 AC代码 #include<iostream> using namespace std; int main() { long long n,t,ans=0,s=0; ...
- 扩展中国剩余定理(exCRT)
我 tm--CRT 没看懂 exCRT 却看懂了--emmmm-- 而且这名字完全就是国内的 OI 带师胡起的吧-- 考虑一次同余方程组 \[\begin{cases} x \equiv a_1\ ( ...
- 从事IT行业 vs 玩卡牌手游
我曾经玩过一款手游,它一直不停地推出新的更高品质的道具和人物,新出的东西比旧的东西拥有更强力的功能,要想保持领先就必须一直充钱出新东西才行.不管你以前充了十几万还是几十万,如果有半年不充,那就会被新区 ...
- 零基础涂鸦智能面板SDK开发记录(一)
前言 本人基础背景:在学校学了点JS,在blbl上看过几节node.js视频,现在是一名Android开发工程师,因公司需要学习涂鸦面板SDK开发.说真的除了官方的一些文档外,我真的找不到其他的资料. ...