saltstack实战4--综合练习3
[root@master ~]# salt 'minion02' state.sls haproxy.install env=prod
关于系统初始化部分和haproxy安装部分,所有minion都是相同的。而业务这块因前期规划不同,配置有差异。
我们把因为业务差异的这部分单独拿出来。单独配置
创建目录,编辑haproxy的配置文件
[root@master ~]# mkdir /srv/salt/prod/cluster

[root@master ~]# mkdir /srv/salt/prod/cluster/files

[root@master ~]# cd /srv/salt/prod/cluster/files/

[root@master files]# vim haproxy-outside.cfg

[root@master files]# cat haproxy-outside.cfg

global

maxconn 100000

chroot /usr/local/haproxy

uid 99

gid 99

daemon

nbproc 1

pidfile /usr/local/haproxy/logs/haproxy.pid

log 127.0.0.1 local3 info

defaults

option http-keep-alive

maxconn 100000

mode http

timeout connect 5000ms

timeout client  50000ms

timeout server 50000ms

listen stats

mode http

bind 0.0.0.0:8888

stats enable

stats uri     /haproxy-status

stats auth    haproxy:saltstack

frontend frontend_www_example_com

bind 10.0.1.111:80

mode http

option httplog

log global

default_backend backend_www_example_com

backend backend_www_example_com

option forwardfor header X-REAL-IP

option httpchk HEAD / HTTP/1.0

balance source

server web-node1  10.0.1.172:8080 check inter 2000 rise 30 fall 15

server web-node2  10.0.1.173:8080 check inter 2000 rise 30 fall 15

[root@master files]#
编辑haproxy的业务状态文件
[root@master files]# cd ..

[root@master cluster]# pwd

/srv/salt/prod/cluster

[root@master cluster]# vim haproxy-outside.sls

[root@master cluster]# cat haproxy-outside.sls

include:

  - haproxy.install

haproxy-service:

  file.managed:

    - name: /etc/haproxy/haproxy.cfg

    - source: salt://cluster/files/haproxy-outside.cfg

    - user: root

    - group: root

    - mode: 644

  service.running:

    - name: haproxy

    - enable: True

    - reload: True

    - require:

      - cmd: haproxy-init

    - watch:

      - file: haproxy-service

[root@master cluster]#
这次我们想通过top.sls执行
[root@master base]# pwd

/srv/salt/base

[root@master base]# cat top.sls

base:

  '*':

    - init.env_init

prod:

  'minion01':

    - cluster.haproxy-outside

  'minion02':

    - cluster.haproxy-outside

[root@master base]#
在执行状态文件直线,先对两台minion的apache端口进行更改
通过cmd.run模块方法,结合grep和sed命令远程更改文件
[root@master base]# salt 'minion01' cmd.run 'grep  Listen /etc/httpd/conf/httpd.conf'

minion01:

    # Listen: Allows you to bind Apache to specific IP addresses and/or

    # Change this to Listen on specific IP addresses as shown below to

    #Listen 12.34.56.78:80

    Listen 80

[root@master base]# salt 'minion01' cmd.run 'grep  '^Listen' /etc/httpd/conf/httpd.conf'

minion01:

    Listen 80

[root@master base]# salt 'minion01' cmd.run "sed -i 's#Listen 80#Listen 8080#g' /etc/httpd/conf/httpd.conf"

minion01:

[root@master base]# salt 'minion01' cmd.run 'grep  Listen /etc/httpd/conf/httpd.conf'

minion01:

    # Listen: Allows you to bind Apache to specific IP addresses and/or

    # Change this to Listen on specific IP addresses as shown below to

    #Listen 12.34.56.78:80

    Listen 8080

[root@master base]# salt 'minion02' cmd.run "sed -i 's#Listen 80#Listen 8080#g' /etc/httpd/conf/httpd.conf"

minion02:

[root@master base]# salt 'minion02' cmd.run 'grep  Listen /etc/httpd/conf/httpd.conf'

minion02:

    # Listen: Allows you to bind Apache to specific IP addresses and/or

    # Change this to Listen on specific IP addresses as shown below to

    #Listen 12.34.56.78:80

    Listen 8080

[root@master base]#
重启两台minion的apache服务
通过service.restart模块操作
[root@master base]# salt '*'  service.restart  'httpd'

minion01:

    True

minion02:

    True

[root@master base]# salt '*'  cmd.run  'lsof -i:8080'

minion01:

    COMMAND   PID   USER   FD   TYPE DEVICE SIZE/OFF NODE NAME

    httpd   21438   root    4u  IPv6 326215      0t0  TCP *:webcache (LISTEN)

    httpd   21443 apache    4u  IPv6 326215      0t0  TCP *:webcache (LISTEN)

    httpd   21444 apache    4u  IPv6 326215      0t0  TCP *:webcache (LISTEN)

    httpd   21445 apache    4u  IPv6 326215      0t0  TCP *:webcache (LISTEN)

    httpd   21446 apache    4u  IPv6 326215      0t0  TCP *:webcache (LISTEN)

    httpd   21447 apache    4u  IPv6 326215      0t0  TCP *:webcache (LISTEN)

    httpd   21448 apache    4u  IPv6 326215      0t0  TCP *:webcache (LISTEN)

    httpd   21449 apache    4u  IPv6 326215      0t0  TCP *:webcache (LISTEN)

    httpd   21450 apache    4u  IPv6 326215      0t0  TCP *:webcache (LISTEN)

minion02:

    COMMAND   PID   USER   FD   TYPE DEVICE SIZE/OFF NODE NAME

    httpd   16185   root    4u  IPv6 321483      0t0  TCP *:webcache (LISTEN)

    httpd   16190 apache    4u  IPv6 321483      0t0  TCP *:webcache (LISTEN)

    httpd   16191 apache    4u  IPv6 321483      0t0  TCP *:webcache (LISTEN)

    httpd   16192 apache    4u  IPv6 321483      0t0  TCP *:webcache (LISTEN)

    httpd   16193 apache    4u  IPv6 321483      0t0  TCP *:webcache (LISTEN)

    httpd   16194 apache    4u  IPv6 321483      0t0  TCP *:webcache (LISTEN)

    httpd   16195 apache    4u  IPv6 321483      0t0  TCP *:webcache (LISTEN)

    httpd   16196 apache    4u  IPv6 321483      0t0  TCP *:webcache (LISTEN)

    httpd   16197 apache    4u  IPv6 321483      0t0  TCP *:webcache (LISTEN)

[root@master base]#
使用命令测试没问题再执行,下面是截图了部分测试的结果
              newfile:

                  /etc/haproxy/haproxy.cfg

----------

          ID: haproxy-service

    Function: service.running

        Name: haproxy

      Result: None

     Comment: Service is set to be started

     Started: 12:38:36.883999

    Duration: 16.114 ms

     Changes:

Summary

-------------

Succeeded: 21 (unchanged=2, changed=1)

Failed:     0

-------------

Total states run:     21

[root@master base]# salt '*' state.highstate test=True
截取部分执行的
salt '*' state.highstate
----------

          ID: haproxy-init

    Function: cmd.run

        Name: chkconfig --add haproxy

      Result: True

     Comment: unless execution succeeded

     Started: 12:41:38.338363

    Duration: 37.244 ms

     Changes:

----------

          ID: net.ipv4.ip_nonlocal_bind

    Function: sysctl.present

      Result: True

     Comment: Sysctl value net.ipv4.ip_nonlocal_bind = 1 is already set

     Started: 12:41:38.375856

    Duration: 17.951 ms

     Changes:

----------

          ID: haproxy-service

    Function: file.managed

        Name: /etc/haproxy/haproxy.cfg

      Result: True

     Comment: File /etc/haproxy/haproxy.cfg updated

     Started: 12:41:38.394036

    Duration: 8.704 ms

     Changes:

              ----------

              diff:

                  New file

              mode:

                  0644

----------

          ID: haproxy-service

    Function: service.running

        Name: haproxy

      Result: True

     Comment: Service haproxy has been enabled, and is running

     Started: 12:41:38.403685

    Duration: 90.121 ms

     Changes:

              ----------

              haproxy:

                  True

Summary

-------------

Succeeded: 21 (changed=2)

Failed:     0

-------------

Total states run:     21

[root@master base]#
检测结果
[root@master base]# salt '*' cmd.run 'lsof -i:80'

minion01:

    COMMAND   PID   USER   FD   TYPE DEVICE SIZE/OFF NODE NAME

    haproxy 21636 nobody    5u  IPv4 329124      0t0  TCP 10.0.1.111:http (LISTEN)

minion02:

    COMMAND   PID   USER   FD   TYPE DEVICE SIZE/OFF NODE NAME

    haproxy 16385 nobody    5u  IPv4 324420      0t0  TCP 10.0.1.111:http (LISTEN)

[root@master base]#
检测是否成功:在浏览器输入
http://10.0.1.172:8888/haproxy-status
http://10.0.1.173:8888/haproxy-status
用户名:haproxy 密码:saltstack
如果能显示haproxy页面即可,下面显示backend是down的状态是因为后端的apache没设置默认主页

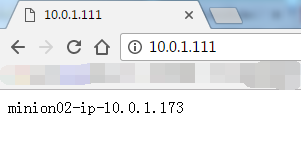
分别设置minion01和minion02 的首页
[root@minion01 ~]# echo minion01-ip-10.0.1.172>>/var/www/html/index.html

[root@minion01 ~]#
minion02的
[root@minion02 ~]# echo minion02-ip-10.0.1.173>>/var/www/html/index.html

[root@minion02 ~]#
再次刷新页面即可

至此,haproxy的业务部分也结束了。
配置keepalived
我们也把它分解下
系统初始化(前期配置haproxy之前已经做过了)
功能模块
业务模块
功能模块部分
采集安装命令
tar xfz keepalived-1.2.19.tar.gz && cd keepalived-1.2.19 && ./configure --prefix=/usr/local/keepalived --disable-fwmark && make && make install
采集文件
启动脚本和keepalived的配置文件需要修改,这两个文件单独取出来
[root@master etc]# pwd

/usr/local/src/keepalived-1.2.19/keepalived/etc

[root@master etc]# ls

init.d  keepalived

[root@master etc]# cp init.d/keepalived.init /srv/salt/prod/keepalived/files/

[root@master etc]# cp keepalived/keepalived.conf /srv/salt/prod/keepalived/files/

[root@master etc]# cd /srv/salt/prod/keepalived/files/

[root@master files]#
编辑文件

下面文件也要取出来,从安装后keepalived的目录取出来
[root@mysql keepalived-1.2.19]# cd /usr/local/keepalived/etc/sysconfig/

[root@mysql sysconfig]# ls

keepalived
文件采集3个
[root@master files]# pwd

/srv/salt/prod/keepalived/files

[root@master files]# ls

keepalived  keepalived.conf  keepalived.init

[root@master files]# ll

total 12

-rw-r--r-- 1 root root  667 Jan  2 13:21 keepalived

-rw-r--r-- 1 root root 3562 Jan  2 13:10 keepalived.conf

-rwxr-xr-x 1 root root 1335 Jan  2 13:19 keepalived.init

[root@master files]#
修改下文件名
[root@master files]# mv keepalived keepalived.sysconfig

[root@master files]# ll

total 12

-rw-r--r-- 1 root root 3562 Jan  2 13:10 keepalived.conf

-rwxr-xr-x 1 root root 1335 Jan  2 13:19 keepalived.init

-rw-r--r-- 1 root root  667 Jan  2 13:21 keepalived.sysconfig

[root@master files]#
上传tar包到此处
[root@master files]# ll

total 336

-rw-r--r-- 1 root root 330164 Dec 17 23:54 keepalived-1.2.19.tar.gz

-rw-r--r-- 1 root root   3562 Jan  2 13:10 keepalived.conf

-rwxr-xr-x 1 root root   1335 Jan  2 13:19 keepalived.init

-rw-r--r-- 1 root root    667 Jan  2 13:21 keepalived.sysconfig

[root@master files]#
开始编写keepalived的功能模块安装文件
[root@master keepalived]# pwd

/srv/salt/prod/keepalived

[root@master keepalived]# cat install.sls

include:

  - pkg.pkg-init

keepalived-install:

  file.managed:

    - name: /usr/local/src/keepalived-1.2.19.tar.gz

    - source: salt://keepalived/files/keepalived-1.2.19.tar.gz

    - user: root

    - group: root

    - mode: 755

  cmd.run:

    - name: cd /usr/local/src && tar xfz keepalived-1.2.19.tar.gz && cd keepalived-1.2.19 && ./configure --prefix=/usr/local/keepalived --disable-fwmark &&  make && make install

    - unless: test -d /usr/local/keepalived

    - require:

      - pkg: pkg-init

      - file: keepalived-install

keepalived-init:

  file.managed:

    - name: /etc/init.d/keepalived

    - source: salt://keepalived/files/keepalived.init

    - user: root

    - group: root

    - mode: 755

  cmd.run:

    - name: chkconfig --add keepalived

    - unless: chkconfig --list | grep keepalived

    - require:

      - file: keepalived-init

/etc/sysconfig/keepalived:

  file.managed:

    - source: salt://keepalived/files/keepalived.sysconfig

    - user: root

    - group: root

    - mode: 644

/etc/keepalived:

  file.directory:

    - user: root

    - group: root

    - mode: 755

[root@master keepalived]#
先测试执行下
[root@master keepalived]# salt 'minion01'  state.sls keepalived.install  env=prod test=True

minion01:

----------

          ID: pkg-init

    Function: pkg.installed

        Name: gcc

      Result: True

     Comment: Package gcc is already installed.

     Started: 13:50:28.614772

    Duration: 1006.367 ms

     Changes:

----------

          ID: pkg-init

    Function: pkg.installed

        Name: glibc

      Result: True

     Comment: Package glibc is already installed.

     Started: 13:50:29.621368

    Duration: 0.371 ms

     Changes:

----------

          ID: pkg-init

    Function: pkg.installed

        Name: openssl

      Result: True

     Comment: Package openssl is already installed.

     Started: 13:50:29.621797

    Duration: 0.239 ms

     Changes:

----------

          ID: pkg-init

    Function: pkg.installed

        Name: openssl-devel

      Result: True

     Comment: Package openssl-devel is already installed.

     Started: 13:50:29.622091

    Duration: 0.356 ms

     Changes:

----------

          ID: pkg-init

    Function: pkg.installed

        Name: autoconf

      Result: True

     Comment: Package autoconf is already installed.

     Started: 13:50:29.622506

    Duration: 0.25 ms

     Changes:

----------

          ID: pkg-init

    Function: pkg.installed

        Name: gcc-c++

      Result: True

     Comment: Package gcc-c++ is already installed.

     Started: 13:50:29.622811

    Duration: 0.234 ms

     Changes:

----------

          ID: pkg-init

    Function: pkg.installed

        Name: make

      Result: True

     Comment: Package make is already installed.

     Started: 13:50:29.623093

    Duration: 0.305 ms

     Changes:

----------

          ID: keepalived-install

    Function: file.managed

        Name: /usr/local/src/keepalived-1.2.19.tar.gz

      Result: None

     Comment: The file /usr/local/src/keepalived-1.2.19.tar.gz is set to be changed

     Started: 13:50:29.625281

    Duration: 4.081 ms

     Changes:

              ----------

              newfile:

                  /usr/local/src/keepalived-1.2.19.tar.gz

----------

          ID: keepalived-install

    Function: cmd.run

        Name: cd /usr/local/src && tar xfz keepalived-1.2.19.tar.gz && cd keepalived-1.2.19 && ./configure --prefix=/usr/local/keepalived --disable-fwmark &&  make && make install

      Result: None

     Comment: Command "cd /usr/local/src && tar xfz keepalived-1.2.19.tar.gz && cd keepalived-1.2.19 && ./configure --prefix=/usr/local/keepalived --disable-fwmark &&  make && make install" would have been executed

     Started: 13:50:29.630366

    Duration: 5.103 ms

     Changes:

----------

          ID: keepalived-init

    Function: file.managed

        Name: /etc/init.d/keepalived

      Result: None

     Comment: The file /etc/init.d/keepalived is set to be changed

     Started: 13:50:29.635689

    Duration: 2.641 ms

     Changes:

              ----------

              newfile:

                  /etc/init.d/keepalived

----------

          ID: keepalived-init

    Function: cmd.run

        Name: chkconfig --add keepalived

      Result: None

     Comment: Command "chkconfig --add keepalived" would have been executed

     Started: 13:50:29.638708

    Duration: 28.72 ms

     Changes:

----------

          ID: /etc/sysconfig/keepalived

    Function: file.managed

      Result: None

     Comment: The file /etc/sysconfig/keepalived is set to be changed

     Started: 13:50:29.667609

    Duration: 2.362 ms

     Changes:

              ----------

              newfile:

                  /etc/sysconfig/keepalived

----------

          ID: /etc/keepalived

    Function: file.directory

      Result: None

     Comment: The following files will be changed:

              /etc/keepalived: directory - new

     Started: 13:50:29.670063

    Duration: 0.503 ms

     Changes:

Summary

------------

Succeeded: 13 (unchanged=6, changed=3)

Failed:    0

------------

Total states run:    13

[root@master keepalived]#
测试没问题,两台机器都执行下,下面只截取部分安装过程
          ID: keepalived-init

    Function: file.managed

        Name: /etc/init.d/keepalived

      Result: True

     Comment: File /etc/init.d/keepalived updated

     Started: 13:52:18.885924

    Duration: 8.804 ms

     Changes:

              ----------

              diff:

                  New file

              mode:

                  0755

----------

          ID: keepalived-init

    Function: cmd.run

        Name: chkconfig --add keepalived

      Result: True

     Comment: Command "chkconfig --add keepalived" run

     Started: 13:52:18.895175

    Duration: 39.056 ms

     Changes:

              ----------

              pid:

                  17951

              retcode:

                  0

              stderr:

              stdout:

----------

          ID: /etc/sysconfig/keepalived

    Function: file.managed

      Result: True

     Comment: File /etc/sysconfig/keepalived updated

     Started: 13:52:18.934468

    Duration: 13.266 ms

     Changes:

              ----------

              diff:

                  New file

              mode:

                  0644

----------

          ID: /etc/keepalived

    Function: file.directory

      Result: True

     Comment: Directory /etc/keepalived updated

     Started: 13:52:18.947818

    Duration: 0.976 ms

     Changes:

              ----------

              /etc/keepalived:

                  New Dir

Summary

-------------

Succeeded: 13 (changed=6)

Failed:     0

-------------

Total states run:     13

[root@master keepalived]# salt '*'  state.sls keepalived.install  env=prod
keepalived的安装过程至此结束
接下来是业务模块的部分
[root@master keepalived]# cd /srv/salt/prod/cluster/files/

[root@master files]# ls

haproxy-outside.cfg

[root@master files]# vim haproxy-outside-keepalived.conf

[root@master files]# cat haproxy-outside-keepalived.conf

! Configuration File for keepalived

global_defs {

   notification_email {

     saltstack@example.com

   }

   notification_email_from keepalived@example.com

   smtp_server 127.0.0.1

   smtp_connect_timeout 30

   router_id {{ROUTEID}}

}

vrrp_instance haproxy_ha {

state {{STATEID}}

interface eth0

    virtual_router_id 36

priority {{PRIORITYID}}

    advert_int 1

authentication {

auth_type PASS

        auth_pass 1111

    }

    virtual_ipaddress {

       10.0.1.111

    }

}

[root@master files]#
[root@master cluster]# pwd

/srv/salt/prod/cluster

[root@master cluster]# ll

total 12

drwxr-xr-x 2 root root 4096 Jan  2 13:56 files

-rw-r--r-- 1 root root  602 Jan  2 14:11 haproxy-outside-keepalived.sls

-rw-r--r-- 1 root root  367 Jan  2 12:12 haproxy-outside.sls

[root@master cluster]# cat haproxy-outside-keepalived.sls

include:

  - keepalived.install

keepalived-service:

  file.managed:

    - name: /etc/keepalived/keepalived.conf

    - source: salt://cluster/files/haproxy-outside-keepalived.conf

    - user: root

    - group: root

    - mode: 644

    - template: jinja

    {% if grains['fqdn'] == 'minion01' %}

    - ROUTEID: haproxy_ha

    - STATEID: MASTER

    - PRIORITYID: 150

    {% elif grains['fqdn'] == 'minion02' %}

    - ROUTEID: haproxy_ha

    - STATEID: BACKUP

    - PRIORITYID: 100

    {% endif %}

  service.running:

    - name: keepalived

    - enable: True

    - watch:

      - file: keepalived-service

[root@master cluster]#
测试一台minion没问题再执行其余minion
[root@master cluster]# salt 'minion01'  state.sls  cluster.haproxy-outside-keepalived  env=prod  test=True

minion01:

----------

          ID: pkg-init

    Function: pkg.installed

        Name: gcc

      Result: True

     Comment: Package gcc is already installed.

     Started: 14:12:06.483808

    Duration: 1020.962 ms

     Changes:

----------

          ID: pkg-init

    Function: pkg.installed

        Name: glibc

      Result: True

     Comment: Package glibc is already installed.

     Started: 14:12:07.504916

    Duration: 0.507 ms

     Changes:

----------

          ID: pkg-init

    Function: pkg.installed

        Name: openssl

      Result: True

     Comment: Package openssl is already installed.

     Started: 14:12:07.505482

    Duration: 0.247 ms

     Changes:

----------

          ID: pkg-init

    Function: pkg.installed

        Name: openssl-devel

      Result: True

     Comment: Package openssl-devel is already installed.

     Started: 14:12:07.505778

    Duration: 0.232 ms

     Changes:

----------

          ID: pkg-init

    Function: pkg.installed

        Name: autoconf

      Result: True

     Comment: Package autoconf is already installed.

     Started: 14:12:07.506063

    Duration: 0.28 ms

     Changes:

----------

          ID: pkg-init

    Function: pkg.installed

        Name: gcc-c++

      Result: True

     Comment: Package gcc-c++ is already installed.

     Started: 14:12:07.506396

    Duration: 0.33 ms

     Changes:

----------

          ID: pkg-init

    Function: pkg.installed

        Name: make

      Result: True

     Comment: Package make is already installed.

     Started: 14:12:07.506779

    Duration: 0.23 ms

     Changes:

----------

          ID: keepalived-install

    Function: file.managed

        Name: /usr/local/src/keepalived-1.2.19.tar.gz

      Result: True

     Comment: The file /usr/local/src/keepalived-1.2.19.tar.gz is in the correct state

     Started: 14:12:07.509872

    Duration: 8.122 ms

     Changes:

----------

          ID: keepalived-install

    Function: cmd.run

        Name: cd /usr/local/src && tar xfz keepalived-1.2.19.tar.gz && cd keepalived-1.2.19 && ./configure --prefix=/usr/local/keepalived --disable-fwmark &&  make && make install

      Result: True

     Comment: unless execution succeeded

     Started: 14:12:07.518977

    Duration: 6.109 ms

     Changes:

----------

          ID: keepalived-init

    Function: file.managed

        Name: /etc/init.d/keepalived

      Result: True

     Comment: The file /etc/init.d/keepalived is in the correct state

     Started: 14:12:07.525288

    Duration: 3.045 ms

     Changes:

----------

          ID: keepalived-init

    Function: cmd.run

        Name: chkconfig --add keepalived

      Result: True

     Comment: unless execution succeeded

     Started: 14:12:07.528774

    Duration: 31.351 ms

     Changes:

----------

          ID: /etc/sysconfig/keepalived

    Function: file.managed

      Result: True

     Comment: The file /etc/sysconfig/keepalived is in the correct state

     Started: 14:12:07.560436

    Duration: 3.227 ms

     Changes:

----------

          ID: /etc/keepalived

    Function: file.directory

      Result: True

     Comment: The directory /etc/keepalived is in the correct state

     Started: 14:12:07.563740

    Duration: 0.545 ms

     Changes:

----------

          ID: keepalived-service

    Function: file.managed

        Name: /etc/keepalived/keepalived.conf

      Result: None

     Comment: The file /etc/keepalived/keepalived.conf is set to be changed

     Started: 14:12:07.564403

    Duration: 7.861 ms

     Changes:

              ----------

              newfile:

                  /etc/keepalived/keepalived.conf

----------

          ID: keepalived-service

    Function: service.running

        Name: keepalived

      Result: None

     Comment: Service is set to be started

     Started: 14:12:07.597748

    Duration: 25.696 ms

     Changes:

Summary

-------------

Succeeded: 15 (unchanged=2, changed=1)

Failed:     0

-------------

Total states run:     15

[root@master cluster]#
先拿minion01执行了
          ID: keepalived-service

    Function: service.running

        Name: keepalived

      Result: True

     Comment: Service keepalived has been enabled, and is running

     Started: 14:13:42.642981

    Duration: 87.148 ms

     Changes:

              ----------

              keepalived:

                  True

Summary

-------------

Succeeded: 15 (changed=2)

Failed:     0

-------------

Total states run:     15

[root@master cluster]# salt 'minion01'  state.sls  cluster.haproxy-outside-keepalived  env=prod
其余minion机器(也就一个minion02了),通过top.sls执行
[root@master base]# cd /srv/salt/base/

[root@master base]# cat top.sls

base:

  '*':

    - init.env_init

prod:

  'minion01':

    - cluster.haproxy-outside

    - cluster.haproxy-outside-keepalived

  'minion02':

    - cluster.haproxy-outside

    - cluster.haproxy-outside-keepalived

[root@master base]#
查看下目录,再次确认都没啥问题,然后执行
[root@master prod]# tree

.

├── cluster

│   ├── files

│   │   ├── haproxy-outside.cfg

│   │   └── haproxy-outside-keepalived.conf

│   ├── haproxy-outside-keepalived.sls

│   └── haproxy-outside.sls

├── haproxy

│   ├── files

│   │   ├── haproxy-1.6.2.tar.gz

│   │   └── haproxy.init

│   └── install.sls

├── keepalived

│   ├── files

│   │   ├── keepalived-1.2.19.tar.gz

│   │   ├── keepalived.conf

│   │   ├── keepalived.init

│   │   └── keepalived.sysconfig

│   └── install.sls

└── pkg

    └── pkg-init.sls

7 directories, 13 files

[root@master prod]#
下面只截取最后执行结果
          ID: keepalived-service

    Function: service.running

        Name: keepalived

      Result: True

     Comment: Service keepalived has been enabled, and is running

     Started: 14:17:44.024593

    Duration: 93.347 ms

     Changes:

              ----------

              keepalived:

                  True

Summary

-------------

Succeeded: 29 (changed=2)

Failed:     0

-------------

Total states run:     29

[root@master prod]# salt '*'  state.highstate
最后确认下minion上vip是否已经有一个在启动状态
[root@master prod]# salt '*'  cmd.run 'ip addr | grep 10.0.1'

minion01:

        inet 10.0.1.172/24 brd 10.0.1.255 scope global eth0

        inet 10.0.1.111/32 scope global eth0

minion02:

        inet 10.0.1.173/24 brd 10.0.1.255 scope global eth0

[root@master prod]#
停止minion01的keepalived服务,vip也能立马飘到minion02上
[root@master prod]# salt 'minion01'  service.stop 'keepalived'

minion01:

    True

[root@master prod]# salt '*'  cmd.run 'ip addr | grep 10.0.1'

minion01:

        inet 10.0.1.172/24 brd 10.0.1.255 scope global eth0

minion02:

        inet 10.0.1.173/24 brd 10.0.1.255 scope global eth0

        inet 10.0.1.111/32 scope global eth0

[root@master prod]#
启动minion01的keepalived,vip又飘过来
[root@master prod]# salt 'minion01'  service.start 'keepalived'

minion01:

    True

[root@master prod]# salt '*'  cmd.run 'ip addr | grep 10.0.1'

minion01:

        inet 10.0.1.172/24 brd 10.0.1.255 scope global eth0

        inet 10.0.1.111/32 scope global eth0

minion02:

        inet 10.0.1.173/24 brd 10.0.1.255 scope global eth0

[root@master prod]#
浏览器测试,输入vip,访问正常,关于一个源地址访问,总是分配到一个固定的minion,原因在于haproxy的balance配置,这里我们写的是source
如果改成roundrobin,就会随机了
saltstack实战4--综合练习3的更多相关文章
- SaltStack实战
SaltStack实战 #安装 安装注意几点 python-libs-2.6.6-64.el6.x86_64 conflicts with file from package python-2.6.6 ...
- zz《分布式服务架构 原理、设计与实战》综合
这书以分布式微服务系统为主线,讲解了微服务架构设计.分布式一致性.性能优化等内容,并介绍了与微服务系统紧密联系的日志系统.全局调用链.容器化等. 还是一样,每一章摘抄一些自己觉得有用的内容,归纳整理, ...
- saltstack实战4--综合练习4
Saltstack配置管理-给minion增加Zabbix-agent zabbix-agent的包 [root@A ~]# rpm -qa |grep zabbix zabbix-2.4.8-1.e ...
- saltstack实战4--综合练习2
Saltstack配置管理-功能模块-安装haproxy 配置管理,我们分了3层 最底层是系统初始化部分 倒数二层是功能模块,就是具体的产品的安装了 假如你的环境需要nginx,php,memcach ...
- saltstack实战4--综合练习1
规范配置管理 实际工作中可能会有现网环境,基线环境,开发环境. 需要使用saltstack统一管理.机器多了,业务多了,可能配置文件存放的会比较乱,因此可以统一管理起来 我们可以再加2个目录,test ...
- saltstack实战3--配置管理之pillar
数据系统-Pillar pillar和grains类似,但是它能给minion指定它想要的数据,安全性较好,另外它是在master端设置的 应用场景: grains的特性–每次启动汇报.静态决定了 ...
- saltstack实战3--配置管理之grains
grains是什么 grains是minion服务启动后,采集的客户端的一些基本信息,硬件信息,软件信息,网络信息,软件版本等.你可以在minion上自定义一些grains信息. 它是静态的信息,mi ...
- saltstack实战3--配置管理之YAML语法
本文来自如下链接http://docs.saltstack.cn/topics/yaml/index.html 了解YAML 默认的SLS文件的renderer是YAML renderer.YAML是 ...
- saltstack实战2--远程执行之目标(target)
target 就是目标的意思,你要在那台机器上执行此命令或此状态.或者说将此动作或者状态文件推送给谁来执行,让那个minion执行可以进行一些匹配 对于拥有大量机器的环境,如果单独一台台的执行指定mi ...
随机推荐
- HDU 5792 World is Exploding (树状数组)
World is Exploding 题目链接: http://acm.hdu.edu.cn/showproblem.php?pid=5792 Description Given a sequence ...
- c语言函数的可选性自变量
功能: 宏va_arg()用于给函数传递可变长度的参数列表. 首先,必须调用va_start() 传递有效的参数列表va_list和函数强制的第一个参数.第一个参数代表将要传递的参数的个数. 其次,调 ...
- hdu 1689 Just a Hook
http://acm.hdu.edu.cn/showproblem.php?pid=1698 Just a Hook Time Limit: 4000/2000 MS (Java/Others) ...
- Maven仓库Nexus的安装配置
1.下载nexus,最新版本是nexus-2.8.0-05 参考文章 下载nexus-latest-bundle.zip文件后,并解压到 D:\nexus下 配置nexus的环境变量:先配置NE ...
- Jeecms自定义标签用法[单个内容]
1.com.jeecms.cms.action.directive包下建立自己的标签类
- Unity3D之Mecanim动画系统学习笔记(三):Animation View
动画组件之间的关系 我们先看一张图: 这里我们可以看到,我们在GameObject之上绑定的Animator组件是控制模型进行动画播放的. 而其属性Controller则对应一个Animator Co ...
- fixed 定位 苹果手机输入框触发时内容全部隐藏
问题出现在东钿微信公众号用户注册页面 页面中只有两个输入框 页面没有超过一屏,悬浮按钮也要出现在本页面 ,开始布局页面的时候没什么问题,然后我在我自己手机上测试 ,输入手机号码,非常奇怪的问题出现了, ...
- oracle 中控制文件中到底记录了哪些信息
oracle 控制文件中的信息 oracle 11g oracle 10g DATABASE ...
- VC中监测程序运行时间(二)-毫秒级
/* * 微秒级计时器,用来统计程序运行时间 * http://blog.csdn.net/hoya5121/article/details/3778487#comments * //整理 [10/1 ...
- 一,彻底理解第一个C语言程序 Hello World
对于初学者来说,第一个程序一般都是hello world,而且是照着书上一点一点敲的.所以,在初学者眼中,敲出来的第一个程序代码不过是一堆看不懂的英语.而事实上,C语言作为一门语言,是有语法的.所以这 ...