.net core在网关中统一配置Swagger
最近在做微服务的时候,由于我们是采用前后端分离来开发的,提供给前端的直接是Swagger,如果Swagger分布在各个API中,前端查看Swagger的时候非常不便,因此,我们试着将Swagger集中放到网关中。
这里我用两个API项目(一个BasicDataApi,一个UsersApi)和一个网关项目(ApiGateway)做示例,下面直接上代码。
首先在BasicDataApi中配置Swagger:
public void ConfigureServices(IServiceCollection services)

        {

            services.AddMvc();

            services.AddSwaggerGen(options =>

            {

                options.SwaggerDoc("BasicDataApi", new Info { Title = "基础数据服务", Version = "v1" });

                var basePath = PlatformServices.Default.Application.ApplicationBasePath;

                var xmlPath = Path.Combine(basePath, "Qka.BasicDataApi.xml");

                options.IncludeXmlComments(xmlPath);

            });

        }

        public void Configure(IApplicationBuilder app, IHostingEnvironment env, ILoggerFactory loggerFactory)

        {

            app.UseMvc()

                 .UseSwagger(c =>

            {

                c.RouteTemplate = "{documentName}/swagger.json";

            })

                .UseSwaggerUI(options =>

            {

                options.SwaggerEndpoint("/BasicDataApi/swagger.json", "BasicDataApi");

            });

        }
在UsersApi中一样的配置:
public void ConfigureServices(IServiceCollection services)

        {

            services.AddSwaggerGen(options =>

            {

                options.SwaggerDoc("UsersApi", new Info { Title = "用户API接口", Version = "v1" });

                var basePath = PlatformServices.Default.Application.ApplicationBasePath;

                var xmlPath = Path.Combine(basePath, "Qka.UsersApi.xml");

                options.IncludeXmlComments(xmlPath);

            });

            services.AddMvc();

        }

        public void Configure(IApplicationBuilder app, IHostingEnvironment env, ILoggerFactory loggerFactory)

        {

            app.UseMvc()

                .UseSwagger(c =>

                {

                    c.RouteTemplate = "{documentName}/swagger.json";

                })

                .UseSwaggerUI(options =>

                {

                    options.SwaggerEndpoint("/UsersApi/swagger.json", "UsersApi");

                });

        }
最后在网关项目中修改Ocelot配置,获取两个项目的swagger.json不要授权:
  "ReRoutes": [

    {

      "DownstreamPathTemplate": "/UsersApi/swagger.json",

      "DownstreamScheme": "http",

      "ServiceName": "userapi",

      "LoadBalancer": "RoundRobin",

      "UseServiceDiscovery": true,

      "UpstreamPathTemplate": "/UsersApi/swagger.json",

      "UpstreamHttpMethod": [ "GET", "POST", "DELETE", "PUT" ]

    },

    {

      "DownstreamPathTemplate": "/BasicDataApi/swagger.json",

      "DownstreamScheme": "http",

      "ServiceName": "basedataapi",

      "LoadBalancer": "RoundRobin",

      "UseServiceDiscovery": true,

      "UpstreamPathTemplate": "/BasicDataApi/swagger.json",

      "UpstreamHttpMethod": [ "GET", "POST", "DELETE", "PUT" ]

    },

    {

      "DownstreamPathTemplate": "/UsersApi/{url}",

      "DownstreamScheme": "http",

      "ServiceName": "userapi",

      "LoadBalancer": "RoundRobin",

      "UseServiceDiscovery": true,

      "UpstreamPathTemplate": "/UsersApi/{url}",

      "UpstreamHttpMethod": [ "GET", "POST", "DELETE", "PUT" ] ,

      "AuthenticationOptions": {

        "AuthenticationProviderKey": "qka_api",

        "AllowedScopes": []

      }

    }

  ],

  "GlobalConfiguration": {

    "BaseUrl": "http://localhost:9000",

    "ServiceDiscoveryProvider": {

      "Host": "192.168.2.144",

      "Port":

    }

  }

}
修改StartUp.cs文件的代码,注意在使用中间件的时候,UseMvc一定要在UseOcelot之前。
:
public void ConfigureServices(IServiceCollection services)

        {

            services.AddOcelot();

            var authenticationProviderKey = "qka_api";

            services.AddAuthentication("Bearer")

                .AddIdentityServerAuthentication(authenticationProviderKey, options =>

                {

                    options.Authority = "http://192.168.2.121:9066/";

                    options.RequireHttpsMetadata = false;

                    options.ApiName = "UserApi";

                });

            services.AddMvc();

            services.AddSwaggerGen(options =>

            {

                options.SwaggerDoc("ApiGateway", new Info { Title = "网关服务", Version = "v1" });

            });

        }

        public void Configure(IApplicationBuilder app, IHostingEnvironment env)

        {

            app.UseMetricsAllMiddleware();

            app.UseMetricsAllEndpoints();

            app.UseCors("default");

            var apis = new List<string> { "BasicDataApi", "UsersApi" };

            app.UseMvc()

               .UseSwagger()

               .UseSwaggerUI(options =>

               {

                   apis.ForEach(m =>

                   {

                       options.SwaggerEndpoint($"/{m}/swagger.json", m);

                   });

               });

            app.UseOcelot().Wait();

        }
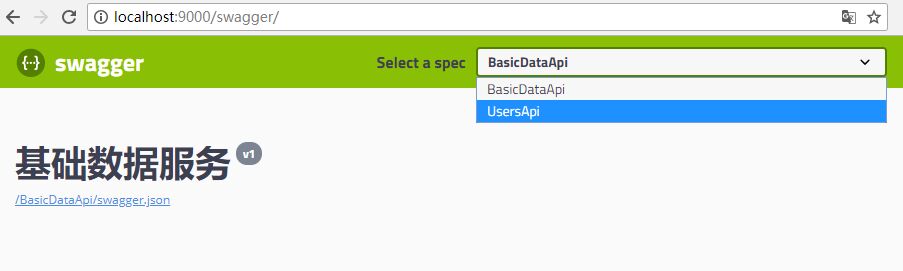
最后上图:
.net core在网关中统一配置Swagger的更多相关文章
- .net core在Ocelot网关中统一配置Swagger
最近在做微服务的时候,由于我们是采用前后端分离来开发的,提供给前端的直接是Swagger,如果Swagger分布在各个API中,前端查看Swagger的时候非常不便,因此,我们试着将Swagger集中 ...
- asp.net core 2.0中的配置(1)---Configuration
配置就是一个装配数据字典的过程,一个字典也就是一个键值对,所以从配置就是键值对. 在asp.net core中关于配置是由四个基本的类型来支撑的,是①IConfigurationSource②ICon ...
- 重新整理 .net core 实践篇————网关中的身份签名认证[三十七]
前言 简单整理一下网关中的jwt,jwt用于授权认证的,其实关于认证授权这块https://www.cnblogs.com/aoximin/p/12268520.html 这个链接的时候就已经写了,当 ...
- .NET Core微服务之基于Apollo实现统一配置中心
Tip: 此篇已加入.NET Core微服务基础系列文章索引 一.关于统一配置中心与Apollo 在微服务架构环境中,项目中配置文件比较繁杂,而且不同环境的不同配置修改相对频繁,每次发布都需要对应修改 ...
- .NET Core WebApi帮助文档使用Swagger生成Api说明文档
Swagger也称为Open API,Swagger从API文档中手动完成工作,并提供一系列用于生成,可视化和维护API文档的解决方案.简单的说就是一款让你更好的书写API文档的框架. 我们为什么选择 ...
- 避免在ASP.NET Core 3.0中为启动类注入服务
本篇是如何升级到ASP.NET Core 3.0系列文章的第二篇. Part 1 - 将.NET Standard 2.0类库转换为.NET Core 3.0类库 Part 2 - IHostingE ...
- 15.ASP.NET Core 应用程序中的静态文件中间件
在这篇文章中,我将向大家介绍,如何使用中间件组件来处理静态文件.这篇文章中,我们讨论下面几个问题: 在ASP.NET Core中,我们需要把静态文件存放在哪里? 在ASP.NET Core中 wwwr ...
- 微服务之十四如何在 Ocelot 网关中配置多实例 Swagger 访问
一.介绍 当我们开发基于微服务的应用程序的时候,有一个环节总是跳不过去的,那就是要创建 WebApi,然后,我们的应用程序基于 WebApi 接口去访问.在没有 Swagger 以前,我们开发好了 W ...
- 基于Apollo实现.NET Core微服务统一配置(测试环境-单机)
一.前言 注:此篇只是为测试环境下的快速入门.后续会给大家带来生产环境下得实战开发. 具体的大家可以去看官方推荐.非常的简单明了.以下介绍引用官方内容: Apollo(阿波罗)是携程框架部门研发的分布 ...
随机推荐
- Kafka消费者-从Kafka读取数据
(1)Customer和Customer Group (1)两种常用的消息模型 队列模型(queuing)和发布-订阅模型(publish-subscribe). 队列的处理方式是一组消费者从服务器读 ...
- 解决:MySQL 报错:1045 - Access denied for user 'root'@'localhost'(using password YES)
一.前言 今年疯狂迷上了开源,只要看到好的开源项目,就会不顾一切一股脑扎进去研究,五一期间发现一个很好的关于众筹的开源项目,但不巧,这个项目竟然是 PHP 写的,没学过 PHP,自然对这个开源项目毫无 ...
- 大数据批量导入,解决办法,实践从定时从 sqlserver 批量同步数据到 mySql
c#代码,批量导入数据代码 public class MySql_Target : ZFCommon.DataAccesser.Base.DABase { public MySql_Target() ...
- java并发包分析之———Atomic类型
一.何谓Atomic? Atomic一词跟原子有点关系,后者曾被人认为是最小物质的单位.计算机中的Atomic是指不能分割成若干部分的意思.如果一段代码被认为是Atomic,则表示这段代码在执行过 ...
- Python基本数据类型之列表、元组、字典、集合及其魔法
列表 1.列表可存放任何东西,并且可修改 2.列表有序 3.列表支持索引与切片 4.支持for,while循环,所以列表为可迭代对象 5支持in操作,判断元素是否在列表中 6可多重索引嵌套列表 7.字 ...
- Servlet总结二(文件路径)
Servlet总结二(文件路径) 前言 前面我们说过ServletContext表示的是web容器中的上下文,下面我们也是用到ServletContext中的方法读取文件 读取WebRoot文件下的文 ...
- LCA最近公共祖先(倍增版)
倍增版LCA lac即最近公共祖先,u和v最近公共祖先就是两节点公用的祖先中深度最大的 比如 其中 lca(1,2)=4, lca(2,3)=4, lca(3,5)=1, lca(2,5)=4; 如何 ...
- python笔记:#010#运算符
运算符 目标 算数运算符 比较(关系)运算符 逻辑运算符 赋值运算符 运算符的优先级 数学符号表链接:https://zh.wikipedia.org/wiki/数学符号表 01. 算数运算符 是完成 ...
- vue组件的生命周期
先来张组件生命周期的示意图: 文档里是这样描述的:你不需要立马弄明白所有的东西,不过以后它会有帮助.传送门. Vue2.0的生命周期钩子一共有10个,同样结合官方文档作出了下表 生命周期钩子 详细 b ...
- python logging method 02
基本用法 下面的代码展示了logging最基本的用法. 1 2 3 4 5 6 7 8 9 10 11 12 13 14 15 16 17 18 19 20 21 22 23 24 25 26 ...