使用ActivityManager实现进程管理
Android中使用ActivityManager可以获得进程信息,并对进程进行管理,如结束进程等。本文使用ActivityManager获得进程列表,并结束选中的进程。
首先,看看布局文件。
<?xml version="1.0" encoding="utf-8"?>

<LinearLayout xmlns:android="http://schemas.android.com/apk/res/android"

    android:layout_width="match_parent"

    android:layout_height="match_parent"

    android:orientation="vertical" >

    <LinearLayout

        android:layout_width="fill_parent"

        android:layout_height="match_parent"

        android:layout_weight="5" >

        <TextView

            android:id="@+id/textView1"

            style="@style/my_style"

            android:layout_width="match_parent"

            android:layout_height="fill_parent"

            android:layout_weight="3" />

        <TextView

            android:id="@+id/textView2"

            style="@style/my_style"

            android:layout_width="match_parent"

            android:layout_height="fill_parent"

            android:layout_gravity="center_vertical|center_horizontal"

            android:layout_weight="3"

            android:gravity="center_vertical|center_horizontal"

            android:text="进程号" />

        <TextView

            android:id="@+id/textView3"

            style="@style/my_style"

            android:layout_width="match_parent"

            android:layout_height="fill_parent"

            android:layout_weight="2"

            android:gravity="center_vertical|center_horizontal"

            android:text="进程名" />

		<TextView

            android:id="@+id/textView4"

            style="@style/my_style"

            android:layout_width="match_parent"

            android:layout_height="fill_parent"

            android:layout_weight="3"

            android:gravity="center_vertical|center_horizontal"

            android:text="内存" />

    </LinearLayout>

    <ListView

        android:id="@id/android:list"

        android:layout_width="fill_parent"

        android:layout_height="match_parent"

        android:layout_weight="1" >

    </ListView>

    <Button

        android:id="@+id/btn_pro"

        style="@style/my_style"

        android:layout_width="fill_parent"

        android:layout_height="match_parent"

        android:layout_weight="5"

        android:text="结束" />

</LinearLayout>
然后是Java文件。
package com.hzhi.sysinfor; import java.util.ArrayList;
import java.util.HashMap;
import java.util.List;
import java.util.Map; import android.app.ActivityManager;
import android.app.AlertDialog;
import android.app.ListActivity;
import android.app.ProgressDialog;
import android.content.Context;
import android.content.DialogInterface;
import android.content.Intent;
import android.content.pm.PackageInfo;
import android.content.pm.PackageManager;
import android.graphics.drawable.Drawable;
import android.net.Uri;
import android.os.Bundle;
import android.os.Debug;
import android.util.Log;
import android.view.Menu;
import android.view.View;
import android.view.View.OnClickListener;
import android.view.ViewGroup;
import android.widget.BaseAdapter;
import android.widget.Button;
import android.widget.CheckBox;
import android.widget.CompoundButton;
import android.widget.CompoundButton.OnCheckedChangeListener;
import android.widget.ImageView;
import android.widget.LinearLayout;
import android.widget.TextView;
import android.widget.Toast; public class process extends ListActivity{ Button btn_stop;
PackageManager pkg_man;
list_pro list_ada;
ActivityManager am; // 获得所有的进程列表
public void get_pro(){ list_ada = new list_pro(this); // 包管理器
am = (ActivityManager) getSystemService(Context.ACTIVITY_SERVICE);
// 获取手机内所有应用
List<ActivityManager.RunningAppProcessInfo> pi = am.getRunningAppProcesses(); for (int i=0; i<pi.size(); i++){ ActivityManager.RunningAppProcessInfo pii =
(ActivityManager.RunningAppProcessInfo) pi.get(i); int[] mem = new int[] {pii.pid};
Debug.MemoryInfo[] mi = am.getProcessMemoryInfo(mem); list_ada.addItem(String.valueOf(pii.pid),
pii.processName,
String.valueOf(mi[0].dalvikPrivateDirty) + "KB",
false); } setListAdapter(list_ada); } @Override
protected void onCreate(Bundle savedInstanceState) { super.onCreate(savedInstanceState);
setContentView(R.layout.activity_list_process); get_pro(); btn_stop = (Button) findViewById(R.id.btn_pro);
btn_stop.setOnClickListener(new View.OnClickListener() { @Override
public void onClick(View v) { for (int j=0; j<list_ada.list_data.size(); j++){ // 该应用需要删除
if (list_ada.list_data.get(j).is_chk){ String name = (String)
list_ada.list_data.get(j).txt_name.getText();
final String pro = (String)
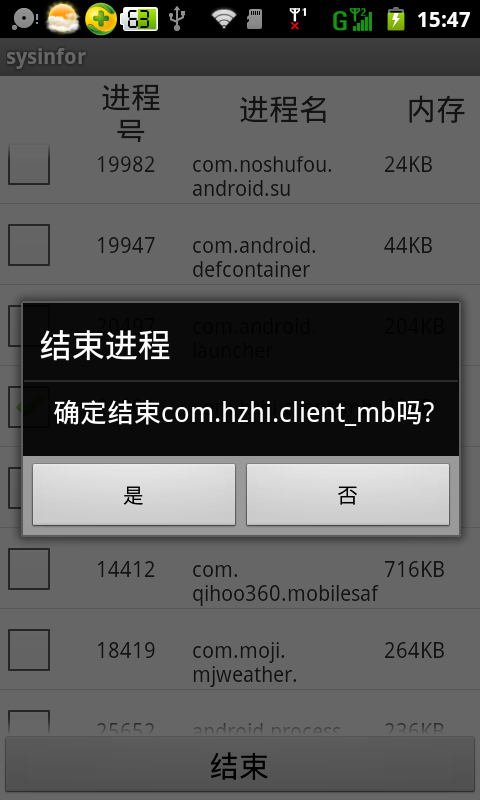
list_ada.list_data.get(j).txt_name.getText(); new AlertDialog.Builder(process.this)
.setTitle("结束进程")
.setMessage("确定结束" + name + "吗?")
.setPositiveButton("是", new DialogInterface.OnClickListener() { @Override
public void onClick(DialogInterface arg0, int arg1) {
unload(pro);
get_pro();
} })
.setNegativeButton("否", null)
.show();
} } }
}); } @Override
public boolean onCreateOptionsMenu(Menu menu) {
getMenuInflater().inflate(R.menu.main, menu);
return true;
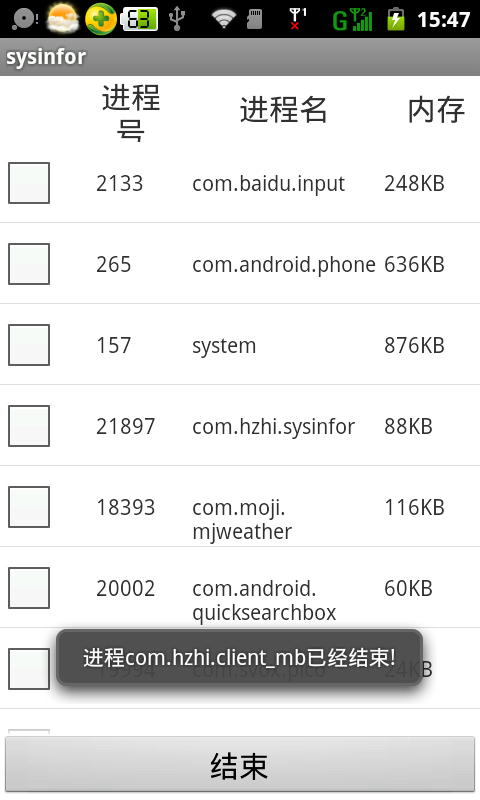
} public boolean unload (String n){ boolean res = true; am.killBackgroundProcesses(n);
Toast.makeText(process.this, "进程" + n + "已经结束!", Toast.LENGTH_LONG)
.show(); return res; } } // pro列表
class list_pro extends BaseAdapter implements OnClickListener{ public Context ctx;
public List<item_pro> list_data; public list_pro(Context context){ ctx = context;
list_data = new ArrayList<item_pro>(); } @Override
public int getCount() {
// TODO Auto-generated method stub
return list_data.size();
} @Override
public Object getItem(int arg0) {
// TODO Auto-generated method stub
return list_data.get(arg0);
} @Override
public long getItemId(int arg0) {
// TODO Auto-generated method stub
return list_data.indexOf(arg0);
} @Override
public View getView(int position, View convertView, ViewGroup parent) { item_pro my_item;
Integer i = 0; if (convertView == null)
{
my_item = new item_pro(ctx,
(String)list_data.get(position).txt_no.getText(),
(String)list_data.get(position).txt_name.getText(),
(String)list_data.get(position).txt_size.getText(),
list_data.get(position).is_chk);
}
else
{
my_item = (item_pro)convertView;
my_item.txt_no.setText(list_data.get(position).txt_no.getText());
my_item.txt_name.setText(list_data.get(position).txt_name.getText());
my_item.txt_size.setText(list_data.get(position).txt_size.getText());
} CheckBox chk_item = (CheckBox) my_item.chk_pro;
chk_item.setOnClickListener(this);
chk_item.setChecked(list_data.get(position).is_chk);
chk_item.setTag(position); return my_item; } public void addItem(String txt_no, String txt_name,
String str_size, Boolean bol_chk)
{
list_data.add(new item_pro(ctx,txt_no,txt_name,str_size,bol_chk));
} @Override
public void onClick(View v) {
// TODO Auto-generated method stub
CheckBox c = (CheckBox) v;
int pos = Integer.parseInt(v.getTag().toString());
list_data.get(pos).is_chk = c.isChecked();
} } // pro列表的一行
class item_pro extends LinearLayout{ public CheckBox chk_pro;
// 进程号
public TextView txt_no;
// 进程名
public TextView txt_name;
// 占用内存大小
public TextView txt_size;
// 是否选中
public boolean is_chk; public item_pro(Context ctx, String str_no, String str_name,
String str_size, Boolean bol_chk)
{
super(ctx);
this.setOrientation(HORIZONTAL); int hei = 80; chk_pro = new CheckBox(ctx);
addView(chk_pro,
new LinearLayout.LayoutParams((int)(MainActivity.wid_scr*0.2),hei)); txt_no = new TextView(ctx);
txt_no.setText(str_no);
addView(txt_no,
new LinearLayout.LayoutParams((int)(MainActivity.wid_scr*0.2),hei)); txt_name = new TextView(ctx);
txt_name.setText(str_name);
addView(txt_name,
new LinearLayout.LayoutParams((int)(MainActivity.wid_scr*0.4),hei)); txt_size = new TextView(ctx);
txt_size.setText(str_size);
addView(txt_size,
new LinearLayout.LayoutParams((int)(MainActivity.wid_scr*0.2),hei)); is_chk = bol_chk; } }
Java文件实现了三个类。process类是整个Activity的类,list_pro是适配器类,item_pro是列表里面的一行。
在process类的get_pro()方法里面,语句am = (ActivityManager) getSystemService(Context.ACTIVITY_SERVICE)获得了一个ActivityManager,List<ActivityManager.RunningAppProcessInfo> pi = am.getRunningAppProcesses()获得了系统的所有进程,并存储在列表pi里面。语句ActivityManager.RunningAppProcessInfo pii = (ActivityManager.RunningAppProcessInfo) pi.get(i)获得了每一个进程信息,pii.processName是该进程的进程名(通常是该进程对应的包名),mi[0].dalvikPrivateDirty是该进程占用的内存大小(通常以KB为单位)。在unload (String n)方法里面,am.killBackgroundProcesses(n)结束了进程名为n的进程,不过要在AndroidManifest.xml中加入android.permission.KILL_BACKGROUND_PROCESSES权限,否则会出现权限错误。
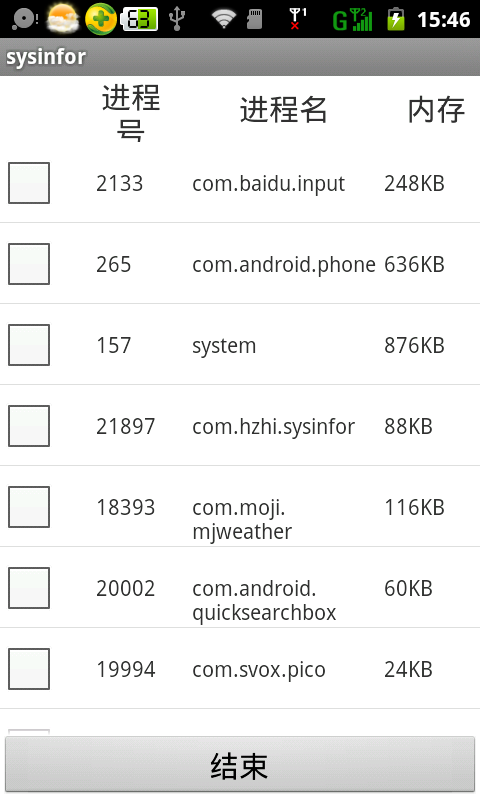
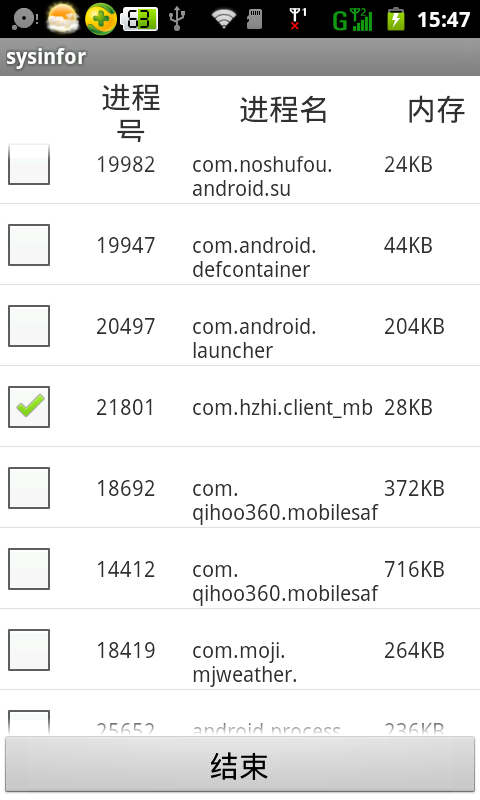
运行效果如下。
需要注意的是,系统进程是不能结束的。
使用ActivityManager实现进程管理的更多相关文章
- android145 360 进程管理
package com.itheima.mobileguard.activities; import java.util.ArrayList; import java.util.List; impor ...
- Android学习笔记_63_手机安全卫士知识点归纳(3)分享 程序锁 服务 进程管理 widget
1.分享: Intent shareIntent = new Intent(); shareIntent.setAction(Intent.ACTION_SEND); shareIntent.setT ...
- Android项目实战_手机安全卫士进程管理
###1.设备进程信息获取获取设备运行进程 ActivityManager am = (ActivityManager) context.getSystemService(Context.ACTIVI ...
- 《Linux内核设计与实现》读书笔记 第三章 进程管理
第三章进程管理 进程是Unix操作系统抽象概念中最基本的一种.我们拥有操作系统就是为了运行用户程序,因此,进程管理就是所有操作系统的心脏所在. 3.1进程 概念: 进程:处于执行期的程序.但不仅局限于 ...
- 进程管理三大扩展工具htop
三大进程管理监控工具 HTOP 介绍: Htop是一款运行于Linux系统监控与进程管理软件,htop提供所有进程的列表,并且使用彩色标识出处理器.swap和内存状态.用户一般可以在top无法提供详尽 ...
- Linux进程管理子系统分析【转】
本文转载自:http://blog.csdn.net/coding__madman/article/details/51298732 Linux进程管理: 进程与程序: 程序:存放在磁盘上的一系列代码 ...
- Linux下取代top的进程管理工具 htop
一.htop 简介 This is htop, an interactive process viewer for Linux. It is a text-mode application (for ...
- Linux进程管理
一.进程管理简介 进程是正在执行的程序或命令,每一个进程都是一个运行实体,都有自己的地址空间,并占用一定的系统资源. 进程管理的作用: 1.判断服务器的健康状态 2.查看系统中的所有进程 3.杀死进程 ...
- C++ Windows进程管理
功能: 1.各个进程启动.挂起.恢复.停止等 2.监听进程的运行状态,进程退出(正常.非正常)时,通知用户 3.异步队列 4.线程安全 进程管理器类: #ifndef __ProcessManager ...
随机推荐
- git rm–r folder fatal:pathspec "" did not match any files
问题描述: 某年某月某日,在查看git库的时候,发现文件的分布和文件夹的名字是极其不合理的,所以移动和重命名了某些文件. 在删除(git rm –r folder)一个空文件夹的时候,出现错误:fat ...
- Linux—解压缩
压缩和解压("//"命令的解释) 常用压缩格式 .zip .gz .bz2 .tar.bz2 .tar.gz .zip格式压缩: zip 压缩 ...
- asp.net web api CORS
using System; using System.Web.Http.Filters; public class AllowCrossSiteJsonAttribute : ActionFilter ...
- 每天一个linux命令(38):cal 命令
cal命令可以用来显示公历(阳历)日历.公历是现在国际通用的历法,又称格列历,通称阳历."阳历"又名"太阳历",系以地球绕行太阳一周为一年,为西方各国所通用,故 ...
- javaweb回顾第八篇如何创建自定义标签
前言:在javaweb开发中自定义标签的用处还是挺多的.今天和大家一起看自定义标签是如何实现的. 1:什么是标签 标签是一种XML元素,通过标签可以使JSP页面变得简介易用,而且标签具有很好的复用性. ...
- hibernate(六) cascade(级联)和inverse关系详解
序言 写这篇文章之前,自己也查了很多的资料来搞清楚这两者的关系和各自所做的事情,但是百度一搜,大多数博文感觉说的云里雾里,可能博主自己清楚是怎么一回事,但是给一个不懂的人或者一知半解的人看的话,别人也 ...
- 快速入门系列--WebAPI--01基础
ASP.NET MVC和WebAPI已经是.NET Web部分的主流,刚开始时两个公用同一个管道,之后为了更加的轻量化(WebAPI是对WCF Restful的轻量化),WebAPI使用了新的管道,因 ...
- 【WP 8.1开发】一键锁屏
在WP8的时候,关于如何关闭屏幕,国内外都有不少文章了,大家有兴趣地可以搜搜,很多,我就不给链接了,因为稍后我的例子中会有. 其实,关闭屏幕是调用了未开放的API,正因为这个API未开放的,不敢保证所 ...
- Javaweb -- ServletContextListener
当启动web应用后端服务时,有时需要预先从数据库或者配置文件等读取信息来配置一些全局变量之类的 这时可以用ServletContextListener,在启动服务时,加载设置基本配置 实现如下: (1 ...
- 后端码农谈前端(CSS篇)第四课:选择器补充(伪类与伪元素)
一.伪类: 属性 描述 :active 向被激活的元素添加样式. :focus 向拥有键盘输入焦点的元素添加样式. :hover 当鼠标悬浮在元素上方时,向元素添加样式. :link 向未被访问的链接 ...