USBDM RS08/HCS08/HCS12/Coldfire V1,2,3,4/DSC/Kinetis Debugger and Programmer -- BDM Construction and Firmware
Construction.
- Build the hardware using the information provided in the PCB download.
- The following are provided:
- PDFs including the circuit diagrams with parts lists and example PCB layouts.
- PCB layouts in Altium designer format (a trial version of the software may be down loaded from http://altium.com/evaluate/).
- PCB layouts exported from Altium designer as Gerber files and NC drill files.
Initial programming of USBDM bootloader into BDM Flash.
- If you purchased a commercial version of the BDM with Version 4.0 or later software then the correct USBDM bootloader should have already been installed and you may go to Update of BDM firmware and changing serial number to update the BDM firmware. If the software is Ver 3 then you are advised to update all the flash including the bootloader.
- Please complete the following before the next step:
- Install the USBDM software Software Installation
- Install the USBDM drivers USB Driver Installation
- Note - Two bootloaders are used in programming the JS16 BDM
- The JS16 has an inbuilt USB bootloader. This is used with the provided JS16 First Stage Bootloader to initially program the JS16.
- The USBDM has its own bootloader. This is necessary for the JMxx versions and for consistency is also used with the JS16 versions. This bootloader has to be programmed into the BDM once (using the built-in bootloader from above!)
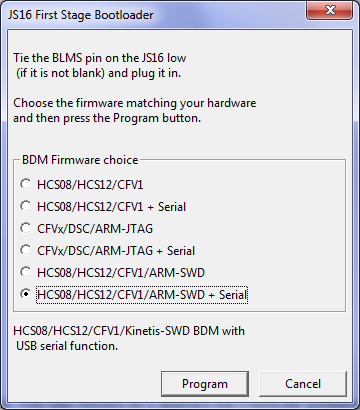
- If the BDM is completely unprogrammed you can simply plug it in, otherwise tie the BLMS pin low before doing so.
- The same driver is used by the JS16 Bootloader as used by the USBDM software so should install automatically.
- If you are having problems detecting the device or are not prompted for the driver you can confirm that the BDM is in Freescale bootloader mode by checking the device PID/VID in the device manager. It should be VID=15A2 & PID=0038 and the device should appears as JS16 Bootloader in the device manager when the driver is correctly installed.
- If you have previously used the Freescale JS16 GUI Bootloader then it may be necessary to uninstall the device first using the Device Manager.
- Start the JS16 Bootloader.
- Select the appropriate firmware to load to the device.
- Press Program to program the device. There is no progress dialogue but after a short wait a confirmation should appear.
- You should then use the USBDM Firmware updater to install the current firmware version as described below.
Update of BDM firmware and changing serial number
This is the usual process for updating the BDM between different levels of the Version 4 firmware.
- Please complete the following before the next step (if not already done):
- Install the USBDM software Software Installation
- Install the USBDM drivers USB Driver Installation
- The provided USBDM Firmware Updater (FirmwareChanger.exe - not the JS16 First stage one!) may be used to change the BDM firmware. Its use is pretty obvious.
These required flash images are installed with the USBDM software and the correct one will be automatically loaded if the Auto update BDM firmware checkbox is selected.
It also allows the serial number of the BDM to be changed as part of the programming process. This is desirable as the serial number is used to identify a particular BDM if several are plugged in at the same time.Notes:
- The bootloader re-boots the BDM into USBDM in-circuit-programming (USBDM-ICP) mode to change the main firmware. The device will be re-enumerate and appears as a new device. You may be prompted to allow driver installation.
- The Bootloader will not allow the programming of a Flash image that doesn't match the existing BDM type i.e. whatever was originally programmed into the BDM. This is to prevent accidental upgrade with an incompatible Flash image.
- The Bootloader requires the BDM to have already been programmed at least once so that the Bootloader firmware is present in the BDM.
- If the BDM contains an old version of the Bootloader firmware (USBDM < V4.0) then it is necessary to take special steps to install the USB drivers to support both old and new VID/PIDs. Please see the driver installation instructions.

USBDM RS08/HCS08/HCS12/Coldfire V1,2,3,4/DSC/Kinetis Debugger and Programmer -- BDM Construction and Firmware的更多相关文章
- USBDM RS08/HCS08/HCS12/Coldfire V1,2,3,4/DSC/Kinetis Debugger and Programmer -- MC9S08JS16
Introduction The attached files provide a port of a combined TBDML/OSBDM code to a MC9S08JS16 proces ...
- USBDM RS08/HCS08/HCS12/Coldfire V1,2,3,4/DSC/Kinetis Debugger and Programmer -- Software Install
Installation of USBDM for Windows Under Windows, installation is done with a standard Windows MSI fi ...
- USBDM RS08/HCS08/HCS12/Coldfire V1,2,3,4/DSC/Kinetis Debugger and Programmer -- MC9S08JM16/32/60
Introduction The attached files provide a port of a combined TBDML/OSBDM/TBLCF code to a MC9S08JM16/ ...
- USBDM RS08/HCS08/HCS12/Coldfire V1,2,3,4/DSC/Kinetis Debugger and Programmer -- Driver Install
Installation of USBDM USB drivers for Windows There are four installers provided: USBDM_Drivers_x_x_ ...
- USBDM Debugger interface for Freescale RS08,HCS08,HCS12,Coldfire and ARM-Kinetis Devices.
Introduction USBDM is a debugger hardware interface for a range of Freescale microcontrollers. It is ...
- USBDM Coldfire V2,3,4/DSC/Kinetis Debugger and Programmer -- MC9S08JS16
Introduction The attached files provide a port of a combined TBLCF/DSC code to a MC9S08JS16 processo ...
- USBDM Kinetis Debugger and Programmer
Introduction The FRM-xxxx boards from Freescale includes a minimal SWD based debugging interface for ...
- Freescale OSBDM JM60仿真器
OSBDM-JM60 - 9S08JM60 Based OSBDM — It includes interfaces and firmware applied to all the targets s ...
- Freescale OSBDM JM60仿真器 BGND Interface
The BGND interface provides the standard 6 pin connection for the single wire BGND signal type devel ...
随机推荐
- P4549 【模板】裴蜀定理
题目描述 给出n个数(A1...An)现求一组整数序列(X1...Xn)使得S=A1X1+...AnXn>0,且S的值最小 输入输出格式 输入格式: 第一行给出数字N,代表有N个数 下面一行给出 ...
- B - C Looooops POJ - 2115 (扩展欧几里得)
题目链接:https://cn.vjudge.net/contest/276376#problem/B 题目大意:for( int i= A ; i != B; i+ = c ),然后给你A,B,C ...
- 编写灵活、稳定、高质量的 HTML 代码的规范
不管有多少人共同参与同一项目,一定要确保每一行代码都像是同一个人编写的. 语法 用两个空格来代替制表符(tab) -- 这是唯一能保证在所有环境下获得一致展现的方法. 嵌套元素应当缩进一次(即两个空格 ...
- 数据库优化之mysql【转】
1. 优化流程图 mysql优化(主要增加数据库的select查询,让查询速度更快) 2. 优化mysql的方面 主要从以下四个方面去优化mysql ①存储层:如何选择一个数据库引擎,选择合适的字段列 ...
- retrying模块的学习
retrying模块的学习 我们在写爬虫的过程中,经常遇到爬取失败的情况,这个时候我们一般会通过try块去进行重试,但是每次都写那么一堆try块,真的是太麻烦,所以今天就来说一个比较pythonic的 ...
- make distclean
清空bin目录make dirclean 清空所有相关的东西,包括下载的软件包,配置文件,feeds内容等make distclean 这个命令会删除feeds目录及其下面的所有的文件,直接结果就是运 ...
- java虚拟机规范(se8)——java虚拟机结构(二)
2.5 运行时数据区域 java虚拟机定义了多个用于程序执行期间的运行时数据区域.这些数据区域中一些随着java虚拟机的启动而创建,随着虚拟机的退出而销毁.其他的数据区域时和线程相关的.线程相关数据区 ...
- DateTime格式字符串HH与hh
早上写了一个关于接口的示例代码,结果发现了一个bug.接口中我内部将DateTime转化为12小时进制的字符串,这样就导致在用户没有指定小时时,不会默认写入00,而是12. 例如: DateTime ...
- LOJ 10155 - 「一本通 5.2 例 3」数字转换
前言 从现在开始,这个博客要写一些题解了.起初,开这个博客只是好玩一样,没事就写写CSS.JS,然后把博客前端搞成了现在这个样子.以前博客只是偶尔记录一些东西,刷题也从来不记录,最近受一些学长的影响, ...
- Android多开/分身检测
原文:https://blog.darkness463.top/2018/05/04/Android-Virtual-Check/ 多开/分身原本用于方便有多个微信/QQ解决同时登录的问题,但近来年被 ...