
深度学习(PYTORCH)-2.python调用dlib提取人脸68个特征点
在看官方教程时,无意中发现别人写的一个脚本,非常简洁。
官方教程地址:http://pytorch.org/tutorials/beginner/data_loading_tutorial.html#sphx-glr-beginner-data-loading-tutorial-py
使用的是dlib自带的特征点检测库,初期用来测试还是不错的
 """Create a sample face landmarks dataset.

 Adapted from dlib/python_examples/face_landmark_detection.py

 See this file for more explanation.

 Download a trained facial shape predictor from:

     http://dlib.net/files/shape_predictor_68_face_landmarks.dat.bz2

 """

 import dlib

 import glob

 import csv

 from skimage import io

 detector = dlib.get_frontal_face_detector()

 predictor = dlib.shape_predictor('shape_predictor_68_face_landmarks.dat')

 num_landmarks = 68

 with open('face_landmarks.csv', 'w', newline='') as csvfile:

     csv_writer = csv.writer(csvfile)

     header = ['image_name']

     for i in range(num_landmarks):

         header += ['part_{}_x'.format(i), 'part_{}_y'.format(i)]

     csv_writer.writerow(header)

     for f in glob.glob('*.jpg'):

         img = io.imread(f)

         dets = detector(img, 1)  # face detection

         # ignore all the files with no or more than one faces detected.

         if len(dets) == 1:

             row = [f]

             d = dets[0]

             # Get the landmarks/parts for the face in box d.

             shape = predictor(img, d)

             for i in range(num_landmarks):

                 part_i_x = shape.part(i).x

                 part_i_y = shape.part(i).y

                 row += [part_i_x, part_i_y]

             csv_writer.writerow(row)
附上使用matplotlib显示特征点的脚本:
 from __future__ import print_function, division

 import os

 import torch

 import pandas as pd

 from skimage import io, transform

 import numpy as np

 import matplotlib.pyplot as plt

 from torch.utils.data import Dataset, DataLoader

 from torchvision import transforms, utils

 # Ignore warnings

 import warnings

 warnings.filterwarnings("ignore")

 plt.ion()   # interactive mode

 landmarks_frame = pd.read_csv('faces/face_landmarks.csv')

 n = 5

 img_name = landmarks_frame.iloc[n, 0]

 landmarks = landmarks_frame.iloc[n, 1:].as_matrix()

 landmarks = landmarks.astype('float').reshape(-1, 2)

 print('Image name: {}'.format(img_name))

 print('Landmarks shape: {}'.format(landmarks.shape))

 print('First 4 Landmarks: {}'.format(landmarks[:4]))

 def show_landmarks(image, landmarks):

     """Show image with landmarks"""

     plt.imshow(image)

     plt.scatter(landmarks[:, 0], landmarks[:, 1], s=10, marker='.', c='r')

     plt.pause(0.001)  # pause a bit so that plots are updated

 plt.figure()

 show_landmarks(io.imread(os.path.join('faces/', img_name)),

                landmarks)

 plt.show()
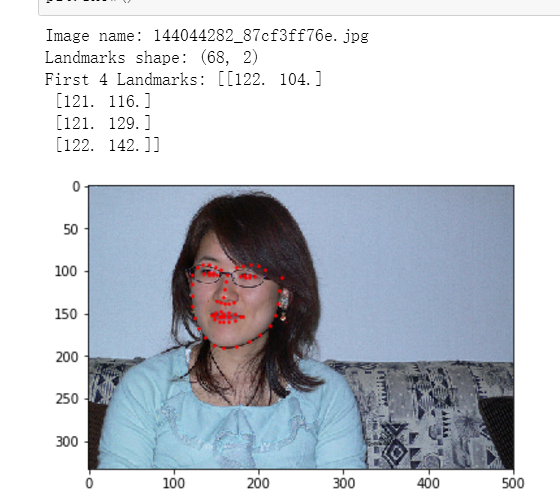
效果图:
深度学习(PYTORCH)-2.python调用dlib提取人脸68个特征点的更多相关文章
- Python 3 利用 Dlib 实现人脸 68个 特征点的标定
0. 引言 利用 Dlib 官方训练好的模型 “shape_predictor_68_face_landmarks.dat” 进行 68 个点标定: 利用 OpenCv 进行图像化处理,在人脸上画出 ...
- MINIST深度学习识别:python全连接神经网络和pytorch LeNet CNN网络训练实现及比较(三)
版权声明:本文为博主原创文章,欢迎转载,并请注明出处.联系方式:460356155@qq.com 在前两篇文章MINIST深度学习识别:python全连接神经网络和pytorch LeNet CNN网 ...
- [深度学习工具]·极简安装Dlib人脸识别库
[深度学习工具]·极简安装Dlib人脸识别库 Dlib介绍 Dlib是一个现代化的C ++工具箱,其中包含用于在C ++中创建复杂软件以解决实际问题的机器学习算法和工具.它广泛应用于工业界和学术界,包 ...
- 深度学习 + OpenCV,Python实现实时视频目标检测
使用 OpenCV 和 Python 对实时视频流进行深度学习目标检测是非常简单的,我们只需要组合一些合适的代码,接入实时视频,随后加入原有的目标检测功能. 在本文中我们将学习如何扩展原有的目标检测项 ...
- PDNN: 深度学习的一个Python工具箱
PDNN: 深度学习的一个Python工具箱 PDNN是一个在Theano环境下开发出来的一个Python深度学习工具箱.它由苗亚杰(Yajie Miao)原创.现在仍然在不断努力去丰富它的功能和扩展 ...
- [深度学习] Pytorch(三)—— 多/单GPU、CPU,训练保存、加载模型参数问题
[深度学习] Pytorch(三)-- 多/单GPU.CPU,训练保存.加载预测模型问题 上一篇实践学习中,遇到了在多/单个GPU.GPU与CPU的不同环境下训练保存.加载使用使用模型的问题,如果保存 ...
- [深度学习] Pytorch学习(一)—— torch tensor
[深度学习] Pytorch学习(一)-- torch tensor 学习笔记 . 记录 分享 . 学习的代码环境:python3.6 torch1.3 vscode+jupyter扩展 #%% im ...
- 一个可扩展的深度学习框架的Python实现(仿keras接口)
一个可扩展的深度学习框架的Python实现(仿keras接口) 动机 keras是一种非常优秀的深度学习框架,其具有较好的易用性,可扩展性.keras的接口设计非常优雅,使用起来非常方便.在这里,我将 ...
- 【神经网络与深度学习】【python开发】caffe-windows使能python接口使用draw_net.py绘制网络结构图过程
[神经网络与深度学习][python开发]caffe-windows使能python接口使用draw_net.py绘制网络结构图过程 标签:[神经网络与深度学习] [python开发] 主要是想用py ...
随机推荐
- Curl实现ElasticSearch的增删改查
一.添加数据(laravel必须安装Curl扩展) $data = [ 'username'=>"张三", 'sex'=>"女", 'age'=&g ...
- Python 计算π及进度条显示
一,首先打开命令提示符找到Python路径,输入pip install tqdm下载第三方库tpdm. 二,写程序 法一 from math import * from tqdm import tqd ...
- 运用python绘制小猪佩奇
用python绘制小猪佩奇 1.打开idle 2.点击File-New Files 3.输入以下代码 1. from turtle import * 2. 3. def nose(x,y):#鼻子 4 ...
- angular6 input节流
一直以为 pipe(debounceTime(1000), distinctUntilChanged()) 不起作用 原因:使用方法错误 <input type="text&qu ...
- JQ菜单滑块
网站导航滑块效果: 复制以下代码保存到html文件中即可查看效果... <html> <head> <title>JQ菜单滑块</title> < ...
- Win10系列:C#应用控件进阶8
LineGeometry LineGeometry控件通过指定直线的起点和终点来定义线.LineGeometry对象无法进行自我绘制,因此同样需要使用 Path元素来辅助呈现.LineGeometry ...
- java多线程高并发知识总结
1. 计算机系统 使用高速缓存来作为内存与处理器之间的缓冲,将运算需要用到的数据复制到缓存中,让计算能快速进行:当运算结束后再从缓存同步回内存之中,这样处理器就无需等待缓慢的内存读写了. 缓 ...
- PyCharm for windows 快捷功能(图片形式讲解)
- 【js高程学习笔记】关于变量值和函数参数
变量包含了两种不同类型的值: 基本类型 (Undefined.null.Boolean.Number.string都属于基本类型) 引用类型 (对象) 两种值在赋值上不同的是: 将一个引用类型的值(对 ...
- 认识jQuery
JQ的优势 轻量级. 强大的选择器 出色的DOM操作的封装 可靠的事件处理机制 完善的Ajax 不污染顶级变量 出色的浏览器兼容性 链式操作 隐式迭代 行为层与结构层分离 丰富的插件支持 完善的文档 ...