Go语言学习之5 进阶-排序、链表、二叉树、接口
本节主要内容:
1. 结构体和方法
2. 接口
1. 结构体和方法
(1). 用来自定义复杂数据结构
(2). struct里面可以包含多个字段(属性)
(3). struct类型可以定义方法,注意和函数的区分
(4). struct类型是值类型
(5). struct类型可以嵌套
(6). Go语言没有class类型,只有struct类型
(1). struct 声明:
type 标识符 struct {
field1 type
field2 type
}
 type Student struct {

     Name string

     Age int

     Score int

 }
example
(2). struct 中字段访问:和其他语言一样,使用点(.)
 var stu Student

 stu.Name = "tony"

 stu.Age =

 stu.Score=

 fmt.Printf("name=%s age=%d score=%d", stu.Name, stu.Age, stu.Score)
example
(3). struct定义的三种形式:
(a) var stu Student
(b) var stu *Student = new (Student)
(c) var stu *Student = &Student{}
其中b和c返回的都是指向结构体的指针,访问形式如下:
stu.Name、stu.Age和stu.Score 或者 (*stu).Name、(*stu).Age。
 package main

 import "fmt"

 type Student struct {

     Name string

     Age int

     score float32

 }

 func main() {

     //下面定义并初始化

     var stu1 Student = Student {

         Name : "zhangsan",

         Age : ,

         score : 99.99,

     }

     //struct定义的形式1

     var stu2 Student

     stu2.Name = "zhangsan2"

     stu2.Age =

     stu2.score = 99.66

     //struct定义的形式2

     var stu3 *Student = new(Student)

     stu3.Name = "lisi" //(*stu1).Name = "lisi"

     stu3.Age =   //(*stu1).Age = 20

     stu3.score = 88.88  //(*stu1).score = 88.88

     //struct定义的形式3

     var stu4 *Student = &Student{

         Name:"wangwu",

         Age:,

         score:99.88,

     }

     fmt.Println(stu1)  //{zhangsan 10 99.99}

     fmt.Println(stu2)  //{zhangsan2 15 99.66}

     fmt.Println(stu3)  //&{lisi 20 88.88}

     fmt.Println(stu4)  //&{wangwu 19 99.88}

 }
example
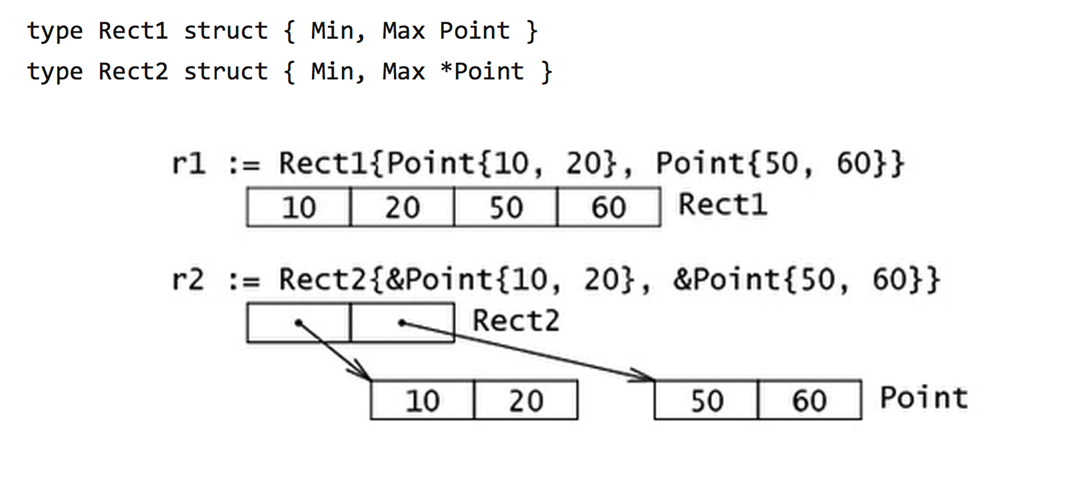
(4). struct的内存布局:struct中的所有字段在内存是连续的,布局如下:
 package main

 import "fmt"

 type Student struct {

     Name  string

     Age   int

     score float32

 }

 func main() {

     var stu Student

     stu.Age =

     stu.Name = "hua"

     stu.score =

     var stu1 *Student = &Student{

         Age:  ,

         Name: "hua",

     }

     var stu3 = Student{

         Age:  ,

         Name: "hua",

     }

     fmt.Println(stu1.Name)

     fmt.Println(stu3)

     fmt.Printf("Name:%p\n", &stu.Name) //Name:0xc042002720

     fmt.Printf("Age: %p\n", &stu.Age)  //Age: 0xc042002730

     fmt.Printf("score:%p\n", &stu.score)  //score:0xc042002738

 }
example
(5). 链表定义
type Student struct {
Name string
Next* Student
}
每个节点包含下一个节点的地址,这样把所有的节点串起来了,通常把链表中的第一个节点叫做链表头。
 package main

 import (

     "fmt"

     "math/rand"

 )

 type Student struct {

     Name string

     Age int

     Score float32

     Id string

     next *Student

 }

 //遍历链表

 func trans(p *Student) {

     for p != nil {

         fmt.Printf("name = %s, Age = %d, Score = %f, id = %s, next = %p\n", p.Name, p.Age, p.Score, p.Id, p.next)

         p = p.next

     }

     fmt.Println()

 }

 //头部插入

 func insertHead(head **Student, new_node *Student) {

     new_node.next = *head

     *head = new_node

 }

 //尾部插入

 func insertTail(p *Student, new_node *Student) {

     for p.next != nil {

         p = p.next

     }

     p.next = new_node

 }

 //删除节点

 func delNode(p *Student, id string) {

     var pre_node *Student = p

     for p != nil {

         if p.Id == id {

             pre_node.next = p.next

             break

         }

         pre_node = p

         p = p.next

     }

 }

 //当前节点后面插入

 func addNode(p *Student, id string, add_node *Student) {

     for p != nil {

         if p.Id == id {

             add_node.next = p.next

             p.next = add_node

             break

         }

         p = p.next

     }

 }

 func checkNode(p *Student, id string) {

     for p != nil {

         if p.Id == id {

             fmt.Printf("name = %s, Age = %d, Score = %f, id = %s, next = %p\n", p.Name, p.Age, p.Score, p.Id, p.next)

             return

         }

         p = p.next

     }

     fmt.Printf("Do not find id = %s\n", id)

 }

 func main() {

     var stu1 Student = Student {

         Name:"name1",

         Age:rand.Intn(),

         Score:rand.Float32()*,

         Id:"",

     }

     trans(&stu1)

     var head *Student = &stu1

     var stu2 Student = Student {

         Name:"name2",

         Age:rand.Intn(),

         Score:rand.Float32()*,

         Id:"",

     }

     insertHead(&head, &stu2)  //头部插入

     trans(head)

     var stu3 Student = Student {

         Name:"name3",

         Age:rand.Intn(),

         Score:rand.Float32()*,

         Id:"",

     }

     insertTail(head, &stu3)  //尾部插入

     trans(head)

     for i := ; i <  ; i++ {

         stu := Student {

             Name:fmt.Sprintf("name%d", i),

             Age:rand.Intn(),

             Score:rand.Float32()*,

             Id:fmt.Sprintf("00000%d", i),

         }

         addNode(head, "", &stu)  //增加节点

     }

     trans(head)

     delNode(head, "")  //删除节点

     trans(head)

     checkNode(head, "") //查

     checkNode(head, "")

 }
单链表的增、删、查
(6). 双链表定义
type Student struct {
Name string
Next* Student
Prev* Student
}
如果有两个指针分别指向前一个节点和后一个节点,我们叫做双链表
(7). 二叉树定义
type Student struct {
Name string
left* Student
right* Student
}
如果每个节点有两个指针分别用来指向左子树和右子树,我们把这样的结构叫做二叉树
 package main

 import "fmt"

 type Student struct {

     Name  string

     Age   int

     Score float32

     left  *Student

     right *Student

 }

 func trans(root *Student) {

     if root == nil {

         return

     }

     fmt.Println(root)

     trans(root.left)

     trans(root.right)

 }

 func main() {

     var root *Student = new(Student)

     root.Name = "stu01"

     root.Age =

     root.Score =

     var left1 *Student = new(Student)

     left1.Name = "stu02"

     left1.Age =

     left1.Score =

     root.left = left1

     var right1 *Student = new(Student)

     right1.Name = "stu04"

     right1.Age =

     right1.Score =

     root.right = right1

     var left2 *Student = new(Student)

     left2.Name = "stu03"

     left2.Age =

     left2.Score =

     left1.left = left2

     trans(root)

 }
二叉树示例
(8). 结构体是用户单独定义的类型,不能和其他类型进行强制转换
 package main

 func main() {

     type Student struct {

         Number int

     }

     type Stu Student //alias

     var a Student

     a.Number =

     var b Stu

     a = b // cannot use b (type Stu) as type Student in assignment

 }
example
 package main

 import "fmt"

 type integer int

 type Student struct {

     Number int

 }

 type Stu Student //alias

 func main() {

     var i integer =

     var j int =

     // j = i  //cannot use i (type integer) as type int in assignment

     j = int(i)  //进行强制转换  ok

     fmt.Println(j)

     var a Student

     a = Student{}

     var b Stu

     a = Student(b)  //进行强制转换  ok

     fmt.Println(a)  //{0}

 }
example2
(9).(工厂模式) golang中的struct没有构造函数,一般可以使用工厂模式来解决这个问题
 package main

 import "fmt"

 type student struct {

     Name string

     Age int

 }

 func NewStudent(name string, age int) *student {

     return &student{

         Name:name,

         Age:age,

     }

 }

 func main() {

     s := new (student)

     s = NewStudent("tony", )

     fmt.Println(s) //&{tony 20}

 }
example
(10). 再次强调
a). make 用来创建map、slice、channel
b). new用来创建值类型
(11). (struct中的tag) 我们可以为struct中的每个字段,写上一个tag。这个tag可以通过反射的机制获取到,最常用的场景就是json序列化和反序列化
type student struct {
Name stirng "this is name field"
Age int "this is age field"
}
 package main

 import (

     "encoding/json"

     "fmt"

 )

 type Student struct {

     Name  string `json:"student_name"`

     Age   int    `json:"age"`

     Score int    `json:"score"`

 }

 type Student2 struct {

     name  string

     age   int

     score int

 }

 func main() {

     var stu Student = Student{

         Name:  "stu01",

         Age:   ,

         Score: ,

     }

     data, err := json.Marshal(stu)

     if err != nil {

         fmt.Println("json encode stu failed, err:", err)

         return

     }

     fmt.Println(string(data))  //{"student_name":"stu01","age":18,"score":80}

     var stu2 Student2 = Student2{

         name:  "stu02",

         age:   ,

         score: ,

     }

     data2, err2 := json.Marshal(stu2)

     if err2 != nil {

         fmt.Println("json encode stu failed, err:", err2)

         return

     }

     fmt.Println(string(data2))  // {}  由于结构体成员变量首字母小写,在json序列化时对外不可见,因此为空。改为首字母大写就OK

 }
tag
(12). (匿名字段)结构体中字段可以没有名字,即匿名字段
type Car struct {
Name string
Age int
}
type Train struct {
Car
Start time.Time
int
}
 package main

 import (

     "fmt"

     "time"

 )

 type Car struct {

     Name string

     Age int

 }

 type Train struct {

     Car

     Start time.Time

     int

 }

 func main() {

     var t Train

     //如果没有命名冲突可以直接这样访问

     //t.Name = "demo"

     //t.Age = 20

     t.Car.Name = "demo"

     t.Car.Age =

     t.int =

     fmt.Println(t) //{{demo 20} 0001-01-01 00:00:00 +0000 UTC 100}

 }
匿名字段示例
(13). 匿名字段冲突处理
 package main

 import (

     "fmt"

 )

 type Cart1 struct {

     name string

     age  int

 }

 type Cart2 struct {

     name string

     age  int

 }

 type Train struct {

     Cart1

     Cart2

 }

 func main() {

     var t Train

     // t.name = "train"

     // t.age = 100

     // fmt.Println(t) //ambiguous selector t.name

     t.Cart1.name = "train1"

     t.Cart1.age =

     t.Cart2.name = "train2"

     t.Cart2.age =

     fmt.Println(t) //{{train1 100} {train2 200}}

 }
匿名字段冲突示例
(14). 方法
a. 方法定义
方法其实就是一个函数,在 func 这个关键字和方法名中间加入了一个特殊的接收器类型。接收器可以是结构体类型或者是非结构体类型。接收器是可以在方法的内部访问的。
Golang中的方法是作用在特定类型的变量上,因此自定义类型,都可以有方法,而不仅仅是struct。
定义:func (recevier type) methodName(参数列表)(返回值列表) {}
 package main

 import "fmt"

 type Student struct {

     Name string

     Age int

 }

 //为结构体Student定义init方法

 func (p *Student) init(name string, age int) {

     p.Name = name

     p.Age = age

 }

 func main() {

     var stu Student

     stu.init("zhansan", )

     fmt.Printf("name = %s, age = %d\n", stu.Name, stu.Age) //name = zhansan, age = 20

 }
example
"类的"方法:
Go 语言不像其它面相对象语言一样可以写个类,然后在类里面写一堆方法,但其实Go语言的方法很巧妙的实现了这种效果:我们只需要在普通函数前面加个接受者(receiver,写在函数名前面的括号里面),这样编译器就知道这个函数(方法)属于哪个struct了。
1). 在 Go 中,(接收者)类型关联的方法不写在类型结构里面,就像类那样;耦合更加宽松;类型和方法之间的关联由接收者来建立。
2). 方法没有和数据定义(结构体)混在一起:它们是正交的类型;表示(数据)和行为(方法)是独立的。
注意:Go语言不允许为简单的内置类型添加方法,所以下面定义的方法是非法的。
 package main

 //cannot define new methods on non-local type int

 func (a int) add(b int) {

 }

 func main() {

 }
error example
 package main

 import(

   "fmt"

 )

 //将int定义别名myInt

 type myInt int

 func Add(a ,b int) int {             //函数

     return a + b

 }

 //cannot define new methods on non-local type int

 // func (a int) Add(b int) {

 // }

 //对myInt类型定义Add方法

 func (a myInt) Add (b myInt) myInt {   //方法

     return a + b

 }

 func main() {

     a, b := ,

     var aa, bb myInt = ,

     fmt.Println(Add(a, b)) //

     fmt.Println(aa.Add(bb))  //

 }
right example
b. 方法的调用
 package main

 import "fmt"

 type A struct {

     a int

 }

 func (this A) test() {

     fmt.Println(this.a)

 }

 func main() {

     var t A

     t.a =

     t.test() //

 }
example
c. 方法和函数的区别
函数调用: function(variable, 参数列表)
方法:variable.function(参数列表)
为什么我们已经有函数了还需要方法呢?
I). Go 不是纯粹的面向对象编程语言,而且Go不支持类。因此,基于类型的方法是一种实现和类相似行为的途径。
II). 相同的名字的方法可以定义在不同的类型上,而相同名字的函数是不被允许的。
 package main

 import "fmt"

 type People struct {

     Age int

 }

 type Animal struct {

     Age int

 }

 func (p People) Eat() {

     fmt.Println("People age is ", p.Age)

 }

 func (a Animal) Eat() {

     fmt.Println("Animal age is ", a.Age)

 }

 func main() {

     var p People = People {

         Age:,

     }

     var a Animal = Animal {

         Age:,

     }

     p.Eat()

     a.Eat()

 }
example
d. 指针接收器与值接收器
本质上和函数的值传递和地址传递是一样的。
在上面的例子中,我们只使用值接收器的方法。还可以创建使用指针接收器的方法。值接收器和指针接收器之间的区别在于,在指针接收器的方法内部的改变对于调用者是可见的,然而值接收器的情况不是这样的。
 #include<stdio.h>

 void set(int *s, int newValue)

 {

     *s = newValue;

 }

 int main()

 {

     int num = ;

     printf("before num = %d\n", num);  //before num = 1

     set(&num, );

     printf("after num = %d\n", num);  //after num = 10

 }
C语言通过传递指针改变变量的值
 package main

 import "fmt"

 type People struct {

     Name string

     Age int

 }

 func (p People) ChangeAge(age int) {

     p.Age = age

 }

 func (p *People) ChangeName(name string) {

     p.Name = name

 }

 func main() {

     var p People = People {

         Name:"zhangsan",

         Age:,

     }

     fmt.Printf("before name = %s, age = %d\n", p.Name, p.Age) //before name = zhangsan, age = 20

     // (&p).ChangeName("lisi")   //OK

     p.ChangeName("lisi") //p.ChangeName("lisi") 自动被Go语言解释为 (&p).ChangeName("lisi")

     p.ChangeAge()

     fmt.Printf("after name = %s, age = %d\n", p.Name, p.Age) //after name = lisi, age = 20

 }
值传递与指针传递区别
那么什么时候使用指针接收器,什么时候使用值接收器?
一般来说,指针接收器可以使用在:对方法内部的接收器所做的改变应该对调用者可见时。
指针接收器也可以被使用在如下场景:
1. 当拷贝一个结构体的代价过于昂贵时。
考虑下一个结构体有很多的字段。在方法内使用这个结构体做为值接收器需要拷贝整个结构体,这是很昂贵的。在这种情况下使用指针接收器,结构体不会被拷贝,只会传递一个指针到方法内部使用。
2. 在其他的所有情况,值接收器都可以被使用。
e. 在方法中使用值接收器 与 在函数中使用值参数
i) 当一个函数有一个值参数,它只能接受一个值参数。
ii) 当一个方法有一个值接收器,它可以接受值接收器和指针接收器。
iii) 当一个方法有一个指针接收器,它可以接受值接收器和指针接收器。
 package main

 import "fmt"

 type Car struct {

     weight int

     name   string

 }

 func InitChange(p Car) {

     p.name = "func"

     p.weight =

 }

 //值接收器

 func (p Car) InitChange() {

     p.name = "receiver"

     p.weight =

 }

 //指针接收器

 func (p *Car) InitChange2() {

     p.name = "receiver2"

     p.weight =

 }

 func main() {

     var c Car = Car{

         weight:,

         name:"bike",

     }

     p := &c

     // Run(&c) // cannot use p (type *Car) as type Car in argument to Run

     InitChange(c)  //传值

     fmt.Println(c, " running in the func") //{200 bike}  running in the func

     // c.Run()

     // 为了方便Go语言把 p.Run() 解释为 (*p).Run(),因此在Run中改变值不起作用

     p.InitChange()  //{100 receiver}  running int the receiver

     fmt.Println(c, " running in the receiver") //{100 bike}  running in the receiver

     // 为了方便Go语言把 c.Run() 解释为 (&c).Run(),因此在Change中改变值起作用

     // c.InitChange2()  //传值

     p.InitChange2()  //传指针

     fmt.Println(c, " running in the receiver2") //{800 receiver2}  running in the Change

 }
example
f. 匿名字段的方法
属于结构体的匿名字段的方法可以被直接调用,就好像这些方法是属于定义了匿名字段的结构体一样。
 package main

 import "fmt"

 type Car struct {

     weight int

     name   string

 }

 func (p Car) Run() {

     fmt.Println("running")

 }

 //Bike不仅继承了Car的成员变量weight和name,同时继承了Run方法

 type Bike struct {

     Car //匿名字段

     wheel int

 }

 func main() {

     var b Bike = Bike {

         Car: Car{

             weight:,

             name:"bike",

         },

         wheel:,

     }

     fmt.Println(b) //{{100 bike} 2}

     b.Run() //running 匿名字段方法 Run

 }
调用匿名字段方法
g. 方法的访问控制,通过大小写控制
在不同的包之间,方法要对外可见需要首字母大写。
h. 继承
如果一个struct嵌套了另一个匿名结构体,那么这个结构可以直接访问匿名结构体的方法,从而实现了继承。
 package main

 import "fmt"

 type Car struct {

     weight int

     name   string

 }

 func (p Car) Run() {

     fmt.Println("running")

 }

 //Bike不仅继承了Car的成员变量weight和name,同时继承了Run方法

 type Bike struct {

     Car

     wheel int

 }

 func main() {

     var a Bike

     a.weight =

     a.name = "bike"

     a.wheel =

     fmt.Println(a) //{{100 bike} 2}

     a.Run() //running

 }
example
i. 组合和匿名字段
如果一个struct嵌套了另一个有名结构体,那么这个模式就叫组合。
go里面的继承是通过组合来实现的。
匿名字段是一个特殊的组合。
 package main

 import "fmt"

 type Car struct {

     weight int

     name   string

 }

 func (p Car) Run() {

     fmt.Println("running")

 }

 type Bike struct {

     Car

     lunzi int

 }

 type Train struct {

     c Car  //组合

 }

 func main() {

     var a Bike

     a.weight =

     a.name = "bike"

     a.lunzi =

     fmt.Println(a)

     a.Run()

     var b Train

     //注意访问方式

     b.c.weight =

     b.c.name = "train"

     b.c.Run()

 }
组合
j. 多重继承
如果一个struct嵌套了多个匿名结构体,那么这个结构可以直接访问多个匿名结构体的方法,从而实现了多重继承。
 package main

 import "fmt"

 type People struct {

     Name string

     Age  int

 }

 type Animal struct {

     Place  string

     Weight   int

 }

 func (p People) Eat() {

     fmt.Println("People eat food")

 }

 func (p People) Sleep() {

     fmt.Println("People sleep")

 }

 func (p Animal) Eat() {

     fmt.Println("Animal sleep")

 }

 func (p Animal) Run() {

     fmt.Println("Animal running")

 }

 func (p Animal) Cry() {

     fmt.Println("Animal cry")

 }

 //Test继承了People和Animal里面的成员变量和方法

 type Test struct {

     People

     Animal

 }

 func main() {

     var t Test

     t.Name = "sara"

     t.Age =

     t.Place = "xian"

     t.Weight =

     // t.Eat()  //ambiguous selector t.Eat

     t.People.Eat()

     t.Animal.Eat()

     t.Sleep()  //t.People.Sleep()

     t.Run() //t.Animal.Run()

     t.Cry() //t.Animal.Cry()

 }
example
2. 接口
什么是接口?
在面向对象的领域里,接口一般这样定义:接口定义一个对象的行为。接口只指定了对象应该做什么,至于如何实现这个行为(即实现细节),则由对象本身去确定。
在 Go 语言中,接口就是方法签名(Method Signature)的集合。当一个类型定义了接口中的所有方法,我们称它实现了该接口。这与面向对象编程(OOP)的说法很类似。接口指定了一个类型应该具有的方法,并由该类型决定如何实现这些方法。
(1). 定义
Interface类型可以定义一组方法,但是这些不需要实现。并且interface不能包含任何变量。
type example interface{
Method1(参数列表) 返回值列表
Method2(参数列表) 返回值列表
…
}
 package main

 import "fmt"

 type People struct {

     name string

     age  int

 }

 type Test interface {

     Eat()

     Sleep()

 }

 func (p People) Eat() {

     fmt.Println("people eat")

 }

 func (p People) Sleep() {

     fmt.Println("people sleep")

 }

 func main() {

     var t Test

     fmt.Println(t) //<nil>

     var people People = People {

         name: "people",

         age:  ,

     }

     t = people

     t.Eat()

     t.Sleep()

     fmt.Println("t:", t)  //t: {people 100}

 }
example
(2). interface类型默认是一个指针
如(1)中的例子var t Test fmt.Println(t) //<nil>
(3). 接口的内部表示
我们可以把接口看作内部的一个元组 (type, value)。 type 是接口底层的具体类型(Concrete Type),而 value 是具体类型的值。
 package main

 import (

     "fmt"

 )

 type Test interface {

     Tester()

 }

 type MyFloat float64

 func (m MyFloat) Tester() {

     fmt.Println(m)

 }

 func describe(t Test) {

     fmt.Printf("Interface type %T value %v\n", t, t)

 }

 func main() {

     var t Test

     f := MyFloat(89.7)

     t = f

     describe(t)  //Interface type main.MyFloat value 89.7

     t.Tester()  //89.7

 }
example
(4). 接口实现
a. Golang中的接口,不需要显示的实现。只要一个变量,含有接口类型中的所有方法,那么这个变量就实现这个接口。因此,golang中没有implement
类似的关键字。
b. 如果一个变量含有了多个interface类型的方法,那么这个变量就实现了多个接口。
 package main

 import "fmt"

 type People struct {

     name string

     age  int

 }

 type EatInter interface {

     Eat()

 }

 type SleepInter interface {

     Sleep()

 }

 func (p People) Eat() {

     fmt.Println("people eat")

 }

 func (p People) Sleep() {

     fmt.Println("people sleep")

 }

 func main() {

     var e EatInter

     var s SleepInter

     var people People = People {

         name: "people",

         age:  ,

     }

     //people实现了EatInter和SleepInter接口

     e = people

     s = people

     e.Eat()

     s.Sleep()

     fmt.Println("e:", e)  //e: {people 100}

     fmt.Println("s:", s)  //s: {people 100}

 }
example
c. 如果一个变量只含有了1个interface的部分方法,那么这个变量没有实现这个接口。
(5). 多态
一种事物的多种形态,都可以按照统一的接口进行操作。
 package main

 import "fmt"

 //一个接口Test,方法Eat()和Sleep()多种实现(People和Animal),这就是多态

 type Test interface {

     Eat()

     Sleep()

 }

 type People struct {

     Name string

 }

 type Animal struct {

     Name  string

 }

 func (p People) Eat() {

     fmt.Printf("People %s eat\n", p.Name)

 }

 func (p People) Sleep() {

     fmt.Printf("People %s sleep\n", p.Name)

 }

 func (p Animal) Eat() {

     fmt.Printf("Animal %s eat\n", p.Name)

 }

 func (p Animal) Sleep() {

     fmt.Printf("Animal %s sleep\n", p.Name)

 }

 func main() {

     var t Test

     var a Animal = Animal {

         Name:  "Cat",

     }

     t = a

     t.Eat()

     t.Sleep()

     fmt.Println("t:", t)

     var p People = People {

         Name: "people",

     }

     t = p

     t.Eat()

     t.Sleep()

     fmt.Println("t:", t)

 }
example
练习:调用Sort系统函数实现对自定义数组的排序
 package main

 import (

     "fmt"

     "math/rand"

     "sort"

 )

 type Student struct {

     Name     string

     Id       string

     Age      int

     sortType int

 }

 type Book struct {

     Name   string

     Author string

 }

 //官网的Sort没有实现对任意类型的排序,为了实现对StudentArray数组的排序,

 //查询官网发现Sort的定义,参数的是一个接口,该接口中只要实现Len,Less,Swap三个方法就可以调用Sort函数

 // func Sort(data Interface)

 // type Interface interface {

 //        Len() int

 //        Less(i, j int) bool

 //        Swap(i, j int)

 // }

 type StudentArray []Student

 func (p StudentArray) Len() int {

     return len(p)

 }

 func (p StudentArray) Less(i, j int) bool {

     return p[i].Name < p[j].Name  //对名字桉升序排列

 }

 func (p StudentArray) Swap(i, j int) {

     p[i], p[j] = p[j], p[i]

 }

 func main() {

     var stus StudentArray

     for i := ; i < ; i++ {

         stu := Student{

             Name: fmt.Sprintf("stu%d", rand.Intn()),

             Id:   fmt.Sprintf("110%d", rand.Int()),

             Age:  rand.Intn(),

         }

         stus = append(stus, stu)

     }

     for _, v := range stus {

         fmt.Println(v)

     }

     fmt.Println("\n\n")

     sort.Sort(stus)

     for _, v := range stus {

         fmt.Println(v)

     }

 }
自定义类型排序
(6). 接口嵌套
一个接口可以嵌套在另外的接口,如下所示:
type ReadWrite interface {
Read(b Buffer) bool
Write(b Buffer) bool
}
type Lock interface {
Lock()
Unlock()
}
type Close interface {
Close()
}
type File interface {
ReadWrite
Lock
Close
}
 package main

 import "fmt"

 type Reader interface {

     Read()

 }

 type Writer interface {

     Write()

 }

 //接口嵌套

 type ReadWriter interface {

     Reader

     Writer

 }

 type File struct {

 }

 func (f *File) Read() {

     fmt.Println("read data")

 }

 func (f *File) Write() {

     fmt.Println("write data")

 }

 func Test(rw ReadWriter) {

     rw.Read()

     rw.Write()

 }

 func main() {

     var f *File

     var b interface{}

     b = f

     // Test(f)

     v, ok := b.(ReadWriter) //f中实现了Reader和Writer接口,因此ok为true

     fmt.Println(v, ok) //<nil> true

 }
example
(7). 类型断言,由于接口是一般类型,不知道具体类型,如果要转成具体类型,可以采用以下方法进行转换:
var t int
var x interface{}
x = t
y = x.(int) //转成int
var t int
var x interface{}
x = t
y, ok = x.(int) //转成int,带检查。y为x的值
类型断言用于提取接口的底层值(Underlying Value)。
在语法 i.(T) 中,接口 i 的具体类型是 T,该语法用于获得接口的底层值。
 package main

 import (

     "fmt"

 )

 func assert(i interface{}) {

     // s := i.(int)

     if v, ok := i.(int); ok { //此时当传入assert(s)时程序不会panic

         fmt.Println(v)

     }

 }

 func main() {

     var s interface{} =

     assert(s)

     s = "hello"

     assert(s) //panic: interface conversion: interface {} is string, not int

 }
example
注意:v, ok := i.(T)
如果 i 的具体类型是 T,那么 v 赋值为 i 的底层值,而 ok 赋值为 true。
如果 i 的具体类型不是 T,那么 ok 赋值为 false,v 赋值为 T 类型的零值,此时程序不会报错。
(8). 类型断言,采用type switch方式
类型选择用于将接口的具体类型与很多 case 语句所指定的类型进行比较。它与一般的 switch 语句类似。唯一的区别在于类型选择指定的是类型,而一般的 switch 指定的是值。
类型选择的语法类似于类型断言。类型断言的语法是 i.(T),而对于类型选择,类型 T 由关键字 type 代替。
练习,写一个函数判断传入参数的类型
func classifier(items ...interface{}) {

    for i, x := range items {

    switch x.(type) {

        case bool: fmt.Printf("param #%d is a bool\n", i)

        case float64: fmt.Printf("param #%d is a float64\n", i)

        case int, int64: fmt.Printf("param #%d is an int\n", i)

        case nil: fmt.Printf("param #%d is nil\n", i)

        case string: fmt.Printf("param #%d is a string\n", i)

        default: fmt.Printf("param #%d’s type is unknown\n", i)

    }

}
 package main

 import "fmt"

 type Student struct {

     Name string

     Sex  string

 }

 func Test(a interface{}) {

     b, ok := a.(Student)

     if ok == false {

         fmt.Println("convert failed")

         return

     }

     //b += 3

     fmt.Println(b)

 }

 func just(items ...interface{}) {

     for index, v := range items {

         switch v.(type) {

         case bool:

             fmt.Printf("%d params is bool, value is %v\n", index, v)

         case int, int64, int32:

             fmt.Printf("%d params is int, value is %v\n", index, v)

         case float32, float64:

             fmt.Printf("%d params is float, value is %v\n", index, v)

         case string:

             fmt.Printf("%d params is string, value is %v\n", index, v)

         case Student:

             fmt.Printf("%d params student, value is %v\n", index, v)

         case *Student:

             fmt.Printf("%d params *student, value is %v\n", index, v)

         }

     }

 }

 func main() {

     var b Student = Student{

         Name: "stu01",

         Sex:  "female",

     }

     Test(b)

     just(, 8.2, "this is a test", b, &b)

 }
example
还可以将一个类型和接口相比较。如果一个类型实现了接口,那么该类型与其实现的接口就可以互相比较。
 package main

 import "fmt"

 type Describer interface {

     Describe()

 }

 type Person struct {

     name string

     age  int

 }

 func (p Person) Describe() {

     fmt.Printf("%s is %d years old", p.name, p.age)

 }

 func findType(i interface{}) {

     switch v := i.(type) {

     case Describer:

         v.Describe()

     default:

         fmt.Printf("unknown type\n")

     }

 }

 func main() {

     findType("zhangsan")  //unknown type

     p := Person{

         name: "zhangsan",

         age:  ,

     }

     findType(p)  //zhangsan is 25 years old

 }
example
(9). 空接口,Interface{}
空接口没有任何方法,所以所有类型都实现了空接口。
var a int
var b interface{} //空接口
b = a
 package main

 import (

     "fmt"

 )

 func describe(i interface{}) {

     fmt.Printf("Type = %T, value = %v\n", i, i)

 }

 func main() {

     s := "Hello World"

     describe(s) //Type = string, value = Hello World

     i :=

     describe(i)  //Type = int, value = 20

     strt := struct {

         name string

     }{

         name: "zhangsan",

     }

     describe(strt) //Type = struct { name string }, value = {zhangsan}

 }
example
(10). 判断一个变量是否实现了指定接口
 package main

 import "fmt"

 type Describer interface {

     Describe() string

 }

 type Person struct {

     Name string

     Age  int

 }

 func (p Person) Describe() string {

     str := fmt.Sprintf("%s is %d years old", p.Name, p.Age)

     return str

 }

 func findType(a interface{}) {

     if v, ok := a.(Describer); ok {

         fmt.Printf("v implements Describer(): %s\n", v.Describe())

     }

 }

 func main() {

     p := Person {

         Name: "zhangsan",

         Age:  ,

     }

     findType(p) //v implements Describer(): zhangsan is 25 years old

 }
example
(11). 指针类型和值类型的区别
 package main

 import "fmt"

 type Describer interface {

     Describe()

 }

 type Person struct {

     name string

     age  int

 }

 func (p Person) Describe() { // 使用值接受者实现

     fmt.Printf("%s is %d years old\n", p.name, p.age)

 }

 type Address struct {

     state   string

     country string

 }

 func (a *Address) Describe() { // 使用指针接受者实现

     fmt.Printf("State %s Country %s", a.state, a.country)

 }

 // func (a Address) Describe() { // 使用指针接受者实现

 //     fmt.Printf("State %s Country %s", a.state, a.country)

 // }

 func main() {

     var d1 Describer

     p1 := Person{"Sam", }

     d1 = p1

     d1.Describe()

     p2 := Person{"James", }

     d1 = &p2

     d1.Describe()

     var d2 Describer

     a := Address{"Washington", "USA"}

     /* cannot use a (type Address) as type Describer

        in assignment: Address does not implement

        Describer (Describe method has pointer

        receiver)

     */

    //出错原因其原因是:对于使用指针接受者的方法,用一个指针或者一个可取得地址的值来调用

    //都是合法的。但接口中存储的具体值(Concrete Value)并不能取到地址,因此在第 47 行,

    //对于编译器无法自动获取 a 的地址,于是程序报错。

     // d2 = a //error 但是如果将22-24替换为26-28,则d2 = a和d2 = &a都可以

     d2 = &a // OK

     d2.Describe()

 }
example
(12). 变量slice和接口slice之间赋值操作,for range
var a []int

var b []interface{}

b = a
(13). 接口的零值
接口的零值是 nil。对于值为 nil 的接口,其底层值(Underlying Value)和具体类型(Concrete Type)都为 nil。
对于值为 nil 的接口,由于没有底层值和具体类型,当我们试图调用它的方法时,程序会产生 panic 异常。
 package main

 import "fmt"

 type Describer interface {

     Describe()

 }

 func main() {

     var d1 Describer

     if d1 == nil {

         fmt.Printf("d1 is nil and has type %T value %v\n", d1, d1)

     }

     //d1.Describe() //panic: runtime error: invalid memory address or nil pointer dereference

 }
example
练习:实现一个通用的链表类(待完善)
 package main

 import "fmt"

 type LinkNode struct {

     data interface{}

     next *LinkNode

 }

 type Link struct {

     head *LinkNode

     tail *LinkNode

 }

 func (p *Link) InsertHead(data interface{}) {

     node := &LinkNode{

         data: data,

         next: nil,

     }

     if p.tail == nil && p.head == nil {

         p.tail = node

         p.head = node

         return

     }

     node.next = p.head

     p.head = node

 }

 func (p *Link) InsertTail(data interface{}) {

     node := &LinkNode{

         data: data,

         next: nil,

     }

     if p.tail == nil && p.head == nil {

         p.tail = node

         p.head = node

         return

     }

     p.tail.next = node

     p.tail = node

 }

 func (p *Link) Trans() {

     q := p.head

     for q != nil {

         fmt.Println(q.data)

         q = q.next

     }

 }
link.go
 package main

 import "fmt"

 func main() {

     var link Link

     for i := ; i < ; i++ {

         //intLink.InsertHead(i)

         link.InsertTail(fmt.Sprintf("str %d", i))

     }

     link.Trans()

 }
main.go
通过下面的例子体会接口的作用:
 package main

 import (

     "fmt"

 )

 type SalaryCalculator interface {

     CalculateSalary() int

 }

 type Permanent struct {

     empId    int

     basicpay int

     pf       int

 }

 type Contract struct {

     empId  int

     basicpay int

 }

 //salary of permanent employee is sum of basic pay and pf

 func (p Permanent) CalculateSalary() int {

     return p.basicpay + p.pf

 }

 //salary of contract employee is the basic pay alone

 func (c Contract) CalculateSalary() int {

     return c.basicpay

 }

 /*

 total expense is calculated by iterating though the SalaryCalculator slice and summing

 the salaries of the individual employees

 */

 func totalExpense(s []SalaryCalculator) {

     expense :=

     for _, v := range s {

         expense = expense + v.CalculateSalary()

     }

     fmt.Printf("Total Expense Per Month $%d", expense)

 }

 func main() {

     pemp1 := Permanent{, , }

     pemp2 := Permanent{, , }

     cemp1 := Contract{, }

     employees := []SalaryCalculator{pemp1, pemp2, cemp1}

     totalExpense(employees)

 }

 //假如公司增加了一种新的员工类型 Freelancer,它有着不同的薪资结构。Freelancer只需传递到 totalExpense 的切片参数中,无需 totalExpense 方法本身进行修改。只要 Freelancer 也实现了 SalaryCalculator 接口,totalExpense 就能够实现其功能。
接口作用
用go实现一个图书管理系统:
1. 实现一个图书管理系统,具有以下功能:
a. 书籍录入功能,书籍信息包括书名、副本数、作者、出版日期
b. 书籍查询功能,按照书名、作者、出版日期等条件检索
c. 学生信息管理功能,管理每个学生的姓名、年级、身份证、性别、借了什么书等信息
d. 借书功能,学生可以查询想要的书籍,进行借出
e. 书籍管理功能,可以看到每种书被哪些人借出了
参考文献:
- https://blog.csdn.net/zyc88888/article/details/80307008 (Go 方法与函数区别)
- https://studygolang.com/articles/12266 (Go 系列教程 - 接口)
- https://studygolang.com/articles/12264 (Go 系列教程)
Go语言学习之5 进阶-排序、链表、二叉树、接口的更多相关文章
- golang(5):struct & 链表 & 二叉树 & 接口
struct : 结构体 // 1. 用来自定义复杂数据结构 // 2. struct里面可以包含多个字段(属性) // 3. struct类型可以定义方法,注意和函数的区分 // 4. struct ...
- C语言学习之交换(冒泡)排序
在学习c语言的过程中,在数组内容中我们总是能学习到对一组数据进行排序,对于排序有许多的方法,像 (交换)冒泡排序.选择排序.(基数)桶排序.(插入)二分法排序等等. 我主要以我个人的理解去分析常见的交 ...
- c语言学习笔记(13)——链表
链表 算法: 1.通俗定义: 解题的方法和步骤 2.狭义定义: 对存储数据的操作 3.广义定义: 广义的算法也叫泛型 无论数据是如何存储的,对数据的操作都是一样的 我们至少可以通过两种结构来存储数据 ...
- leetcood学习笔记-82-删除排序链表中的重复元素二
题目描述: 方法一: class Solution(object): def deleteDuplicates(self, head): """ :type head: ...
- Leecode刷题之旅-C语言/python-83删除排序链表中的重复元素
/* * @lc app=leetcode.cn id=83 lang=c * * [83] 删除排序链表中的重复元素 * * https://leetcode-cn.com/problems/rem ...
- 单链表 C语言 学习记录
概念 链接方式存储 链接方式存储的线性表简称为链表(Linked List). 链表的具体存储表示为: 用一组任意的存储单元来存放线性表的结点(这组存储单元既可以是连续的,也可以是不连续的). 链表中 ...
- C语言 删除排序链表中的重复元素
给定一个排序链表,删除所有重复的元素,使得每个元素只出现一次. 示例 1: 输入: 1->1->2输出: 1->2示例 2: 输入: 1->1->2->3-> ...
- 足球运动训练心得及经验分析-c语言学习调查
在准备预备作业02之前,我参考娄老师的提示,阅读了<[做中学(Learning By Doing)]之乒乓球刻意训练一年总结>一文. 在文章描述的字里行间,给予我的印象是系统.负责,娄老师 ...
- 5332盛照宗 如何获取新技能+c语言学习调查
如何获取新技能+c语言学习调查 你有什么技能比大多人(超过90%以上)更好? 如果问我有没有什么技能比大多数人,并且是90%的人好,我还真不敢说有,因为世界上有70亿人,要比63亿人做的好才行啊.我也 ...
随机推荐
- 02: djangorestframework使用
1.1 djangorestframework登录.认证和权限 1.认证与权限相关模块 # -*- coding: utf-8 -*- from django.utils import six fro ...
- python简说(十六)第三方模块安装
安装第三模块 1.pip install xxx pip问题 1.提示没有pip命令的, 把python的安装目录. 安装目录下面的scripts目录加入到环境变量里面 2.Unknown or un ...
- bzoj 4810 由乃的玉米田 - bitset - 莫队算法
由乃在自己的农田边散步,她突然发现田里的一排玉米非常的不美.这排玉米一共有N株,它们的高度参差不齐. 由乃认为玉米田不美,所以她决定出个数据结构题 这个题是这样的: 给你一个序列a,长度为n,有m ...
- JS实现页面字体繁简转换
封装的JS代码 // 网页简繁体转换 // 本js用于客户在网站页面选择繁体中文或简体中文显示,默认是正常显示,即简繁体同时显示 // 在用户第一次访问网页时,会自动检测客户端语言进行操作并提示.此功 ...
- Arrays的排序算法sort及方法使用
Java工具包中的Arrays工具类里面有数组的快速排序算法. 源码如下: /** * Sorts the specified range of the array using the given * ...
- 比较实用的前端 js框架 ,组件 汇总
一.js 前端ui框架 Kendo UI 商用收费,组件丰富,界面简洁美观,有jQuery和angular两个js的版本 Webix 商用收费,组件丰富,界面特别美观 JQwidgets 商用收费,丰 ...
- topcoder srm 700 div1 -3
1.有$n$个人,编号1到$n$.将其平均分到$m$个房间中,每个房间$K$个人.现在知道每个房间编号最小的人的编号.对于给出的人$x$.问其可能在的房间有多少种? 思路:先假设其在某个房间,然后判断 ...
- tp剩余未验证内容-4
关于pop-up被blocked的问题 首先 这个pop-up的功能叫 popup blocker , 它是浏览器(包括ff, chrome等) 自身 所内置 的一个功能, 不是 安装的外部 插件/或 ...
- SpringBoot 整合携程Apollo配置管理中心
携程官网对apollo的使用讲解了很多种方式的使用,但是感觉一些细节还是没讲全,特别是eureka配置中心地址的配置 这里对springboot整合apollo说一下 >SpringBoot启动 ...
- 全排列+字符串查找|扑克排序|2014年蓝桥杯A组题解析第六题-fishers
标题:扑克序列 A A 2 2 3 3 4 4, 一共4对扑克牌.请你把它们排成一行. 要求:两个A中间有1张牌,两个2之间有2张牌,两个3之间有3张牌,两个4之间有4张牌. 请填写出所有符合要求的排 ...