
gitlab的安装以及汉化
gitlab的安装
首先在网上下载好任意版本gitlab的rpm包
推荐下面的地址:
https://mirrors.tuna.tsinghua.edu.cn/gitlab-ce/yum/el7/gitlab-ce-8.8.5-ce.1.el7.x86_64.rpm
 [root@linux-node1 ~]# rz -E

 rz waiting to receive.

 [root@linux-node1 ~]# ls

 anaconda-ks.cfg  gitlab-ce-8.8.-ce..el7.x86_64.rpm

 [root@linux-node1 ~]# rpm -ivh gitlab-ce-8.8.-ce..el7.x86_64.rpm #安装

 Preparing...################################# [%]

 Updating / installing...

    :gitlab-ce-8.8.-ce..el7         ################################# [%]

 gitlab: Thank you for installing GitLab!

 gitlab: To configure and start GitLab, RUN THE FOLLOWING COMMAND:

 sudogitlab-ctl reconfigure  #配置并启动gitlab

 gitlab: GitLab should be reachable at http://linux-node1  默认的访问地址

 gitlab: Otherwise configure GitLab for your system by editing /etc/gitlab/gitlab.rb file  #gitlab的配置文件,修改之后需要重新gitlab-ctl reconfigure

 gitlab: And running reconfigure again.

 gitlab:

 gitlab: For a comprehensive list of configuration options please see the Omnibus GitLab readme

 gitlab: https://gitlab.com/gitlab-org/omnibus-gitlab/blob/master/README.md

 gitlab:

 It looks like GitLab has not been configured yet; skipping the upgrade script.

 [root@linux-node1 ~]#
这里我先修改下配置文件
vim /etc/gitlab/gitlab.rb #修改配置文件
修改结果如下:
[root@linux-node1 ~]# grep -n "^[a-Z]" /etc/gitlab/gitlab.rb

:external_url 'http://192.168.56.11'

[root@linux-node1 ~]# gitlab-ctl reconfigure  #配置并启动gitlab
打开浏览器输入http://192.168.56.11 #192.168.56.11我的本机ip
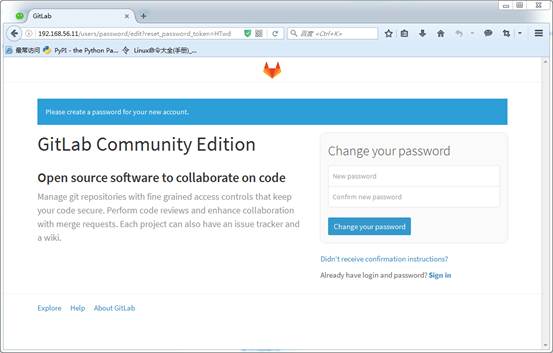
第一次登录要求设置root密码
登录成功之后,是这样的
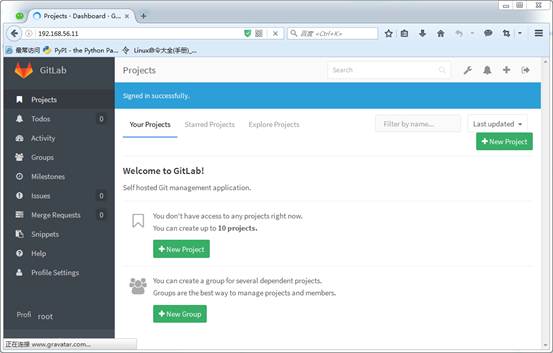
汉化:
[root@linux-node1 ~]# rz

[root@linux-node1 ~]# ls

anaconda-ks.cfggitlab-ce-8.8.-ce..el7.x86_64.rpmgitlabhq.tar.gz

[root@linux-node1 ~]# tar xf gitlabhq.tar.gz

[root@linux-node1 ~]# ls

anaconda-ks.cfggitlab-ce-8.8.-ce..el7.x86_64.rpmgitlabhq  gitlabhq.tar.gz
###关于这个也可以直接git clone git clone https://github.com/larryli/gitlabhq.git
[root@linux-node1 ~]# cp -r /opt/gitlab/embedded/service/gitlab-rails{,.ori}

[root@linux-node1 ~]# gitlab-ctl stop

ok: down: gitlab-workhorse: 1s, normally up

ok: down: logrotate: 0s, normally up

ok: down: nginx: 0s, normally up

ok: down: postgresql: 1s, normally up

ok: down: redis: 0s, normally up

ok: down: sidekiq: 0s, normally up

ok: down: unicorn: 0s, normally up

[root@linux-node1 ~]# \cp -rf /root/gitlabhq/* /opt/gitlab/embedded/service/gitlab-rails/

cp: cannot overwrite non-directory ‘/opt/gitlab/embedded/service/gitlab-rails/log’ with directory ‘/root/gitlabhq/log’

cp: cannot overwrite non-directory ‘/opt/gitlab/embedded/service/gitlab-rails/tmp’ with directory ‘/root/gitlabhq/tmp’
#这里的错误,忽略,因为之前已经设置gitlab的root密码了
[root@linux-node1 ~]# gitlab-ctl start

ok: run: gitlab-workhorse: (pid ) 0s

ok: run: logrotate: (pid ) 0s

ok: run: nginx: (pid ) 1s

ok: run: postgresql: (pid ) 0s

ok: run: redis: (pid ) 1s

ok: run: sidekiq: (pid ) 0s

ok: run: unicorn: (pid ) 0s
汉化完成之后的效果

gitlab的安装以及汉化的更多相关文章
- GitLab 的安装及汉化
系统环境:CentOS7 切记:安装GitLab 时会自动安装GitLab自带的Nginx,为了避免冲突,部署环境时先不要安装Nginx. 官网安装及汉化安装 官网安装最新版GitLab:https: ...
- CentOS7系统下GitLab的安装、汉化、修改默认端口、开启发送邮箱
一.centos7.4 下安装及汉化 =============================================== 2017/11/12_第6次修改 ...
- gitlab 的安装、汉化、卸载
新机 dell服务器 2核4G 官网: https://about.gitlab.com/install/ 1.本次安装选择版本v10.8.4 wget https://mirrors.tuna.ts ...
- Gitlab安装以及汉化
Gitlab安装以及汉化 系统环境: CentOS 7.5 IP:192.168.1.2 关闭selinux.firewalld gitlab-ce-10.8.4 rpm包:下载地址 一.下载并安装g ...
- Linux-GitLab安装及汉化
gitlab 安装及汉化 GitLab简介: GitLab是一个用于仓库管理系统的开源项目.使用Git作为代码管理工具,并在此基础上搭建起来的Web服务.可通过Web界面进行访问公开的或者私人项目.它 ...
- Windows+Atlassian-Jira-6.0.4+MySql5.0安装破解汉化
Windows+Atlassian-Jira-6.0.4+MySql5.0安装破解汉化 一:整理的安装程序 例如以下图: 文件太大.上传不到csdn上.有须要的联系. 新增的百度云盘下载:链接: ...
- Eclipse的安装及汉化图解
Eclipse的安装及汉化图解 Eclipse的安装 有了JDK,你可以编译Java源码,运行Java程序,但是还没有代码编辑器,没有版本管理工具,也不能方便的管理工程文件,不能与团队协作.安装Ecl ...
- Confluence安装&破解&汉化
p.MsoNormal,li.MsoNormal,div.MsoNormal { margin: 0cm; margin-bottom: .0001pt; text-align: justify; f ...
- IntelliJ IDEA 2018.1.2 安装及汉化教程(附:下载地址)
附:安装包及汉化包下载地址 链接:https://pan.baidu.com/s/1ysxtVH_gnBm0QnnqB5mluQ 密码: 9pqd 1.安装步骤: 选择安装地址:可以默认.本人安装在 ...
随机推荐
- oracle中exp,imp的使用详解
http://www.cnblogs.com/yugen/archive/2010/07/25/1784763.html
- makeKeyAndVisible的功能
makeKeyAndVisible的作用 [self.window makeKeyAndVisible] 由于iPhone是单窗口程序,所以也就只有这么一个Window对象,而且是UIWindow,不 ...
- maven分模块间依赖注意事项
1.被依赖模块应该先通过 maven -install 命令将该模块打包为jar发布到本地仓库 2.引用的模块通过在pom.xml文件中添加dependence引用 maven -package 将项 ...
- CSS定位(postion)和移动(float)
5.定位和移动:Positioning(定位)CSS定位属性允许你为一个元素定位.它也可以将一个元素放在另一个元素后面,并指定一个元素的内容太大时,应该发生什么. 元素可以使用的顶部,底部,左侧和右侧 ...
- Robot Framework自动化测试(二)第一个用例
RIDE启动界面: 首先创建一个Test project File-New Project ,选择Directory类型 在创建的文件夹上右键,创建一个Test Suite Openbaidu, NE ...
- sdk 命令行
1.关闭服务命令:adb kill-server 2. 启动服务命令:adb start-server 3.查询当前设备命令:adb devices 4.安装应用程序命令:adb install [a ...
- HTTPResponse.read([amt]):只能read一次
业务需要:我要写个tanx模拟器,给DSP发竞价请求. 下面是部分代码: def PostDataToDSP(self,url,postdata): headers = { 'Content-Type ...
- CSS-div漂浮
显示效果如下: 代码如下: <div style="width:100%;border-top:0px solid #999999;"> <div style=& ...
- Tomcat 优化
1.apr 许多朋友可能在启动tomcat的时候都会看到类似这样的信息: 引用 org.apache.catalina.core.AprLifecycleListener init 信息: The A ...
- MyEclipse的快捷键的使用
MyEclipse的10个快捷键:Ctrl + Shift + T: 打开类型:显示"打开类型"对话框来在编辑器中打开类型."打开类型"选择对话框显示工作空间中 ...