lvs + keepalived + nginx + tomcat高可用负载反向代理服务器配置(二) LVS+Keepalived
一、安装ipvs
sudo apt-get install ipvsadm
二、安装keepalived
sudo apt-get install keepalived
三、创建keepalived.conf文件
sudo gedit /etc/keepalived/keepalived.conf
四、配置keepalived.conf
说明:VIP: 192.168.2.68
real_server: 192.168.2.66(MASTER), 192.168.2.67(BACKUP)
# Global Configuration

global_defs {

    lvs_id  director1

}

# VRRP Configuration

vrrp_instance LVS {       #定义虚拟路由,LVS 为虚拟路由的标示符,自己定义名称

    state MASTER              #备份服务器上将MASTER改为BACKUP

    interface eth0

    virtual_router_id 51    #虚拟路由的ID,而且这个ID也是虚拟MAC最后一段的来源,这个ID号一般不能大于255,且这个ID一定不能有冲突

    priority 150         #初始优先级

    advert_int 1         #通告的个数

    authentication {      #认证机制

        auth_type PASS     #认证类型

        auth_pass 123456    #密码,应该为随机的字符串

    }

    virtual_ipaddress {    #虚拟地址,即VIP

        192.168.2.68
     #(如果有多个VIP,继续换行填写.)

    }

    # Virtual Server Configuration - for WWW service

    virtual_server 192.168.2.68  {

        delay_loop 1                       #(每隔1秒查询realserver状态)

        lb_algo rr                         #(lvs 算法)

        lb_kind DR                         #(Direct Route)

        persistence_timeout 60             #(同一IP的连接60秒内被分配到同一台realserver)

        protocol TCP                       #(用TCP协议检查realserver状态)

        # Real Server  configuration

        real_server 192.168.2.67  {

            weight 1                       #权重

            TCP_CHECK {

                connection_timeout 10      #(10秒无响应超时)

                nb_get_retry

                delay_before_retry

            }

        }

        # Real Server  configuration

        real_server 192.168.2.66  {

            weight

            TCP_CHECK {

                connection_timeout

                nb_get_retry

                delay_before_retry

            }

        }

    }

}
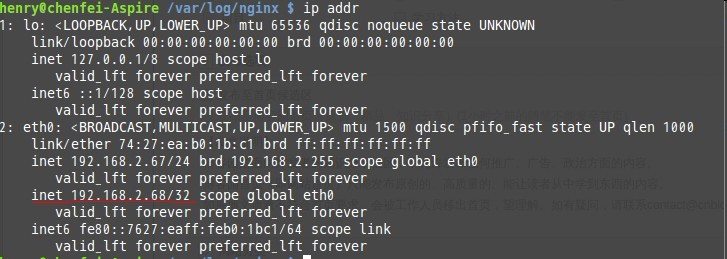
1.配置vrrp ip为68(启动keepalived之后可使用ip addr可查看)
2.配置real_server 此处是67和66的一个集群
五、启动并查看keepalived
#service keepalived start

查看 keepalived状态

#  ps -ef | grep keepalived

root              : ?        :: keepalived -D

root           : ?        :: keepalived -D

root           : pts/    :: grep keepalived

如果未能启动,请使用sudo启动或者检查配置文件

# tail -f /var/log/syslog

Feb  :: localhost Keepalived_vrrp: Registering gratutious ARP shared channel

Feb  :: localhost Keepalived_vrrp: Opening file '/etc/keepalived/keepalived.conf'.

Feb  :: localhost Keepalived_vrrp: Configuration is using :  Bytes

Feb  :: localhost Keepalived_vrrp: Using LinkWatch kernel netlink reflector...

Feb  :: localhost Keepalived_vrrp: VRRP sockpool: [ifindex(), proto(), fd(,)]

Feb  :: localhost Keepalived_vrrp: VRRP_Instance(VI_1) Transition to MASTER STATE

Feb  :: localhost Keepalived_vrrp: VRRP_Instance(VI_1) Entering MASTER STATE

Feb  :: localhost Keepalived_vrrp: VRRP_Instance(VI_1) setting protocol VIPs.

Feb  :: localhost Keepalived_vrrp: VRRP_Instance(VI_1) Sending gratuitous ARPs on eth0 for 192.168.2.68

Feb  :: localhost avahi-daemon[]: Registering new address record for 192.168.2.68 on eth0.

可以看到VIP已经在主服务器上开启
到此lvs+keepalived就已经完成了,接下来就是nginx.
Append: 使用Keepalived管理nginx
! Configuration File for keepalived

global_defs {

#   notification_email {

#        henryhe@starhubdev.com

#   }

#   notification_email_from happy@starhubdev.com

#   smtp_server 127.0.0.1

#   smtp_connect_timeout

    router_id LVS_DEVEL

}

vrrp_script chk_nginx {

   script "/etc/keepalived/check_nginx.sh"

   interval

   weight

}

vrrp_instance VI_1 {

    state BACKUP

    interface eno1

    virtual_router_id

    priority

    advert_int

    authentication {

        auth_type PASS

        auth_pass starhub

    }

    virtual_ipaddress {

        172.31.34.92

    }

    track_script {

        chk_nginx

   }

}

#virtual_server 172.31.34.92  {

#    delay_loop

#    lb_algo rr

#    lb_kind DR

#    nat_mask 255.255.255.248

#    persistence_timeout

#    protocol TCP

#    sorry_server 172.31.34.94

#    real_server 172.31.34.93  {

#        weight

#        notify_down /usr/local/bin/keepalived_notify.sh

#        TCP_CHECK {

#            connect_timeout

#            nb_get_retry

#            delay_before_retry

#            connect_port

#        }

#    }

}
check_nginx.sh
!/bin/bash

status=$(ps -C nginx --no-heading|wc -l)

if [ "${status}" = "" ]; then

        /bin/systemctl start  nginx.service #redhat7

        /etc/init.d/nginx start  #centos

        status2=$(ps -C nginx --no-heading|wc -l)

        if [ "${status2}" = ""  ]; then

             /bin/systemctl stop  keepalived.service #redhat7

             /etc/init.d/keepalived start  #centos

        fi

fi
lvs + keepalived + nginx + tomcat高可用负载反向代理服务器配置(二) LVS+Keepalived的更多相关文章
- lvs + keepalived + nginx + tomcat高可用负载反向代理服务器配置(一) 简介
一. 为什么这样构架 1. 系统高可用性 2. 系统可扩展性 3. 负载均衡能力 LVS+keepalived能很好的实现以上的要求,keepalived提供健康检查,故障转移,提高系统的可用性!采用 ...
- lvs + keepalived + nginx + tomcat高可用负载反向代理服务器配置(三) Nginx
1. 安装 sudo apt-get install nginx 2. 配置nginx sudo gedit /etc/nginx/nginx.conf user www-data; worker_ ...
- [转]搭建Keepalived+Nginx+Tomcat高可用负载均衡架构
[原文]https://www.toutiao.com/i6591714650205716996/ 一.概述 初期的互联网企业由于业务量较小,所以一般单机部署,实现单点访问即可满足业务的需求,这也是最 ...
- Keepalived + Nginx + Tomcat 高可用负载均衡架构
环境: 1.centos7.3 2.虚拟ip:192.168.217.200 3.192.168.217.11.192.168.217.12上分别部署Nginx Keepalived Tomcat并进 ...
- LVS+Keepalived+Nginx+Tomcat高可用负载均衡集群配置(DR模式,一个VIP,多个端口)
一.概述 LVS作用:实现负载均衡 Keepalived作用:监控集群系统中各个服务节点的状态,HA cluster. 配置LVS有两种方式: 1. 通过ipvsadm命令行方式配置 2. 通过Red ...
- Keepalived+Nginx实现高可用负载均衡集群
一 环境介绍 1.操作系统CentOS Linux release 7.2.1511 (Core) 2.服务keepalived+nginx双主高可用负载均衡集群及LAMP应用keepalived-1 ...
- LVS+keeplived+nginx+tomcat高可用、高性能jsp集群
原创作品,允许转载,转载时请务必以超链接形式标明文章 原始出处 .作者信息和本声明.否则将追究法律责任.http://kerry.blog.51cto.com/172631/557749 #!/bin ...
- KeepAlived+Nginx实现高可用负载
一.环境及安装版本: centos6.5.Nginx1.4.7.keepalived1.3.2 虚拟IP 真是IP Nginx端口 主从分配 10.0.90.215 10.0.90.217 80 MA ...
- Linux巩固记录(9) keepalived+nginx搭建高可用负载分发环境
环境准备(继续服用hadoop节点) slave1 192.168.2.201(CentOs 7) slave2 192.168.2.202(CentOs 7) slave1 和 slave2 上 ...
随机推荐
- sql 递归显示所有父节点
1.我先建两个表 一个表示项目及级别 另一个表示项目最后一级中包含内容.两个表的数据如图 CREATE TABLE [dbo].[yq_Project]( ,) primary key, ) NOT ...
- 零基础入门学习python--第一章
知识点汇总1. Python的应用范围:操作系统.3D动画.WEB.企业应用.云计算等.2. Python是什么类型的语言?脚本语言,即电脑编程语言,比C.C++或java之类的系统编程语言简单容易. ...
- Game of Taking Stones && POJ1259 /// 最大空凸包 几何+DP
题目大意: 给定n个点 求出这n个点中最大空凸包的面积 只放个模板 一份模板过两题(滑稽 这个讲解够详细了 https://blog.csdn.net/nyroro/article/details/4 ...
- Java oop创建自定义异常
package com.test; /** *不管是在方法定义时就使用try catch,还是在定义方法时将异常抛出在调用方法时使用try catch都能达到效果 * */public class M ...
- MySQL - 锁等待超时与information_schema的三个表
引用地址:https://blog.csdn.net/J080624/article/details/80596958 回顾一下生产中的一次MySQL异常,Cause: java.sql.SQLExc ...
- Android开发 retrofit入门讲解
前言 retrofit基于okhttp封装的网络请求框架,网络请求的工作本质上是 OkHttp 完成,而 retrofit 仅负责网络请求接口的封装.如果你不了解OKhttp建议你还是先了解它在来学习 ...
- SpringDataJPA在Entity中常用的注解浅析
首先我们常用的注解包括(@Entity.@Table.@Id.@IdClass.@GeneratedValue.@Basic.@Transient.@Column.@Temporal.@Enumera ...
- SpringBoot 非web项目简单架构
1.截图 2.DemoService package com.github.weiwei02.springcloudtaskdemo; import org.springframework.beans ...
- SSE:服务器推送事件
SSE:Server-Sent Event,服务器推送事件 常规的Http协议是一个请求对应一个响应的这种方式的 但对于某些实时性要求比较高的需求,HTML5中新增了SSE,可以很方便的实现局部数据的 ...
- luoguP1154 奶牛分厩 [数论]
题目描述 农夫约翰有N(1<=N<=5000)头奶牛,每头奶牛都有一个唯一的不同于其它奶牛的编号Si,所有的奶牛都睡在一个有K个厩的谷仓中,厩的编号为0到K-1.每头奶牛都知道自己该睡在哪 ...