SpringBoot系统列 2 - 配置文件,多环境配置(dev,qa,online)
实现项目的多环境配置的方法有很多,比如通过在Pom.xml中配置profiles(最常见) 然后在Install项目打War包的时候,根据需求打不同环境的包,如图:

这种配置多环境的方法在SSM框架中使用的最多,但在SpringBoot中使用最多的是在启动SpringBoot项目的时候指定运行环境,下面也是主要描述这种配置的方法:
1.添加配置文件
在SpringBoot的Resources目录下建4个配置文件 application.yml、application-dev.yml、application-qa.yml、application-online.yml
dev:开发环境
qa:测试环境
online:生产环境
然后在application.yml配置文件中配置默认的运行环境:
spring:

  profiles:

    active: dev
然后在dev、qa、online中分别配置不同的配置内容,例如变更端口:
dev
server:

  port: 8085

  servlet:

    context-path: /api

  tomcat:

    max-threads: 100

  connection-timeout: 5000

spring:

  profiles: dev
qa
server:

  port: 8086

  servlet:

    context-path: /api

  tomcat:

    max-threads: 100

  connection-timeout: 5000

spring:

  profiles: qa
online
server:

  port: 8087

  servlet:

    context-path: /api

  tomcat:

    max-threads: 100

  connection-timeout: 5000

spring:

  profiles: online
然后在 SpringBoot系统列 1 - HelloWorld! 的基础上继续添加代码,新建WebConfig用于存放SpringBoot的一些配置信息(SpringBoot的配置即可以在配置文件中配置,也可以在类中配置):
import org.springframework.beans.factory.annotation.Value;

import org.springframework.boot.SpringBootConfiguration;

/**

 * 配置类

 * @author XIHONGLEI

 * @date 2018-10-31

 */

@SpringBootConfiguration

public class WebConfig {

    @Value("${server.port}")

    public String port;

}
然后改造一下HelloContrlller,为了区分环境,我们在请求/api/hello的时候将端口号展示出:
import com.hello.WebConfig;

import org.springframework.beans.factory.annotation.Autowired;

import org.springframework.web.bind.annotation.RequestMapping;

import org.springframework.web.bind.annotation.RestController;

@RestController

public class HelloController {

    @Autowired

    private WebConfig webConfig;

    @RequestMapping("hello")

    public String hello() {

        return "Hello World! port:".concat(webConfig.port);

    }

}
然后在pom.xml配置Jar包的打包配置:
<packaging>jar</packaging>

    <build>

        <finalName>spring-boot-hello</finalName>

        <resources>

            <resource>

                <directory>src/main/java</directory>

                <includes>

                    <include>**/*.yml</include>

                    <include>**/*.properties</include>

                    <include>**/*.xml</include>

                </includes>

                <filtering>false</filtering>

            </resource>

            <resource>

                <directory>src/main/resources</directory>

                <includes>

                    <include>**/*.yml</include>

                    <include>**/*.properties</include>

                    <include>**/*.xml</include>

                </includes>

                <filtering>false</filtering>

            </resource>

        </resources>

        <plugins>

            <plugin>

                <groupId>org.springframework.boot</groupId>

                <artifactId>spring-boot-maven-plugin</artifactId>

                <configuration>

                    <fork>true</fork>

                    <mainClass>com.hello.Application</mainClass>

                </configuration>

                <executions>

                    <execution>

                        <goals>

                            <goal>repackage</goal>

                        </goals>

                    </execution>

                </executions>

            </plugin>

            <plugin>

                <artifactId>maven-resources-plugin</artifactId>

                <version>2.5</version>

                <configuration>

                    <encoding>UTF-8</encoding>

                    <useDefaultDelimiters>true</useDefaultDelimiters>

                </configuration>

            </plugin>

            <plugin>

                <groupId>org.apache.maven.plugins</groupId>

                <artifactId>maven-surefire-plugin</artifactId>

                <version>2.18.1</version>

                <configuration>

                    <skipTests>true</skipTests>

                </configuration>

            </plugin>

            <plugin>

                <groupId>org.apache.maven.plugins</groupId>

                <artifactId>maven-compiler-plugin</artifactId>

                <version>2.3.2</version>

                <configuration>

                    <source>1.8</source>

                    <target>1.8</target>

                </configuration>

            </plugin>

        </plugins>

    </build>
然后Install,找打Jar包 spring-boot-hello.jar;
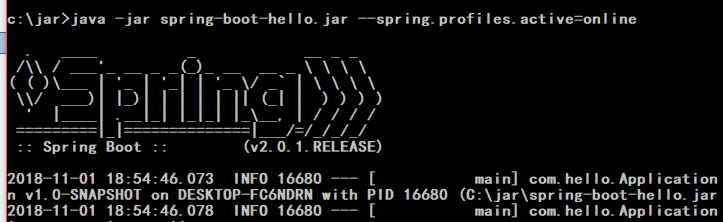
在Window控制台或者Linux中可以使用java -jar spring-boot-hello.jar来启动SpringBoot项目,然后通过在后方添加--spring.profiles.active来指定启动SpringBoot项目时使用的环境:
# Dev环境

$ java -jar spring-boot-hello.jar --spring.profiles.active=dev

# qa环境

$ java -jar spring-boot-hello.jar --spring.profiles.active=qa

# online环境

$ java -jar spring-boot-hello.jar --spring.profiles.active=online
例启动Online环境:
然后通过 http://localhost:8087/api/hello 来访问,因为Online中配置的端口是8087

完成!
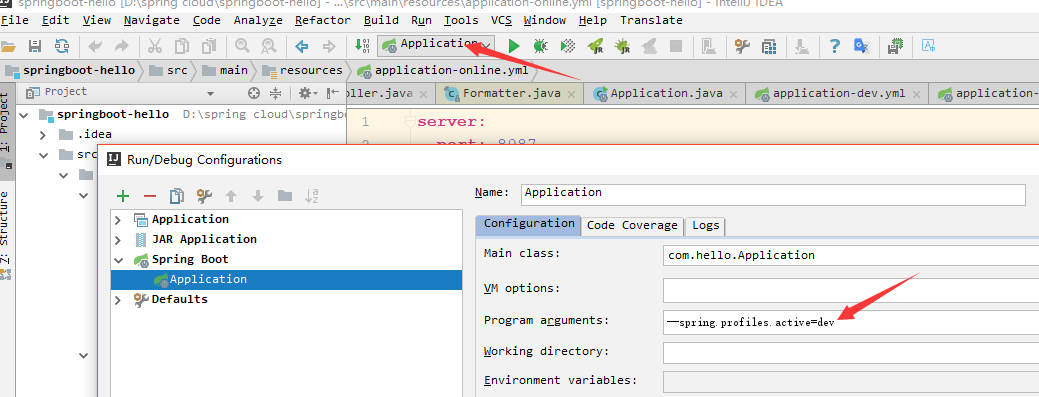
在IDEA中怎么在运行的时候选定执行环境,可以通过配置Application的program arguments中配置运行环境:
SpringBoot系统列 2 - 配置文件,多环境配置(dev,qa,online)的更多相关文章
- SpringBoot系统列 1 - HelloWorld!
学习SpringBoot系统列之HelloWorld! 1.新建一个Maven项目 2.添加POM配置 <parent> <groupId>org.springframewor ...
- WIN7系统JavaEE(java+tomcat7+Eclipse)环境配置
https://jingyan.baidu.com/article/3a2f7c2e62d25e26afd611fa.html WIN7系统JavaEE(java+tomcat7+Eclipse)环境 ...
- SpringBoot在启动时的多环境配置以及加载顺序
通常我们在开发完成一个SpringBoot项目时,总是要打包部署的. 在启动SpringBoot应用时,我们常常会使用命令java -jar xxx.jar来启动这个服务. 命令java -jar 除 ...
- SpringBoot | 第五章:多环境配置
前言 写上一篇看英文资料,耗费了心力呀,这章,相对来说简单点.也比较熟悉,但是这很实用.不扯了,开始~ 多环境配置 maven的多环境配置 springboot多环境配置 总结 老生常谈 多环境配置 ...
- windows系统下简单nodej.s环境配置 安装
国内目前关注最高,维护最好的一个关于nodejs的网站应该是http://www.cnodejs.org/ windows系统下简单nodejs环境配置. 第一步:下载安装文件 下载地址:官网 htt ...
- 配置文件,环境配置和war报分离,方便生产更改
在生产环境实现配置文件和war包 的分离,为方便在必要的时候进行一定的更改,可以避免修改包,但是需要重启 最初为这样的选择配置,单不知为何未生效,修改为配置2配置方法,但不灵活,待跟进.配置1: &l ...
- windows系统下简单node.js环境配置 安装
国内目前关注最高,维护最好的一个关于nodejs的网站应该是http://www.cnodejs.org/ windows系统下简单nodejs环境配置. 第一步:下载安装文件 下载地址:官网 htt ...
- (四)Spring Boot之配置文件-多环境配置
一.Properties多环境配置 1. application.properties配置激活选项 spring.profiles.active=dev 2.添加其他配置文件 3.结果 applica ...
- Ubuntu系统下《汇编语言》环境配置
说明 1.系统:Ubuntu codists@pc:~$ lsb_release -a No LSB modules are available. Distributor ID: Ubuntu Des ...
随机推荐
- HTML(一)
html基本结构 一个html的基本结构如下: <!DOCTYPE html> <html lang="en"> <head> <meta ...
- Flask蓝图
它的作用就是将 功能 与 主服务 分开怎么理解呢? 比如说,你有一个客户管理系统,最开始的时候,只有一个查看客户列表的功能,后来你又加入了一个添加客户的功能(add_user)模块, 然后又加入了一个 ...
- Windows10关机问题----只有“睡眠”、“更新并重启”、“更新并关机”,但是又不想更新,解决办法
最近的一个问题,电脑关机的时候发现,只有“睡眠”.“更新并重启”.“更新并关机” 内心很是煎熬.... 尝试了N种方式,然后总结如下: 第一种方式:(表示自己window的系统用着挺好,力荐) 1.打 ...
- this-11.1-笔记
1. 基本数据类型:string undefined null boolean number 引用数据类型 Object array function 1.2 二者的区别 基本数据 ...
- Python标准库12 数学与随机数
想用高斯分布生成随机数,在网上看到很强大的总结,保留一下,以备后用 https://www.cnblogs.com/vamei/archive/2012/10/26/2741702.html
- AnjularJS表单回车提交事件
问题: 输入手机号之后,再验证码输入框点击回车时,触发发送验证码事件. <div class="login-main"> <form name="log ...
- 首席技术官应该考虑的网络安全问题 IT大咖说 - 大咖干货,不再错过
首席技术官应该考虑的网络安全问题 IT大咖说 - 大咖干货,不再错过 http://www.itdks.com/dakalive/detail/5523
- 巧用watch命令执行循环操作,来解放我们的双手
有时候我们需要重复执行某个 命令,观察某个文件和某个结果的变化情况.可以写 脚本去实现这些需求,但是有更简单的方法,本文档要介绍的就是watch 命令. 1. 以固定时间反复执行某个命令 root@j ...
- SSE图像算法优化系列二十一:基于DCT变换图像去噪算法的进一步优化(100W像素30ms)。
在优化IPOL网站中基于DCT(离散余弦变换)的图像去噪算法(附源代码) 一文中,我们曾经优化过基于DCT变换的图像去噪算法,在那文所提供的Demo中,处理一副1000*1000左右的灰度噪音图像耗时 ...
- sql 有条件计数
select InstitutionID=LEFT(InstitutionID,9), Irregularities_Type=sum(CASE WHEN Irregularities_Type> ...