Dubbo服务调用过程源码解析④
经过前面三章的分析,了解了Dubbo的基础:Dubbo SPI,了解了Provider的服务暴露和Consumer的服务引用。最后我们需要学习一下服务完整的调用过程。Dubbo服务调用过程虽然复杂,比如包含发送请求、编解码、服务降级、过滤器、序列化、线程派发以及响应请求等步骤。但是先理解其大概的逻辑过程,再重点看一下主要的几个类,其实也非常好理解。
分析之前放一张官网的调用过程图:
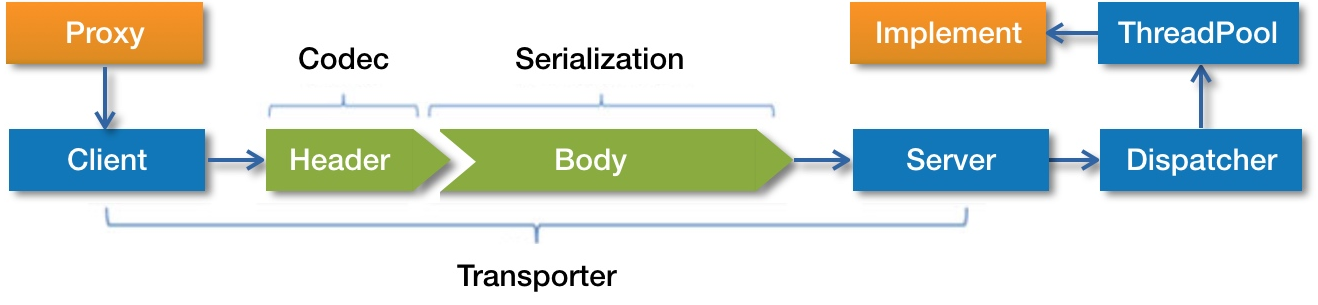
首先消费者通过代理对象发起请求,通过网络通信客户端将编码后的请求发送给Provider的Server。Server收到后进行解码。解码后的请求交给Dispatcher分发器,再由分发器分配到指定的线程池上,最后由线程池执行具体的服务。还有回发响应的过程这张图并没有体现出来。在正式开始分析之前,最好打开自己的IDE,一起跟踪源码,看得更清楚。
0.服务的调用
由上面那个图可以看到,调用源于代理对象Proxy。代理类是动态生成的,直接操作的字节码,我们需要把它反编译一下,看一下它到底长什么样。Dubbo用的是Javassist,我们使用也是阿里开源的诊断工具Arthas反编译看一下。首先去它的官网下载软件包:https://arthas.aliyun.com/doc/download.html
解压后,进入到软件根目录,执行如下命令启动:
java -jar arthas-boot.jar
启动后,终端上会显示Java进程列表,比如这样:(注意这时候需要你启动消费者,保持运行)。

接着输入Consumer对应编号,比如4。Arthas就会关联到这个进程。由于我这个Demo只有一个服务接口,所以生成的代理类也只有一个,我们直接根据后缀名搜索一下:
sc *.proxy0

记住这个路径,最后用jad命令反编译:
jad com.alibaba.dubbo.common.bytecode.proxy0
编译完成后,终端上就会显示对应的代理类:
public class proxy0 implements ClassGenerator.DC,ServiceAPI,EchoService {

    //方法数组

    public static Method[] methods;

    private InvocationHandler handler;

    public proxy0(InvocationHandler invocationHandler) {

        this.handler = invocationHandler;

    }

    public proxy0() {

    }

    public String sendMessage(String string) {

        //把参数存到Object数组

        Object[] arrobject = new Object[]{string};

        //调用InvocationHandler的invoke方法

        Object object = this.handler.invoke(this, methods[0], arrobject);

        return (String)object;

    }

    //测试方法

    @Override

    public Object $echo(Object object) {

        Object[] arrobject = new Object[]{object};

        Object object2 = this.handler.invoke(this, methods[1], arrobject);

        return object2;

    }

}
整个代理类比较简单,主要就是调用了InvocationHandler的invoke方法。我么找到它的实现类,在Dubbo中,它的实现类是InvokerInvocationHandler:
public class InvokerInvocationHandler implements InvocationHandler {

    private final Invoker<?> invoker;

    public InvokerInvocationHandler(Invoker<?> handler) {

        this.invoker = handler;

    }

    public Object invoke(Object proxy, Method method, Object[] args) throws Throwable {

        String methodName = method.getName();

        Class<?>[] parameterTypes = method.getParameterTypes();

        if (method.getDeclaringClass() == Object.class) {

            return method.invoke(invoker, args);

        }

        if ("toString".equals(methodName) && parameterTypes.length == 0) {

            return invoker.toString();

        }

        if ("hashCode".equals(methodName) && parameterTypes.length == 0) {

            return invoker.hashCode();

        }

        if ("equals".equals(methodName) && parameterTypes.length == 1) {

            return invoker.equals(args[0]);

        }

        return invoker.invoke(new RpcInvocation(method, args)).recreate();

    }

}
通过调试我们发现,这个invoker变量的类型是MockClusterInvoker,也就是最后会调用这个类的invoke方法。MockClusterInvoker#invoke会调用AbstractClusterInvoker#invoke方法,接着执行一些服务降级的逻辑。接下来又是一连串调用,我们直接看关键方法:DubboInvoker#doInvoke
protected Result doInvoke(final Invocation invocation) throws Throwable {

    //它会记录调用方法、接口、参数等信息

    RpcInvocation inv = (RpcInvocation) invocation;

    final String methodName = RpcUtils.getMethodName(invocation);

    //设置path和version到inv的attachments

    inv.setAttachment(Constants.PATH_KEY, getUrl().getPath());

    inv.setAttachment(Constants.VERSION_KEY, version);

    //获取通信客户端

    ExchangeClient currentClient;

    if (clients.length == 1) {

        currentClient = clients[0];

    } else {

        currentClient = clients[index.getAndIncrement() % clients.length];

    }

    try {

        //获取异步配置

        boolean isAsync = RpcUtils.isAsync(getUrl(), invocation);

        //isOneway为true时,代表单向通信

        boolean isOneway = RpcUtils.isOneway(getUrl(), invocation);

        int timeout = getUrl().getMethodParameter(methodName, Constants.TIMEOUT_KEY, Constants.DEFAULT_TIMEOUT);

        //异步无返回值

        if (isOneway) {

            boolean isSent = getUrl().getMethodParameter(methodName, Constants.SENT_KEY, false);

            //发送请求

            currentClient.send(inv, isSent);

            //设置上下文futrue为null

            RpcContext.getContext().setFuture(null);

            //返回空的结果

            return new RpcResult();

        //异步有返回值

        } else if (isAsync) {

            //发送请求,并得到一个future

            ResponseFuture future = currentClient.request(inv, timeout);

            //把future设置到上下文中

            RpcContext.getContext().setFuture(new FutureAdapter<Object>(future));

            //暂时返回一个空的结果

            return new RpcResult();

        //同步调用

        } else {

            RpcContext.getContext().setFuture(null);

            //虽然也有future,但是这里就调用get方法了,就会一直等待,相当于同步

            return (Result) currentClient.request(inv, timeout).get();

        }

    } catch (TimeoutException e) {

        throw new RpcException(RpcException.TIMEOUT_EXCEPTION, "Invoke remote method timeout. method: " + invocation.getMethodName() + ", provider: " + getUrl() + ", cause: " + e.getMessage(), e);

    } catch (RemotingException e) {

        throw new RpcException(RpcException.NETWORK_EXCEPTION, "Failed to invoke remote method: " + invocation.getMethodName() + ", provider: " + getUrl() + ", cause: " + e.getMessage(), e);

    }

}
上面的方法,对Dubbo如果异步、同步调用写的非常清晰。关键的区别就在于由谁来调用这个get方法,异步模式下又用户调用。Dubbo中异步的返回值类型是ResponseFuture,它默认的实现类是DefaultFuture,我们来看几个关键方法:
//属性略。。。

public DefaultFuture(Channel channel, Request request, int timeout) {

    this.channel = channel;

    this.request = request;

    //获取请求id,非常重要,由于是异步请求,响应信息的匹配就是靠这个

    this.id = request.getId();

    this.timeout = timeout > 0 ? timeout : channel.getUrl().getPositiveParameter(Constants.TIMEOUT_KEY, Constants.DEFAULT_TIMEOUT);

    //存储请求ID和future到Map中

    FUTURES.put(id, this);

    CHANNELS.put(id, channel);

}

public Object get() throws RemotingException {

    return get(timeout);

}

public Object get(int timeout) throws RemotingException {

    if (timeout <= 0) {

        timeout = Constants.DEFAULT_TIMEOUT;

    }

    //检测Provider是否返回调用结果

    if (!isDone()) {

        long start = System.currentTimeMillis();

        lock.lock();

        try {

            //循环检测

            while (!isDone()) {

                //如果结果尚未返回就等一会在while,免得浪费资源

                done.await(timeout, TimeUnit.MILLISECONDS);

                //如果返回结果或者超时,就跳出while

                if (isDone() || System.currentTimeMillis() - start > timeout) {

                    break;

                }

            }

        } catch (InterruptedException e) {

            throw new RuntimeException(e);

        } finally {

            lock.unlock();

        }

        //如果跳出while还没有结果,就抛出异常

        if (!isDone()) {

            throw new TimeoutException(sent > 0, channel, getTimeoutMessage(false));

        }

    }

    //返回调用结果

    return returnFromResponse();

}

public boolean isDone() {

    return response != null;

}

private Object returnFromResponse() throws RemotingException {

    Response res = response;

    if (res == null) {

        throw new IllegalStateException("response cannot be null");

    }

    //如果响应状态为OK,表示调用过程正常

    if (res.getStatus() == Response.OK) {

        return res.getResult();

    }

    //超时就是抛出异常

    if (res.getStatus() == Response.CLIENT_TIMEOUT || res.getStatus() == Response.SERVER_TIMEOUT) {

        throw new TimeoutException(res.getStatus() == Response.SERVER_TIMEOUT, channel, res.getErrorMessage());

    }

    throw new RemotingException(channel, res.getErrorMessage());

}

//其他方法略。。。
上面的几个方法中,构造函数会进行几个重要属性的赋值,get方法如果没有收到结果就会被阻塞。至此,代理类的请求如果一步步发送出去的解析就结束了,接下来接着分析请求数据是如何发送与接收的,以及响应数据的发送与接收。
1.发送请求
接着上面的DubboInvoker,我们深入分析一下它是怎么发出请求的,即currentClient.request。通过调试我们找到它的实现类,是ReferenceCountExchangeClient:
final class ReferenceCountExchangeClient implements ExchangeClient {

    private final URL url;

    private final AtomicInteger refenceCount = new AtomicInteger(0);

    //其他属性略。。。

    public ReferenceCountExchangeClient(ExchangeClient client, ConcurrentMap<String, LazyConnectExchangeClient> ghostClientMap) {

        this.client = client;

        //引用计数自增

        refenceCount.incrementAndGet();

        this.url = client.getUrl();

        //略。。。

    }

    public ResponseFuture request(Object request) throws RemotingException {

        //调用HeaderExchangeClient#request

        return client.request(request);

    }

    public ResponseFuture request(Object request, int timeout) throws RemotingException {

        //带有超时的请求

        return client.request(request, timeout);

    }

    public void close(int timeout) {

        //引用计数自减

        if (refenceCount.decrementAndGet() <= 0) {

            if (timeout == 0) {

                client.close();

            } else {

                client.close(timeout);

            }

            client = replaceWithLazyClient();

        }

    }

    public void incrementAndGetCount() {

        //引用计数自增,该方法由外部调用

        refenceCount.incrementAndGet();

    }

    //其他方法略。。。

}
refenceCount为内部定义的引用计数变量,每当该对象被引用一次refenceCount就会自增,每当被close一次就会自减。其他省略的方法都是些简单的工具方法,我们接着分析HeaderExchangeClient,即request调用的同名方法所在类。
public class HeaderExchangeClient implements ExchangeClient {

    private static final Logger logger = LoggerFactory.getLogger(HeaderExchangeClient.class);

    private static final ScheduledThreadPoolExecutor scheduled = new ScheduledThreadPoolExecutor(2, new NamedThreadFactory("dubbo-remoting-client-heartbeat", true));

    private final Client client;

    private final ExchangeChannel channel;

    // heartbeat timer

    private ScheduledFuture<?> heartbeatTimer;

    private int heartbeat;

    // heartbeat timeout (ms), default value is 0 , won't execute a heartbeat.

    private int heartbeatTimeout;

    public HeaderExchangeClient(Client client, boolean needHeartbeat) {

        if (client == null) {

            throw new IllegalArgumentException("client == null");

        }

        this.client = client;

        //创建HeaderExchangeChannel对象

        this.channel = new HeaderExchangeChannel(client);

        //心跳检测

        String dubbo = client.getUrl().getParameter(Constants.DUBBO_VERSION_KEY);

        this.heartbeat = client.getUrl().getParameter(Constants.HEARTBEAT_KEY, dubbo != null && dubbo.startsWith("1.0.") ? Constants.DEFAULT_HEARTBEAT : 0);

        this.heartbeatTimeout = client.getUrl().getParameter(Constants.HEARTBEAT_TIMEOUT_KEY, heartbeat * 3);

        if (heartbeatTimeout < heartbeat * 2) {

            throw new IllegalStateException("heartbeatTimeout < heartbeatInterval * 2");

        }

        if (needHeartbeat) {

            //开启心跳检测定时器

            startHeatbeatTimer();

        }

    }

    public ResponseFuture request(Object request) throws RemotingException {

        //调用HeaderExchangeChannel#request

        return channel.request(request);

    }

    public ResponseFuture request(Object request, int timeout) throws RemotingException {

        //带超时的request

        return channel.request(request, timeout);

    }

    public void close() {

        doClose();

        channel.close();

    }

    public void close(int timeout) {

        // Mark the client into the closure process

        startClose();

        doClose();

        channel.close(timeout);

    }

    //开始心跳检测计时器

    private void startHeatbeatTimer() {

        stopHeartbeatTimer();

        if (heartbeat > 0) {

            heartbeatTimer = scheduled.scheduleWithFixedDelay(

                    new HeartBeatTask(new HeartBeatTask.ChannelProvider() {

                        public Collection<Channel> getChannels() {

                            return Collections.<Channel>singletonList(HeaderExchangeClient.this);

                        }

                    }, heartbeat, heartbeatTimeout),

                    heartbeat, heartbeat, TimeUnit.MILLISECONDS);

        }

    }

    //关闭心跳检测计时器

    private void stopHeartbeatTimer() {

        if (heartbeatTimer != null && !heartbeatTimer.isCancelled()) {

            try {

                heartbeatTimer.cancel(true);

                scheduled.purge();

            } catch (Throwable e) {

                if (logger.isWarnEnabled()) {

                    logger.warn(e.getMessage(), e);

                }

            }

        }

        heartbeatTimer = null;

    }

    //关闭心跳检测计时器

    private void doClose() {

        stopHeartbeatTimer();

    }

    //其他方法略。。。

}
上面省略的很多方法,都只是调用了HeaderExchangeChannel同名方法,作用也比较简单,比如设置属性,获取地址,心跳检测等等,这些不是关注的重点,我们看一下request相关的方法:
final class HeaderExchangeChannel implements ExchangeChannel {

    private final Channel channel;

    private volatile boolean closed = false;

    //其他属性略。。。

    HeaderExchangeChannel(Channel channel) {

        if (channel == null) {

            throw new IllegalArgumentException("channel == null");

        }

        //这个channel指向Netty客户端,创建Netty客户端时会调用这个构造函数进行赋值

        this.channel = channel;

    }

    public ResponseFuture request(Object request) throws RemotingException {

        return request(request, channel.getUrl().getPositiveParameter(Constants.TIMEOUT_KEY, Constants.DEFAULT_TIMEOUT));

    }

    public ResponseFuture request(Object request, int timeout) throws RemotingException {

        if (closed) {

            throw new RemotingException(this.getLocalAddress(), null, "Failed to send request " + request + ", cause: The channel " + this + " is closed!");

        }

        // 创建request对象,包含着调用的方法名、参数类型、invoker等信息,在之前我们都分析过了

        Request req = new Request();

        req.setVersion("2.0.0");

        //双向通信

        req.setTwoWay(true);

        //这个request类型为RpcInvocation

        req.setData(request);

        //创建futrue,即异步请求的接收对象

        DefaultFuture future = new DefaultFuture(channel, req, timeout);

        try {

            //最终会调用Netty的send

            channel.send(req);

        } catch (RemotingException e) {

            future.cancel();

            throw e;

        }

        返回futrue

        return future;

    }

}
上面的方法中,我们终于知道了request是在哪创建的了。这个Request的结构大家感兴趣可以自己看一下,比较简单,就是一些属性加上一些工具方法而已。重点看一下最终的send方法在哪。通过调试发现还需要通过几次调用才能真正到达Netty,如图:

NettyChannel前的两个抽象类只是对通信客户端的一些抽象,因为Dubbo不止支持Netty一个通信框架的,所以不可能直接由HeaderExchangeChannel跳到Netty。比如AbstractClient的实现类之一就是NettyClient,NettyClient才会紧接着调用NettyChannel。我们直接看NettyChannel#send方法:
public void send(Object message, boolean sent) throws RemotingException {

    super.send(message, sent);

    boolean success = true;

    int timeout = 0;

    try {

        //发送消息

        ChannelFuture future = channel.write(message);

        //sent源于<dubbo:method sent="true/false">

        //true代表等待消息发出,消息发出失败抛出异常

       //false代表不等待消息发出,将消息放入IO对了,立即返回

        if (sent) {

            timeout = getUrl().getPositiveParameter(Constants.TIMEOUT_KEY, Constants.DEFAULT_TIMEOUT);

            //等待消息发出,如果超时success就设置为false

            success = future.await(timeout);

        }

        Throwable cause = future.getCause();

        if (cause != null) {

            throw cause;

        }

    } catch (Throwable e) {

        throw new RemotingException(this, "Failed to send message " + message + " to " + getRemoteAddress() + ", cause: " + e.getMessage(), e);

    }

    //success为false就抛出异常

    if (!success) {

        throw new RemotingException(this, "Failed to send message " + message + " to " + getRemoteAddress()

                + "in timeout(" + timeout + "ms) limit");

    }

}
到这里,消息终于真正的发出了。上面方法中的channel是真正的Netty的channel,而不是Dubbo封装的。当然,在发出消息前一步还有编码,我们可以通过NettyServer的初始化来找到对应的编解码器。我们来到NettyServer类中,熟悉Netty的朋友应该都熟悉,这个类就是Netty的启动类,里面会进行相关Pipeline的配置,我们可以看到:
pipeline.addLast("decoder", adapter.getDecoder());

pipeline.addLast("encoder", adapter.getEncoder());
这个就是进行编解码的处理方法,adapter对象的类就是进行编解码的地方。
2.请求编码
上面我们一路分析到了发出消息的源码,但是还有重要一步,就是编码。我们也找到了编解码对应的类,即NettyCodecAdapter。在分析之前我们有必要了解一下Dubbo的数据包结构。Dubbo数据包结构包含消息头和消息体,消息头包含一些元信息,比如魔数、数据包类型、消息体长度等。消息体包含具体的调用信息,比如方法名、参数列表等。下面我放一张官网的消息头内容截图:
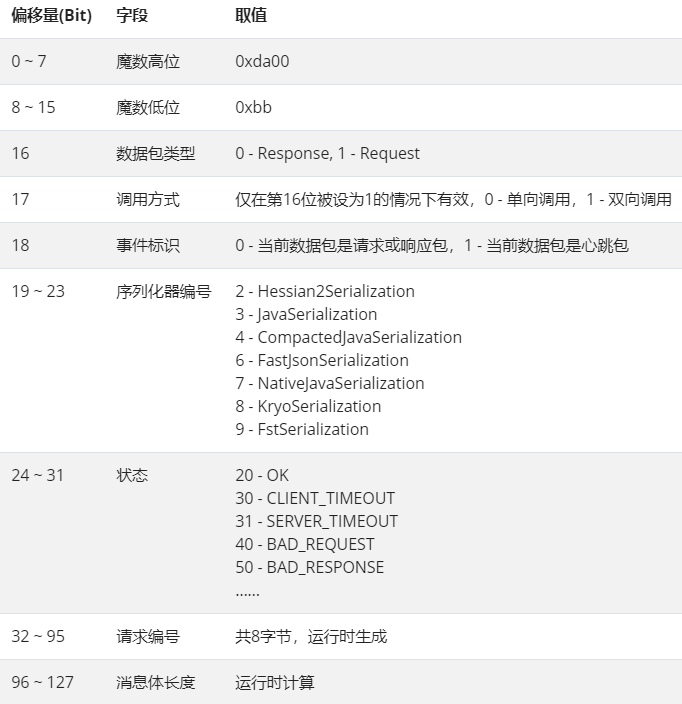
了解了Dubbo数据包结构,接着我们进入编解码方法进行分析。首先进入到NettyCodecAdapter类。这里就不贴它的源码了,可以发现它又引用了一个Codec2接口,调用了其encode和decode方法。我们知道虽然Dubbo默认选择Netty当通信工具,但是其不止支持一种通信框架,所以针对每种框架都会有一个对应的编解码适配器。那么实现了Codec2接口的实现类才是编解码的主要逻辑。我们直接通过调试找到了最终的逻辑所在类:ExchangeCodec。
public class ExchangeCodec extends TelnetCodec {

    // 消息头长度

    protected static final int HEADER_LENGTH = 16;

    // 魔数内容

    protected static final short MAGIC = (short) 0xdabb;

    protected static final byte MAGIC_HIGH = Bytes.short2bytes(MAGIC)[0];

    protected static final byte MAGIC_LOW = Bytes.short2bytes(MAGIC)[1];

    protected static final byte FLAG_REQUEST = (byte) 0x80;

    protected static final byte FLAG_TWOWAY = (byte) 0x40;

    protected static final byte FLAG_EVENT = (byte) 0x20;

    protected static final int SERIALIZATION_MASK = 0x1f;

    private static final Logger logger = LoggerFactory.getLogger(ExchangeCodec.class);

    public Short getMagicCode() {

        return MAGIC;

    }

    public void encode(Channel channel, ChannelBuffer buffer, Object msg) throws IOException {

        if (msg instanceof Request) {

            //对请求对象进行编码

            encodeRequest(channel, buffer, (Request) msg);

        } else if (msg instanceof Response) {

            //对响应对象进行编码(后面再分析)

            encodeResponse(channel, buffer, (Response) msg);

        } else {

            super.encode(channel, buffer, msg);

        }

    }

    protected void encodeRequest(Channel channel, ChannelBuffer buffer, Request req) throws IOException {

    Serialization serialization = getSerialization(channel);

    // 创建消息头字节数组,长度为16

    byte[] header = new byte[HEADER_LENGTH];

    // 设置魔数

    Bytes.short2bytes(MAGIC, header);

    // 设置数据包类型和序列化器

    header[2] = (byte) (FLAG_REQUEST | serialization.getContentTypeId());

    //设置通信方式(单向/双向)

    if (req.isTwoWay()) header[2] |= FLAG_TWOWAY;

    //设置事件标识

    if (req.isEvent()) header[2] |= FLAG_EVENT;

    // 设置请求id

    Bytes.long2bytes(req.getId(), header, 4);

    //获取buffer当前写的位置

    int savedWriteIndex = buffer.writerIndex();

    //更新witerIndex,为消息头保留16个字节的空间

    buffer.writerIndex(savedWriteIndex + HEADER_LENGTH);

    ChannelBufferOutputStream bos = new ChannelBufferOutputStream(buffer);

    //创建序列化器

    ObjectOutput out = serialization.serialize(channel.getUrl(), bos);

    if (req.isEvent()) {

        //对事件数据进行序列化操作

        encodeEventData(channel, out, req.getData());

    } else {

        //对请求数据进行序列化操作

        encodeRequestData(channel, out, req.getData());

    }

    out.flushBuffer();

    if (out instanceof Cleanable) {

        ((Cleanable) out).cleanup();

    }

    bos.flush();

    bos.close();

    //获取消息体长度

    int len = bos.writtenBytes();

    checkPayload(channel, len);

    //把消息体长度写入消息头中

    Bytes.int2bytes(len, header, 12);

    // 将buffer指针移到savedWriteIndex,为写消息头做准备

    buffer.writerIndex(savedWriteIndex);

    //写入消息头

    buffer.writeBytes(header);

    //将指针移到原写下标+消息头长度+消息体长度

    buffer.writerIndex(savedWriteIndex + HEADER_LENGTH + len);

}

    //其他方法略。。。。比如解码,我们按照数据发送的顺序来分析,在这里就不分析了

}
上面就是请求对象的编码过程,整体工作流程就是通过位运算将消息头写入header。然后对请求对象的data进行序列化,序列化后的数据存到ChannelBuffer中。接着得到数据长度len,将len写入消息头。最后再将消息头也写入到ChannelBuffer中。
3.请求的解码
当数据编码好,发出去之后。Netty服务端收到消息,进行解码。还是在ExchangeCodec中,我们分析一下解码方法:
public class ExchangeCodec extends TelnetCodec {

public Object decode(Channel channel, ChannelBuffer buffer) throws IOException {

    int readable = buffer.readableBytes();

    //创建消息头数组

    byte[] header = new byte[Math.min(readable, HEADER_LENGTH)];

    //读取消息头数据

    buffer.readBytes(header);

    //调用解码方法

    return decode(channel, buffer, readable, header);

}

protected Object decode(Channel channel, ChannelBuffer buffer, int readable, byte[] header) throws IOException {

    // 检查魔数是否与规定魔数相等

    if (readable > 0 && header[0] != MAGIC_HIGH

            || readable > 1 && header[1] != MAGIC_LOW) {

        int length = header.length;

        if (header.length < readable) {

            header = Bytes.copyOf(header, readable);

            buffer.readBytes(header, length, readable - length);

        }

        for (int i = 1; i < header.length - 1; i++) {

            if (header[i] == MAGIC_HIGH && header[i + 1] == MAGIC_LOW) {

                buffer.readerIndex(buffer.readerIndex() - header.length + i);

                header = Bytes.copyOf(header, i);

                break;

            }

        }

        //如果不相等就调用TelnetCodec的decode进行解码

        return super.decode(channel, buffer, readable, header);

    }

    //检查可读数据是否小于消息头长度

    if (readable < HEADER_LENGTH) {

        return DecodeResult.NEED_MORE_INPUT;

    }

    // 获取消息体长度

    int len = Bytes.bytes2int(header, 12);

    //检查消息体长度是否超过限制,超出就抛出异常

    checkPayload(channel, len);

    int tt = len + HEADER_LENGTH;

    //检查可读字节数是否小于实际字节数

    if (readable < tt) {

        return DecodeResult.NEED_MORE_INPUT;

    }

    // limit input stream.

    ChannelBufferInputStream is = new ChannelBufferInputStream(buffer, len);

    try {

        //继续进行编码工作

        return decodeBody(channel, is, header);

    } finally {

        if (is.available() > 0) {

            try {

                if (logger.isWarnEnabled()) {

                    logger.warn("Skip input stream " + is.available());

                }

                StreamUtils.skipUnusedStream(is);

            } catch (IOException e) {

                logger.warn(e.getMessage(), e);

            }

        }

    }

}

}
上面的解码方法主要是对请求的数据进行一系列检查。接着看一下decodeBody方法,虽然在这个类中也实现了这个方法,但是ExchangeCodec的子类DubboCodec覆盖了这个方法,所以接着分析一下DubboCodec#decodeBody:
public class DubboCodec extends ExchangeCodec implements Codec2 {

  protected Object decodeBody(Channel channel, InputStream is, byte[] header) throws IOException {

    //获取第三个字节,并通过逻辑与运算得到序列化器编号

    byte flag = header[2], proto = (byte) (flag & SERIALIZATION_MASK);

    Serialization s = CodecSupport.getSerialization(channel.getUrl(), proto);

    //获取请求编号

    long id = Bytes.bytes2long(header, 4);

    //通过逻辑与运算得到调用类型,0是响应,1是请求

    if ((flag & FLAG_REQUEST) == 0) {

      //略。。。

      //对响应结果进行解码,得到Response对象。前面说过我们按照数据发出的顺序类分析,故先不分析这部分代码

    } else {

        //创建request对象

        Request req = new Request(id);

        req.setVersion("2.0.0");

        //通过逻辑与计算出通信方式

        req.setTwoWay((flag & FLAG_TWOWAY) != 0);

        //检查是否位事件类型

        if ((flag & FLAG_EVENT) != 0) {

            //将心跳事件设置到request中

            req.setEvent(Request.HEARTBEAT_EVENT);

        }

        try {

            Object data;

            if (req.isHeartbeat()) {

                //对心跳包进行解码

                data = decodeHeartbeatData(channel, deserialize(s, channel.getUrl(), is));

            } else if (req.isEvent()) {

                //对事件数据进行解码

                data = decodeEventData(channel, deserialize(s, channel.getUrl(), is));

            } else {

                DecodeableRpcInvocation inv;

                //根据url参数判断是否在当前线程上对消息体进行解码

                if (channel.getUrl().getParameter(

                        Constants.DECODE_IN_IO_THREAD_KEY,

                        Constants.DEFAULT_DECODE_IN_IO_THREAD)) {

                    inv = new DecodeableRpcInvocation(channel, req, is, proto);

                    inv.decode();

                } else {

                    //不在当前线程上解码

                    inv = new DecodeableRpcInvocation(channel, req,

                            new UnsafeByteArrayInputStream(readMessageData(is)), proto);

                }

                data = inv;

            }

            //设置数据

            req.setData(data);

        } catch (Throwable t) {

            if (log.isWarnEnabled()) {

                log.warn("Decode request failed: " + t.getMessage(), t);

            }

            // bad request

            req.setBroken(true);

            req.setData(t);

        }

        return req;

    }

}

}
以上方法只对部分字段进行了解码,并将解码字段封装到Request对象中。随后会调用DecodeableRpcInvocation的decode方法进行后续的解码工作。此工作可以解码出调用的方法名、attachment、参数。我们看一下这个方法:
public Object decode(Channel channel, InputStream input) throws IOException {

    //创建序列化器

    ObjectInput in = CodecSupport.getSerialization(channel.getUrl(), serializationType)

            .deserialize(channel.getUrl(), input);

    //通过序列化获取dubbo version、path、version,并保存到attachments中

    setAttachment(Constants.DUBBO_VERSION_KEY, in.readUTF());

    setAttachment(Constants.PATH_KEY, in.readUTF());

    setAttachment(Constants.VERSION_KEY, in.readUTF());

    //获取方法名

    setMethodName(in.readUTF());

    try {

        Object[] args;

        Class<?>[] pts;

        //获取参数类型

        String desc = in.readUTF();

        if (desc.length() == 0) {

            pts = DubboCodec.EMPTY_CLASS_ARRAY;

            args = DubboCodec.EMPTY_OBJECT_ARRAY;

        } else {

            //将desc解析为类型数组

            pts = ReflectUtils.desc2classArray(desc);

            args = new Object[pts.length];

            for (int i = 0; i < args.length; i++) {

                try {

                    args[i] = in.readObject(pts[i]);

                } catch (Exception e) {

                    if (log.isWarnEnabled()) {

                        log.warn("Decode argument failed: " + e.getMessage(), e);

                    }

                }

            }

        }

        //设置参数类型数组

        setParameterTypes(pts);

        //通过反序列化得到原attachment

        Map<String, String> map = (Map<String, String>) in.readObject(Map.class);

        if (map != null && map.size() > 0) {

            Map<String, String> attachment = getAttachments();

            if (attachment == null) {

                attachment = new HashMap<String, String>();

            }

            //将原attachment与现在的attachment融合

            attachment.putAll(map);

            setAttachments(attachment);

        }

        for (int i = 0; i < args.length; i++) {

            args[i] = decodeInvocationArgument(channel, this, pts, i, args[i]);

        }

        //设置参数列表

        setArguments(args);

    } catch (ClassNotFoundException e) {

        throw new IOException(StringUtils.toString("Read invocation data failed.", e));

    } finally {

        if (in instanceof Cleanable) {

            ((Cleanable) in).cleanup();

        }

    }

    return this;

}
上面的方法通过反序列化,得到了方法名、参数列表等信息。到这里,请求数据的解码过程就完成了,接下来就可以调用实际的服务了。
4.调用具体服务
前面解码了请求数据,并封装到了Request对象中。我们回到NettyServer中,找到Pipeline添加的逻辑处理类,即NettyHandler。

不了解Netty的话,可以把Pipeline看作一个逻辑处理链路,一个双向链路,链路上不是每个处理类都必须执行,但是相对顺序不能变。传入的数据会根据Pipeline添加的逻辑处理类的顺序进行相应的处理。比如图中,nettyHandler的主要作用是收发消息,收消息前,必须经过解码,发消息后必须经过编码。博客写到这里内容已经非常多了,为了节约篇幅就不再展示比较简单的源码了,大家可以自己点进去看一下NettyHandler的源码。解码完后,会进入到NettyHandler#messageReceived。主要逻辑就是获取NettyChannel实例,然后通过ChannelHandler#received继续向下传递。
我们现在回顾一下开头贴出的Dubbo调用图,Server收到请求并解码完后,有一个线程派发器。一般情况下,很少会拿Netty接收请求的线程去执行实际的服务逻辑。而是通过线程派发器派发到线程池中执行。Dubbo支持5种不同类型的线程派发策略(IO线程就是通信框架接收请求的线程):

Dubbo默认使用all派发策略,其实现类是AllChannelHandler,这个类实现了ChannelHandler。所以上面的NettyHandler#messageReceived中调用的ChannelHandler#received,会进入到这个实现类里面,进行线程派发。

AllChannelHandler#received比较简单,就不贴了。方法一开始就新建了一个线程池,意图也很明显。关键在于,它把请求对象封装到了ChannelEventRunnable中:

ChannelEventRunnable类也比较简单,仅是一个中转站的作用。主要是在run方法里面,对不同的消息类型,调用不同的处理方法。
我们主要是分析received方法,像连接等方法我们就不跟进了。在ChannelEventRunnable#run方法里经过中转后,进入到了DecodeHandler类,看一下received方法:
public void received(Channel channel, Object message) throws RemotingException {

    if (message instanceof Decodeable) {

        //如果实现了Decodeable接口,就进行解码

        decode(message);

    }

    if (message instanceof Request) {

        //对Request的data进行解码

        decode(((Request) message).getData());

    }

    if (message instanceof Response) {

        //对Request的result进行解码

        decode(((Response) message).getResult());

    }

    //执行后续逻辑

    handler.received(channel, message);

}
我们前面说过,解码可以在IO线程,也可以在线程池里执行。这里就体现线程池解码的逻辑。完成解码后,后续逻辑在HeaderExchangeHandler:
public void received(Channel channel, Object message) throws RemotingException {

    channel.setAttribute(KEY_READ_TIMESTAMP, System.currentTimeMillis());

    ExchangeChannel exchangeChannel = HeaderExchangeChannel.getOrAddChannel(channel);

    try {

        //处理请求对象

        if (message instanceof Request) {

            Request request = (Request) message;

            if (request.isEvent()) {

                //处理事件

                handlerEvent(channel, request);

            //处理普通的请求

            } else {

                //双向通信

                if (request.isTwoWay()) {

                    //调用handleRequest

                    Response response = handleRequest(exchangeChannel, request);

                    //将调用结果返回给消费者

                    channel.send(response);

                } else {

                    //如果是单向通信,不需要返回结果

                    handler.received(exchangeChannel, request.getData());

                }

            }

        //处理响应对象,消费者会执行此逻辑,后面分析

        } else if (message instanceof Response) {

            handleResponse(channel, (Response) message);

        } //略。。。

    } finally {

        HeaderExchangeChannel.removeChannelIfDisconnected(channel);

    }

}

Response handleRequest(ExchangeChannel channel, Request req) throws RemotingException {

    Response res = new Response(req.getId(), req.getVersion());

    //检查请求是否合法

    if (req.isBroken()) {

        Object data = req.getData();

        String msg;

        if (data == null) msg = null;

        else if (data instanceof Throwable) msg = StringUtils.toString((Throwable) data);

        else msg = data.toString();

        res.setErrorMessage("Fail to decode request due to: " + msg);

        //不合法,就设置BAD_REQUEST状态

        res.setStatus(Response.BAD_REQUEST);

        return res;

    }

    //获取data字段

    Object msg = req.getData();

    try {

        //调用后续逻辑

        Object result = handler.reply(channel, msg);

        res.setStatus(Response.OK);

        res.setResult(result);

    } catch (Throwable e) {

        res.setStatus(Response.SERVICE_ERROR);

        res.setErrorMessage(StringUtils.toString(e));

    }

    return res;

}
HeaderExchangeHandler#received方法逻辑比较清晰,如果是双向通信,就继续后续的逻辑并返回结果。单向通信不返回结果,仅向下接着执行。我们接着分析,进入到DubboProtocol#reply。就不贴代码了,主要逻辑就是获取Invoker实例对象,通过invoker调用具体服务:
return invoker.invoke(inv);
这个invoke方法的实现在AbstractProxyInvoker,中间会经过一堆过滤器,大家可以直接把断点打在这个抽象类里。而AbstractProxyInvoker#invoke主要就是调用了doInvoke方法,而这个方法是个抽象方法。它需要具体的Invoker实例实现。Invoker是通过JavassistProxyFactory创建的,第二章提到过:
public <T> Invoker<T> getInvoker(T proxy, Class<T> type, URL url) {

    // TODO Wrapper cannot handle this scenario correctly: the classname contains '$'

    final Wrapper wrapper = Wrapper.getWrapper(proxy.getClass().getName().indexOf('$') < 0 ? proxy.getClass() : type);

    return new AbstractProxyInvoker<T>(proxy, type, url) {

        @Override

        protected Object doInvoke(T proxy, String methodName,

                                  Class<?>[] parameterTypes,

                                  Object[] arguments) throws Throwable {

            return wrapper.invokeMethod(proxy, methodName, parameterTypes, arguments);

        }

    };

}
Wrapper是一个抽象类,Dubbo会在运行时通过Javassist框架为其生成实现类,并实现invokeMethod方法。同样的,我们利用Arthas反编译一下。进入到Provider的进程,搜索*.Wrapper0,再用jad反编译:
public class Wrapper0 extends Wrapper implements ClassGenerator.DC {

    public static String[] pns;

    public static Map pts;

    public static String[] mns;

    public static String[] dmns;

    public static Class[] mts0;

    public Object invokeMethod(Object object, String string, Class[] arrclass, Object[] arrobject) throws InvocationTargetException {

        //这就是我们需要调用的服务接口

        ServiceAPI serviceAPI;

        try {

            //类型转换

            serviceAPI = (ServiceAPI)object;

        }

        catch (Throwable throwable) {

            throw new IllegalArgumentException(throwable);

        }

        try {

            //sendMessage就是我们调用的方法名,根据方法名找到指定方法

            if ("sendMessage".equals(string) && arrclass.length == 1) {

                return serviceAPI.sendMessage((String)arrobject[0]);

            }

        }

        catch (Throwable throwable) {

            throw new InvocationTargetException(throwable);

        }

        throw new NoSuchMethodException(new StringBuffer().append("Not found method \"").append(string).append("\" in class com.yelow.springboot.dubbo.ServiceAPI.").toString());

    }

    //其他方法略。。。

}
到这里,终于看到了调用具体方法的代码。
5.返回调用结果
获取到执行结果后,我们就需要返回了,详细的调用链就不再重复了,大家可以自己debug一下。这里只看一下Response的编码。在请求编码那一节中,我们分析了ExchangeCodec,其中,对响应对象进行编码没有分析,我们现在来看看:
protected void encodeResponse(Channel channel, ChannelBuffer buffer, Response res) throws IOException {

    int savedWriteIndex = buffer.writerIndex();

    try {

        Serialization serialization = getSerialization(channel);

        // 创建消息头字节数组

        byte[] header = new byte[HEADER_LENGTH];

        // 设置魔数

        Bytes.short2bytes(MAGIC, header);

        // 设置序列化器编号

        header[2] = serialization.getContentTypeId();

        if (res.isHeartbeat()) header[2] |= FLAG_EVENT;

        // 设置响应状态码

        byte status = res.getStatus();

        header[3] = status;

        //设置请求编号

        Bytes.long2bytes(res.getId(), header, 4);

        buffer.writerIndex(savedWriteIndex + HEADER_LENGTH);

        ChannelBufferOutputStream bos = new ChannelBufferOutputStream(buffer);

        ObjectOutput out = serialization.serialize(channel.getUrl(), bos);

        // encode response data or error message.

        if (status == Response.OK) {

            if (res.isHeartbeat()) {

                //对心跳响应结果进行序列化

                encodeHeartbeatData(channel, out, res.getResult());

            } else {

                //对调用结果进行序列化

                encodeResponseData(channel, out, res.getResult());

            }

        } else out.writeUTF(res.getErrorMessage());

        out.flushBuffer();

        if (out instanceof Cleanable) {

            ((Cleanable) out).cleanup();

        }

        bos.flush();

        bos.close();

        int len = bos.writtenBytes();

        checkPayload(channel, len);

        Bytes.int2bytes(len, header, 12);

        // write

        buffer.writerIndex(savedWriteIndex);

        buffer.writeBytes(header); // write header.

        buffer.writerIndex(savedWriteIndex + HEADER_LENGTH + len);

    } catch (Throwable t) {

        //异常处理略。。。

    }

}
6.接收调用结果
终于到了最后一步,前面经历了发起服务调用-发送请求-请求编码-请求解码-调用具体服务-返回请求结果(请求结果编码)。
接收调用结果后,同样需要解码。这一块不想再重复了,具体代码在DubboCodec#decodeBody中,有了前面的经验,大家可以自己debug看一下。
响应数据解码完成后,Dubbo会将响应对象派发到线程池上,线程池会把调用的结果传递到用户线程。前面说到过,请求发送后,会用DefaultFuture的get方法等待响应结果。当响应对象来了后,用户线程会被唤醒,并通过请求编号获取自己的响应结果。我们来分析下,首先解码完成后,肯定是要在Netty的逻辑处理类里面进行后续逻辑的调用,如handler.received。这个received就会进入到DefaultFuture中:
public class DefaultFuture implements ResponseFuture {

    private static final Logger logger = LoggerFactory.getLogger(DefaultFuture.class);

    private static final Map<Long, Channel> CHANNELS = new ConcurrentHashMap<Long, Channel>();

    private static final Map<Long, DefaultFuture> FUTURES = new ConcurrentHashMap<Long, DefaultFuture>();

public static void received(Channel channel, Response response) {

    try {

        DefaultFuture future = FUTURES.remove(response.getId());

        if (future != null) {

            //继续往下调用

            future.doReceived(response);

        } else {

            logger.warn("The timeout response finally returned at "

                    + (new SimpleDateFormat("yyyy-MM-dd HH:mm:ss.SSS").format(new Date()))

                    + ", response " + response

                    + (channel == null ? "" : ", channel: " + channel.getLocalAddress()

                    + " -> " + channel.getRemoteAddress()));

        }

    } finally {

        CHANNELS.remove(response.getId());

    }

}

private void doReceived(Response res) {

    lock.lock();

    try {

        //保存响应对象

        response = res;

        if (done != null) {

            //唤醒用户线程

            done.signal();

        }

    } finally {

        lock.unlock();

    }

    if (callback != null) {

        invokeCallback(callback);

    }

}

}
以上逻辑就是把对象保存到DefaultFuture中,然后唤醒用户线程。随后用户线程调用get方法获取结果。
完整的调用过程就分析到这里了,更多用法和源码分析可以看官网文档:http://dubbo.apache.org/zh/docs/
Dubbo服务调用过程源码解析④的更多相关文章
- dubbo系列四、dubbo服务暴露过程源码解析
一.代码准备 1.示例代码 参考dubbo系列二.dubbo+zookeeper+dubboadmin分布式服务框架搭建(windows平台) 2.简单了解下spring自定义标签 https://w ...
- Dubbo消费方服务调用过程源码分析
参考:dubbo消费方服务调用过程源码分析dubbo基于spring的构建分析Dubbo概述--调用过程dubbo 请求调用过程分析dubbo集群容错机制代码分析1dubbo集群容错策略的代码分析2d ...
- (转)Dubbo服务暴露过程源码分析
参考
- 【图解源码】Zookeeper3.7源码分析,包含服务启动流程源码、网络通信源码、RequestProcessor处理请求源码
Zookeeper3.7源码剖析 能力目标 能基于Maven导入最新版Zookeeper源码 能说出Zookeeper单机启动流程 理解Zookeeper默认通信中4个线程的作用 掌握Zookeepe ...
- Dubbo服务调用的动态代理和负载均衡
Dubbo服务调用的动态代理及负载均衡源码解析请参见:http://manzhizhen.iteye.com/blog/2314514
- Spring IOC容器启动流程源码解析(四)——初始化单实例bean阶段
目录 1. 引言 2. 初始化bean的入口 3 尝试从当前容器及其父容器的缓存中获取bean 3.1 获取真正的beanName 3.2 尝试从当前容器的缓存中获取bean 3.3 从父容器中查找b ...
- Hadoop中Yarnrunner里面submit Job以及AM生成 至Job处理过程源码解析
参考 http://blog.csdn.net/caodaoxi/article/details/12970993 Hadoop中Yarnrunner里面submit Job以及AM生成 至Job处理 ...
- 第四章 dubbo内核之aop源码解析
ExtensionLoader<Protocol> loader = ExtensionLoader.getExtensionLoader(Protocol.class); final P ...
- Dubbo——服务调用过程
文章目录 引言 服务的交互 服务降级 集群容错 服务调用 服务端接收请求 总结 引言 经过之前文章的铺垫,现在可以来分析服务的交互调用过程了. 服务的交互 服务降级 从名字上看我们不难理解MockCl ...
随机推荐
- JQuery案例:暖心小广告
暖心小广告 写一个页面,每隔3秒显示小广告,再过3秒自动关闭. <head> <meta charset="UTF-8"> <title>暖心广 ...
- 05 python开发之文件处理
05 python开发之文件处理 目录 05 python开发之文件处理 5 文件处理 5.1 字符编码 5.1.1 基本概念 5.1.2 发展历程 5.1.3 使用 5.2 文件处理基础 5.2.1 ...
- eclispe中打点不会提示的解决方法,以及自动补全
Eclipse中打点无提示的解决办法 建了个JAVA工程,然后发现输入代码后,在输入.后面不会弹出来我所要的函数. alt+/ 提示No Default Proposals 自己找了半天, ...
- 第15.4节 PyCharm程序代码检测功能介绍
老猿使用PyCharm有将近一个月了,发现PyCharm并不能很好的完成语法检查,有时运行时突然终止,仔细核查却发现是基本的语法错误,不过有次无意中移动鼠标到代码最右边的边框时发现其实PyCharm有 ...
- PyQt学习随笔:Model/View中诸如DisplayRole的数据角色及含义
在PyQt中,模型可以针对不同的组件(或者组件的不同部分,比如存储数据.界面展示数据.按钮的提示等)提供不同的数据.例如,Qt.DisplayRole用于视图的文本显示.通常来说,模型中的数据项包含一 ...
- PyQt(Python+Qt)学习随笔:调用disconnect进行信号连接断开时的信号签名与断开参数的匹配要求
老猿Python博文目录 专栏:使用PyQt开发图形界面Python应用 老猿Python博客地址 在使用信号调用disconnect()方法断开信号和槽的连接时,信号可以带签名也可不带签名,参数可以 ...
- Pentaho Report Designer 报表系统 - 入门详解
目录 简介 安装与配置 环境要求 运行方式 使用教学 数据源配置与原始数据获取 报表布局设计与格式化 布局设计 模块结构 控件 示例 报表预览与发布 报表访问与获取 参考材料 简介 Pentaho ...
- centos7最小安装后——网络配置、常见命令安装,远程连接、yum源安装软件包
安装环境 #软件:vmware 14 #centos版本:CentOS-7-x86_64-DVD-1810 下载地址: #网络配置:NAT模式 配置 网络配置 #动态获取ip: centos7最小安装 ...
- ORACLE PRAGMA AUTONOMOUS_TRANSACTION 自治事务 单独提交某一段操作
个人使用示例: CREATE OR REPLACE PROCEDURE logs(p_remark VARCHAR2, p_log CLOB) AS PRAGMA AUTONOMOUS_TRANSAC ...
- 权威部门接连下发文件,Panda交易所带你走进区块链概念股
Panda交易所获悉,7月21日,北京市地方金融监督管理局发文<北京股权交易中心获得首批开展区块链试点建设资格>,文中表示证监会7月7日发布<关于原则同意北京.上海.苏州.浙江.深圳 ...