vue3项目,记录我是如何用1h实现产品预估1天工作量的界面需求
最近在编写前端界面,硬是一人一周时间加班加点写完了一个项目的前端界面(一级菜单有12个页面+一个控制台大屏,二三级界面有N个),之前预估前端界面的编写需要一个月,我是自己把自己卷死了(没有办法,项目经理说项目要1周写界面,2周发版,我这个项目前端只我1个人,后端有3个人...).......下面要说的是某一个界面中的一个小模块。
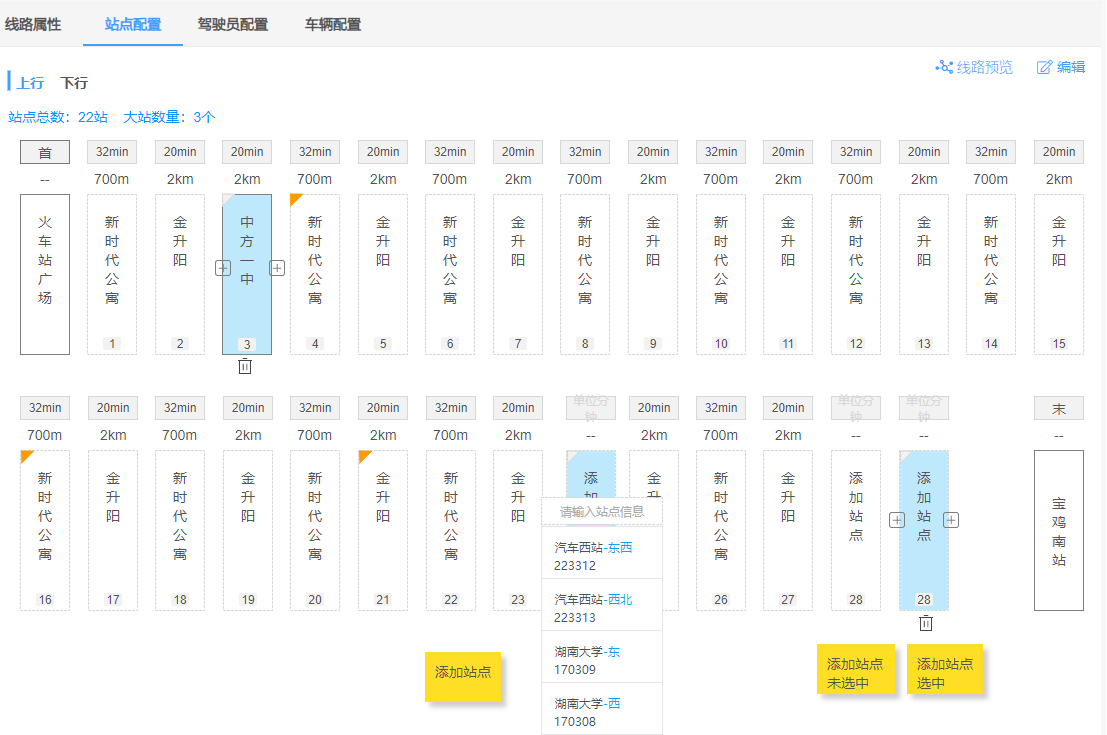
产品原型
需求说明:
【站点配置】
1、站点配置,需要线路属性配置完后才可以配置,编辑的时候做校验,线路属性没有配置完,不可以编辑,禁用状态。
2、上下行:需要选择配置上行还是下行的站点,单选。是否有上下行,需要根据线路属性来判断。
2、统计:统计上行或下行站点数量,大站数量
3、站点配置:
3.1、场站:根据线路属性配置的上下行场站,如果为上行,上行场站在前下行场站在后,在图中显示场站名称。反之,下行场站在前上行场站在后。
3.2、场站显示:上行场站,标记“首”,无“--”里程信息。下行场站,标记“末 ”,无“--”里程信息。反之,下行场站,标记“首”,无“--”里程信息。上行场站,标记“末 ”,无“--”里程信息
3.3、场站操作:“首”场站选中后,左侧显示“+”,可以添加第一个站点。“末”场站选中后,由侧显示“+”,可以添加倒数第一个站点。
3.4、站点显示:显示序号、站间距、时长。站间距根据地图计算,时长需要输入,3位整数,单位分钟。
3.5、站点移动:鼠标选中,移动鼠标可以拖动排序。
3.6、站点操作:鼠标选中后,可以往前或往后添加站点,也可以删除站点,并自动排序。
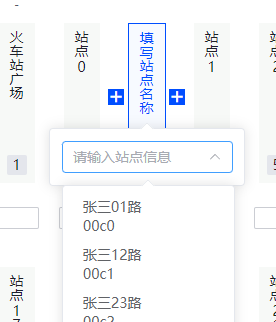
3.7、添加站点:添加空白站点,点击可以添加站点,按照站点名字搜索和选择,数据来源站点管理。
3.8、时长修改:不需要选中站点,可以直接修改时长。
3.9、大站设置:鼠标选中后,选中左上角图标,设置为大站点
3.10、 站点修改:不做站点的编辑操作,只可以删除在添加。
3.11、如果有添加操作,但未添加站点信息。不可以保存。提示“请添加站点信息或删除空白站点”
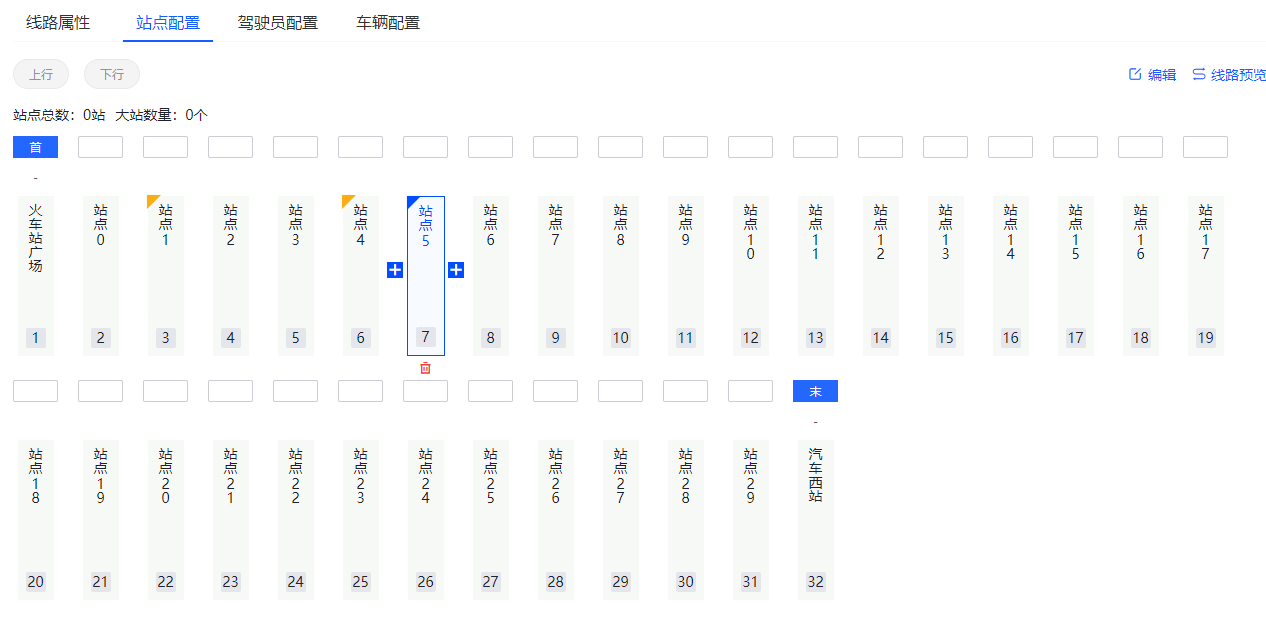
我做出来的界面效果
代码实现
分析:要能拖拽,要能动态编辑。拖拽,用第三方插件vuedraggable,布局用flex。注意安装的是vue3版本,yarn add vuedraggable@next,一开始有考虑过vue-grid-layout,后面感觉grid布局操作会更复杂,所以果断放弃。
前端项目技术栈:vue3+ts+vite3.x+element plus+wujie微前端。
Dom代码结构:
<template>

  <div class="site-set">

    <div class="operator-box">

      <div class="tag-box">

        <el-tag

          v-for="tag in appTags"

          :key="tag.name"

          size="large"

          :closable="false"

          round

          :type="getTagType(tag)"

          @click="onClickTag(tag)"

          class="cursor-pointer"

        >

          {{ tag.name }}

        </el-tag>

      </div>

      <div class="tools-box">

        <xdEditCancleBtn v-model="isEditSiteInfo" @onOK="onEditInfo"></xdEditCancleBtn>

        <el-link type="primary" :underline="false" @click="onLineView()">

          <i class="iconfont icon-xianlu"></i>线路预览

        </el-link>

      </div>

    </div>

    <div class="total-info-box">

      <span class="total-num">站点总数:{{ totalSiteNums }}站</span>

      <span>大站数量:{{ bigSiteNums }}个</span>

    </div>

    <div class="site-list-box xd-scrollBar">

      <draggable

        class="wrapper-site"

        v-model="siteList"

        @start="drag = true"

        @end="drag = false"

        item-key="index"

        filter=".fixed"

      >

        <template #item="{ element, index }">

          <div

            class="site-item"

            :class="{ actived: activedIndex == index, fixed: getFixedClass(index) }"

            @click="onClickSiteItem(index)"

          >

            <span class="text">

              <template v-if="isStartSite(index)"> 首 </template>

              <template v-else-if="isEndSite(index)"> 末 </template>

              <template v-else>

                <input class="time" />

              </template>

            </span>

            <span class="distance">

              <template v-if="isStartOrEndSite(index)"> - </template>

            </span>

            <span class="content">

              <el-popover

                v-if="element.id == -1 && activedIndex == index"

                placement="bottom"

                :width="196"

                trigger="click"

                :visible="visible"

              >

                <template #reference>

                  <span class="site-name" @click="visible = !visible"

                    >{{ element.name }}

                  </span>

                </template>

                <el-select

                  placeholder="请输入站点信息"

                  class="select-block-mini"

                  popper-class="popper-block"

                  filterable

                  @change="onChangeSite"

                >

                  <el-option

                    v-for="item in allSiteList"

                    :key="item.code"

                    :label="item.name"

                    :value="item.code"

                    :disabled="item.disabled"

                  >

                    <div class="select-item">

                      <div class="row">

                        <span class="name">

                          {{ item.name }}

                        </span>

                        <span class="line-name">{{ item.lineName }}</span>

                      </div>

                      <div class="row">

                        <span class="code">{{ item.code }}</span>

                      </div>

                    </div>

                  </el-option>

                </el-select>

              </el-popover>

              <span v-else class="site-name">{{ element.name }} </span>

              <span class="site-index">{{ index + 1 }}</span>

              <span

                v-if="element.isBigSite && activedIndex != index"

                class="triangle-block"

              ></span>

              <span

                @click="onChangeBigSite(index)"

                title="切换大小站"

                v-if="element.id != -1 && activedIndex == index"

                class="triangle-block edit"

              ></span>

            </span>

            <span

              v-if="!isStartOrEndSite(index)"

              class="del-btn"

              @click="delSiteItem(index)"

              title="移除"

            >

              <i class="iconfont icon-shanchu"> </i>

            </span>

            <span

              @click="onLeftAddSite(index)"

              class="plus left"

              v-if="!isStartSite(index)"

              title="左边添加"

            >

              <i class="iconfont icon-jia"></i>

            </span>

            <span

              @click="onRightAddSite(index)"

              class="plus right"

              v-if="!isEndSite(index)"

              title="右边添加"

            >

              <i class="iconfont icon-jia"></i>

            </span>

          </div>

        </template>

      </draggable>

    </div>

  </div>

</template>
ts代码:
<script setup lang="ts">

import draggable from "vuedraggable";

const siteList = ref<any>([

  { name: "火车站广场", id: 0, isBigSite: false }, //首站

]);

for (let i = 0; i < 30; i++) {

  siteList.value.push({ name: "站点" + i, id: i + 1, isBigSite: false });

}

siteList.value.push({ name: "汽车西站", id: siteList.length + 1, isBigSite: false }); //末站

const appTags = [

  { name: "上行", id: 1 },

  { name: "下行", id: 2 },

];

const state = reactive({

  drag: false,

  activedIndex: -1, //当前激活项索引

  activedApp: "",

  totalSiteNums: 0, //总站数

  bigSiteNums: 0, //大站数量

});

//获取tab类型样式

const getTagType = (tag: any) => {

  return tag.id == state.activedApp ? "" : "info";

};

//点击标签

const onClickTag = (tag: any) => {

  state.activedApp = tag.id;

};

const isEditSiteInfo = ref(false); //是否是编辑

//编辑信息

const onEditInfo = () => {

  isEditSiteInfo.value = true;

};

//线路预览

const onLineView = () => {};

//获取固定样式

const getFixedClass = (index: number) => {

  return index == 0 || index == siteList.value.length - 1;

};

//点击站点项

const onClickSiteItem = (index: number) => {

  console.log("onClickSiteItem");

  state.activedIndex = index;

};

//是否是首站

const isStartSite = (index: number) => {

  return index == 0;

};

//是否是末站

const isEndSite = (index: number) => {

  return index == siteList.value.length - 1;

};

//是否是首末站

const isStartOrEndSite = (index: number) => {

  return isStartSite(index) || isEndSite(index);

};

const addSiteItem = {

  name: "填写站点名称",

  id: -1,

  isBigSite: false,

};

//左边添加站点

const onLeftAddSite = (index: number) => {

  siteList.value.splice(index, 0, addSiteItem);

};

//右边添加站点

const onRightAddSite = (index: number) => {

  siteList.value.splice(index + 1, 0, addSiteItem);

};

//删除站点项

const delSiteItem = (index: number) => {

  siteList.value.splice(index, 1);

};

const visible = ref(false);

const allSiteList = ref<any>([]);

for (let i = 0; i < 20; i++) {

  let item: any = { name: "张三" + i, code: "00c" + i, lineName: i + 1 + "路" };

  // let disabled = driverTags.value.some((s: any) => s.code == item.code);

  // item.disabled = disabled;

  allSiteList.value.push(item);

}

//选择站点

const onChangeSite = (val: any) => {

  const item = allSiteList.value.find((f: any) => f.code == val);

  siteList.value.splice(activedIndex.value, 0, item);

};

//切换大站小站

const onChangeBigSite = (index: number) => {

  siteList.value[index].isBigSite = !siteList.value[index].isBigSite;

};

const { totalSiteNums, bigSiteNums, drag, activedIndex } = toRefs(state);

</script>
css代码较多,已独立css文件,css代码如下:


.operator-box {

  display: flex;

  width: 100%;

  justify-content: space-between;

  height: 36px;

  align-items: center;

  .tag-box {

    .el-tag {

      margin-right: 15px;

      padding: 0px 15px;

    }

  }

  .tools-box {

    display: flex;

    align-items: center;

    .iconfont {

      padding-right: 4px;

    }

  }

}

.total-info-box {

  width: 100%;

  display: flex;

  align-items: center;

  height: 44px;

  color: var(--sub-title-color);

  .total-num {

    padding-right: 10px;

  }

}

.site-list-box {

  height: 488px; //2行的高度

  overflow-y: auto;

}

.wrapper-site {

  display: flex;

  width: 100%;

  flex-wrap: wrap;

  gap: 20px;

  margin-bottom: -4px;

}

.site-item {

  width: 45px;

  height: 220px;

  color: var(--sub-title-color);

  display: flex;

  flex-direction: column; //220 - 160 -22

  align-items: center;

  position: relative;

  margin-bottom: 4px;

  .text {

    width: 45px;

    height: 22px;

    display: flex;

    justify-content: center;

    align-items: center;

    .time {

      width: 45px;

      height: 22px;

      border: 1px solid #cbcdd3;

      border-radius: 2px;

    }

  }

  &.fixed {

    .text {

      background-color: var(--hover-font-color);

      color: #f7f9f7;

      font-size: 12px;

    }

  }

  .distance {

    height: 38px;

    color: #4f5a68;

    font-size: 12px;

    display: flex;

    justify-content: center;

    align-items: center;

  }

  .content {

    height: 160px;

    background-color: #f7f9f7;

    writing-mode: vertical-rl;

    display: flex;

    align-items: center;

    justify-content: space-between;

    padding: 8px;

    position: relative;

    .site-name {

      writing-mode: vertical-rl;

      text-orientation: upright; /* 数字垂直展示 */

      // position:absolute;left:50%;top:50%;--webkit-transform:translate(-50%,-50%);

    }

    .site-index {

      width: 20px;

      height: 20px;

      border-radius: 2px;

      background: #e4e6ec;

      color: var(--sub-title-color);

      writing-mode: horizontal-tb;

      text-align: center;

      line-height: 20px;

    }

    $bw: 10px;

    .triangle-block {

      display: inline-block;

      height: 0;

      width: 0;

      border-top: $bw solid #faad14;

      border-bottom: $bw solid transparent;

      border-left: $bw solid transparent;

      border-right: $bw solid transparent;

      transform: rotate(135deg);

      transform-origin: top;

      position: absolute;

      top: 6px;

      left: -4px;

      &.edit {

        border-top: $bw solid #004eff;

      }

    }

  }

  .del-btn {

    display: flex;

    justify-content: center;

    height: 24px;

    align-items: center;

    width: 24px;

    position: absolute;

    bottom: -24px;

    left: calc(50% - 12px);

    &:hover {

      .iconfont {

        color: red;

      }

    }

  }

  //左右加号

  .plus {

    display: none;

    position: absolute;

    z-index: 9;

    top: calc(50% + 16px);

    width: 16px;

    height: 16px;

    justify-content: center;

    align-items: center;

    background-color: var(--main-btn-color);

    .iconfont {

      font-size: 14px;

      color: white;

    }

    &.left {

      left: -16px;

    }

    &.right {

      right: -16px;

    }

  }

  .iconfont {

    font-size: 14px;

    display: none;

    &.icon-shanchu {

      color: #f53f3f;

    }

  }

  &.actived {

    .content {

      border: 1px solid var(--main-btn-color);

      color: var(--main-btn-color);

      background: #f7faff;

    }

    .iconfont,

    .plus {

      display: flex;

    }

  }

}
vue组件中引入css代码:
<style lang="scss" scoped>

@import "./scss/siteSet.scss";

</style>

<style lang="scss">

.el-select {

  &.select-block-mini {

    width: 171.27px;

  }

}

</style>
其实我花了1.5h,主要是按UI的稿子调样式,因为很赶,所以代码很糙,我早就有了后面重构的觉悟,那么短的时间内,几乎不可能想得很周到,我只能想办法在最短的时间内实现需求。里面其实有部分功能没有实现,因为后端一期不现实。最近写代码真是写得手都快抽搐了,即便是各种复制粘贴也累啊,界面实在太多了.....
vue3项目,记录我是如何用1h实现产品预估1天工作量的界面需求的更多相关文章
- Vue(1):用Vue-cli构建Vue3项目
使用Vue-cli构建Vue3项目 1.检查node版本 node -v 以上node版本位14.15.0满足Vue3项目的创建条件(Vu3需要node 版本8以上) 为什么需要安装node? vue ...
- 从零搭建基于webpack的Electron-Vue3项目(1)——基于webpack的Vue3项目搭建
从零搭建基于webpack的Electron-Vue3项目(1)--基于webpack的Vue3项目搭建 前言 本篇文章内容,主要是基于webpack的Vue3项目开发环境进行搭建,暂时还不涉及到El ...
- Vue3项目的简单搭建与项目结构的简单介绍
Vue3项目的创建与运行 本文记录下自己近期学习的Vue3项目的创建,以及如何去运行一个Vue应用,同时包括对Vue项目结构进行一个简单的介绍. 一.node与npm的安装 通常平常进行开发的同学应该 ...
- IOS客户端Coding项目记录导航
IOS客户端Coding项目记录(一) a:UITextField设置出现清除按键 b:绘画一条下划线 表格一些设置 c:可以定义表头跟底部视图(代码接上面) d:隐藏本页的导航栏 e:UIEdge ...
- Unity Project Wizard (最近打开的项目记录)
最近打开工程列表 当用Unity打开过的项目越来越多之后,在最近打开项目记录框中就会变的很长,那么如何才能删除最近打开的记录呢? Unity4.x最近打开的工程记录 Unity5.x最近打开的工程记录 ...
- jenkins构建项目记录2(tag)
与jenkins构建项目记录1不同的是通过tag拉去对应版本代码 1.先安装创建(git parameter) 2.general设置 name可任意命名,下面源码管理设置时变量会引用到. 3.源码管 ...
- Vue3项目搭建规范
Vue3项目搭建规范 一. 代码规范 1.1 集成editorconfig配置 EditorConfig有助于为不同IDE编辑器上维护一致的编码风格 安装插件:EditorConfig for VS ...
- 【Parcel 2 + Vue 3】从0到1搭建一款极快,零配置的Vue3项目构建工具
前言 一周时间,没见了,大家有没有想我啊!哈哈!我知道肯定会有的.言归正传,我们切入正题.上一篇文章中我主要介绍了使用Vite2+Vue3+Ts如何更快的入手项目.那么,今天我将会带领大家认识一个新的 ...
- Tengine是由淘宝网发起的Web服务器项目。它在Nginx的基础上,针对大访问量网站的需求,添加了很多高级功能和特性
简介 Tengine是由淘宝网发起的Web服务器项目.它在Nginx的基础上,针对大访问量网站的需求,添加了很多高级功能和特性.Tengine的性能和稳定性已经在大型的网站如淘宝网,天猫商城等得到了很 ...
- <p>在我们的实际软件项目中,管理团队事实上比写代码或者实现一个客户的需求更为的有挑战性。由于编程实际上是和机器打交道,而和机器打交道,仅仅要你符合机器预定的逻辑,</p>
在我们的实际软件项目中,管理团队事实上比写代码或者实现一个客户的需求更为的有挑战性. 由于编程实际上是和机器打交道.而和机器打交道,仅仅要你符合机器预定的逻辑, 一步步迈向解决这个问题的道路上一点都不 ...
随机推荐
- Azure DevOps Pipelines部署.Net Core 应用到Kubernetes
一. 先决条件 1.Azure Repos Git/Git和项目上传 把本地的Net Core项目上传至Azure Repos Git/Git 2.Docker Registry Service ...
- 5.MongoDB系列之索引(二)
1. $运算符如何使用索引 1.1 低效的运算符 $ne.$not查询可以使用索引,但不是很有效,尽量避免 1.2 范围查询 范围查询其实是多值查询,根据复核索引规则,尽可能先等值精确匹配,然后范围查 ...
- 前端开发日常——CSS动画无限轮播
近来没有什么值得写的东西,空闲的时候帮前端的同学做了些大屏上的展示模块,就放在这里写写吧,手把手"需求->设计-> 实现",受众偏新手向. 为了直观便于理解, 直接把结 ...
- 8.gitlab服务器搭建(基于centos7)
gitlab服务硬件要求 建议服务器最低配置:2核 2G以上内存(不包含2GB,2GB内存运行的时候内存直接爆掉) 官网给出的推荐配置:4核 4GB内存 支持500个用户,8核 8GB内存 支持100 ...
- 10.-ORM-基础字段及选项
一.ORM-基础字段及选项 任何关于表结构的修改,务必在对应模型类上修改 例如 给 books_book表添加一个info字段 varchar(100) 1.在模型中添加对应的类属性 2.执行数据库迁 ...
- ML-朴素贝叶斯算法
贝叶斯定理 w是由待测数据的所有属性组成的向量.p(c|x)表示,在数据为x时,属于c类的概率. \[p(c|w)=\frac{p(w|c)p(c)}{p(w)} \] 如果数据的目标变量最后有两个结 ...
- springboot整合mybatis步骤以及错误集合
1.首先在springboot项目中的pomx文件引入官方的依赖 <groupId>org.mybatis.spring.boot</groupId> <artifact ...
- MYSQL一键导库脚本
上周完成了一个性能测试环境搭建,有富余时间的同时研究了一个一键导库的脚本,一周的开始先马住!!! 一.思路 准备:54.158服务器上分别已经装好了MYSQL数据库 目的:把部分库从54导出并导入到1 ...
- 云原生之旅 - 11)基于 Kubernetes 动态伸缩 Jenkins Build Agents
前言 上一篇文章 云原生之旅 - 10)手把手教你安装 Jenkins on Kubernetes 我们介绍了在 Kubernetes 上安装 Jenkins,本文介绍下如何设置k8s pod作为Je ...
- Java:String、StringBuilder、StringJoiner学习笔记
String创建的俩种方式 1.直接赋值 String str = "Hello World!"; 当使用直接赋值的方式去创建字符串的时候,虚拟机会去串池里去检查字符串是否存在,如 ...