(转) Quartz学习——SSMM(Spring+SpringMVC+Mybatis+Mysql)和Quartz集成详解(四)
http://blog.csdn.net/u010648555/article/details/60767633
当任何时候觉你得难受了,其实你的大脑是在进化,当任何时候你觉得轻松,其实都在使用以前的坏习惯。
通过前面的学习,你可能大致了解了Quartz,本篇博文为你打开学习SSMM+Quartz的旅程!欢迎上车,开始美好的旅程!
本篇是在SSM框架——spring+SpringMVC+Mybatis的搭建教程这篇为基础上进行的,如果不了解SSM搭建请先点击闪现到查看详情:闪现
一:环境介绍
工具:Eclipse+ MySQL
框架:Spring+SpringMVC+Mybatis
日志:logback
构建工具:Maven
单元测试:Junit4
Quartz版本:2.2.1
二:SSMM+Quartz集成详解
1:概述
在之前SSM框架的基础集合Quartz写一个简单的Web项目,实现Quartz的动态添加,修改和删除功能!(这里只是对Cron类型的Trigger进行操作)
2:项目结构 
3:初始化
在项目中找到初始化sql——quartz_test.sql ,导入自己的数据库中!初始化的表信息如下:
qrtz_blob_triggers,

qrtz_calendars,

qrtz_fired_triggers,

qrtz_locks,

qrtz_paused_trigger_grps,

qrtz_scheduler_state,

qrtz_simple_triggers,

qrtz_simprop_triggers,

qrtz_triggers,

user_t
4:配置文件介绍
(1):在ApplicationContext.xml中添加下面的配置:
<bean name="quartzScheduler" class="org.springframework.scheduling.quartz.SchedulerFactoryBean" >

        <property name="dataSource" ref ="dataSource" />

        <property name="applicationContextSchedulerContextKey" value="applicationContextKey"/>

        <property name="configLocation" value="classpath:quartz.properties"/>

    </bean>
(2):添加quartz.properties配置文件
# Default Properties file for use by StdSchedulerFactory

# to create a Quartz Scheduler Instance, if a different

# properties file is not explicitly specified.

#

#============================================================================

# Configure Main Scheduler Properties

#============================================================================

org.quartz.scheduler.instanceName: quartzScheduler

org.quartz.scheduler.instanceId = AUTO

org.quartz.scheduler.rmi.export: false

org.quartz.scheduler.rmi.proxy: false

org.quartz.scheduler.wrapJobExecutionInUserTransaction: false

#============================================================================

# Configure ThreadPool

#============================================================================

org.quartz.threadPool.class: org.quartz.simpl.SimpleThreadPool

org.quartz.threadPool.threadCount: 2

org.quartz.threadPool.threadPriority: 5

org.quartz.threadPool.threadsInheritContextClassLoaderOfInitializingThread: true

org.quartz.jobStore.misfireThreshold: 60000

#============================================================================

# Configure JobStore

#============================================================================

#default config

#org.quartz.jobStore.class: org.quartz.simpl.RAMJobStore

#持久化配置

org.quartz.jobStore.class:org.quartz.impl.jdbcjobstore.JobStoreTX

org.quartz.jobStore.driverDelegateClass:org.quartz.impl.jdbcjobstore.StdJDBCDelegate

org.quartz.jobStore.useProperties:true

#============================================================================

#havent cluster spring

#============================================================================

org.quartz.jobStore.isClustered = false

#数据库表前缀

org.quartz.jobStore.tablePrefix:qrtz_

#org.quartz.jobStore.dataSource:qzDS

#============================================================================

# Configure Datasources

#============================================================================

#JDBC驱动  Sping去管理dataSource ,这里不在配置数据源信息

#org.quartz.dataSource.qzDS.driver:com.mysql.jdbc.Driver

#org.quartz.dataSource.qzDS.URL:jdbc:mysql://localhost:3306/quartz_test

#org.quartz.dataSource.qzDS.user:root

#org.quartz.dataSource.qzDS.password:root

#org.quartz.dataSource.qzDS.maxConnection:10
5:关键代码简单介绍
(1):过滤器
添加过滤器拦截请求,若用户没有登录,则跳转到登录页面!
a. 新增LoginFilter.Java,核心代码如下:
    @Override

    public void doFilter(ServletRequest req, ServletResponse resp, FilterChain chain) throws IOException, ServletException {

        HttpServletRequest request = (HttpServletRequest) req;

        HttpServletResponse response = (HttpServletResponse) resp;

        HttpSession session = request.getSession();

        //判断Session中是否有登录用户信息

        String toke = (String) session.getAttribute(CommonConstant.LONGIN_TOKE);

        if(!StringUtils.isEmpty(toke)){

            chain.doFilter(req, resp);

        }else{

            //若没有则,跳转到登录页面

            response.sendRedirect(request.getContextPath() + "/user/toLogin");

        }

}b.在web.xml配置过滤器:
 <filter>

    <filter-name>LoginFilter</filter-name>

    <filter-class>org.ssm.dufy.filter.LoginFilter</filter-class>

  </filter>

  <filter-mapping>

    <filter-name>LoginFilter</filter-name>

    <url-pattern>/</url-pattern>

  </filter-mapping>
(2)BAO和Service接口
Dao主要是用户的一些操作!
public interface IUserDao {

    int deleteByPrimaryKey(Integer id);

    int insert(User record);

    int insertSelective(User record);

    User selectByPrimaryKey(Integer id);

    int updateByPrimaryKeySelective(User record);

    int updateByPrimaryKey(User record);

    User findUser(User user);

}
Service主要是对定时任务的一些操作!
package org.ssm.dufy.service;

public interface QuartzService {

    /**

     * addJob(方法描述:添加一个定时任务) <br />

     * (方法适用条件描述: – 可选)

     *

     * @param jobName

     *            作业名称

     * @param jobGroupName

     *            作业组名称

     * @param triggerName

     *            触发器名称

     * @param triggerGroupName

     *            触发器组名称

     * @param cls

     *            定时任务的class

     * @param cron

     *            时间表达式 void

     * @exception

     * @since 1.0.0

     */

    public void addJob(String jobName, String jobGroupName,String triggerName, String triggerGroupName, Class cls, String cron);

    /**

     *

     * @param oldjobName 原job name

     * @param oldjobGroup 原job group

     * @param oldtriggerName 原 trigger name

     * @param oldtriggerGroup 原 trigger group

     * @param jobName

     * @param jobGroup

     * @param triggerName

     * @param triggerGroup

     * @param cron

     */

    public boolean modifyJobTime(String oldjobName,String oldjobGroup, String oldtriggerName, String oldtriggerGroup, String jobName, String jobGroup,String triggerName, String triggerGroup, String cron);

    /**

     * 修改触发器调度时间

     * @param triggerName  触发器名称

     * @param triggerGroupName  触发器组名称

     * @param cron cron表达式

     */

    public void modifyJobTime(String triggerName,

            String triggerGroupName, String cron);

    /**

     * 暂停指定的任务

     * @param jobName 任务名称

     * @param jobGroupName 任务组名称

     * @return

     */

    public void pauseJob(String jobName,String jobGroupName);

    /**

     * 恢复指定的任务

     * @param jobName 任务名称

     * @param jobGroupName 任务组名称

     * @return

     */

    public void resumeJob(String jobName,String jobGroupName);

    /**

     * 删除指定组任务

     * @param jobName 作业名称

     * @param jobGroupName 作业组名称

     * @param triggerName 触发器名称

     * @param triggerGroupName 触发器组名称

     */

    public void removeJob(String jobName, String jobGroupName,

            String triggerName, String triggerGroupName);

    /**

     * 开始所有定时任务。启动调度器

     */

    public void startSchedule();

    /**

     * 关闭调度器

     */

    public void shutdownSchedule();

}
操作用户通过Mybatis进行,操作定时器任务,使用的Quartz封装好的接口!
主要的实现代码就不在这里展示!如需查看请看源码!
(3)Controller
(1):UserController
处理一些用户的请求操作!
(2):QuartzController
处理Quartz的请求操作!
6:任务类
package org.ssm.dufy.job;

import java.util.Date;

import org.quartz.Job;

import org.quartz.JobExecutionContext;

import org.quartz.JobExecutionException;

public class HelloWorldJob implements Job{

    /**

     * "0/5 * * * * ?  五秒运行一次

     */

    @Override

    public void execute(JobExecutionContext arg0) throws JobExecutionException {

        System.out.println("----hello world---" + new Date());

    }

}
7:待优化地方
- 界面的美观性
- 可以添加Simple类型的Trigger
- 用户信息的管理
- 抽象Job的Dao类
。。。。。。
三:运行效果介绍
有两种方式启动本实例项目:
1:Tomcat方式,Tomcat方式不在讲解!
2:Jetty方式
在pom.xml中配置了Jetty的依赖的插件!
<plugin>

                <groupId>org.apache.maven.plugins</groupId>

                <artifactId>maven-war-plugin</artifactId>

                <version>2.4</version>

            </plugin>

            <plugin>

                <groupId>org.mortbay.jetty</groupId>

                <artifactId>jetty-maven-plugin</artifactId>

                <version>8.1.15.v20140411</version>

                <configuration>

                    <scanIntervalSeconds>10</scanIntervalSeconds>

                    <stopPort>9999</stopPort>

                    <reload>manual</reload>

                    <webAppConfig>

                        <contextPath>/ssm_quratz</contextPath>

                    </webAppConfig>

                    <connectors>

                        <connector implementation="org.eclipse.jetty.server.nio.SelectChannelConnector">

                            <port>8080</port>

                            <maxIdleTime>60000</maxIdleTime>

                        </connector>

                    </connectors>

                </configuration>

            </plugin>
在Eclipse运行步骤如在截图:
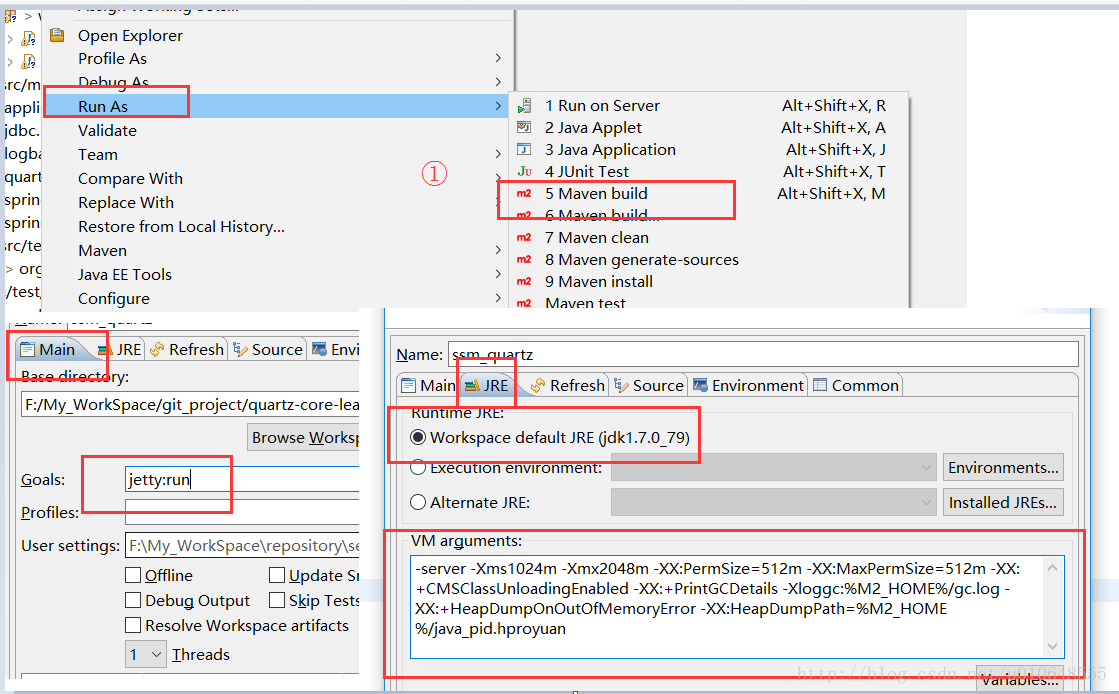
配置的参数:
-server -Xms1024m -Xmx2048m -XX:PermSize=512m -XX:MaxPermSize=512m -XX:+CMSClassUnloadingEnabled -XX:+PrintGCDetails -Xloggc:%M2_HOME%/gc.log -XX:+HeapDumpOnOutOfMemoryError -XX:HeapDumpPath=%M2_HOME%/java_pid.hproyuan- 1
- 1
配置好之后运行启动不报错就ok!
最后打开浏览器,输入 http://localhost:8080/ssm_quratz
3:运行结果图
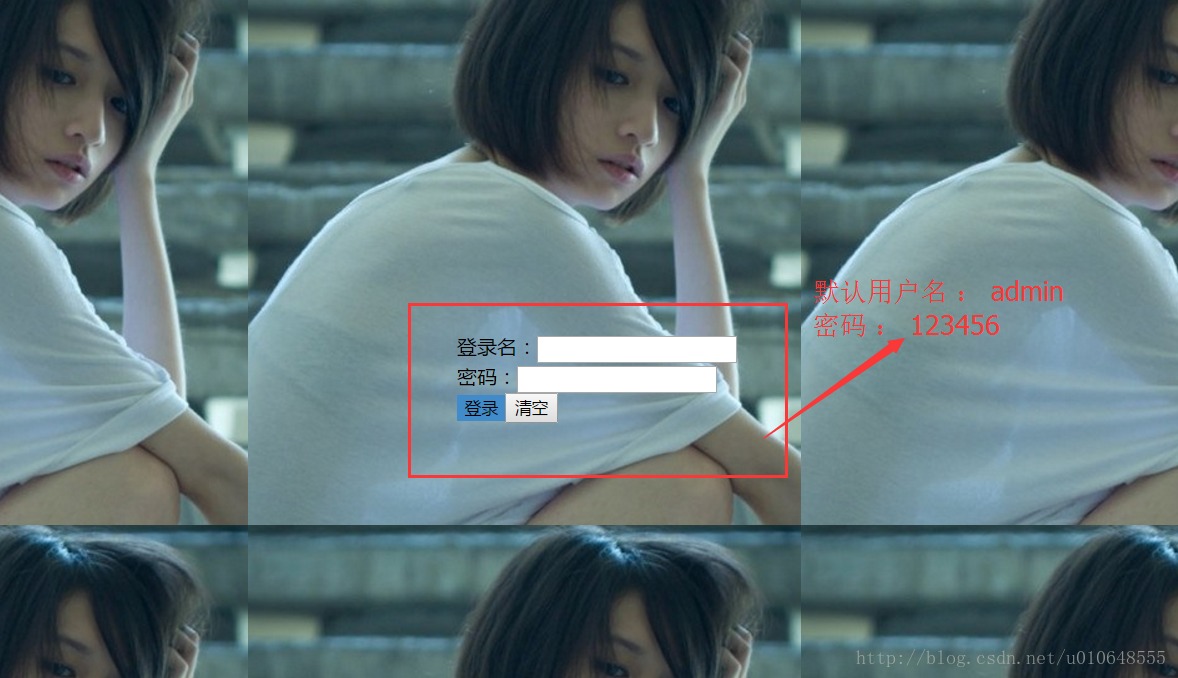
(1)登录页面
(2)任务列表页面

(3)新增页面(编辑页面和此类似)

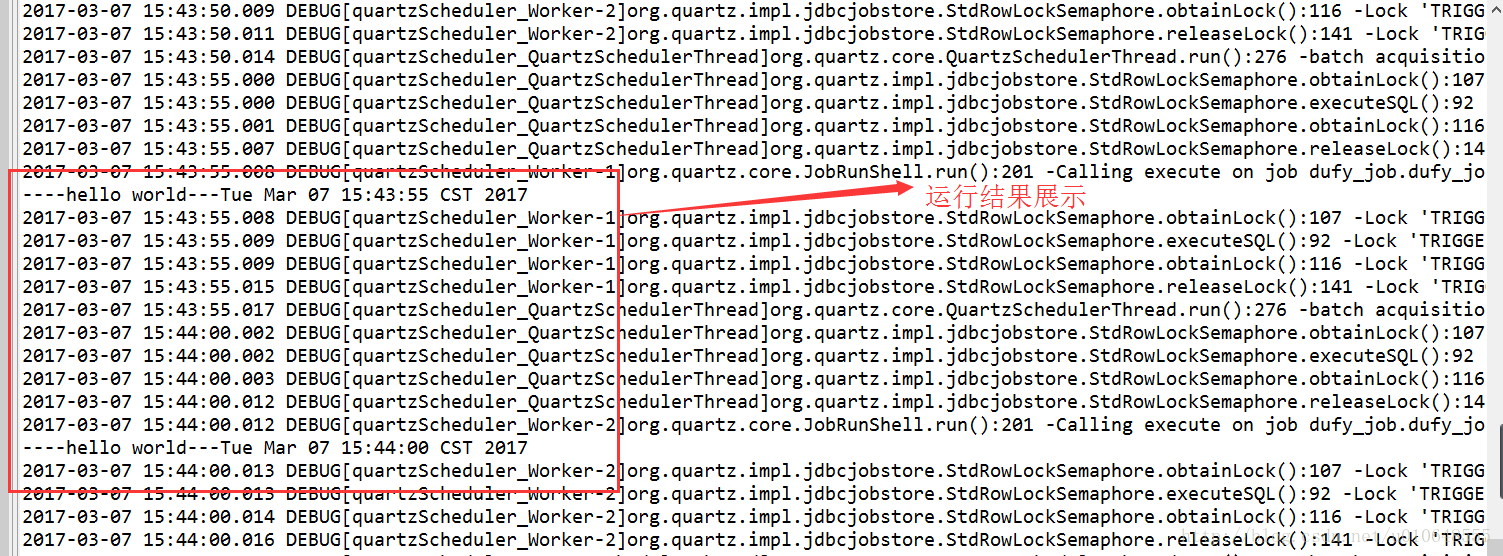
(4)Eclipse控制台打印的信息
四:源码
SSMM(Spring+SpringMVC+Mybatis+Mysql)和Quartz集成 源码
(转) Quartz学习——SSMM(Spring+SpringMVC+Mybatis+Mysql)和Quartz集成详解(四)的更多相关文章
- Quartz学习——SSMM(Spring+SpringMVC+Mybatis+Mysql)和Quartz集成详解(转)
通过前面的学习,你可能大致了解了Quartz,本篇博文为你打开学习SSMM+Quartz的旅程!欢迎上车,开始美好的旅程! 本篇是在SSM框架基础上进行的. 参考文章: 1.Quartz学习——Qua ...
- Quartz学习——SSMM(Spring+SpringMVC+Mybatis+Mysql)和Quartz集成详解(四)
当任何时候觉你得难受了,其实你的大脑是在进化,当任何时候你觉得轻松,其实都在使用以前的坏习惯. 通过前面的学习,你可能大致了解了Quartz,本篇博文为你打开学习SSMM+Quartz的旅程!欢迎上车 ...
- 如约而至,Java 10 正式发布! Spring+SpringMVC+MyBatis+easyUI整合进阶篇(十四)Redis缓存正确的使用姿势 努力的孩子运气不会太差,跌宕的人生定当更加精彩 优先队列详解(转载)
如约而至,Java 10 正式发布! 3 月 20 日,Oracle 宣布 Java 10 正式发布. 官方已提供下载:http://www.oracle.com/technetwork/java ...
- SSM后台管理系统(Spring SpringMVC Mybatis Mysql EasyUI)
非常简单的一个后台管理系统,功能不多,框架也不复杂, 源码下载(附数据库)-ssm后台管理系统框架(Spring mvc + mybatis + mysql + easyui ) 实例图片
- Java架构学习 转(Spring+SpringMVC+MyBatis+easyUI)
Spring+SpringMVC+MyBatis+easyUI : http://www.cnblogs.com/han-1034683568/p/6730869.html
- Spring+SpringMVC+MyBatis+easyUI整合进阶篇(十四)Redis缓存正确的使用姿势
作者:13 GitHub:https://github.com/ZHENFENG13 版权声明:本文为原创文章,未经允许不得转载. 简介 这是一篇关于Redis使用的总结类型文章,会先简单的谈一下缓存 ...
- SSM框架搭建(Spring+SpringMVC+MyBatis)与easyui集成并实现增删改查实现
一.用myEclipse初始化Web项目 新建一个web project: 二.创建包 controller //控制类 service //服务接口 service.impl //服务 ...
- 带你搭建一个简单的mybatis项目:IDEA+spring+springMVC+mybatis+Mysql
最近小编有点闲,突发奇想想重温一下mybatis,然后在脑海中搜索了一下,纳尼,居然不太会用了,想到这里都是泪啊!!现在我所呆的的公司使用的是springboot+hebinate,编程都是使用的JP ...
- SSM框架整合(注解)-Spring+SpringMVC+MyBatis+MySql
准备工作: 下载整合所需的jar包 点击此处下载 使用MyBatis Generator生成dao接口.映射文件和实体类 如何生成 搭建过程: 先来看一下项目的 目录结构 1.配置dispatcher ...
随机推荐
- Ubuntu18.04卸载lnmp
1.卸载 apache2 sudo apt-get --purge remove apache2* sudo apt-get autoremove apache2 (--purge 是完全删除并且不保 ...
- 1.4-动态路由协议OSPF①
r2#sh ip ospf border-routers 查看ABR 修改OSPF接口优先级 r1(config)#int e 0 r1(config-if)#ip ospf priority 100 ...
- ubuntu 网络监控 nethogs
***网络监控ubuntu自带的 netstat -an 查看当前网络状况 sudo netstat -anp 查看当前网络状况带对应进程号 traceroute 追踪路由 ***我比较喜欢用Neth ...
- Solidworks如何另存为和打开OBJ文件
1 点击工具-插件,勾选ScanTo3D(最好后面的启动也勾选上,否则下次启动将不会默认自动启动这个插件,还需要再做一次才能打开或者另存为OBJ) 2 注意打开零件图的方式,你不能直接打开Soli ...
- JavaScript初探之——图片移动
在我们打开页面的时候我们看到的大部分页面都是动态的,曾经学习VB的时候要实现一些动态的画面第一个想到的就是用Flash,如今学习了BS的东西,才算是开眼界了,刚刚学习了一个动画的效果,给大家展示一下. ...
- Live555研究之中的一个 源码编译
Live555研究之中的一个 源代码编译 Live555 是一个为流媒体提供解决方式的跨平台的C++开源项目,它 ...
- Hibernate——三种状态的理解
在Hibernate中有三种状态,对这三种状态的深入的理解,能够更好的理解Hibernate的执行机制. 在整个Hibernate中这三种状态是能够进行转换的. 1.Transient Object( ...
- 关于linux的用户
1 linux支持多个用户 2 每个登陆用户有自己的shell,自己的home目录 3 可以将用户分组 4 用户对文件有各自的权限,从而将用户分割 5 用户对应属于它的一批进程 6 可以执行addus ...
- hdoj--1205--吃糖果(规律)
吃糖果 Time Limit: 6000/3000 MS (Java/Others) Memory Limit: 65535/32768 K (Java/Others) Total Sub ...
- Gold Coins
http://poj.org/problem?id=2000 #include<stdio.h> ; int main() { int coin[N]; ,j,k; j = ; k = ; ...