emqtt emq 的用户密码认证
MQTT 认证设置
EMQ 消息服务器认证由一系列认证插件(Plugin)提供,系统支持按用户名密码、ClientID 或匿名认证。
系统默认开启匿名认证(anonymous),通过加载认证插件可开启的多个认证模块组成认证链:
           ----------------           ----------------           ------------

Client --> | Username认证 | -ignore-> | ClientID认证 | -ignore-> | 匿名认证 |

           ----------------           ----------------           ------------

                  |                         |                         |

                 \|/                       \|/                       \|/

            allow | deny              allow | deny              allow | deny
注解
EMQ 2.0 消息服务器还提供了 MySQL、PostgreSQL、Redis、MongoDB、HTTP、LDAP 认证插件。
开启匿名认证
etc/emq.conf 配置启用匿名认证:
## Allow Anonymous authentication

mqtt.allow_anonymous = true
EMQ 2.0 版本提供的认证插件包括:
| 插件 | 说明 |
|---|---|
| emq_auth_clientid | ClientId 认证/鉴权插件 |
| emq_auth_username | 用户名密码认证/鉴权插件 |
| emq_auth_ldap | LDAP 认证/鉴权插件 |
| emq_auth_http | HTTP 认证/鉴权插件 |
| emq_auth_mysql | MySQ L认证/鉴权插件 |
| emq_auth_pgsql | Postgre 认证/鉴权插件 |
| emq_auth_redis | Redis 认证/鉴权插件 |
| emq_auth_mongo | MongoDB 认证/鉴权插件 |
用户名密码认证
基于 MQTT 登录用户名(username)、密码(password)认证。
etc/plugins/emq_auth_username.conf 中配置默认用户:
auth.user.$N.username = admin

auth.user.$N.password = public
启用 emq_auth_username 插件:
./bin/emqttd_ctl plugins load emq_auth_username
使用 ./bin/emqttd_ctl users 命令添加用户:
$ ./bin/emqttd_ctl users add <Username> <Password>
ClientId 认证
基于 MQTT 客户端 ID 认证。
etc/plugins/emq_auth_clientid.conf:
auth.client.$N.clientid = clientid

auth.client.$N.password = passwd
启用 emq_auth_clientid 插件:
./bin/emqttd_ctl plugins load emq_auth_clientid
LDAP 插件认证
etc/plugins/emq_auth_ldap.conf 配置 LDAP 参数:
auth.ldap.servers = 127.0.0.1

auth.ldap.port = 389

auth.ldap.timeout = 30

auth.ldap.user_dn = uid=%u,ou=People,dc=example,dc=com

auth.ldap.ssl = false
启用 LDAP 认证插件:
./bin/emqttd_ctl plugins load emq_auth_ldap
HTTP 插件认证
注解
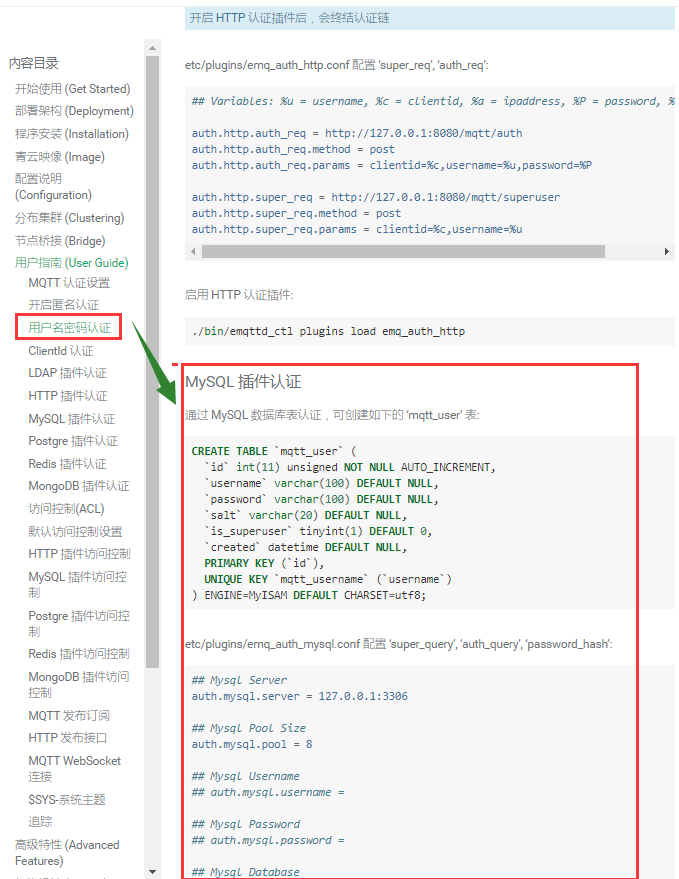
开启 HTTP 认证插件后,会终结认证链
etc/plugins/emq_auth_http.conf 配置 ‘super_req’, ‘auth_req’:
## Variables: %u = username, %c = clientid, %a = ipaddress, %P = password, %t = topic

auth.http.auth_req = http://127.0.0.1:8080/mqtt/auth

auth.http.auth_req.method = post

auth.http.auth_req.params = clientid=%c,username=%u,password=%P

auth.http.super_req = http://127.0.0.1:8080/mqtt/superuser

auth.http.super_req.method = post

auth.http.super_req.params = clientid=%c,username=%u
启用 HTTP 认证插件:
./bin/emqttd_ctl plugins load emq_auth_http
MySQL 插件认证
通过 MySQL 数据库表认证,可创建如下的 ‘mqtt_user’ 表:
CREATE TABLE `mqtt_user` (

  `id` int(11) unsigned NOT NULL AUTO_INCREMENT,

  `username` varchar(100) DEFAULT NULL,

  `password` varchar(100) DEFAULT NULL,

  `salt` varchar(20) DEFAULT NULL,

  `is_superuser` tinyint(1) DEFAULT 0,

  `created` datetime DEFAULT NULL,

  PRIMARY KEY (`id`),

  UNIQUE KEY `mqtt_username` (`username`)

) ENGINE=MyISAM DEFAULT CHARSET=utf8;
etc/plugins/emq_auth_mysql.conf 配置 ‘super_query’, ‘auth_query’, ‘password_hash’:
## Mysql Server

auth.mysql.server = 127.0.0.1:3306

## Mysql Pool Size

auth.mysql.pool = 8

## Mysql Username

## auth.mysql.username =

## Mysql Password

## auth.mysql.password =

## Mysql Database

auth.mysql.database = mqtt

## Variables: %u = username, %c = clientid

## Authentication Query: select password only

auth.mysql.auth_query = select password from mqtt_user where username = '%u' limit 1

## Password hash: plain, md5, sha, sha256, pbkdf2

auth.mysql.password_hash = sha256

## %% Superuser Query

auth.mysql.super_query = select is_superuser from mqtt_user where username = '%u' limit 1
注解
如果系统已有MQTT认证表,可通过配置’auth_query’查询语句集成。
启用 MySQL 认证插件:
./bin/emqttd_ctl plugins load emq_auth_mysql
Postgre 插件认证
通过 PostgreSQL 数据库表认证,可创建如下的 ‘mqtt_user’ 表:
CREATE TABLE mqtt_user (

  id SERIAL primary key,

  is_superuser boolean,

  username character varying(100),

  password character varying(100),

  salt character varying(40)

);
etc/plugins/emq_auth_pgsql.conf 配置 ‘auth_query’、’password_hash’:
## Postgre Server

auth.pgsql.server = 127.0.0.1:5432

auth.pgsql.pool = 8

auth.pgsql.username = root

#auth.pgsql.password =

auth.pgsql.database = mqtt

auth.pgsql.encoding = utf8

auth.pgsql.ssl = false

## Variables: %u = username, %c = clientid, %a = ipaddress

## Authentication Query: select password only

auth.pgsql.auth_query = select password from mqtt_user where username = '%u' limit 1

## Password hash: plain, md5, sha, sha256, pbkdf2

auth.pgsql.password_hash = sha256

## sha256 with salt prefix

## auth.pgsql.password_hash = salt sha256

## sha256 with salt suffix

## auth.pgsql.password_hash = sha256 salt

## Superuser Query

auth.pgsql.super_query = select is_superuser from mqtt_user where username = '%u' limit 1
启用 Postgre 认证插件:
./bin/emqttd_ctl plugins load emq_auth_pgsql
Redis 插件认证
Redis 认证。MQTT 用户记录存储在 Redis Hash, 键值: “mqtt_user:<Username>”
etc/plugins/emq_auth_redis.conf 设置 ‘super_cmd’、’auth_cmd’、’password_hash’:
## Redis Server

auth.redis.server = 127.0.0.1:6379

## Redis Pool Size

auth.redis.pool = 8

## Redis Database

auth.redis.database = 0

## Redis Password

## auth.redis.password =

## Variables: %u = username, %c = clientid

## Authentication Query Command

auth.redis.auth_cmd = HGET mqtt_user:%u password

## Password hash: plain, md5, sha, sha256, pbkdf2

auth.redis.password_hash = sha256

## Superuser Query Command

auth.redis.super_cmd = HGET mqtt_user:%u is_superuser
启用 Redis 认证插件:
./bin/emqttd_ctl plugins load emq_auth_redis
MongoDB 插件认证
按 MongoDB 用户集合认证,例如创建 ‘mqtt_user’ 集合:
{

    username: "user",

    password: "password hash",

    is_superuser: boolean (true, false),

    created: "datetime"

}
etc/plugins/emq_auth_mongo.conf 设置 ‘super_query’、’auth_query’:
## Mongo Server

auth.mongo.server = 127.0.0.1:27017

## Mongo Pool Size

auth.mongo.pool = 8

## Mongo User

## auth.mongo.user =

## Mongo Password

## auth.mongo.password =

## Mongo Database

auth.mongo.database = mqtt

## auth_query

auth.mongo.auth_query.collection = mqtt_user

auth.mongo.auth_query.password_field = password

auth.mongo.auth_query.password_hash = sha256

auth.mongo.auth_query.selector = username=%u

## super_query

auth.mongo.super_query.collection = mqtt_user

auth.mongo.super_query.super_field = is_superuser

auth.mongo.super_query.selector = username=%u
启用 MongoDB 认证插件:
./bin/emqttd_ctl plugins load emq_auth_mongo
emqtt emq 的用户密码认证的更多相关文章
- emqtt 试用(五)emq 的用户密码认证
MQTT 认证设置 EMQ 消息服务器认证由一系列认证插件(Plugin)提供,系统支持按用户名密码.ClientID 或匿名认证. 系统默认开启匿名认证(anonymous),通过加载认证插件可开启 ...
- EMQ -- 用户密码认证
emq 的用户密码认证 MQTT 认证设置 EMQ 消息服务器认证由一系列认证插件(Plugin)提供,系统支持按用户名密码.ClientID 或匿名认证. 系统默认开启匿名认证(anonymous) ...
- squid+stunnel+用户密码认证的三种玩法
没办法,应用越来越深入,就会越来越多要求. squid+stunnel+用户密码认证的场景至少以下三个,我会遇到. 1,标准玩法 在服务器上建一个SQUID,加密码认证,然后,其它人通过它上网.(不要 ...
- elasticsearch 6.2.4添加用户密码认证
elasticsearch 6.3版本之前的添加认证需安装x-pack插件,6.3之后貌似去掉了这个. 1.安装x-pack 先切换到elastic用户下,在执行以下命令 $cd /data/elas ...
- Oracle用户密码认证方式
oracle用户有两种认证方式: 操作系统认证(要求该用户属于本地DBA组,然后通过操作系统认证登录oracle,从而启动数据库) 密码文件认证 oracle使用哪种认证方式决定在于两个参数: 1.r ...
- scylladb docker-compose 用户密码认证配置
scylladb 对于用户的认证配置还是比较简单的,以下是一个docker-compose 配置的说明 环境准备 docker-compose 文件 version: "3" se ...
- python装饰器实现用户密码认证(简单初形)
import timecurrent_user={'user':None}def auth(engine = 'file'): def deco(func): #func=最初始的index和最初始的 ...
- 搭建Docker私有仓库&用户密码认证&web可视化界面
1.拉取镜像 docker pull hyper/docker-registry-web docker pull registry 2.安装 yum install docker-compose 3. ...
- ansible不配ssh连接,用户密码登录
ansible 不配ssh免密链接,直接用ssh用户密码连接,要先装sshpass. 否则会报错: sshpass安装 sshpass下载地址:http://sourceforge.net/proje ...
随机推荐
- Microsoft SQL Server下的SQL语句
SQL语句先前写的时候,很容易把一些特殊的用法忘记,我特此整理了一下SQL语句操作.一.基础 1.说明:创建数据库CREATE DATABASE database-name 2.说明:删除数据库dro ...
- 在 Android 中实现 Redux 的一点经验
简评: Redux 是一个用于应用程序状态管理的开源JavaScript库,其核心是通过可管理和控制的状态来描述一个系统.这意味着其思想其实是可以应用于任何类型应用的开发的,包括移动应用. Redux ...
- JS 转Boolean的两张方法
// 1.Boolean() console.log(Boolean(123)); // true console.log(Boolean(undefined)); // false console. ...
- CI/CD----jenkins+gitlab+django(内网)
1.py第三方包获取 ./pip3 ./pip3 -i "http://pypi.douban.com/simple/" --trusted-host pypi.douban.co ...
- mysql单表操作与多表操作
0. null和notnull: 使用null的时候: create table t8( id int auto_increment primary key, name varchar(32), em ...
- mybatis 分页插件PageHelper的简单使用
首先在pom.xml配置文件中增加相关的插件. 插件地址:https://github.com/pagehelper/Mybatis-PageHelper <dependency> < ...
- mysql创建函数槽点
上机环境 mysql8.0 navicat for mysql 很有那么一批软件程序,要不做点脱了裤子放屁的事儿就觉得自己不够二进制似的,今儿写了一下午mysql函数,怎么都通过不了,上网一看 mys ...
- 在神经网络中weight decay
weight decay(权值衰减)的最终目的是防止过拟合.在损失函数中,weight decay是放在正则项(regularization)前面的一个系数,正则项一般指示模型的复杂度,所以weigh ...
- maven项目创6 表现层整合
springmvc.xm创建l 和 web.xml配置 ,报错先不管 springmvc.xml com.taotao.controller 空包 其中 资源映射 是等 web.x ...
- Jmeter -- 添加断言,及断言结果
步骤: 1. 添加响应断言(添加-断言-响应断言) Add --> Assertions --> Response Assertion 2. 配置断言 判断响应内容中,是否包含关键字“禅 ...