
1.shell编程-变量的高级用法
1.1.变量替换
变量替换的六种形式

实例:非贪婪和贪婪的区别
从头部删除
[root@VM_0_9_centos shell_learn]# var_1="i love you,do you love me"

[root@VM_0_9_centos shell_learn]# echo $var_1

i love you,do you love me

[root@VM_0_9_centos shell_learn]# var1=${var_1#*ov}

[root@VM_0_9_centos shell_learn]# echo $var1

e you,do you love me

[root@VM_0_9_centos shell_learn]# var2=${var_1##*ov}

[root@VM_0_9_centos shell_learn]# echo $var2

e me

[root@VM_0_9_centos shell_learn]#
从尾部删除
[root@VM_0_9_centos shell_learn]# var_1="i love you,do you love me"

[root@VM_0_9_centos shell_learn]# echo $var_1

i love you,do you love me

[root@VM_0_9_centos shell_learn]# var3=${var_1%ov*}

[root@VM_0_9_centos shell_learn]# echo $var3

i love you,do you l

[root@VM_0_9_centos shell_learn]# var4=${var_1%%ov*}

[root@VM_0_9_centos shell_learn]# echo $var4

i l

[root@VM_0_9_centos shell_learn]#
字符串替换,把bin替换成大写的BIN,单斜线和双斜线的区别
[root@VM_0_9_centos shell_learn]# echo $PATH

/usr/local/sbin:/usr/local/bin:/usr/sbin:/usr/bin:/root/bin

[root@VM_0_9_centos shell_learn]#

[root@VM_0_9_centos shell_learn]# var5=${PATH/bin/BIN}

[root@VM_0_9_centos shell_learn]# echo $var5

/usr/local/sBIN:/usr/local/bin:/usr/sbin:/usr/bin:/root/bin

[root@VM_0_9_centos shell_learn]#

[root@VM_0_9_centos shell_learn]# var6=${PATH//bin//BIN}

[root@VM_0_9_centos shell_learn]# echo $var6

/usr/local/s/BIN:/usr/local//BIN:/usr/s/BIN:/usr//BIN:/root//BIN

[root@VM_0_9_centos shell_learn]#
1.2.字符串处理
计算字符串长度
方法一
${#string}
方法二
string有空格,则必须加双引号
expr length "$string"
实例
[root@VM_0_9_centos shell_learn]# var1="hello world"

[root@VM_0_9_centos shell_learn]# len=${#var1}

[root@VM_0_9_centos shell_learn]# echo $len

11

[root@VM_0_9_centos shell_learn]# len2=`expr length "$var1"`

[root@VM_0_9_centos shell_learn]# echo $len2

11

[root@VM_0_9_centos shell_learn]#
获取子串在字符串中的索引位置
expr index $string $substring
实例
[root@VM_0_9_centos shell_learn]# var1="quickstart is a app"

[root@VM_0_9_centos shell_learn]# index=`expr index "$var1" start`

[root@VM_0_9_centos shell_learn]# echo $index

6

[root@VM_0_9_centos shell_learn]# index2=`expr index "$var1" uniq`

[root@VM_0_9_centos shell_learn]# echo $index2

1

[root@VM_0_9_centos shell_learn]# index3=`expr index "$var1" cnk`

[root@VM_0_9_centos shell_learn]# echo $index3

4

[root@VM_0_9_centos shell_learn]#
会把子串分割成一个一个字符,index是最先找到的那个字符的位置。
计算子串长度
expr match $string substr
实例
[root@VM_0_9_centos shell_learn]# var1="quickstart is a app"

[root@VM_0_9_centos shell_learn]# len=`expr match "$var1" quic`

[root@VM_0_9_centos shell_learn]# echo $len

4

[root@VM_0_9_centos shell_learn]# len=`expr match "$var1" app`

[root@VM_0_9_centos shell_learn]# echo $len

0

[root@VM_0_9_centos shell_learn]# len=`expr match "$var1" quic.*`

[root@VM_0_9_centos shell_learn]# echo $len

19

[root@VM_0_9_centos shell_learn]#
必须从开头匹配才可以
抽取子串
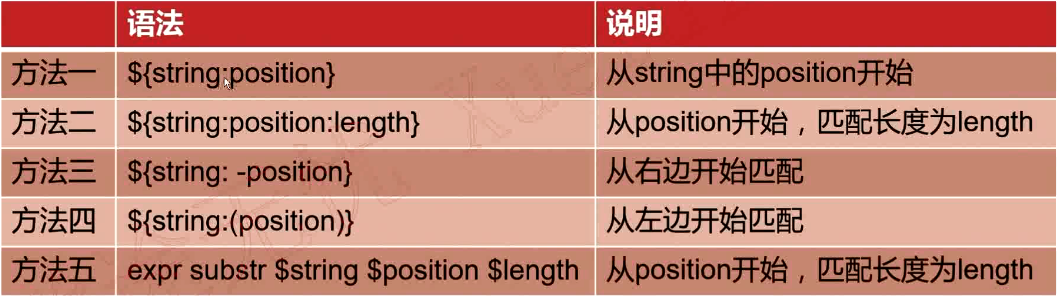
实例
[root@VM_0_9_centos shell_learn]# var1="kafka hadoop yarn mapreduce"

[root@VM_0_9_centos shell_learn]# sub1=${var1:10}

[root@VM_0_9_centos shell_learn]# echo $sub1

op yarn mapreduce

[root@VM_0_9_centos shell_learn]# sub2=${var1:10:5}

[root@VM_0_9_centos shell_learn]# echo $sub2

op ya

[root@VM_0_9_centos shell_learn]# sub3=${var1: -5}

[root@VM_0_9_centos shell_learn]# echo $sub3

educe

[root@VM_0_9_centos shell_learn]# sub4=${var1:(-6)}

[root@VM_0_9_centos shell_learn]# echo $sub4

reduce

[root@VM_0_9_centos shell_learn]# sub5=${var1: -5:3}

[root@VM_0_9_centos shell_learn]# echo $sub5

edu

[root@VM_0_9_centos shell_learn]# sub6=`expr substr "$var1" 10 5`

[root@VM_0_9_centos shell_learn]# echo $sub6

oop y

[root@VM_0_9_centos shell_learn]#
注意:使用expr索引是从1开始计算,使用${string:position},索引从0开始计算。
1.3.字符串处理完整脚本
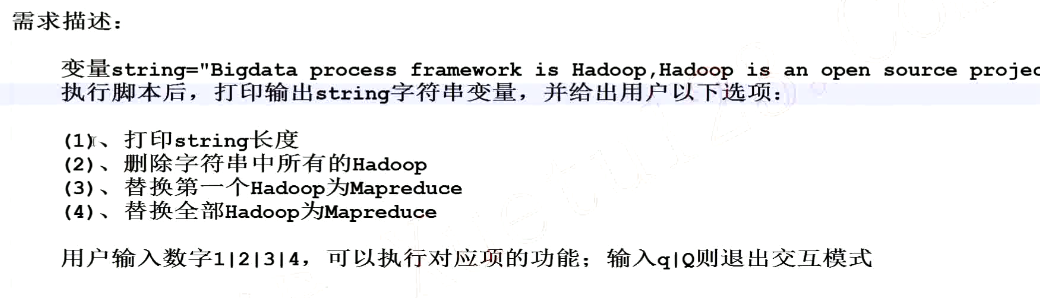
思路分析
1.将不同的功能模块划分,并编写函数

    function print_tips

    function len_of_string

    function del_hadoop

    function rep_hadoop_mapreduce_first

    function rep_hadoop_maapreduce_all

2.实现第一步所定义的功能函数

3.程序主流程的设计
vim example.sh
#!/bin/bash

string="Bigdata process framework is Hadoop,Hadoop is an open source project"

function print_tips

{

    echo "******************************"

    echo "(1)打印string长度"

    echo "(2)删除字符串中所有的Hadoop"

    echo "(3)替换第一个Hadoop为Mapreduce"

    echo "(4)替换全部Hadoop为Mapreduce"

    echo "*******************************"

}

function len_of_string

{

    echo "${#string}"

}

function del_hadoop

{

    echo "${string//Hadoop/}"

}

function rep_hadoop_mapreduce_first

{

    echo "${string/Hadoop/Mapreduce}"

}

function rep_hadoop_mapreduce_all

{

        echo "${string//Hadoop/Mapreduce}"

}

while true

do

    echo "[string=$string]"

    echo

    print_tips

    read -p "Pls input your choice(1|2|3|4|q|Q): " choice

    case $choice in

        1)

            len_of_string

            ;;

        2)

            del_hadoop

            ;;

        3)

            rep_hadoop_mapreduce_first

            ;;

        4)

            rep_hadoop_mapreduce_all

            ;;

        q|Q)

            exit

            ;;

        *)

            echo "Error,input only in {1|2|3|4|q|Q|}"

            ;;

    esac

done
sh example.sh

1.4.命令替换
语法格式
方法一:

`command`

方法二:

$(command)
实例一:获取系统所有的用户并输出
cat /etc/passwd | cut -d ":" -f 1
vim example2.sh
#!/bin/bash

#

index=1

for user in `cat /etc/passwd | cut -d ":" -f 1`

do

    echo "This is $index user: $user"

    index=$(($index+1))

done
结果
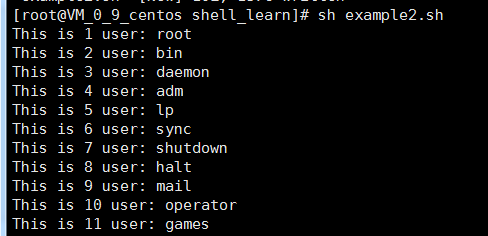
实例二:根据当前当前时间计算今年和明年
$(());两个括号主要用来进行整数运算
[root@VM_0_9_centos shell_learn]# date

Wed Jun 26 21:58:04 CST 2019

[root@VM_0_9_centos shell_learn]# date +%Y

2019

[root@VM_0_9_centos shell_learn]# echo "This is $(date +%Y) year"

This is 2019 year

[root@VM_0_9_centos shell_learn]# echo "This is $(($(date +%Y) + 1)) year"

This is 2020 year

[root@VM_0_9_centos shell_learn]#
实例三:根据当前时间获取今年还剩下多少星期和已经过了多少星期
[root@VM_0_9_centos shell_learn]# date +%j

177

[root@VM_0_9_centos shell_learn]# echo "This yaer have passed $(date +%j) days"

This yaer have passed 177 days

[root@VM_0_9_centos shell_learn]# echo "This yaer have passed $(($(date +%j)/7)) weeks"

This yaer have passed 25 weeks

[root@VM_0_9_centos shell_learn]# echo "今年还剩下$(((365 - $(date +%j))/7))星期"

今年还剩下26星期

[root@VM_0_9_centos shell_learn]#
实例四:判断nginx进程是否存在,若不存在则自动拉起该进程
[root@VM_0_9_centos shell_learn]# ps -ef |grep nginx

root      6658     1  0 22:33 ?        00:00:00 nginx: master process /usr/sbin/nginx

nginx     6659  6658  0 22:33 ?        00:00:00 nginx: worker process

root      6891   501  0 22:35 pts/0    00:00:00 grep --color=auto nginx

[root@VM_0_9_centos shell_learn]# ps -ef |grep nginx |grep -v grep |wc -l

2

[root@VM_0_9_centos shell_learn]# systemctl stop nginx

[root@VM_0_9_centos shell_learn]#

[root@VM_0_9_centos shell_learn]# ps -ef |grep nginx |grep -v grep |wc -l

0

[root@VM_0_9_centos shell_learn]# sh example3.sh

[root@VM_0_9_centos shell_learn]#

[root@VM_0_9_centos shell_learn]# ps -ef |grep nginx |grep -v grep |wc -l

2

[root@VM_0_9_centos shell_learn]#
vim example3.sh
如果nginx的进程个数为0,则拉起该进程
#!/bin.bash

#

nginx_process_num=$(ps -ef | grep nginx | grep -v grep | wc -l)

if [ $nginx_process_num -eq 0 ];then

    systemctl start nginx

fi
1.5.有类型变量
declare和typeset命令
- declare和typeset命令两者等价
- declare和typeset命令都是用来定义变量类型的
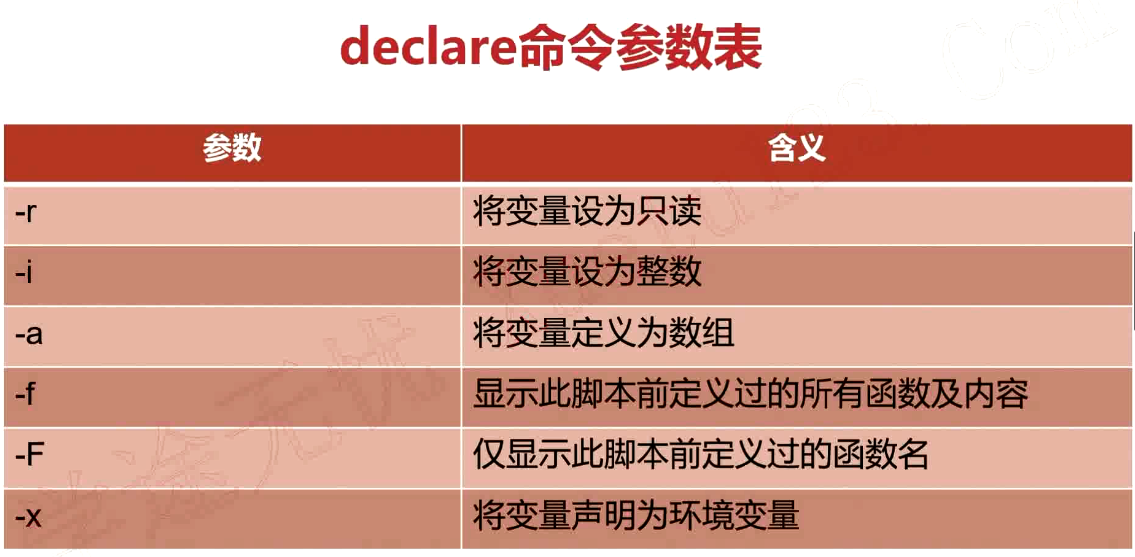
取消申明的变量
declare +r

declare +i

declare +a

declare +x
实例一:-r 将变量设为只读
[root@VM_0_9_centos shell_learn]# var1="hello world"

[root@VM_0_9_centos shell_learn]# var1="hello python"

[root@VM_0_9_centos shell_learn]# echo $var1

hello python

[root@VM_0_9_centos shell_learn]# declare -r var1

[root@VM_0_9_centos shell_learn]# var1="hello go"

-bash: var1: readonly variable

[root@VM_0_9_centos shell_learn]#
实例二:-i 将变量设为整数
shell中如果不声明,默认当做字符串处理
[root@VM_0_9_centos shell_learn]# num1=10

[root@VM_0_9_centos shell_learn]# num2=$num1+20

[root@VM_0_9_centos shell_learn]# echo $num2

10+20

[root@VM_0_9_centos shell_learn]# declare -i num2

[root@VM_0_9_centos shell_learn]# num2=$num1+20

[root@VM_0_9_centos shell_learn]# echo $num2

30

[root@VM_0_9_centos shell_learn]#
实例三:-a 将变量定义为数组
定义数组
[root@VM_0_9_centos shell_learn]# declare -a array

[root@VM_0_9_centos shell_learn]# array=("jones" "mike" "kobe" "jordan")
输出数组所有的内容
[root@VM_0_9_centos shell_learn]# echo ${array[@]}

jones mike kobe jordan
第一个元素
[root@VM_0_9_centos shell_learn]# echo ${array[0]}

jones
数组长度
[root@VM_0_9_centos shell_learn]# echo ${#array[@]}

4
删除元素
[root@VM_0_9_centos shell_learn]# unset array
1.6.Bash数学运算之expr
语法格式
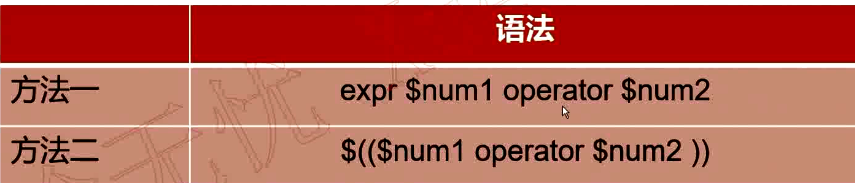
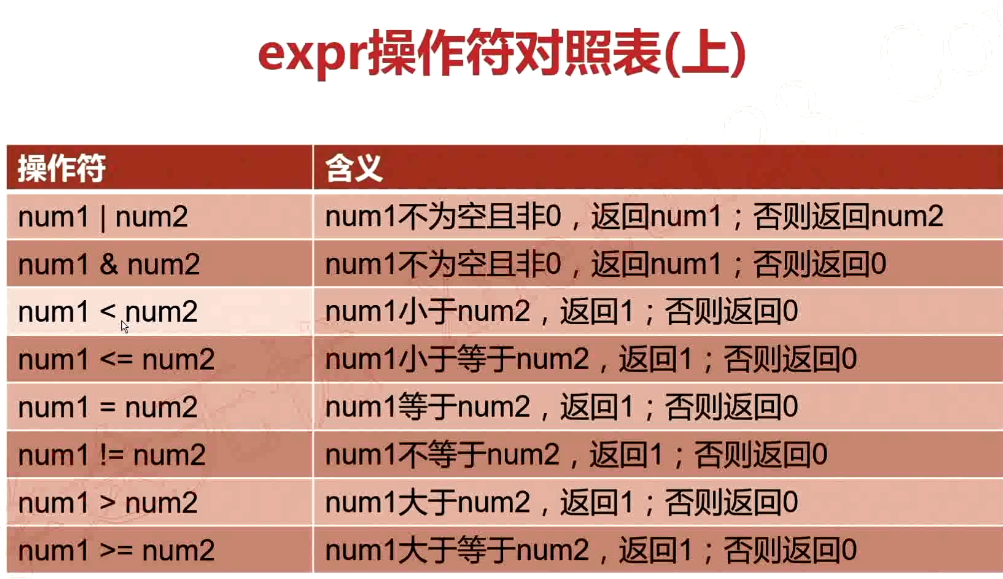
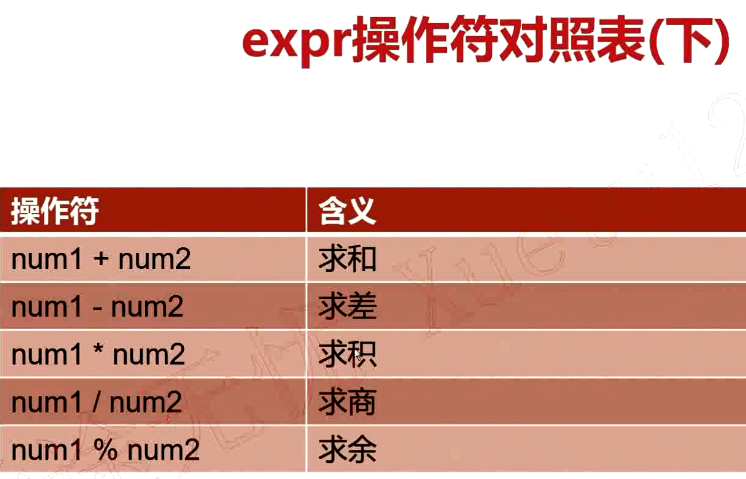
需要加转义字符“\”
[root@VM_0_9_centos shell_learn]# num1=30

[root@VM_0_9_centos shell_learn]# num2=40

[root@VM_0_9_centos shell_learn]# expr $num1 \> $num2

0

[root@VM_0_9_centos shell_learn]# expr $num1 \< $num2

1

[root@VM_0_9_centos shell_learn]# expr $num1 + $num2

70

[root@VM_0_9_centos shell_learn]# expr $num1 - $num2

-10

[root@VM_0_9_centos shell_learn]# expr $num1 * $num2

expr: syntax error

[root@VM_0_9_centos shell_learn]# expr $num1 \* $num2

1200
1.7.Bash数学运算之bc
bc是bash内建的运算器,支持浮点数运算。内建变量scale可以设置,默认为0.
[root@VM_0_9_centos ~]# echo "23+35" | bc

58

[root@VM_0_9_centos ~]# echo "23.3+35" | bc

58.3

[root@VM_0_9_centos ~]# echo "scale=3;23.3/3.5" | bc

6.657

[root@VM_0_9_centos ~]#
1.shell编程-变量的高级用法的更多相关文章
- 2.shell编程-函数的高级用法
2.1.函数的定义和使用 函数基本使用 [root@VM_0_9_centos ~]# test() > {} -bash: syntax error near unexpected token ...
- Bash 脚本编程的一些高级用法
概述 偶然间发现 man bash 上其实详细讲解了 shell 编程的语法,包括一些很少用却很实用的高级语法.就像发现了宝藏的孩子,兴奋莫名.于是参考man bash,结合自己的理解,整理出了这篇文 ...
- Shell编程中Shift的用法
Shell编程中Shift的用法 位置参数可以用shift命令左移.比如shift 3表示原来的$4现在变成$1,原来的$5现在变成$2等等,原来的$1.$2.$3丢弃,$0不移动.不带参数的shif ...
- Shell编程中Shift的用法【转】
本文转载自:http://www.cnblogs.com/image-eye/archive/2011/08/20/2147153.html Shell编程中Shift的用法 位置参数可以用shift ...
- 详解shell编程中2>&1用法
在使用 linux 命令或者 shell 编程时,这个用法常会遇到 2>&1 下面看一个命令示例,然后分析下他是如何工作的: ls foo > /dev/null 2>&am ...
- shell编程变量赋值
[shell编程变量赋值] 1.等号两边均不能有空格存在.例, a="hello world" 2.变量和其它文字以{}或空格格开,否则会混淆.例, 有时候变量名可能会和其它文 ...
- shell 变量的高级用法
变量删除和替换 案例:从头开始匹配,将符合最短的数据删除 (#) variable_1="I love you, Do you love me" echo $variable_1 ...
- Linux_10------Linux之shell编程------变量
.-9 vim num.sh #! /bin/bash num1=$1 num2=$2 sum=$(($num1+$num2)) #变量sum是num1和num2的综合 echo $sum 执行 ./ ...
- Linux Shell编程变量赋值和引用
我们可以使用任意一种文字编辑器,比如gedit.kedit.emacs.vi等来编写shell脚本,它必须以如下行开始(必须放在文件的第一行): #!/bin/sh ... 注意:最好使用“! ...
随机推荐
- shell脚本安装python、pip-----非交互式的--批量执行函数
首先把pip-.tgz 安装包放在 /usr/local 下面,按照顺序先安装pip,再安装python.不要先安装或只安装python,否则很容易出错, cat >>pip-python ...
- PTA --- 天梯赛 L1-028 判断素数
L1-028 判断素数 (10 point(s)) 本题的目标很简单,就是判断一个给定的正整数是否素数. 输入格式: 输入在第一行给出一个正整数N(≤ 10),随后N行,每行给出一个小于231 ...
- 手把手教你用 Strace 诊断问题
早些年,如果你知道有个 strace 命令,就很牛了,而现在大家基本都知道 strace 了,如果你遇到性能问题求助别人,十有八九会建议你用 strace 挂上去看看,不过当你挂上去了,看着满屏翻滚的 ...
- Java基础开篇
我是一个2019毕业的非计算机的毕业生,从大二开始喜欢上Java直到现在一直都在学习,Brid从小就对计算机感兴趣,可惜高中的时候不懂事,没有规划未来,考上了一所专科学院,然后大一并不能转专业,现在毕 ...
- 最短meeting路线(树的直径)--牛客第四场(meeting)
题意: 给你一棵树,树上有些点是有人的,问你选一个点,最短的(最远的那个人的距离)是多少. 思路: 其实就是树的直径,两遍dfs,dfs第二遍的时候遇到人就更新直径就行了,ans是/2,奇数的话+1. ...
- # Pycharm打造高效Python IDE
Pycharm打造高效Python IDE 建议以scientific mode运行,在科学计算时,可以方便追踪变量变化,并且会提示函数的用法,比普通模式下的提示更加智能,一般在文件中引入了numpy ...
- PageObject 页面对象模式
一.PageObject 页面对象设计模式 (一个页面建一个类,即对象,页面对象) 每个页面都建对应的class,类中包含了页面的输入框.标题.元素等元素,测试代码中测试这个页面时,只需要调用这个页 ...
- mysql转换表的存储引擎方法
如果转换表的存储引擎,将会丢失原存储引擎的所有特性. 例如:如果将innodb转换成myisam,再转回innodb,原innodb表的的外键将丢失. 假设默认存储引擎是MyISAM转为InnoDB ...
- JVM(6)之 二次标记
开发十年,就只剩下这套架构体系了! >>> 上一章我们讲到了标记,但是不是被标记了就肯定会被回收呢?不知道小伙伴们记不记得Object类有一个finalize()方法,所有类都继 ...
- 埋在 MYSQL 数据库应用中的17个关键问题!
Mysql的使用非常普遍,跟mysql有关的话题也非常多,如性能优化.高可用性.强一致性.安全.备份.集群.横向扩展.纵向扩展.负载均衡.读写分离等.要想掌握其中的精髓,可得花费不少功力,虽然目前流行 ...