记录下自己安装cuda以及cudnn
之前已经装过一次了,不过没有做记录,现在又要翻一堆博客安装,长点记性,自己记录下。
环境 ubuntu16.04 python2.7
商家送过来时候已经装好了显卡驱动,所以省去了一大麻烦。
剩下的就是安装cuda和cudnn。
显卡驱动与cuda版本是有对应关系的,官网上贴出的匹配表
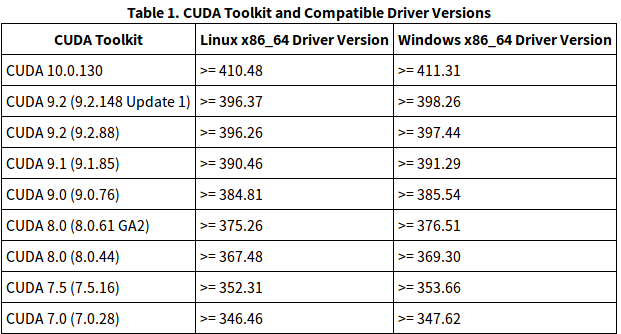
我的显卡驱动是384.130,与cuda8对应,于是下载cuda8,官网进去后就是cuda10,旧版本的地址 https://developer.nvidia.com/cuda-toolkit-archive
下载好后,一路回车,然后在是否安装显卡驱动时输入no,因为显卡驱动已经有了,选yes会被覆盖掉。
安装的默认路径是/usr/local/cuda-8.0,我们需要手动添加该路径到环境中,如下
$ sudo gedit ~/.bashrc
然后在后面添加两行
export PATH=/usr/local/cuda-8.0/bin${PATH:+:${PATH}}
export LD_LIBRARY_PATH=/usr/local/cuda-8.0/lib64${LD_LIBRARY_PATH:+:${LD_LIBRARY_PATH}}
另外在profile中也要添加上面两行
$ sudo gedit /etc/profile
重启一下,输入nvcc -V
输出如下
nvcc: NVIDIA (R) Cuda compiler driver
Copyright (c) 2005-2016 NVIDIA Corporation
Built on Tue_Jan_10_13:22:03_CST_2017
Cuda compilation tools, release 8.0, V8.0.61
此时,cuda已经装好了,接下来安装cudnn.
cudnn的版本与cuda也是有对应关系的,如下
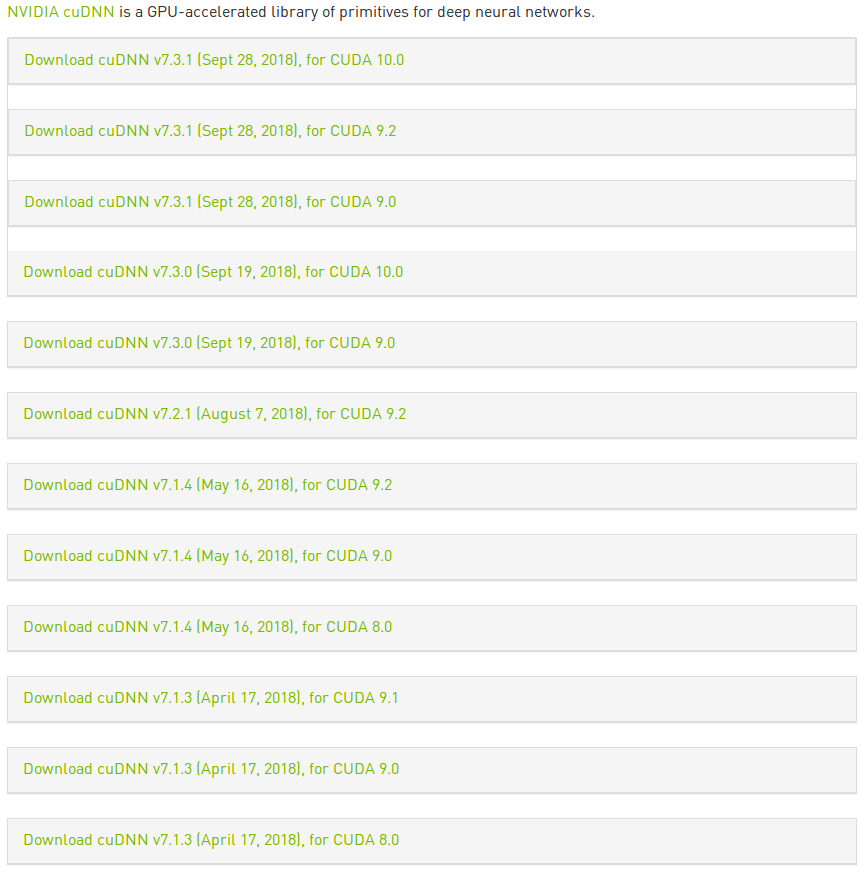
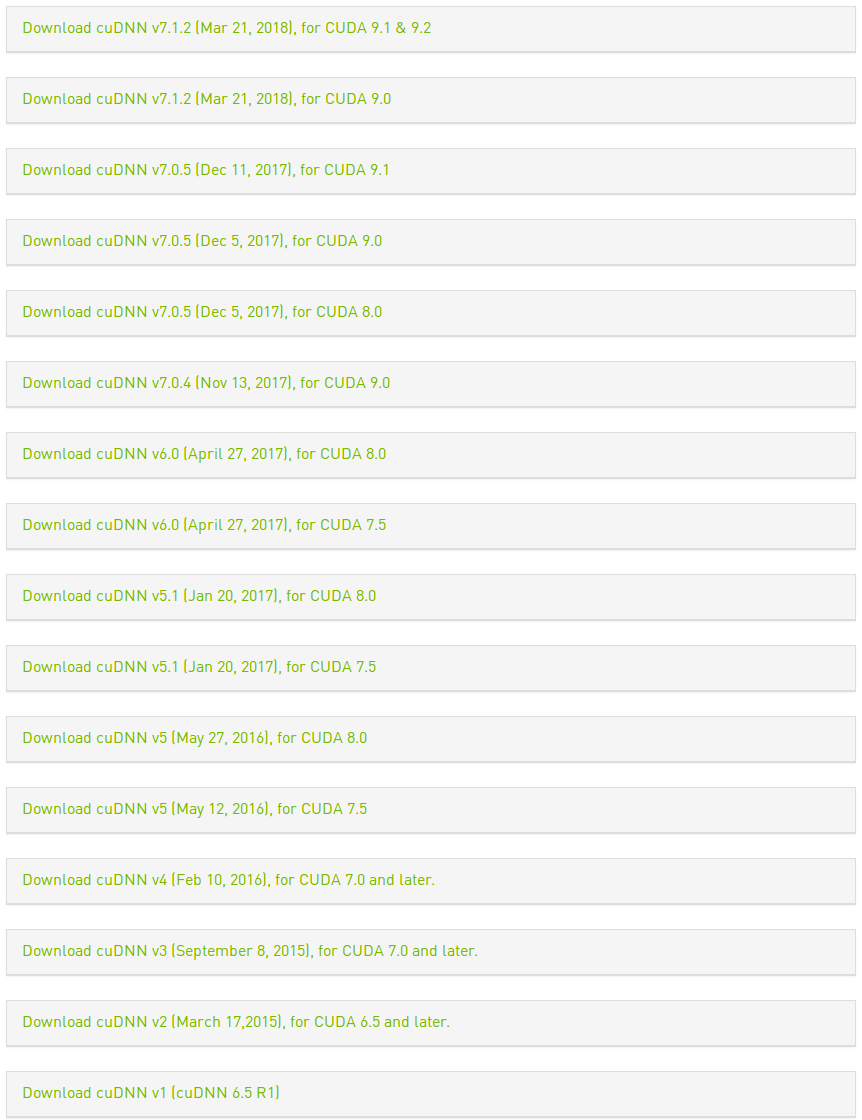
看到网上的教程中cuda8与cudnn6搭配的比较多,于是我采用cudnn6.
下载cudnn需要注册帐号,挺麻烦的,看到有一个博客中直接用wget下载,试了一下,速度飞快,还省去了注册帐号的麻烦。
wget http://developer.download.nvidia.com/compute/redist/cudnn/v6.0/cudnn-8.0-linux-x64-v6.0.tgz
然后需要解压,并将头文件和动态链接库复制到cuda路径中,
$ tar -zxvf cudnn-8.0-linux-x64-v6.0.tgz
$ sudo cp cuda/include/cudnn.h /usr/local/cuda/include/
$ sudo cp cuda/lib64/libcudnn* /usr/local/cuda/lib64/
$ sudo chmod a+r /usr/local/cuda/include/cudnn.h
$ sudo chmod a+r /usr/local/cuda/lib64/libcudnn*
有好多教程最后要创建软链接,我没有创建,直接安装了tensorflow-gpu
pip install tensorflow-gpu
默认安装的是1.12,版本应该是高了,结果需要cuda9,于是卸载了,重新安装1.3
pip install tensorflow-gpu==1.3
用python测试了一下,输出如下
Python 2.7.12 (default, Nov 12 2018, 14:36:49)
[GCC 5.4.0 20160609] on linux2
Type "help", "copyright", "credits" or "license" for more information.
>>> import tensorflow as tf
>>> tf.Session()
2018-11-20 00:34:37.313431: W tensorflow/core/platform/cpu_feature_guard.cc:45] The TensorFlow library wasn't compiled to use SSE4.1 instructions, but these are available on your machine and could speed up CPU computations.
2018-11-20 00:34:37.313493: W tensorflow/core/platform/cpu_feature_guard.cc:45] The TensorFlow library wasn't compiled to use SSE4.2 instructions, but these are available on your machine and could speed up CPU computations.
2018-11-20 00:34:37.313515: W tensorflow/core/platform/cpu_feature_guard.cc:45] The TensorFlow library wasn't compiled to use AVX instructions, but these are available on your machine and could speed up CPU computations.
2018-11-20 00:34:37.313538: W tensorflow/core/platform/cpu_feature_guard.cc:45] The TensorFlow library wasn't compiled to use AVX2 instructions, but these are available on your machine and could speed up CPU computations.
2018-11-20 00:34:37.313559: W tensorflow/core/platform/cpu_feature_guard.cc:45] The TensorFlow library wasn't compiled to use FMA instructions, but these are available on your machine and could speed up CPU computations.
2018-11-20 00:34:37.467953: I tensorflow/stream_executor/cuda/cuda_gpu_executor.cc:893] successful NUMA node read from SysFS had negative value (-1), but there must be at least one NUMA node, so returning NUMA node zero
2018-11-20 00:34:37.468324: I tensorflow/core/common_runtime/gpu/gpu_device.cc:955] Found device 0 with properties:
name: GeForce GTX 1080 Ti
major: 6 minor: 1 memoryClockRate (GHz) 1.582
pciBusID 0000:01:00.0
Total memory: 10.91GiB
Free memory: 10.54GiB
2018-11-20 00:34:37.468342: I tensorflow/core/common_runtime/gpu/gpu_device.cc:976] DMA: 0
2018-11-20 00:34:37.468348: I tensorflow/core/common_runtime/gpu/gpu_device.cc:986] 0:   Y
2018-11-20 00:34:37.468355: I tensorflow/core/common_runtime/gpu/gpu_device.cc:1045] Creating TensorFlow device (/gpu:0) -> (device: 0, name: GeForce GTX 1080 Ti, pci bus id: 0000:01:00.0)
<tensorflow.python.client.session.Session object at 0x7f93d7d96250>
一切正常,安装成功。

参考资料
https://blog.csdn.net/weixin_41864878/article/details/79621210
https://www.cnblogs.com/wmxfd/p/installation_of_nvidia_graphics_driver_and_cuda8_and_cudnn6.html
https://blog.csdn.net/qq_34057614/article/details/81228746
https://blog.csdn.net/xiangxianghehe/article/details/79177833
https://blog.csdn.net/qq_38522539/article/details/80678412
https://www.cnblogs.com/chay/p/8038251.html#_label3
https://blog.csdn.net/zong596568821xp/article/details/80410416
https://blog.csdn.net/twt520ly/article/details/79415787
记录下自己安装cuda以及cudnn的更多相关文章
- win10 安装cuda和cudnn
首先通过nvidia-smi 查看自己的显卡驱动对应的cuda版本. 参考:https://blog.csdn.net/qq_40212975/article/details/89963016 再去官 ...
- Ubuntu安装CUDA、CUDNN比较有用的网址总结
Ubuntu安装CUDA.CUDNN比较有用的网址总结 1.tensorflow各个版本所对应的的系统要求和CUDA\CUDNN适配版本 https://tensorflow.google.cn/in ...
- 安装CUDA和cuDNN
GPU和CPU区别 1,CPU主要用于处理通用逻辑,以及各种中断事物 2,GPU主要用于计算密集型程序,可并行运作: NVIDIA 的 GeForce 显示卡系列采用 GPU 特性进行快速计算,渲染电 ...
- 【tf.keras】Linux 非 root 用户安装 CUDA 和 cuDNN
TensorFlow 2.0 for Linux 使用时报错:(cuDNN 版本低了) E tensorflow/stream_executor/cuda/cuda_dnn.cc:319] Loade ...
- 非root用户安装cuda和cudnn
1.根据自己的系统在官网下载cuda (选择runfile(local)) https://developer.nvidia.com/cuda-downloads 2.进入下载目录,并执行 sh cu ...
- Anaconda--在虚拟环境中安装CUDA and cudnn
在conda虚拟环境中安装CUDAconda install cudatoolkit=8.0 -c https://mirrors.tuna.tsinghua.edu.cn/anaconda/pkgs ...
- ubuntu 安装 CUDA、 cuDNN 的tips
CUDA 查看驱动兼容性:https://docs.nvidia.com/cuda/cuda-toolkit-release-notes/index.html 查看GCC 与CUDA 驱动版本的兼容性 ...
- ubuntu安装cuda、cudnn
环境: Ubuntu 16.04.4 LTS CUDA:8.0 CUDNN:5.1 CUDA下载:https://developer.nvidia.com/cuda-80-ga2-download-a ...
- Ubuntu16.04 安装Tensorflow1.7过程记录二:安装CUDA及Tensorflow
参考 How to install Tensorflow 1.7.0 using official pip package 其中的CUDNN应该改为7.05for CUDA9.0 后面安装的spyde ...
随机推荐
- 使用matplotlib的示例:调整字体-设置刻度、坐标、colormap和colorbar等
使用matplotlib的示例:调整字体-设置刻度.坐标.colormap和colorbar等 2013-08-09 19:04 27805人阅读 评论(1) 收藏 举报 分类: Python(71 ...
- ClientDataSet + DataSetProvider + FDQuery 的bug
ClientDataSet + DataSetProvider +FDQuery 有 bug ClientDataSet + DataSetProvider +ADOQuery正常. Client ...
- NSFileManager和NSFileHandle使用
一.NSFileManager: 1.1.获取NSFileManager NSFileManager *manager = [NSFileManager defaultManager]; NS ...
- URL网址参数解析类
/** * Created by myc on 2015/12/9. */ import android.text.TextUtils; import java.util.HashMap; impor ...
- getParameter的用法及含义
equest.getparameter用来获取页面输入框输入的数据例如:jsp页面学员账户:<input type="text" name="username&qu ...
- C++下基本类型所占位数和取值范围
原文:http://hi.baidu.com/magicdemon/blog/item/821b2e22d7df494cad34debd.html C++下基本类型所占位数和取值范围: 符号属性 ...
- ie7下z-index失效问题解决方法
绝对定位元素的“有定位属性(relative或absolute)的父元素”在渲染层次时起到了主要作用,前面的被后面的覆盖了.解决办法就是给有定位属性的父元素设置z-index 解决办法: 父级元素加上 ...
- java字符编码转换研究(转)
1. 概述 本文主要包括以下几个方面:编码基本知识,java,系统软件,url,工具软件等. 在下面的描述中,将以"中文"两个字为例,经查表可以知道其GB2312编码是" ...
- Android 之 信息通知栏消息Notification
Notification是安卓手机顶部的消息提示 这里我们分别设置两个按钮,来实现顶部消息的发送和取消 功能实现 首先要在主Activity中设置一个通知控制类 NotificationManager ...
- 51NOD 1616 最小集合
传送门 分析 不难发现集合中的数一定是集合内其它一堆数的$gcd$ 于是我们枚举$i$,统计原来集合中有几个数是$i$的倍数,设这个值为$f(i)$ 之后对于每个$i$如果不存在$f(x*i) = f ...