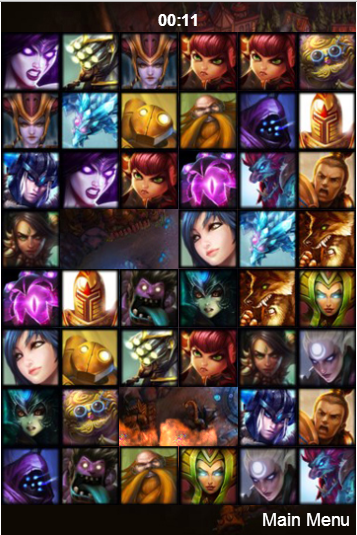
用cocos2d-html5做的消除类游戏《英雄爱消除》(3)——游戏主界面
游戏主界面,同时也是主程序,包括sprite的生成加入以及游戏状态的控制。
下面同样贴下源码再讲解;
/**

 * Power by  html5中文网(html5china.com)

 * author: jackyWHJ

 */

var STATE_PLAYING = 0;

var STATE_GAMEOVER = 1;

var g_sharedGameLayer;

var GameLayer = cc.Layer.extend({

    _time:0,

    _timeLabel:null,

    _timeString:"",

    screenRect:null,

    _state:STATE_PLAYING,

    _explosions:null,

    _texOpaqueBatch:null,

    _blocks:[],

    _heroFrameCache:null,

    init:function () {

        var bRet = false;

        if (this._super()) {

            cc.SpriteFrameCache.getInstance().addSpriteFrames(s_textureOpaquePack_plist);

            this._heroFrameCache = cc.SpriteFrameCache.getInstance();

            this._heroFrameCache.addSpriteFrames(s_textureNormalImage_plist);

            cc.SpriteFrameCache.getInstance().addSpriteFrames(s_textureLoveImage_plist);

            // reset global values

            LLK.map = [];//元素表,Block数组

            this._state = STATE_PLAYING;

            // OpaqueBatch

            var texOpaque = cc.TextureCache.getInstance().addImage(s_textureOpaquePack);

            this._texOpaqueBatch = cc.SpriteBatchNode.createWithTexture(texOpaque);

            this._texOpaqueBatch.setBlendFunc(gl.SRC_ALPHA, gl.ONE);

            this.addChild(this._texOpaqueBatch);

            var winSize = cc.Director.getInstance().getWinSize();

//            this._wayManager = new WayManager(this);

            this.screenRect = cc.rect(0, 0, winSize.width, winSize.height + 10);

            // explosion batch node

            cc.SpriteFrameCache.getInstance().addSpriteFrames(s_explosion_plist);

            var explosionTexture = cc.TextureCache.getInstance().addImage(s_explosion);

            this._explosions = cc.SpriteBatchNode.createWithTexture(explosionTexture);

            this._explosions.setBlendFunc(gl.SRC_ALPHA, gl.ONE);

            this.addChild(this._explosions);

            Explosion.sharedExplosion();

            this.initBackground();

            this.initBlock();

            // accept touch now!

            this._timeLabel = cc.LabelTTF.create("00:00","Arial Bold",16);

            this._timeLabel.setPosition(180,520);

            this._timeLabel.setColor(cc.c3b(255,255,255));

            this.addChild(this._timeLabel,10);

            if( 'keyboard' in sys.capabilities )

                this.setKeyboardEnabled(true);

            if( 'mouse' in sys.capabilities )

                this.setMouseEnabled(true);

            if( 'touches' in sys.capabilities )

                this.setTouchEnabled(true);

            if (LLK.SOUND) {

//                cc.log(cc.AudioEngine.getInstance().isMusicPlaying());

                cc.AudioEngine.getInstance().playMusic(s_bgMusic_mp3,true);

            }

            // schedule

            this.scheduleUpdate();

            this.schedule(this.scoreCounter, 1);

            bRet = true;

            g_sharedGameLayer = this;

        }

        return bRet;

    },

    initBlock:function(){

        var mapIndex = 0,i = 0,j = 0;

        var imgLen =  LLK.CONTAINER.NORMALIMAGES.length;

        if(LLK.MODE){

            imgLen =  LLK.CONTAINER.NORMALIMAGES.length;

            for ( i = 0; i < LLK.LEVEL.x*LLK.LEVEL.y; i+=2) {

                this._blocks[i] = this._blocks[i + 1] = LLK.CONTAINER.NORMALIMAGES[Math.floor(Math.random() * imgLen)];

            }

        }

        else{

            imgLen =  LLK.CONTAINER.MENGIMAGES.length;

            for ( i = 0; i < LLK.LEVEL.x*LLK.LEVEL.y; i+=2) {

                this._blocks[i] = this._blocks[i + 1] = LLK.CONTAINER.MENGIMAGES[Math.floor(Math.random() * imgLen)];

            }

        }

        var imgName = "";

        for ( j=0; j < LLK.LEVEL.y; j++) {

            for ( i=0; i < LLK.LEVEL.x; i++) {

                imgName = this.randomArray(this._blocks);

                var temp = new Block(imgName);

                temp.pointX = i;

                temp.pointY = j;

                temp.name = imgName;

                temp.id = mapIndex;

                LLK.map[temp.id] = temp;

                temp.setAnchorPoint(cc.p(0, 0));

                temp.setPosition(i*60, j*60+30);

                this.addChild(temp);

                mapIndex ++;

            }

        }

        LLK.COUNT = mapIndex;

    },

    randomArray:function (arr){

        var index = Math.floor(Math.random()*arr.length);

        return arr.splice(index,1)[0];

    },

    scoreCounter:function () {

        if( this._state == STATE_PLAYING ) {

            this._time++;

            var minute = 0 | (this._time / 60);

            var second = this._time % 60;

            minute = minute > 9 ? minute : "0" + minute;

            second = second > 9 ? second : "0" + second;

            this._timeString = minute + ":" + second;

            this._timeLabel.setString(this._timeString);

//            this._levelManager.loadLevelResource(this._time);

        }

    },

    initBackground:function () {

        // bg

        var bgImage = s_b03;

        if(Math.random() > 0.5){

            bgImage = s_b04;

        }

        this._backSky = cc.Sprite.create(bgImage);

        this._backSky.setAnchorPoint(cc.p(0, 0));

        this._backSkyHeight = this._backSky.getContentSize().height;

        this.addChild(this._backSky, -10);

    },

    onGameOver:function () {

        this._state = STATE_GAMEOVER;

        var scene = cc.Scene.create();

        scene.addChild(GameOver.create());

        cc.Director.getInstance().replaceScene(cc.TransitionFade.create(1.2, scene));

    }

});

GameLayer.create = function () {

    var sg = new GameLayer();

    if (sg && sg.init()) {

        return sg;

    }

    return null;

};

GameLayer.scene = function () {

    var scene = cc.Scene.create();

    var layer = GameLayer.create();

    scene.addChild(layer, 1);

    return scene;

};

GameLayer.prototype.addExplosions = function (explosion) {

    this._explosions.addChild(explosion);

};

GameLayer.prototype.addSpark = function (spark) {

    this._texOpaqueBatch.addChild(spark);

};
cc.SpriteFrameCache.getInstance().addSpriteFrames(s_textureOpaquePack_plist);

this._heroFrameCache = cc.SpriteFrameCache.getInstance();

this._heroFrameCache.addSpriteFrames(s_textureNormalImage_plist);

cc.SpriteFrameCache.getInstance().addSpriteFrames(s_textureLoveImage_plist);
这里因为我们这个游戏存在这2个模式,所以有2个纹理集,之后的程序中会根据当前选择的模式对应使用纹理集。
       // explosion batch node

            cc.SpriteFrameCache.getInstance().addSpriteFrames(s_explosion_plist);

            var explosionTexture = cc.TextureCache.getInstance().addImage(s_explosion);

            this._explosions = cc.SpriteBatchNode.createWithTexture(explosionTexture);

            this._explosions.setBlendFunc(gl.SRC_ALPHA, gl.ONE);

            this.addChild(this._explosions);

            Explosion.sharedExplosion();
  initBlock:function(){

        var mapIndex = 0,i = 0,j = 0;

        var imgLen =  LLK.CONTAINER.NORMALIMAGES.length;

        if(LLK.MODE){

            imgLen =  LLK.CONTAINER.NORMALIMAGES.length;

            for ( i = 0; i < LLK.LEVEL.x*LLK.LEVEL.y; i+=2) {

                this._blocks[i] = this._blocks[i + 1] = LLK.CONTAINER.NORMALIMAGES[Math.floor(Math.random() * imgLen)];

            }

        }

        else{

            imgLen =  LLK.CONTAINER.MENGIMAGES.length;

            for ( i = 0; i < LLK.LEVEL.x*LLK.LEVEL.y; i+=2) {

                this._blocks[i] = this._blocks[i + 1] = LLK.CONTAINER.MENGIMAGES[Math.floor(Math.random() * imgLen)];

            }

        }

        var imgName = "";

        for ( j=0; j < LLK.LEVEL.y; j++) {

            for ( i=0; i < LLK.LEVEL.x; i++) {

                imgName = this.randomArray(this._blocks);

                var temp = new Block(imgName);

                temp.pointX = i;

                temp.pointY = j;

                temp.id = mapIndex;

                LLK.map[temp.id] = temp;

                temp.setAnchorPoint(cc.p(0, 0));

                temp.setPosition(i*60, j*60+30);

                this.addChild(temp);

                mapIndex ++;

            }

        }

        LLK.COUNT = mapIndex;

    },
在该方法中,我们根据当前选择的模式随机生成this._blocks数组,记住这里的block是成对出现的。之后我们根据我们的界面的XY层数从我们的this._blocks数组中随机取出元素,取出的元素作为参数初始化Block然后把它添加到Layer中,在生成Block的时候我们要注意给Block的坐标pointX 、pointY赋值,并且使用我们的map数组缓存Block数组,供之后的Block移动查找移动位置的Block使用,最后,我们不要忘记给我们的Block计数附上值。
this._timeLabel = cc.LabelTTF.create("00:00","Arial Bold",16);

this._timeLabel.setPosition(180,520);

this._timeLabel.setColor(cc.c3b(255,255,255));

this.addChild(this._timeLabel,10);
  scoreCounter:function () {

        if( this._state == STATE_PLAYING ) {

            this._time++;

            var minute = 0 | (this._time / 60);

            var second = this._time % 60;

            minute = minute > 9 ? minute : "0" + minute;

            second = second > 9 ? second : "0" + second;

            this._timeString = minute + ":" + second;

            this._timeLabel.setString(this._timeString);

//            this._levelManager.loadLevelResource(this._time);

        }

    },
当游戏还在运行状态,时间计数每次加1然后转化成相应的时间显示形式之后修改时间显示label的内容。
  onGameOver:function () {

        this._state = STATE_GAMEOVER;

        var scene = cc.Scene.create();

        scene.addChild(GameOver.create());

        cc.Director.getInstance().replaceScene(cc.TransitionFade.create(1.2, scene));

    }
它做的是修改游戏的状态并且切换游戏场景。
下面是几个主要功能的教程
用cocos2d-html5做的消除类游戏《英雄爱消除》——概述
用cocos2d-html5做的消除类游戏《英雄爱消除》(1)——系统主菜单
用cocos2d-html5做的消除类游戏《英雄爱消除》(2)——Block设计实现
用cocos2d-html5做的消除类游戏《英雄爱消除》(3)——游戏主界面
用cocos2d-html5做的消除类游戏《英雄爱消除》(4)——游戏结束
ps:概述中有完整的源码链接
用cocos2d-html5做的消除类游戏《英雄爱消除》(3)——游戏主界面的更多相关文章
- 用cocos2d-html5做的消除类游戏《英雄爱消除》(1)——系统主菜单
系统主菜单如下图所示: 首先,介绍下这个主菜单,它包含了一个动画logo以及一个按钮选项,动画logo每隔1秒钟切换一张图片,点击相应的按钮选项会切换不同的游戏场景. 下面看下这个界面的源码: /** ...
- 用cocos2d-html5做的消除类游戏《英雄爱消除》(2)——Block设计实现
Block可以说是这个游戏的核心类,它除了包含自身的一些属性和方法外还添加了对触摸事件的响应. 我们先来看下源码吧 /** * Power by html5中文网(html5china.com) * ...
- 用cocos2d-html5做的消除类游戏《英雄爱消除》——概述
在bbs.html5china.com论坛学习了MV和老马的小熊蘑菇后我也自己模仿他们做了这样子一个游戏,权当技术交流学习,现在附上游戏截图和源码. 游戏截图: 1.系统菜单界面: 2.游戏界面 3. ...
- 用cocos2d-html5做的消除类游戏《英雄爱消除》(4)——游戏结束
游戏结束界面: 在前面几个教程中,这个界面的创作所需要的知识点基本我们都讲过了,这里就说下用户数据的缓存吧,也是先来看下源码 /** * Power by html5中文网(html5china.co ...
- 消除类游戏(js版)
最近一直在玩一款消灭星星的消除类游戏,周末无聊就用js也写了一遍,感觉玩比写还困难一直玩不到10000分.废话不多说直接上源码. 效果图(ps 页面有点难看木有美工) 代码总共456行,未经过严格测试 ...
- ccf题库中2015年12月2号消除类游戏
题目如下: 问题描述 消除类游戏是深受大众欢迎的一种游戏,游戏在一个包含有n行m列的游戏棋盘上进行,棋盘的每一行每一列的方格上放着一个有颜色的棋子,当一行或一列上有连续三个或更多的相同颜色的棋子时,这 ...
- CCF2015122消除类游戏(C语言版)
问题描述 消除类游戏是深受大众欢迎的一种游戏,游戏在一个包含有n行m列的游戏棋盘上进行,棋盘的每一行每一列的方格上放着一个有颜色的棋子,当一行或一列上有连续三个或更多的相同颜色的棋子时,这些棋子都被消 ...
- ccf消除类游戏
问题描述 消除类游戏是深受大众欢迎的一种游戏,游戏在一个包含有n行m列的游戏棋盘上进行,棋盘的每一行每一列的方格上放着一个有颜色的棋子,当一行或一列上有连续三个或更多的相同颜色的棋子时,这些棋子都被消 ...
- CCF CSP 201512-2 消除类游戏
CCF计算机职业资格认证考试题解系列文章为meelo原创,请务必以链接形式注明本文地址 CCF CSP 201512-2 消除类游戏 问题描述 消除类游戏是深受大众欢迎的一种游戏,游戏在一个包含有n行 ...
随机推荐
- 基于RxJava2+Retrofit2精心打造的Android基础框架
代码地址如下:http://www.demodashi.com/demo/12132.html XSnow 基于RxJava2+Retrofit2精心打造的Android基础框架,包含网络.上传.下载 ...
- Mac下配置mnmp环境
虽然比较喜欢玩下新语言, 但是php还是常会用到的. lnmp很多人都听过, 但是不能用在Mac上面, 另外还有个mnpp但在osx 10.8.3下面跑不起来.所以自己手动一步步安装, 整理了方便安装 ...
- hdu Portal(离线,并查集)
题意:在一张无向图上,已知边权,做q组询问,问小于L的点对共有几组.点对间的距离取=min(两点之间每一条通路上的最大值). 分析:这里取最大值的最小值,常用到二分.而这里利用离线算法,先对边从小到大 ...
- 【Java并发编程】并发编程大合集
转载自:http://blog.csdn.net/ns_code/article/details/17539599 为了方便各位网友学习以及方便自己复习之用,将Java并发编程系列内容系列内容按照由浅 ...
- ListView中CheckBox使用问题
因为CheckBox的点击事件优先级比ListView的高,所以当ListView中使用CheckBox会导致ListView的setOnItemClickListener失去响应. 解决的方法:在C ...
- C#实战Microsoft Messaging Queue(MSMQ)消息队列(干货)<转>
前言 在使用MSMQ之前,我们需要自行安装消息队列组件!(具体安装方法大家自己搜一下吧) 采用MSMQ带来的好处是:由于是异步通信,无论是发送方还是接收方都不用等待对方返回成功消息,就可以执行余下的代 ...
- 在数组中的两个数字,如果前面一个数字大于后面的数字,则这两个数字组成一个逆序对。输入一个数组,求出这个数组中的逆序对的总数P。并将P对1000000007取模的结果输出。 即输出P%1000000007
include "stdafx.h" #include<iostream> #include<vector> #include <algorithm& ...
- wps文档怎样去除广告
安装完 WPS 之后右键—属性—打开文件夹位置(如图) 接下来进入 10.1.0.6929 文件夹内,再次进入 office6 文件夹内,找到 wpscenter 应用程序,将其删除.此应用包含定时弹 ...
- [转]基于fiddler的APP抓包及服务端模拟
在HTTP接口的测试过程中,一般我们会按照如下的步骤进行: 1)测试环境的准备 2)HTTP消息体的构造 3)HTTP消息的发送及断言 如果我们可以拿到项目组的接口文档,并且HTTP后台服务是可以工作 ...
- 多媒体开发之---h264 rtp打包
http://blog.csdn.net/newthinker_wei/article/details/8997440 http://blog.csdn.net/dengzikun/article/d ...