Java NIO基本使用介绍
NIO主要包括Channel,Buffer,Selector三个核心元素组成。
Channel即通道,l和Buffer有好几种类型。下面是JAVA NIO中的一些主要Channel的实现:
- FileChannel
- DatagramChannel
- SocketChannel
- ServerSocketChannel
正如你所看到的,这些通道涵盖了UDP 和 TCP 网络IO,以及文件IO。
Buffer有IntBuffer,CharBuffer,FloatBuffer。。。。。
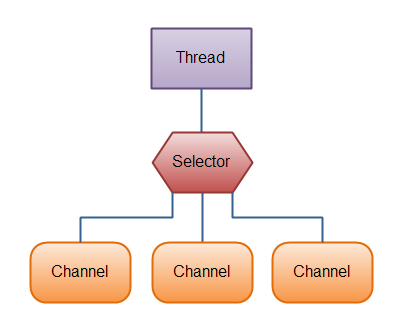
可以在Selector上注册通道。
Selector所在线程负责处理监听,待所关注的事件到达时,将事件分发给在Selector上注册的channel作异步处理,如下图所示。

Buffer的基本用法
使用Buffer读写数据一般遵循以下四个步骤:
- 调用channel的read()方法,将channel中的数据写入到Buffer中。
- 调用
flip()方法flip方法将Buffer从写模式切换到读模式。调用flip()方法会将position设回0,并将limit设置成之前position的值。
换句话说,position现在用于标记读的位置,limit表示之前写进了多少个byte、char等 —— 现在能读取多少个byte、char等。
public final Buffer flip() {

    limit = position;

    position = 0;

    mark = -1;

    return this;

} - 调用channel的write()方法,将Buffer中的数据写入channel中。
- 调用
clear()方法或者compact()方法
为了理解Buffer的工作原理,需要熟悉它的三个属性:
- capacity
- position
- limit
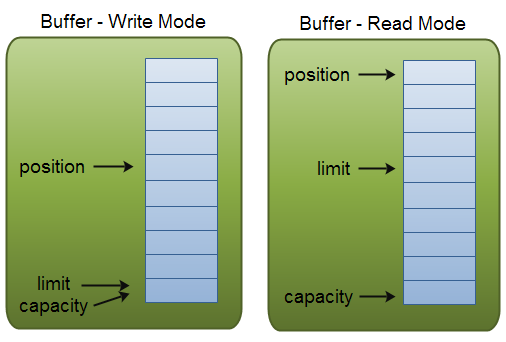
position和limit的含义取决于Buffer处在读模式还是写模式。不管Buffer处在什么模式,capacity的含义总是一样的。
这里有一个关于capacity,position和limit在读写模式中的说明,详细的解释在插图后面。

capacity
作为一个内存块,Buffer有一个固定的大小值,也叫“capacity”.你只能往里写capacity个byte、long,char等类型。一旦Buffer满了,需要将其清空(通过读数据或者清除数据)才能继续写数据往里写数据。
position
当你写数据到Buffer中时,position表示当前的位置。初始的position值为0.当一个byte、long等数据写到Buffer后, position会向前移动到下一个可插入数据的Buffer单元。position最大可为capacity – 1.
当读取数据时,也是从某个特定位置读。当将Buffer从写模式切换到读模式,position会被重置为0. 当从Buffer的position处读取数据时,position向前移动到下一个可读的位置。
limit
在写模式下,Buffer的limit表示你最多能往Buffer里写多少数据。 写模式下,limit等于Buffer的capacity。
当切换Buffer到读模式时, limit表示你最多能读到多少数据。因此,当切换Buffer到读模式时,limit会被设置成写模式下的position值。换句话说,你能读到之前写入的所有数据(limit被设置成已写数据的数量,这个值在写模式下就是position)
使用JAVA NIO编写一个客户端与服务端通信的例子。
Server
 package com.nio;

 import java.io.IOException;

 import java.net.InetSocketAddress;

 import java.nio.ByteBuffer;

 import java.nio.channels.SelectionKey;

 import java.nio.channels.Selector;

 import java.nio.channels.ServerSocketChannel;

 import java.nio.channels.SocketChannel;

 import java.util.Iterator;

 import java.util.Set;

 public class Server {

     private Selector selector;

     private ByteBuffer readBuffer = ByteBuffer.allocate(100);

     public void start() throws IOException {

         ServerSocketChannel ssc = ServerSocketChannel.open();

         ssc.configureBlocking(false);

         ssc.socket().bind(new InetSocketAddress("localhost", 8002));

         selector = Selector.open();

         ssc.register(selector, SelectionKey.OP_ACCEPT);

         while (!Thread.currentThread().isInterrupted()) {

             selector.select();

             Set selectedKeys = selector.selectedKeys();

             Iterator iterator = selectedKeys.iterator();

             while (iterator.hasNext()) {

                 SelectionKey key = (SelectionKey) iterator.next();

                 if (!key.isValid()) {

                     continue;

                 }

                 if (key.isAcceptable()) {

                     accept(key);

                 } else if (key.isReadable()) {

                     read(key);

                 }

             }

             iterator.remove();

         }

     }

     private void read(SelectionKey key) throws IOException {

         SocketChannel socketChannel = (SocketChannel) key.channel();

         this.readBuffer.clear();

         int readNum = 0;

         try {

             readNum = socketChannel.read(this.readBuffer);

         } catch (IOException e) {

             key.cancel();

             socketChannel.close();

             return;

         }

         if (readNum > 0) {

             byte[] newBytes = new byte[readNum];

             System.arraycopy(readBuffer.array(), 0, newBytes, 0, readNum);

             String message = new String(newBytes);

             System.out.println(message);

             message = "你好,已收到你发的消息:" + message;

             readBuffer.flip();

             readBuffer = ByteBuffer.wrap(message.getBytes());

             socketChannel.write(readBuffer);

         }

     }

     private void accept(SelectionKey key) throws IOException {

         ServerSocketChannel ssc = (ServerSocketChannel) key.channel();

         SocketChannel clientChanel = ssc.accept();

         clientChanel.configureBlocking(false);

         clientChanel.register(selector, SelectionKey.OP_READ);

         System.out.println("a new client connected...");

     }

     public static void main(String[] args) throws IOException {

         new Server().start();

     }

 }
Client
 package com.nio;

 import java.io.IOException;

 import java.net.InetSocketAddress;

 import java.nio.ByteBuffer;

 import java.nio.channels.SelectionKey;

 import java.nio.channels.Selector;

 import java.nio.channels.SocketChannel;

 import java.util.Iterator;

 import java.util.Scanner;

 import java.util.Set;

 public class Client {

     private void start() throws IOException {

         SocketChannel sc = SocketChannel.open();

         sc.configureBlocking(false);

         sc.connect(new InetSocketAddress("localhost", 8002));

         Selector selector = Selector.open();

         sc.register(selector, SelectionKey.OP_CONNECT );

         Scanner scanner = new Scanner(System.in);

         while (true) {

             selector.select();

             Set selectedKeys = selector.selectedKeys();

             Iterator iterator = selectedKeys.iterator();

             while (iterator.hasNext()) {

                 SelectionKey key = (SelectionKey) iterator.next();

                 if (key.isConnectable()) {

                     sc.finishConnect();

                     sc.register(selector, SelectionKey.OP_WRITE);

                     System.out.println("server connected");

                     break;

                 } else if (key.isWritable()) {

                     System.out.println("please input message");

                     String message = scanner.nextLine();

                     ByteBuffer writebufBuffer = ByteBuffer.wrap(message.getBytes());

                     sc.write(writebufBuffer);

                     sc.register(selector, SelectionKey.OP_READ);

                 }else if(key.isReadable()){

                     ByteBuffer readBuffer = ByteBuffer.allocate(1024);

                     int readNum = sc.read(readBuffer);

                     byte[] newBytes = new byte[readNum];

                     System.arraycopy(readBuffer.array(), 0, newBytes, 0, readNum);

                     String message = new String(newBytes);

                     System.out.println(message);

                     sc.register(selector, SelectionKey.OP_WRITE);

                 }

             }

             iterator.remove();

         }

     }

     public static void main(String[] args) throws IOException {

         new Client().start();

     }

 }
Client端输入abc后,Server端会将收到的信息返回到Client端,打印"你好,已收到......"

Server端也会打印出Client端发送的消息。

Java NIO基本使用介绍的更多相关文章
- 快学Java NIO 续篇
可以先看Java NIO的整体介绍,这篇接着说以下内容,<快学Java NIO>续篇 FileChannel SocketChannel ServerSocketChannel Java ...
- Java NIO简单介绍(二)
上一篇<NIO简单介绍(一)>中讲解了NIO中本地IO相关的内容,这篇重点介绍的NIO的非阻塞式网络通信 一.阻塞与非阻塞 传统的 IO 流都是阻塞式的.也就是说,当一个线程调用 read ...
- Java NIO简单介绍(一)
Java NIO( New IO) 是从Java 1.4版本开始引入的 一个新的IO API,可以替代标准的Java IO API. NIO与原来的IO有同样的作用和目的,但是使用的方式完全不同,NI ...
- java学习-NIO(五)NIO学习总结以及NIO新特性介绍
我们知道是NIO是在2002年引入到J2SE 1.4里的,很多Java开发者比如我还是不知道怎么充分利用NIO,更少的人知道在Java SE 7里引入了更新的输入/输出 API(NIO.2).但是对于 ...
- java NIO介绍
前言 我们在写java程序的时候,为了进行优化,把全部的精力用在了处理效率上,但是对IO的关注却很少.这也可能是由以前java早期时JVM在解释字节码时速度慢,运行速率大大低于本地编译代码,因此以前往 ...
- Java中NIO的简单介绍
NIO基本介绍 Java NIO(New IO) 也有人称之为Java non-blocking IO 是从Java1.4版本开始引入的一个新的IO API,可以代替标准的IO API.NIO与原来的 ...
- Java NIO框架Mina、Netty、Grizzly介绍与对比(zz)
Mina:Mina(Multipurpose Infrastructure for Network Applications) 是 Apache 组织一个较新的项目,它为开发高性能和高可用性的网络应用 ...
- [翻译] java NIO 教程---介绍
原文地址:http://tutorials.jenkov.com/java-nio/index.html Java NIO(new IO)是从java1.4之后的对IO API的另一种选择,即对标准j ...
- Java NIO框架Mina、Netty、Grizzly介绍与对比
Mina:Mina(Multipurpose Infrastructure for Network Applications) 是 Apache 组织一个较新的项目,它为开发高性能和高可用性的网络应用 ...
随机推荐
- linux strace-跟踪进程的系统调用或是信号产生情况,lstrace-跟踪己丑年调用库函数情况,进程跟踪调试命令
本工具可以用来做大多数排除,比如mount一个NFS,很慢,找不出原因,我们可以使用strace命令来跟中mount这个经常所有的调用过程. strace 命令是一种强大的工具,它能够显示所有由用户空 ...
- js数组与 json 的区别
一,数组 1. 定义一维数组:var s1=new Array(); s1=[1,2,3,4]或者s1[0]=1,s1[1]=2,s1[3]=3,s1[4]=4; alert(s1[0]); 结果为1 ...
- python 字典 get 小例子
语法 get()方法语法: dict.get(key, default=None) 参数 key -- 字典中要查找的键. default -- 如果指定键的值不存在时,返回该默认值值. 返回值 返回 ...
- javaScript之跨浏览器的事件对象
跨浏览器的兼容代码 var eventHandler = { addHandler: function(element, type, handler){}, removeHandler: functi ...
- 菜鸟攻城狮1(JAVA程序设计)
1.JAVA是一个完整的平台,有一个庞大的库,提供了可重复利用的代码功能块,安全性,跨操作系统的可以移植性,自动垃圾回收机制 2.JAVA设计者白皮书:简单性.面向对象.网络技能.健壮性.安全性.体系 ...
- CentOS 7 配置 http 服务器
一.http单域名访问 1.安装软件: yum -y install httpd 2.启动服务:systemctl start httpd 3.设置开机启动: systemctl enable ht ...
- android studio在windows上设置git/ssh
windows果然是与众不同的,凡事都要那么麻烦一点点(当然..是对程序员来说..) 一开始,我想用cygwin里的git,就省得我再多装一套软件,配置也可以统一,但事实证明不行 在android s ...
- python 列表中 [[], [], []] 和 3*[[]]差异
问: What's the difference between "[[], [], []]" and "3*[[]]" ? 答: [[], [], []] m ...
- 我的windows软件
1.360安全卫士 http://www.360.cn/ 装好系统后用它来卸载预装软件,杀毒,关闭开机启动项和清理垃圾 2.QQ http://im.qq.com/download/ 手机和电脑通信 ...
- Extjs知识点汇总
自定义渲染单元格内容 { name:"device.flag", header: '确认', dataIndex: 'flag', width:50, renderer: func ...
