gitlab HA集群
https://docs.gitlab.com/ee/administration/high_availability/gitlab.html
https://about.gitlab.com/high-availability/
https://www.oschina.net/translate/gitlab-high-availability?lang=chs
gitlab目录结构:
find / -name gitlab |grep -v "^/opt/"
/run/gitlab # pid目录
/etc/gitlab # 配置目录
/var/log/gitlab # 日志目录
/var/opt/gitlab # 应用数据保存目录,要同步的主要是这里的部分数据
/opt/gitlab # bin程序目录
架构图:
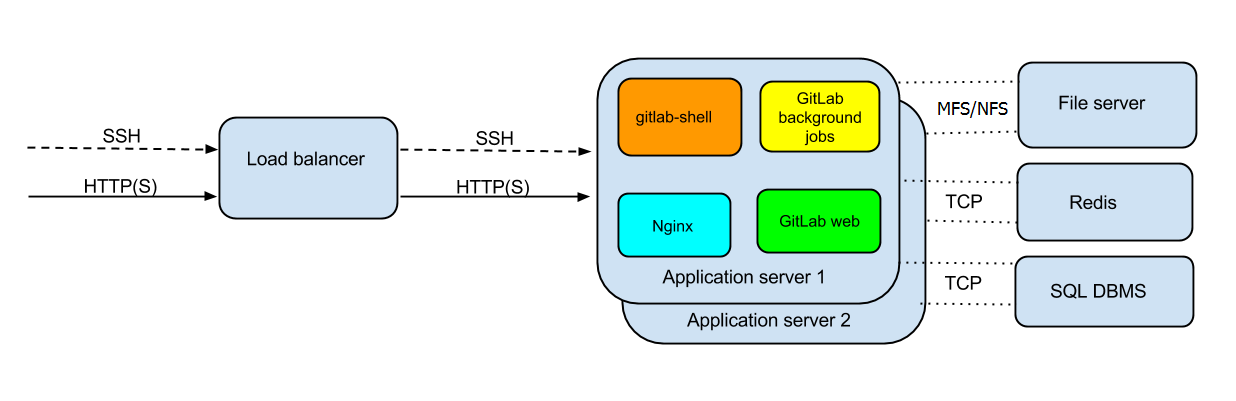
git1
git2:
(gitlab 允许多个节点,多活)
postgresql集群:
redis集群(哨兵模式)
MFS网络文件存储
# MFS集群部署见 http://www.cnblogs.com/linkenpark/p/7416998.html
redis集群(哨兵模式):http://blog.51cto.com/tianshili/1759289
# PostgreSQL 主从集群部署 http://www.cnblogs.com/linkenpark/p/8339936.html
安装postgresql扩展pg_trgm
yum -y install postgresql96-contrib-9.6.8 # 默认的 yum -y install postgresql-contrib
创建用户及库
su - postgres

psql

create role gitlab login encrypted password 'pass';

\du   ;显示用户

create database gitlabhq_production owner=gitlab ENCODING = 'UTF8';

\l     ;列出数据库

;添加pg_trgm扩展

CREATE EXTENSION pg_trgm;
在MFS服务端根目录下创建一个项目给gitlab用
mkdir gitlab
cd gitlab; mkdir -p .ssh gitlab-rails/uploads gitlab-rails/shared gitlab-ci/builds git-data
git1、git2 挂载MFS目录
mkdir -p /var/opt/gitlab/.ssh /var/opt/gitlab/gitlab-rails/uploads /var/opt/gitlab/gitlab-rails/shared /var/opt/gitlab/gitlab-ci/builds /var/opt/gitlab/git-data
cat /etc/fstab
mfsmount /var/opt/gitlab/.ssh    fuse    mfsmaster=mfsmaster,mfsport=9421,mfssubfolder=/gitlab/.ssh,mfspassword=passwd,_netdev 0 0

mfsmount /var/opt/gitlab/gitlab-rails/uploads    fuse    mfsmaster=mfsmaster,mfsport=9421,mfssubfolder=/gitlab/gitlab-rails/uploads,mfspassword=passwd,_netdev 0 0

mfsmount /var/opt/gitlab/gitlab-rails/shared    fuse    mfsmaster=mfsmaster,mfsport=9421,mfssubfolder=/gitlab/gitlab-rails/shared,mfspassword=passwd,_netdev 0 0

mfsmount /var/opt/gitlab/gitlab-ci/builds    fuse    mfsmaster=mfsmaster,mfsport=9421,mfssubfolder=/gitlab/gitlab-ci/builds,mfspassword=passwd,_netdev 0 0

mfsmount /var/opt/gitlab/git-data    fuse    mfsmaster=mfsmaster,mfsport=9421,mfssubfolder=/gitlab/git-data,mfspassword=passwd,_netdev 0 0
git1、git2安装gitlab
添加gitlab yum源
cat /etc/yum.repos.d/gitlab-ce.repo
[gitlab-ce]

name=Gitlab CE Repository

baseurl=https://mirrors.tuna.tsinghua.edu.cn/gitlab-ce/yum/el$releasever/

gpgcheck=0

enabled=1
yum install -y curl policycoreutils-python openssh-server sudo systemctl enable sshd
systemctl start sshd
firewall-cmd --permanent --add-service=http
systemctl reload firewalld

yum -y install postfix
systemctl enable postfix
systemctl start postfix
yum install -y gitlab-ce

gitlab启动脚本
cat /etc/systemd/system/gitlab.service
[Unit]

Description=gitlab

[Service]

Type=oneshot

RemainAfterExit=yes

ExecStart=/bin/gitlab-ctl start

ExecStop=/bin/gitlab-ctl stop

[Install]

WantedBy=multi-user.target
systemctl enable gitlab
git1配置
grep -Ev "^#|^$" /etc/gitlab/gitlab.rb
external_url 'http://git.conf.com'

gitlab_rails['time_zone'] = 'Asia/Shanghai'

# Disable components that will not be on the GitLab application server

roles ['application_role']

# Prevent GitLab from starting if MFS data mounts are not available

high_availability['mountpoint'] = '/var/opt/gitlab/git-data'

# PostgreSQL connection details

postgresql['enable'] = false

gitlab_rails['db_adapter'] = "postgresql"

gitlab_rails['db_encoding'] = "utf8"

gitlab_rails['db_database'] = "gitlabhq_production"

gitlab_rails['db_username'] = "gitlab"

gitlab_rails['db_password'] = "db_password"

gitlab_rails['db_host'] = "172.16.3.203"

gitlab_rails['db_port'] = 5432

# Redis connection details(单实例、或主从集群)

redis['enable'] = false

gitlab_rails['redis_host'] = "172.16.3.203"

gitlab_rails['redis_port'] = 6379

gitlab_rails['redis_password'] = "redis_password"

gitlab_rails['redis_database'] = 0

# Redis connection details(哨兵集群)

# redis连接方式只设置一种就可以,CE版也可以连接redis sentinel集群

redis['enable'] = false

gitlab_rails['redis_sentinels'] = [

    {'host' => 'sentinel-0.conf.com', 'port' => 26379},

    {'host' => 'sentinel-1.conf.com', 'port' => 26379},

    {'host' => 'sentinel-2.conf.com', 'port' => 26379},

    {'host' => 'sentinel-3.conf.com', 'port' => 26379},

]

redis['master_name'] = 'mymaster'

redis['master_password'] = 'redis_auth_pass'

gitlab_rails['redis_database'] = 0

# nginx enable

nginx['enable'] = true
使配置生效
gitlab-ctl reconfigure
如要再次初始化数据,运行 gitlab-rake gitlab:setup(一般前面执行了gitlab-ctl reconfigure已经初始化发数据)
gitlab-ctl start
git2配置
从git1把/etc/gitlab/gitlab-secrets.json 复制到 git2的/etc/gitlab目录下
touch /etc/gitlab/skip-auto-migrations
grep -v "^#" /etc/gitlab/gitlab.rb
external_url 'http://git.conf.com'


gitlab_rails['time_zone'] = 'Asia/Shanghai'

# Disable components that will not be on the GitLab application server

roles ['application_role']

# Prevent GitLab from starting if MFS data mounts are not available

high_availability['mountpoint'] = '/var/opt/gitlab/git-data'

# disable automatic database migrations

gitlab_rails['auto_migrate'] = false

# PostgreSQL connection details

postgresql['enable'] = false

gitlab_rails['db_adapter'] = "postgresql"

gitlab_rails['db_encoding'] = "utf8"

gitlab_rails['db_database'] = "gitlabhq_production"

gitlab_rails['db_username'] = "gitlab"

gitlab_rails['db_password'] = "db_password"

gitlab_rails['db_host'] = "172.16.3.203"

gitlab_rails['db_port'] = 5432

# Redis connection details(单实例、或主从集群)

redis['enable'] = false

gitlab_rails['redis_host'] = "172.16.3.203"

gitlab_rails['redis_port'] = 6379

gitlab_rails['redis_password'] = "redis_password"

gitlab_rails['redis_database'] = 0

# Redis connection details(哨兵集群)

# redis连接方式只设置一种就可以,CE版也可以连接redis sentinel集群

redis['enable'] = false

gitlab_rails['redis_sentinels'] = [

    {'host' => 'sentinel-0.conf.com', 'port' => 26379},

    {'host' => 'sentinel-1.conf.com', 'port' => 26379},

    {'host' => 'sentinel-2.conf.com', 'port' => 26379},

    {'host' => 'sentinel-3.conf.com', 'port' => 26379},

]

redis['master_name'] = 'mymaster'

redis['master_password'] = 'redis_auth_pass'

gitlab_rails['redis_database'] = 0

# nginx enable

nginx['enable'] = true
gitlab-ctl reconfigure
gitlab-ctl start
如有更多的 second app 请参照git2配置
# 前端负载均衡
前端再分别对http负载(可用nginx反向代理)
ssh(可用HAproxy代理,或nginx TCP代理)
由其他gitlab服务器数据迁移到此gitlab集群
原gitlab服务器数据备份
可以通过/etc/gitlab/gitlab.rb配置文件来修改默认存放备份文件的目录
gitlab_rails['backup_path'] = "/var/opt/gitlab/backups"
/var/opt/gitlab/backups修改为你想存放备份的目录即可, 修改完成之后使用gitlab-ctl reconfigure命令重载配置文件即可.
/opt/gitlab/bin/gitlab-rake gitlab:backup:create #执行备份命令
如 /var/opt/gitlab/backups/1524449406_2018_04_23_10.6.4_gitlab_backup.tar
把 备份的数据 1524449406_2018_04_23_10.6.4_gitlab_backup.tar 复制到 gitlab集群的第一个节点的/var/opt/gitlab/backups目录下
chmod 777 /var/opt/gitlab/backups/1524449406_2018_04_23_10.6.4_gitlab_backup.tar
# 停止相关数据连接服务
gitlab-ctl stop unicorn
gitlab-ctl stop sidekiq
umount /var/opt/gitlab/gitlab-rails/uploads # 由于恢复时会把该目录重启命令成 /var/opt/gitlab/gitlab-rails/uploads.时间戳 ,生产新的/var/opt/gitlab/gitlab-rails/uploads目录,但该目录被挂载了会提示设备busy
umount /var/opt/gitlab/gitlab-ci/builds # 由于恢复时会把该目录重启命令成/var/opt/gitlab/gitlab-ci/builds.时间戳 ,生产新的/var/opt/gitlab/gitlab-ci/builds目录,但该目录被挂载了会提示设备busy
gitlab-rake gitlab:backup:restore BACKUP=1524449406_2018_04_23_10.6.4 #执行恢复备份
mv /var/opt/gitlab/gitlab-rails/uploads /var/opt/gitlab/gitlab-rails/uploads_ok
mkdir -p /var/opt/gitlab/gitlab-rails/uploads
mount /var/opt/gitlab/gitlab-rails/uploads
cp -ap /var/opt/gitlab/gitlab-rails/uploads_ok/* /var/opt/gitlab/gitlab-rails/uploads
mv /var/opt/gitlab/gitlab-ci/builds /var/opt/gitlab/gitlab-ci/builds_ok
mkdir -p /var/opt/gitlab/gitlab-ci/builds
mount /var/opt/gitlab/gitlab-ci/builds
cp -rp /var/opt/gitlab/gitlab-ci/builds_ok/* /var/opt/gitlab/gitlab-ci/builds
gitlab-ctl start unicorn
gitlab-ctl start sidekiq
完成恢复
# key认证问题
可能报错:
报错情况1:(key没有从master复制过来)
IT IS POSSIBLE THAT SOMEONE IS DOING SOMETHING NASTY!
Someone could be eavesdropping on you right now (man-in-the-middle attack)!
It is also possible that a host key has just been changed.
The fingerprint for the ECDSA key sent by the remote host is
SHA256:9DdK4jo9LPLg7snd/vueT3wI2dy0hb7CVYRRGOTU8TY.
Please contact your system administrator.
Add correct host key in /c/Users/cd/.ssh/known_hosts to get rid of this message.
Offending ECDSA key in /c/Users/cd/.ssh/known_hosts:4
ECDSA host key for git.tuandai888.com has changed and you have requested strict checking.
Host key verification failed.
fatal: Could not read from remote repository.
Please make sure you have the correct access rights
and the repository exists.
报错情况2:(从master复制过来的key权限没设置好)
ssh_exchange_identification: Connection closed by remote host
fatal: Could not read from remote repository.
Please make sure you have the correct access rights
and the repository exists.
解决方法:
把master的 /etc/ssh/*key* 文件全部复制到从节点来,并注意权限与master的设置一样,
scp root@[master_IP]:/etc/ssh/*key* /etc/ssh
chown root:ssh_keys ssh_host_ecdsa_key ssh_host_ed25519_key ssh_host_rsa_key
# 注意
只有连接Postgresql master库, gitlab才能正常使用。因为gitlab web登录时就要求写数据库。连接到postgresql从库,gitlab web登录失败,报500错。ssh连接仓库正常。
gitlab HA集群的更多相关文章
- 安装spark ha集群
安装spark ha集群 1.默认安装好hadoop+zookeeper 2.安装scala 1.解压安装包 tar zxvf scala-2.11.7.tgz 2.配置环境变量 vim /etc/p ...
- Hadoop的HA集群启动和停止流程
假设我们有3台虚拟机,主机名分别是hadoop01.hadoop02和hadoop03. 这3台虚拟机的Hadoop的HA集群部署计划如下: 3台虚拟机的Hadoop的HA集群部署计划 hadoop0 ...
- corosync+pacemaker实现高可用(HA)集群
corosync+pacemaker实现高可用(HA)集群(一) 重要概念 在准备部署HA集群前,需要对其涉及的大量的概念有一个初步的了解,这样在实际部署配置时,才不至于不知所云 资源.服务与 ...
- 使用QJM部署HDFS HA集群
一.所需软件 1. JDK版本 下载地址:http://www.oracle.com/technetwork/java/javase/index.html 版本: jdk-7u79-linux-x64 ...
- Storm-1.0.1+ZooKeeper-3.4.8+Netty-4.1.3 HA集群安装
Storm-1.0.1+ZooKeeper-3.4.8+Netty-4.1.3 HA集群安装 下载Storm-1.0.1 http://mirrors.tuna.tsinghua.edu.cn/apa ...
- 菜鸟玩云计算之十九:Hadoop 2.5.0 HA 集群安装第2章
菜鸟玩云计算之十九:Hadoop 2.5.0 HA 集群安装第2章 cheungmine, 2014-10-26 在上一章中,我们准备好了计算机和软件.本章开始部署hadoop 高可用集群. 2 部署 ...
- 菜鸟玩云计算之十八:Hadoop 2.5.0 HA 集群安装第1章
菜鸟玩云计算之十八:Hadoop 2.5.0 HA 集群安装第1章 cheungmine, 2014-10-25 0 引言 在生产环境上安装Hadoop高可用集群一直是一个需要极度耐心和体力的细致工作 ...
- 架构之高可用性(HA)集群(Keepalived)
Keepalived简介 Keepalived是Linux下一个轻量级别的高可用解决方案.高可用(High Avalilability,HA),其实两种不同的含义:广义来讲,是指整个系统的高可用行,狭 ...
- 手动部署 kubernetes HA 集群
前言 关于kubernetes HA集群部署的方式有很多种(这里的HA指的是master apiserver的高可用),比如通过keepalived vip漂移的方式.haproxy/nginx负载均 ...
随机推荐
- 使用iview-project 打包build报错,ERROR in xxxxx.cheunk.js from UglifyJs
一.iview-project 为iview官方推荐工程,一个基于iview的vue脚手架 github网址:https://github.com/iview/iview-project 废话不多说 ...
- oracle 产生一个任意大小的随机数
SELECT DBMS_RANDOM.RANDOM FROM DUAL; 产生一个任意大小的随机数 SELECT ABS(MOD(DBMS_RANDOM.RANDOM,100)) F ...
- RTU命令设置笔记
YN+12VCTL=1 配置+12V输出控制模式:永久输出YN+5VCTL=1 配置+5V输出控制模式:永久输出 YN+GETDATA 读取采样值 YN++LIST 获取设置参数列表 YN+LOAD ...
- zabbix的搭建与入门
一,Zabbix架构 zabbix 是一个基于 WEB 界面的提供分布式系统监视以及网络监视功能的企业级的开源解决方案.zabbix 能监视各种网络参数,保证服务器系统的安全运营:并提供灵活的通知机制 ...
- spring aop 的理解
spring aop的相关概念(所有的概念都是为了生成代理类这个过程所需要的信息的抽象): 1.Targer:目标对象.被代理的对象. 2.Advice:增强/通知.就是为目标对象扩展的功能.分为前置 ...
- 搜索评价指标——NDCG
◆版权声明:本文出自胖喵~的博客,转载必须注明出处. 转载请注明出处:https://www.cnblogs.com/by-dream/p/9403984.html 概念 NDCG,Normali ...
- 基于GUI的简单聊天室02
服务器端 与上一篇相比,加进了线程内部类,解决多个客户端连接时,服务器无法全部响应的问题. 利用List集合来装载客户端的对象. 还需要注意全局变量的应用. /** * 相比01,加进了线程内部类,解 ...
- pygame精灵类实现房子爆炸效果
# coding=utf8 import random import pygame from pygame.locals import * from cStringIO import StringIO ...
- 15款Cocos2d-x游戏源码
(1)用cocos2d-x开发的中国象棋游戏源码 使用Cocos2d-X2.2.3开发的一款中国象棋游戏,游戏中可以实现.新局面.悔棋.游戏音乐.胜利后会显示游戏结果. 源码下载:http://www ...
- SWIFT Function
Swift中的函数跟JAVA语言的函数差不多,但也有差别,SWIFT中定义函数可以指定参数的名称这也是别的语言没有的,好处就是增加了可读性.其返回值是放在未尾的,如以下定义一个加法器: func ad ...