
使用 Microsoft.Web.Administration 管理iis
How to Automate IIS 7 Configuration with .NET
How to Automate IIS 7 Configuration with .NET
Are you tired of manually configuring IIS sites (adding Web sites, application pools, virtual directories and so on)? Use C# and the Microsoft.Web.Administration Namespace to simplify your life (or at least IIS configuration).
- By Patrick Steele
- 06/24/2014

I maintain a number of Web sites outside my day job. Nothing major -- a church Web site, a small PHP Web site for the salon my wife works at and a hot-lunch-ordering Web site for my kid's school. These sites are all hosted by Web hosting companies, but I have a copy of all of them set up on my development machine for maintenance and testing.
From time to time, I have to do a clean install of my machine. It's either a new version of Windows or, most recently, a solid-state drive (SSD) that died on me. Either way, when it comes to setting up IIS on my new environment, I grew tired of the myriad of settings and options that had to be configured for all these sites. I decided to put my programming skills to work and automate this task.
Admins Only!
An important point I'd like to begin with: Access to IIS Manager is restricted to Administrators. Therefore, any utilities you write using the techniques covered in this article must be executed by an administrator. Likewise, if you're going to do debugging of your utilities from inside Visual Studio, you'll need to be running Visual Studio with Administrator access.
The sample code included in this article contains a complete example of programmatically creating an IIS site, complete with virtual directories, application pools and security settings.
IIS 7 Information
To show you what's possible, I created a new Windows Forms application and used NuGet to install the Microsoft.Web.Administration package. Then I dropped a few lines of code into the Form_Load event. It displays basic information for the local IIS server in a tree view, as you can see in Listing 1.
Listing 1: Form_Load Event Showing Information for Local IIS Server in a Tree View
using (var serverManager = new ServerManager())

{

  foreach (var site in serverManager.Sites)

  {

    var siteNode = tvwIIS.Nodes.Add(string.Format("Site: {0}", site.Name));

    foreach (var appl in site.Applications)

    {

      var appPoolNode =

        siteNode.Nodes.Add(string.Format("AppPool: {0}, Type: {1}", appl.ApplicationPoolName,

          GetApplType(serverManager, appl)));

      foreach (var virtDir in appl.VirtualDirectories)

      {

        appPoolNode.Nodes.Add(String.Format("Dir: {0} [{1}]", virtDir.Path,

          virtDir.PhysicalPath));

      }

    }

  }

}
The utility function GetApplType is used to obtain the .NET runtime version based on the Application Pool the Application's using:
private string GetApplType(ServerManager sm, Application appl)

{

  var appPool = sm.ApplicationPools[appl.ApplicationPoolName];

  return appPool.ManagedRuntimeVersion;

}
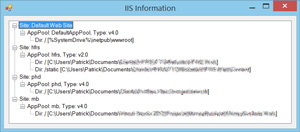
The result of running this on my machine is shown in Figure 1. It isn't going to win any UI design awards, but I hope you'll see how easy it is to query basic information about IIS and its inner configuration. Now I'm going to do some real work!
Creating a New Site
Now I want to automate the setup and configuration of my Web sites in IIS. The first thing to do is create the actual site. When I run locally, each site is mapped to its own port on my local machine. I don't need to remember the port numbers because I have bookmarks for each one. However, when it comes to setting these up (manually), I had to remember the port numbers. The process of automating this has the added benefit of not having to change my bookmarks if I accidentally set up a site on the wrong port.
Site creation is easy, as shown in Listing 2.
Listing 2: Site Creation in IIS
private static void AddSite(string siteName, string physicalPath, int portNumber)

{

  using (var sm = new ServerManager())

  {

    var invalidChars = SiteCollection.InvalidSiteNameCharacters();

    if (siteName.IndexOfAny(invalidChars) > -1)

    {

      throw new Exception(String.Format("Invalid Site Name: {0}", siteName));

    }

    var site = sm.Sites.Add(siteName, physicalPath, portNumber);

    site.ServerAutoStart = true;

    sm.CommitChanges();

  }

}
Note the SiteCollection object exposes a static char[] that contains a list of invalid site name characters. All of my sites have simple names that I know contain valid characters. But as you can see, I've created a generic AddSite method that can be used in many situations. This extra check makes sure I don't accidentally use any invalid characters.
You should also see that the last line inside the using block is a call to the CommitChanges method on the ServerManager. All the work done before this call is just done in-memory. If I forget to call CommitChanges, nothing is changed in IIS. The CommitChanges call pushes the changes from memory into IIS and makes them live.
At this point, my site is created and browsing to http://localhost:9898 works fine. However, I'm not done yet. I like each of my sites to have their own application pool. This is mostly for isolation, but if you noticed in Figure 1, I still have one of these old sites running under the Microsoft .NET Framework 2.0. If I don't provide the name of the application pool when I'm setting up my site, it uses the DefaultAppPool -- which, on my current machine, is running the .NET Framework 4. So I'm going to expand my AddSite method to support Application Pool creation.
Creating an AppPool
When creating the application pool, I need to set three things:
- The application pool name. For this, I'm going to default to the site name with "_AppPool" appended to it.
- The .NET runtime version. All of my sites, except for one, are running the .NET Framework 4, so I guess I could make this the default if it isn't provided by the caller.
- The Managed Pipeline Mode. Again, this would normally default to "Integrated," but the old .NET 2.0 site needs "Classic." Like the runtime version, I'll create some overloads that default to Integrated.
When setting the .NET runtime version, the ApplicationPool class takes in a string of either v2.0 or v4.0 as the runtime version. Microsoft probably used a string instead of an enum to allow you to plug in future versions of the runtime without having to update an enum. The Managed Pipline mode, however, is exposed as an enum.
Here's my updated AddSite signature:
void AddSite(string siteName, string physicalPath, int portNumber, string runtimeVersion,

  ManagedPipelineMode pipelineMode)
After making sure the siteName passed to AddSite is valid, I added some code to create the application pool:
...

var poolName = siteName + "_AppPool";

AddAppPool(sm, poolName, runtimeVersion, pipelineMode);

...
The assignment of the application pool to my site is done through an Application. A site can have many Applications, but will always have at least one -- and that one is automatically associated with the root directory of the site. Application pool assignment is done by using the app pool name, not a reference to an ApplicationPool object:
site.Applications.First().ApplicationPoolName = poolName;
The AddAppPool code is trivial:
private static void AddAppPool(ServerManager sm, string poolName, string runtimeVersion,

  ManagedPipelineMode piplineMode)

{

  var appPool = sm.ApplicationPools.Add(poolName);

  appPool.ManagedRuntimeVersion = runtimeVersion;

  appPool.ManagedPipelineMode = piplineMode;

}
Basic setup for this site is now complete. With minimal effort, I've got code to quickly set up my sites with specific configuration settings. This gets me 90 percent of the way there. One site has a virtual directory to be created, and a couple have some customizations to be made to the application pool. The current AddSite method already has five arguments, and I'd hate to add more. Instead, I'm going to refactor things a bit.
Customized Configurations
Instead of sending a bunch of parameters as settings for the various properties of my IIS objects, I'll expose a lambda that receives the IIS objects and allows the caller to set whatever it wants. Here's what my new AddSite signature looks like:
void AddSite(string siteName, Action<ServerManager, Site> siteConfigurator, Action<ServerManager,

  ApplicationPool> appPoolConfigurator)
This gives callers of this method full control to configure each item (site and app pool) the way they like, but doesn't burden them with the repetitive code of creating the sites, app pools and committing changes.
My new code to set up the "vsm" site is now:
AddSite("vsm", (mgr, site) =>

{

  site.SetPhysicalPath(@"C:\temp\vsm");

  site.BindToPort(9898);

  site.ServerAutoStart = true;

}, (mgr, appPool) =>

{

  appPool.ManagedRuntimeVersion = "V2.0";

  appPool.ManagedPipelineMode = ManagedPipelineMode.Classic;

});
And AddSite has been updated to execute the callbacks during the site creation process, shown in Listing 3.
Listing 3: Updating AddSite to Execute Callbacks During Site Creation Process
private static void AddSite(string siteName, Action<ServerManager, Site> siteConfigurator,

  Action<ServerManager, ApplicationPool> appPoolConfigurator)

{

  using (var sm = new ServerManager())

  {

    var invalidChars = SiteCollection.InvalidSiteNameCharacters();

    if (siteName.IndexOfAny(invalidChars) > -1)

    {

      throw new Exception(String.Format("Invalid Site Name: {0}", siteName));

    }

    var poolName = siteName + "_AppPool";

    var appPool = sm.ApplicationPools.Add(poolName);

    appPoolConfigurator(sm, appPool);

    var site = sm.Sites.Add(siteName, "", 0);

    site.Applications.First().ApplicationPoolName = poolName;

    siteConfigurator(sm, site);

    sm.CommitChanges();

  }

}
Notice that I no longer pass in the physical path and port number to the AddSite method. I wanted to keep the parameters passed to AddSite to a minimum. But this did create a problem -- the SiteCollection.Add method requires the physical path and port number. I changed the SiteCollection.Add call to pass in an empty string for physical path and zero for port number. Instead, the physical path and port are set during my site configuration callback:
(mgr, site) =>

  {

    site.SetPhysicalPath(@"C:\temp\vsm");

    site.BindToPort(9898);

    site.ServerAutoStart = true;

  }
The Site object doesn't have a method called SetPhysicalPath, nor a method called BindToPort. Those are extension methods I created to make the assignment of those two items easier to perform.
As pointed out earlier, when a site's created, it automatically gets an Application created for it. That's where I assigned the app pool name. In addition to an Application being created, that Application has a virtual directory automatically created (to map the root directory), and an HTTP binding is created in the site's Bindings collection.
Knowing that, my extension methods simply grab those default objects and set their properties individually:
static class Extensions

{

  public static void SetPhysicalPath(this Site site, string path)

  {

    site.Applications.First().VirtualDirectories.First().PhysicalPath = path;

  }

  public static void BindToPort(this Site site, int port)

  {

    site.Bindings.First().BindingInformation = String.Format("*:{0}:", port);

  }

}
Virtual Directories
I already touched on virtual directories a bit -- there's a default one created for each site's root directory. One of my sites needs an additional virtual directory created that points to a folder outside the site's physical path.
To add a new one, I just had to grab the list of virtual directories from the site's Application and add a new entry with a specific path and physical location:
AddSite("vsm", (mgr, site) =>

{

  ...

  site.Applications.First().VirtualDirectories.Add("/static", @"C:\Temp\static");

  ...

}
The last part of my IIS site creation automation was some more changes for the application pools.
Further AppPool Configuration
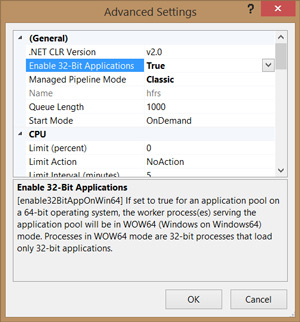
The site I maintain that still uses the .NET Framework 2.0 also has a DLL that must be run in 32-bit mode. Normally, from the IIS Manager GUI, I'd go in to the Advanced Settings for my app pool and set the option to Enable 32-bit Applications (see Figure 2).
I want this automated as well. Luckily, this is easy, as this functionality is exposed via a Boolean property. Here's my updated app pool configuration handler with the new code in the second-to-last line:
(mgr, appPool) =>

  {

    appPool.ManagedRuntimeVersion = "V2.0";

    appPool.ManagedPipelineMode = ManagedPipelineMode.Classic;

    appPool.Enable32BitAppOnWin64 = true;

  }
Another thing that needs changing is the identity under which some of the app pools and virtual directories run. You may have noticed in Figure 1 that all of these sites are under My Documents on my machine. Normally, the default identity of the ASP.NET worker process doesn't have high-enough permissions to access my directory, so I need to change the identity under which the app pool and virtual directories run.
参考:https://docs.microsoft.com/en-us/iis/manage/scripting/how-to-use-microsoftwebadministration
https://johnlnelson.com/2014/06/15/the-microsoft-web-administration-namespace/
https://visualstudiomagazine.com/articles/2014/06/01/automating-iis-7.aspx
https://www.codeproject.com/Articles/99634/Use-C-to-manage-IIS
使用 Microsoft.Web.Administration 管理iis的更多相关文章
- Microsoft.Web.Administration in IIS
http://blogs.msdn.com/b/carlosag/archive/2006/04/17/microsoftwebadministration.aspx 最好使用在IIS8中,因为为每一 ...
- IIS 7管理API——Microsoft.Web.Administration介绍
原文:http://www.cnblogs.com/dflying/archive/2006/04/17/377276.html 本文翻译整理自Carlos Aguilar Mares的blog文章: ...
- C# IIS站点管理--Microsoft.Web.Administration.dll
Microsoft中提供了管理IIS7及以上版本一个非常强大的API - Microsoft.Web.Administration.dll,利用该API可以让我们很方便的以编程的方式管理和设定IIS的 ...
- IIS7 开发与 管理 编程 之 Microsoft.Web.Administration
一.引言: 关于IIS7 Mocrosoft.Web.Administration 网上这方面详细资料相对来说比较少,大家千篇一律的(都是一篇翻译过来的文章,msdn 里面的实列没有).前段做了一个 ...
- C#操作IIS站点 Microsoft.Web.Administration.dll
利用IIS7自带类库管理IIS现在变的更强大更方便,而完全可以不需要用DirecotryEntry这个类了(网上很多.net管理iis6.0的文章都用到了DirecotryEntry这个类 ),Mic ...
- IIS7 Microsoft.Web.Administration 创建Application问题
在使用DirectoryEntry操作IIS时,可以设置很多属性.但使用Microsoft.Web.Administration中的一些类时,不知道在哪设置.例如:AccessScript,Acces ...
- Microsoft.Web.Administration操作IIS7时的权限设置
在用Microsoft.Web.Administration操作IIS7时,你可能会遇到如下权限错误: 文件名: redirection.config错误: 由于权限不足而无法读取配置文件 如下图: ...
- C#管理IIS中的站点
原文:http://www.knowsky.com/534237.html Microsoft自Windows Vista一起发布了IIS 7.0,这个已经是去年的话题了,随后,由.NET开发的Web ...
- IIS站点管理-IIS站点以管理员身份或指定用户运行
PS:概要.背景.结语都是日常“装X”,可以跳过直接看应用程序池设置 环境:Windows Server 2008.阿里云ECS.IIS7.0 概要 IIS应用程序默认情况下,是使用内置帐户运行的,权 ...
随机推荐
- 数据结构与算法—Trie树
Trie,又经常叫前缀树,字典树等等.它有很多变种,如后缀树,Radix Tree/Trie,PATRICIA tree,以及bitwise版本的crit-bit tree.当然很多名字的意义其实有交 ...
- ApplicationContext的名称解释
如果说BeanFactory是Spring的心脏,那么Application就是完整的身躯.ApplicationContext就是由BeanFactory派生出来的. 1.ApplicationCo ...
- C语言printf函数转换说明表及其修饰符表
请求printf()函数打印数据的指令要与打印数据的类型匹配. 例如, 打印整数时使用%d, 打印字符是使用%c. 这些符号被称为转换说明, 他们指定了数据转换称可显示的形式. 1. ANSI C标准 ...
- Anaconda安装、更新第三方包
conda和pip简介 conda conda是包及其依赖项和环境的管理工具. 适用语言:Python, R, Ruby, Lua, Scala, Java, JavaScript, C/C++, F ...
- python应用-给出行数,输出相应的杨辉三角
def main(): num = int(input('Number of rows: ')) yh = [[]] * num for row in range(num): yh[row] = [N ...
- Linux下用ls和du命令查看文件以及文件夹大小(转)
转自:https://www.cnblogs.com/xueqiuqiu/p/7635722.html ls的用法 ls -l |grep "^-"|wc -l或find ./co ...
- render()--组件--纯函数
render() 当 被调用时,它会检查 和 的变化并返回以下类型之一: React 元素.通常通过 JSX 创建.例如,<div /> 会被 React 渲染为 DOM 节点,<M ...
- MYSQL中group_concat( )函数中参数的排序方法
使用mysql中的group_concat( )函数连接指定字段时,可以先对该字段进行排序. PS:是因为二刷mysql的51道题的第12题遇到的:查询和" 01 "号同学学习的课 ...
- PHP7新增的主要特性
1.use的用法 <?php // PHP 7 之前版本用法 use some\namespace\ClassA; use some\namespace\ClassB; use some\nam ...
- CF 900D Unusual Sequences
题目链接 \(Description\) 给定\(x,y\),求有多少个数列满足\(gcd(a_i)=x且\sum a_i=y\).答案对\(10^9+7\)取模. \(1≤x,y≤10^9\) \( ...