ArcFace 2.0 Demo [C++]
环境: win10(10.0.16299.0)+ VS2017
sdk版本:ArcFace v2.0
OPENCV3.43版本
x64平台Debug、Release配置都已通过编译
下载地址:https://download.csdn.net/download/cngwj/10763108
配置过程
->0x01 下载sdk:
虹安sdk https://ai.arcsoft.com.cn

->0x02 工程配置:
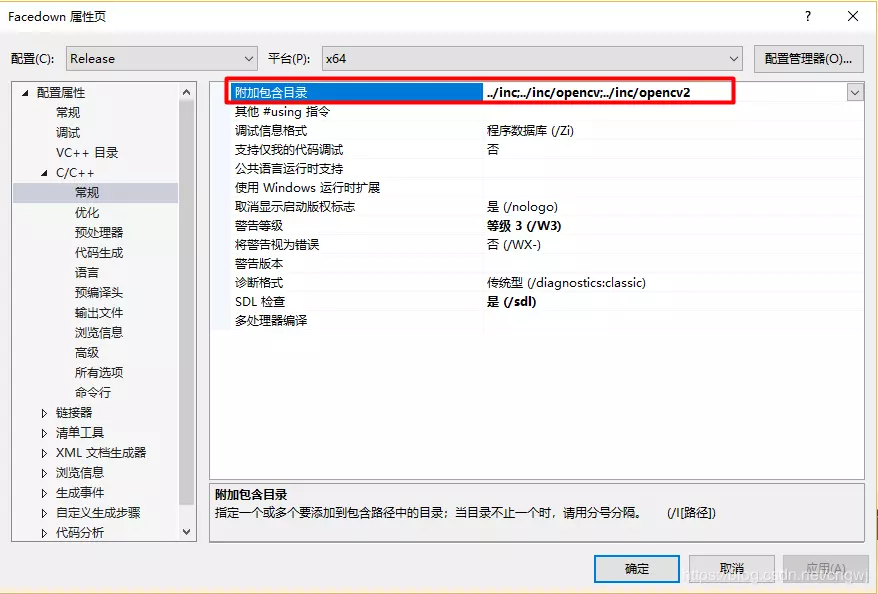
1、 添加工程的头文件目录:
a) 右键单击工程名, 选择属性---配置属性---c/c++---常规---附加包含目录
b) 添加头文件存放目录
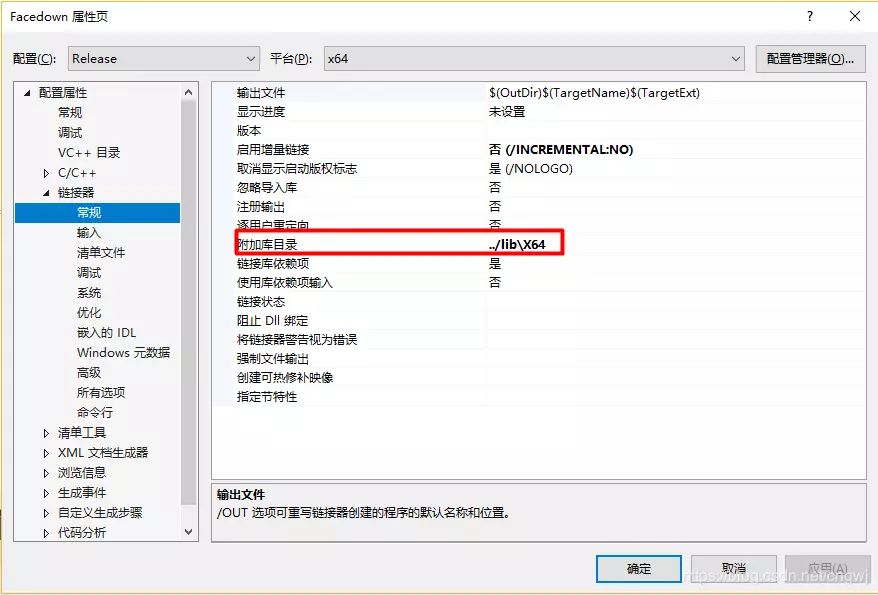
2、 添加文件引用的 lib 静态库路径:
a) 右键单击工程名,选择属性---配置属性---链接器---常规---附加库目录
b) 添加 lib 文件存放
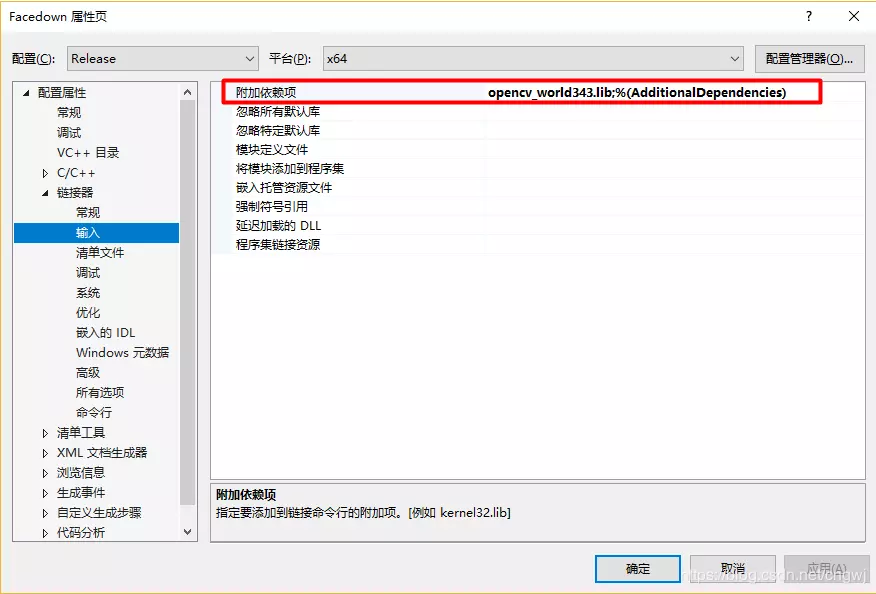
3、 添加工程引用的 lib 库:
a) 右键单击工程名,选择属性---配置属性---链接器---输入---附加依赖项
b) 添加依赖的 lib 库名称
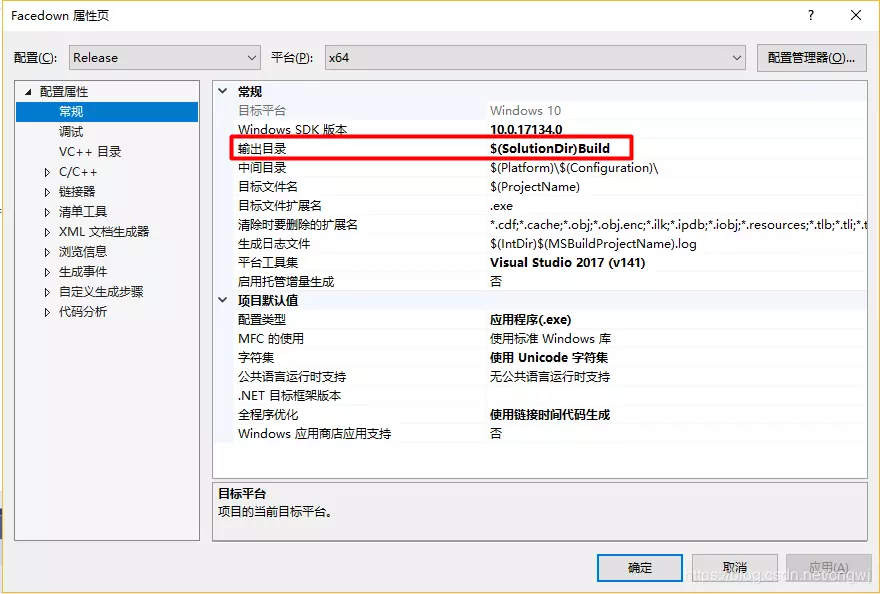
4、自定义可执行文件输出目录
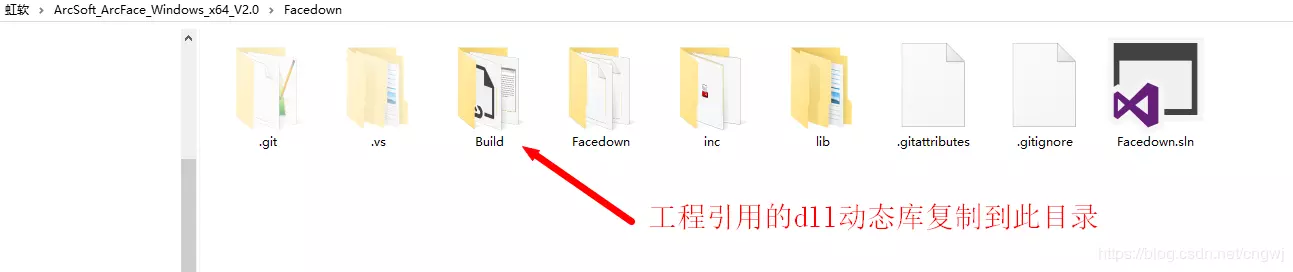
5、 添加工程引用的 dll 动态库:
a) 把引用的 dll 放到工程的可执行文件所在的目录下(复制到Build目录)
6、添加自己申请的APPID

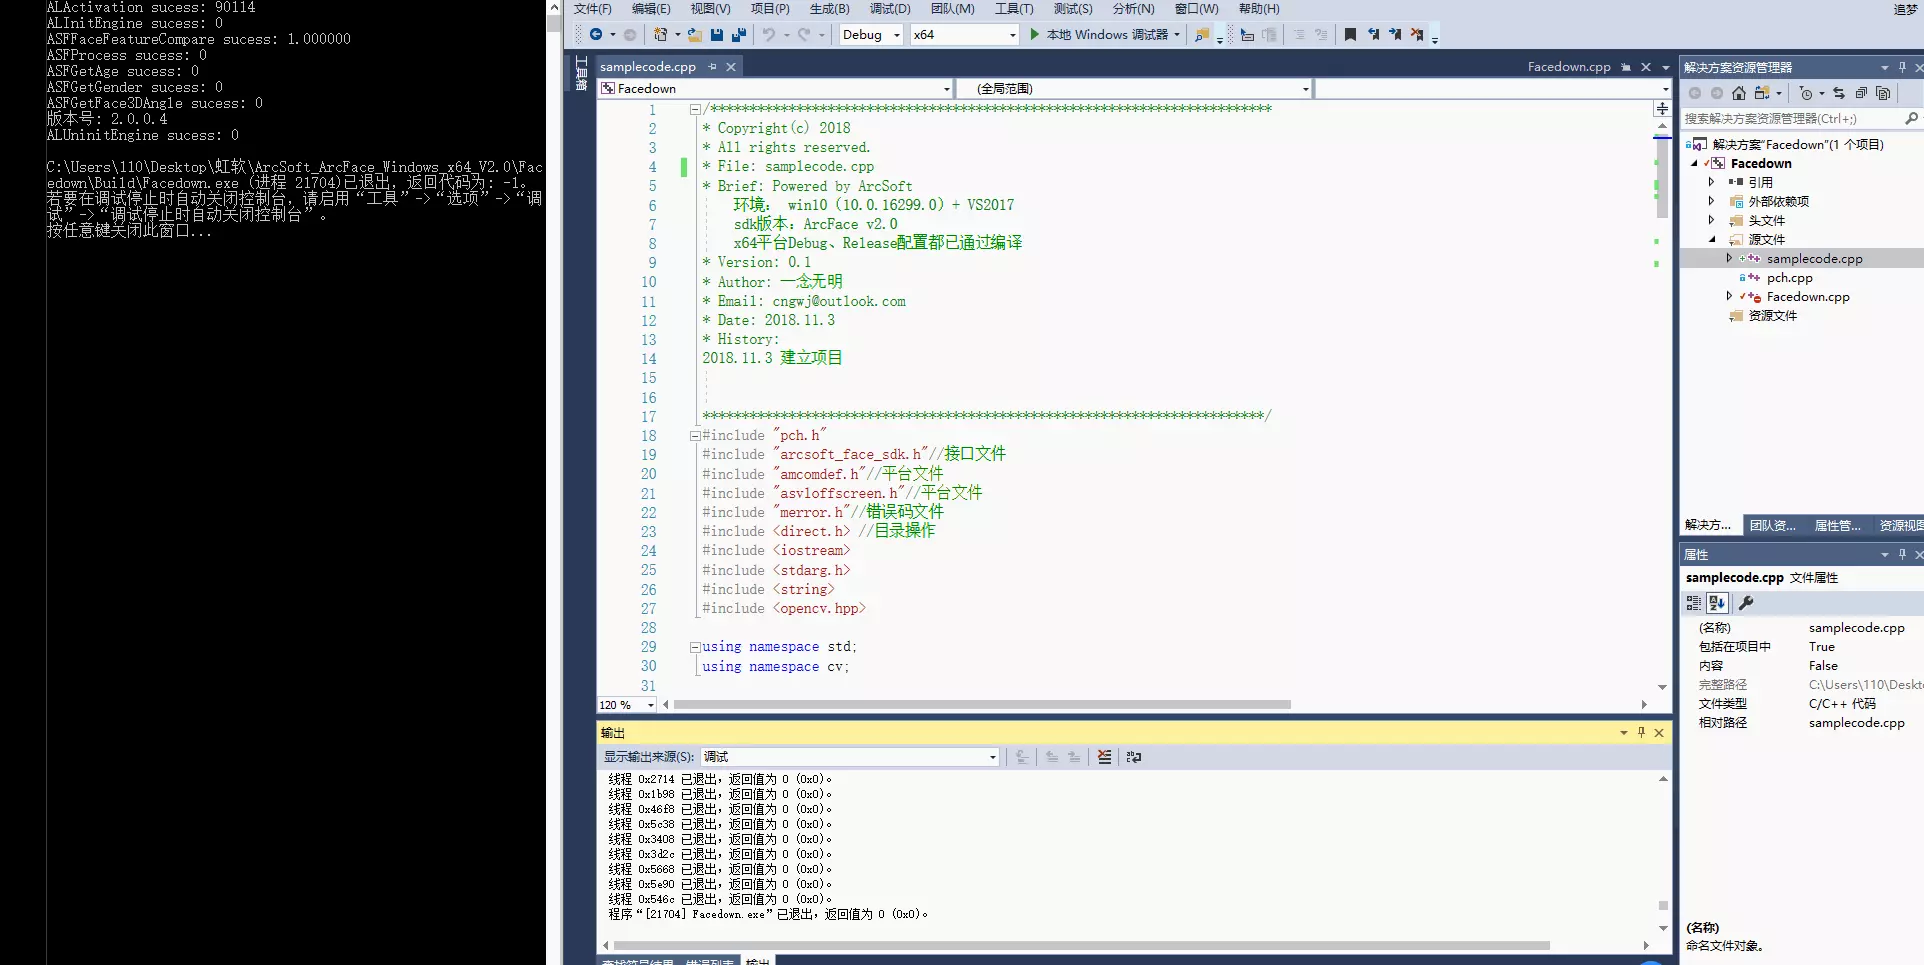
->0x03 参考代码
/************************************************************************
* Copyright(c) 2018
* All rights reserved.
* File: samplecode.cpp
* Brief: Powered by ArcSoft
环境: win10(10.0.16299.0)+ VS2017
sdk版本:ArcFace v2.0
x64平台Debug、Release配置都已通过编译
* Version: 0.1
* Author: 一念无明
* Email: cngwj@outlook.com
* Date: 2018.11.3
* History:
2018.11.3 建立项目
************************************************************************/
#include "pch.h"
#include "arcsoft_face_sdk.h"//接口文件
#include "amcomdef.h"//平台文件
#include "asvloffscreen.h"//平台文件
#include "merror.h"//错误码文件
#include <direct.h> //目录操作
#include <iostream>
#include <stdarg.h>
#include <string>
#include <opencv.hpp> using namespace std;
using namespace cv; #pragma comment(lib, "libarcsoft_face_engine.lib")
#define APPID ""
#define SDKKey ""
#define MERR_ASF_BASE_ALREADY_ACTIVATED 90114 //SDK已激活
#define SafeFree(p) { if ((p)) free(p); (p) = NULL; }
#define SafeArrayDelete(p) { if ((p)) delete [] (p); (p) = NULL; }
#define SafeDelete(p) { if ((p)) delete (p); (p) = NULL; } int main()
{
//激活SDK
MRESULT res = ASFActivation(APPID, SDKKey);
if (MOK != res && MERR_ASF_BASE_ALREADY_ACTIVATED != res)
printf("ALActivation fail: %d\n", res);
else
printf("ALActivation sucess: %d\n", res); //初始化引擎
MHandle handle = NULL;
MInt32 mask = ASF_FACE_DETECT | ASF_FACERECOGNITION | ASF_AGE | ASF_GENDER | ASF_FACE3DANGLE;
res = ASFInitEngine(ASF_DETECT_MODE_IMAGE, ASF_OP_0_ONLY, 16, 5, mask, &handle);
if (res != MOK)
printf("ALInitEngine fail: %d\n", res);
else
printf("ALInitEngine sucess: %d\n", res); // 人脸检测
IplImage* img = cvLoadImage("../Build\\1.bmp");//图片宽度需符合4的倍数
IplImage* img1 = cvLoadImage("../Build\\2.bmp"); if (img && img1)
{
ASF_MultiFaceInfo detectedFaces1 = { 0 };//多人脸信息;
ASF_SingleFaceInfo SingleDetectedFaces1 = { 0 };
ASF_FaceFeature feature1 = { 0 };
ASF_FaceFeature copyfeature1 = { 0 };
res = ASFDetectFaces(handle, img->width, img->height, ASVL_PAF_RGB24_B8G8R8, (MUInt8*)img->imageData, &detectedFaces1);
if (MOK == res)
{
SingleDetectedFaces1.faceRect.left = detectedFaces1.faceRect[0].left;
SingleDetectedFaces1.faceRect.top = detectedFaces1.faceRect[0].top;
SingleDetectedFaces1.faceRect.right = detectedFaces1.faceRect[0].right;
SingleDetectedFaces1.faceRect.bottom = detectedFaces1.faceRect[0].bottom;
SingleDetectedFaces1.faceOrient = detectedFaces1.faceOrient[0];
//单人脸特征提取
res = ASFFaceFeatureExtract(handle, img->width, img->height, ASVL_PAF_RGB24_B8G8R8, (MUInt8*)img->imageData, &SingleDetectedFaces1, &feature1);
if (res == MOK)
{
//拷贝feature
copyfeature1.featureSize = feature1.featureSize;
copyfeature1.feature = (MByte *)malloc(feature1.featureSize);
memset(copyfeature1.feature, 0, feature1.featureSize);
memcpy(copyfeature1.feature, feature1.feature, feature1.featureSize);
}
else
printf("ASFFaceFeatureExtract 1 fail: %d\n", res);
}
else
printf("ASFDetectFaces 1 fail: %d\n", res); //第二张人脸提取特征
ASF_MultiFaceInfo detectedFaces2 = { 0 };
ASF_SingleFaceInfo SingleDetectedFaces2 = { 0 };
ASF_FaceFeature feature2 = { 0 };
res = ASFDetectFaces(handle, img1->width, img1->height, ASVL_PAF_RGB24_B8G8R8, (MUInt8*)img1->imageData, &detectedFaces2);
if (MOK == res)
{
SingleDetectedFaces2.faceRect.left = detectedFaces2.faceRect[0].left;
SingleDetectedFaces2.faceRect.top = detectedFaces2.faceRect[0].top;
SingleDetectedFaces2.faceRect.right = detectedFaces2.faceRect[0].right;
SingleDetectedFaces2.faceRect.bottom = detectedFaces2.faceRect[0].bottom;
SingleDetectedFaces2.faceOrient = detectedFaces2.faceOrient[0]; res = ASFFaceFeatureExtract(handle, img1->width, img1->height, ASVL_PAF_RGB24_B8G8R8, (MUInt8*)img1->imageData, &SingleDetectedFaces2, &feature2);
if (MOK != res)
printf("ASFFaceFeatureExtract 2 fail: %d\n", res);
}
else
printf("ASFDetectFaces 2 fail: %d\n", res); // 单人脸特征比对
MFloat confidenceLevel;
res = ASFFaceFeatureCompare(handle, ©feature1, &feature2, &confidenceLevel);
if (res != MOK)
printf("ASFFaceFeatureCompare fail: %d\n", res);
else
printf("ASFFaceFeatureCompare sucess: %lf\n", confidenceLevel); // 人脸信息检测
MInt32 processMask = ASF_AGE | ASF_GENDER | ASF_FACE3DANGLE;
res = ASFProcess(handle, img1->width, img1->height, ASVL_PAF_RGB24_B8G8R8, (MUInt8*)img1->imageData, &detectedFaces1, processMask);
if (res != MOK)
printf("ASFProcess fail: %d\n", res);
else
printf("ASFProcess sucess: %d\n", res); // 获取年龄
ASF_AgeInfo ageInfo = { 0 };
res = ASFGetAge(handle, &ageInfo);
//printf("年龄: %d\n", ageInfo);
if (res != MOK)
printf("ASFGetAge fail: %d\n", res);
else
printf("ASFGetAge sucess: %d\n", res); // 获取性别
ASF_GenderInfo genderInfo = { 0 };
res = ASFGetGender(handle, &genderInfo);
if (res != MOK)
printf("ASFGetGender fail: %d\n", res);
else
printf("ASFGetGender sucess: %d\n", res); // 获取3D角度
ASF_Face3DAngle angleInfo = { 0 };
res = ASFGetFace3DAngle(handle, &angleInfo);
if (res != MOK)
printf("ASFGetFace3DAngle fail: %d\n", res);
else
printf("ASFGetFace3DAngle sucess: %d\n", res); SafeFree(copyfeature1.feature); //释放内存
} //获取版本信息
const ASF_VERSION* pVersionInfo = ASFGetVersion(handle);
printf("版本号: %s\n", pVersionInfo->Version); //反初始化
res = ASFUninitEngine(handle);
if (res != MOK)
printf("ALUninitEngine fail: %d\n", res);
else
printf("ALUninitEngine sucess: %d\n", res); getchar();
return 0;
}
ArcFace 2.0 Demo [C++]的更多相关文章
- C++ 虹软人脸识别 ArcFace 2.0 Demo
环境配置: 开发环境:Win10 + VS 2013 SDK版本:ArcFace v2.0 OpenCV版本:2.4.9 平台配置: x64.x86下Release.Debug SDK 下载地址:戳这 ...
- 虹软离线人脸识别 ArcFace 2.0 Demo [C++]
环境: win10(10.0.16299.0)+ VS2017 sdk版本:ArcFace v2.0 OPENCV3.43版本 x64平台Debug.Release配置都已通过编译 下载地址:http ...
- Android 离线人脸识别 ArcFace 2.0 Demo开发分享
环境要求 1.运行环境 armeabi-v7a 2.系统要求 Android 5.0 (API Level 21)及以上 3.开发环境 Android Studio 下载地 ...
- C# 离线人脸识别Demo 使用ArcFace 2.0开发完成
环境: win7以上 VS2013以上 sdk版本:ArcFace v2.0 x86 x64平台Debug.Release配置都已通过编译 下载地址:https://github ...
- java 虹软ArcFace 2.0,java SDK使用、人脸识别-抽取人脸特征并做比对
java人脸识别 虹软ArcFace 2.0,java SDK使用.人脸识别-抽取人脸特征并做比对 虹软产品地址:http://ai.arcsoft.com.cn/product/arcface.ht ...
- Java离线人脸识别SDK 支持arcface 2.0 最新版
虹软人脸识别SDK之Java版,支持SDK 1.1+,以及当前最新版本2.0,滴滴,抓紧上车! JDK SDK Win release license status 前言 由于业务需求,最近跟人脸识别 ...
- 离线人脸识别 ArcFaceSharp -- ArcFace 2.0 SDK C#封装库分享
ArcFaceSharp ArcFaceSharp 是ArcSoft 虹软 ArcFace 2.0 SDK 的一个 C# 封装库,为方便进行 C# 开发而封装.欢迎 Start & Fork. ...
- java 虹软ArcFace 2.0,java SDK使用-进行人脸检测
虹软产品地址:http://ai.arcsoft.com.cn/product/arcface.html虹软ArcFace功能简介 人脸检测人脸跟踪人脸属性检测(性别.年龄)人脸三维角度检测人脸对比 ...
- [小试牛刀]部署在IDEA的JFinal 3.0 demo
进入JFinal 极速开发市区:http://www.jfinal.com/ 如上图,点击右边的最新下载:JFinal 3.0 demo - 此过程跳过注册\登录过程, 进入到如下,下载 下载并解压到 ...
随机推荐
- Vim常用命令:移动 跳转 到 文档开头或末尾
gg:命令将光标移动到文档开头 G:命令将光标移动到文档末尾 vi编辑器中在命令行模式下输入G可以直接跳转到页面的底部 在命令行模式下输入1G可以跳转到页面的头部位置 更多在vi中移动编辑位置的命令说 ...
- yield表达式形式
首先了解 1.iterator iterator叫做迭代器,用来遍历可以序列化的数据,比如一个list,set 等,当然如果对象想要能够使用迭代器来遍历,只要在该对象的类中添加__iter__()方法 ...
- mysql/oracle jdbc大数据量插入优化
10.10.6 大数据量插入优化 在很多涉及支付和金融相关的系统中,夜间会进行批处理,在批处理的一开始或最后一般需要将数据回库,因为应用和数据库通常部署在不同的服务器,而且应用所在的服务器一般也不会 ...
- oracle 12c AUTO_SAMPLE_SIZE动态采用工作机制
The ESTIMATE_PERCENT parameter in DBMS_STATS.GATHER_*_STATS procedures controls the percentage of ro ...
- 零基础Python爬虫实现(爬取最新电影排行)
提示:本学习来自Ehco前辈的文章, 经过实现得出的笔记. 目标网站 http://dianying.2345.com/top/ 网站结构 要爬的部分,在ul标签下(包括li标签), 大致来说迭代li ...
- DL_WITH_PY系统学习(第2章)
本节提示: 1.第一个dl例子: 2.tensor和tensor操作: 3.DL如何通过逆向传播和梯度下降达到学习目的. 2.1 输入数据集的格式 ,*,))) network.add(layer ...
- python --- 07 补充( join 删除和添加 fromkeys ) 深浅拷贝
一.基本数据类型补充 1.join() "*".join("马虎疼") # 马*虎*疼 把传递进去的参数进行迭代. 获取到的每个元素和前面的*进行拼接. 得到 ...
- ol3对地图上某些特定的经纬度进行标注
最终效果需要类似于这种 1.首先我们需要一个最基本的地图,这一步骤可以浏览该分类下的上一篇随笔. 2.ol3支持的文件格式有.geojson,我们需要将坐标制作成符合这种格式的样子才能被ol3识别并显 ...
- 流程控制if,while,for
if语句 什么是if语句 判断一个条件如果成立则做...不成立则做....为何要有if语句 让计算机能够像人一样具有判断的能力 如何用if语句 语法1: if 条件1: code1 code2 cod ...
- R语言之正则表达式
常见与正则表达式相关的函数: grep(pattern, x, ignore.case = FALSE, perl = FALSE, value = FALSE, fixed = FALSE, use ...