RabbitMQ 05 直连模式-Spring Boot操作
Spring Boot集成RabbitMQ是现在主流的操作RabbitMQ的方式。
官方文档:https://docs.spring.io/spring-amqp/docs/current/reference/html/
引入依赖。
<dependency>

    <groupId>org.springframework.boot</groupId>

    <artifactId>spring-boot-starter-amqp</artifactId>

</dependency>
添加配置。
spring:

  rabbitmq:

    addresses: 127.0.0.1

    username: admin

    password: admin

    virtual-host: /test
配置类。
import org.springframework.amqp.core.Binding;

import org.springframework.amqp.core.BindingBuilder;

import org.springframework.amqp.core.Exchange;

import org.springframework.amqp.core.ExchangeBuilder;

import org.springframework.amqp.core.Queue;

import org.springframework.amqp.core.QueueBuilder;

import org.springframework.beans.factory.annotation.Qualifier;

import org.springframework.context.annotation.Bean;

import org.springframework.context.annotation.Configuration;

/**

 * RabbitMQ配置类

 */

@Configuration

public class RabbitMqConfig {

    /**

     * 定义交换机,可以很多个

     * @return 交换机对象

     */

    @Bean("directExchange")

    public Exchange exchange(){

        return ExchangeBuilder.directExchange("amq.direct").build();

    }

    /**

     * 定义消息队列

     * @return 消息队列对象

     */

    @Bean("testQueue")

    public Queue queue(){

        return QueueBuilder

                // 非持久化类型

                .nonDurable("test_springboot")

                .build();

    }

    /**

     * 定义绑定关系

     * @return 绑定关系

     */

    @Bean

    public Binding binding(@Qualifier("directExchange") Exchange exchange,

                           @Qualifier("testQueue") Queue queue){

        // 将定义的交换机和队列进行绑定

        return BindingBuilder

                // 绑定队列

                .bind(queue)

                // 到交换机

                .to(exchange)

                // 使用自定义的routingKey

                .with("test_springboot_key")

                // 不设置参数

                .noargs();

    }

}
普通消费
实现生产者。
import org.junit.jupiter.api.Test;
import org.springframework.amqp.rabbit.core.RabbitTemplate;
import org.springframework.beans.factory.annotation.Autowired;
import org.springframework.boot.test.context.SpringBootTest; @SpringBootTest
class RabbitMqSpringBootTests { /**
* RabbitTemplate封装了大量的RabbitMQ操作,已经由Starter提供,因此直接注入使用即可
*/
@Autowired
private RabbitTemplate rabbitTemplate; /**
* 生产者
*/
@Test
void producer() { /*
发送消息
参数 1:指定交换机。
参数 2:指定路由标识。
参数 3:消息内容。
*/
rabbitTemplate.convertAndSend("amq.direct", "test_springboot_key", "Hello World!");
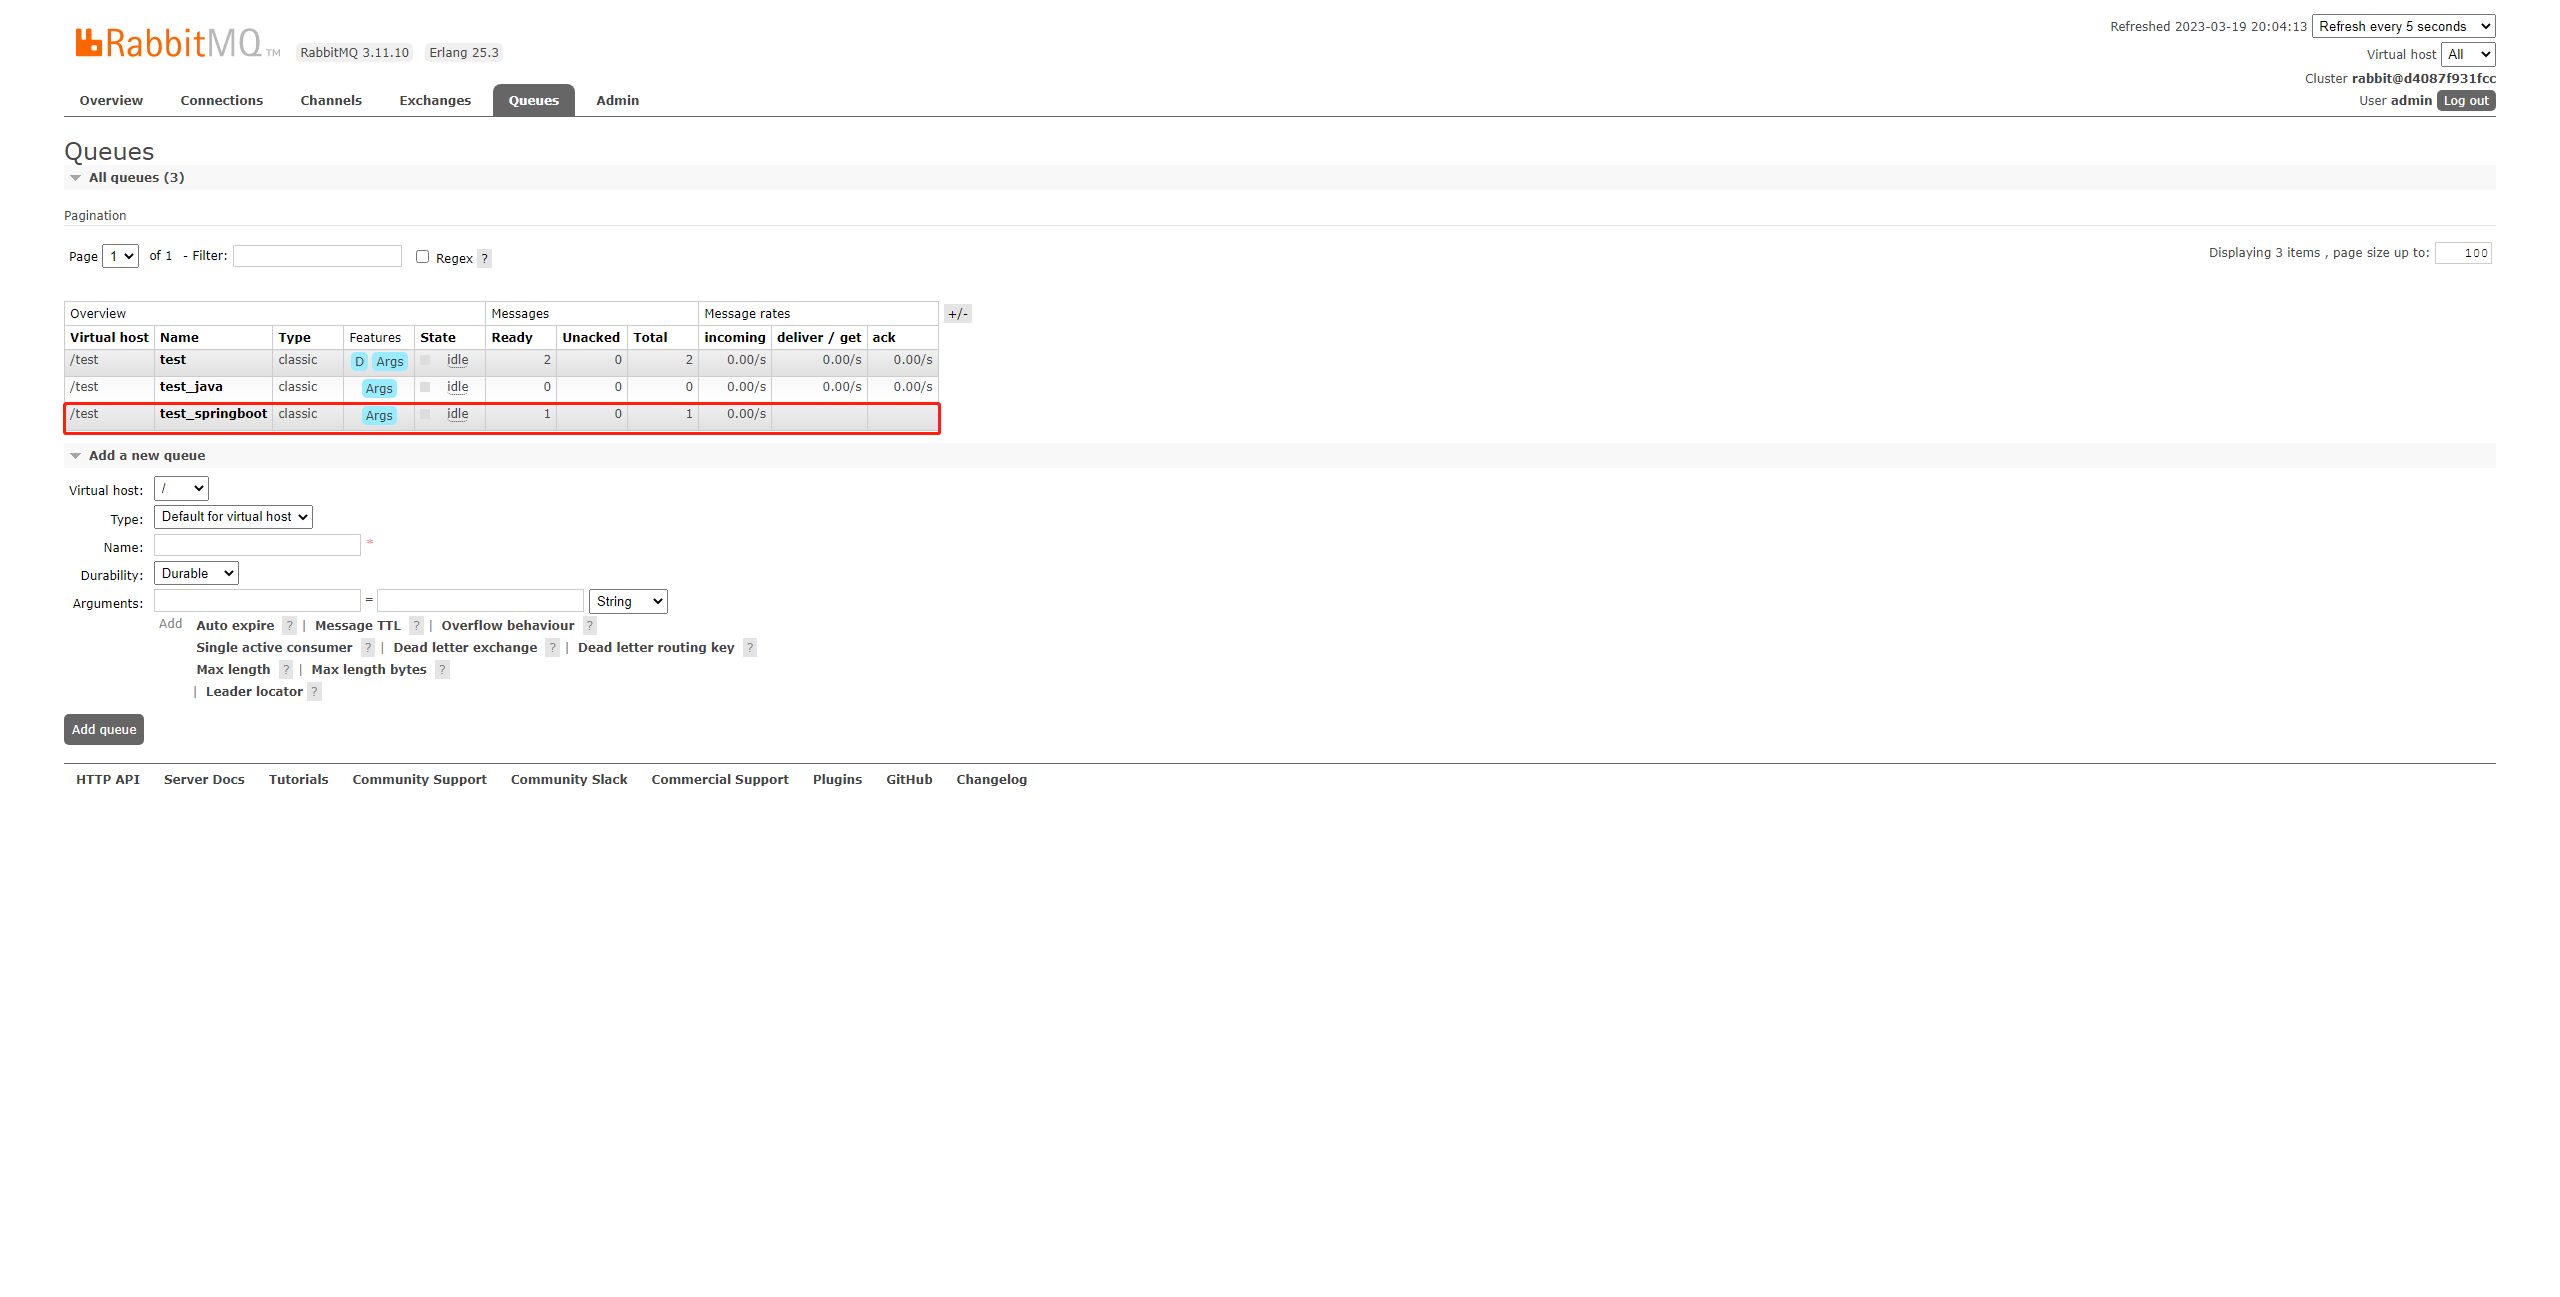
} }运行代码后,查看可视化界面,可以看到创建了一个新的队列:
绑定关系也已经建立:

实现消费者。
消费者实际上就是一直等待消息然后进行处理的角色,这里只需要创建一个监听器就行了,它会一直等待消息到来然后再进行处理:
import org.springframework.amqp.core.Message;

import org.springframework.amqp.rabbit.annotation.RabbitListener;

import org.springframework.stereotype.Component;

/**

 * 直连队列监听器

 * @author CodeSail

 */

@Component

public class DirectListener {

    /**

     * 定义此方法为队列test_springboot的监听器,一旦监听到新的消息,就会接受并处理

     * @param message 消息内容

     */

    @RabbitListener(queues = "test_springboot")

    public void customer(Message message){

        System.out.println(new String(message.getBody()));

    }

}
启动服务。

可以看到,成功消费了消息。
消费并反馈
如果需要确保消息能够被消费者接受并处理,然后得到消费者的反馈,也是可以的。
定义生产者。
import org.junit.jupiter.api.Test;

import org.springframework.amqp.rabbit.core.RabbitTemplate;

import org.springframework.beans.factory.annotation.Autowired;

import org.springframework.boot.test.context.SpringBootTest;

@SpringBootTest

class RabbitMqSpringBootTests {

    /**

     * RabbitTemplate封装了大量的RabbitMQ操作,已经由Starter提供,因此直接注入使用即可

     */

    @Autowired

    private RabbitTemplate rabbitTemplate;

    /**

     * 生产者

     */

    @Test

    void producer() {

        // 会等待消费者消费然后返回响应结果

        Object res = rabbitTemplate.convertSendAndReceive("amq.direct", "test_springboot_key", "Hello World!");

        System.out.println("收到消费者响应:" + res);

    }

}
定义生产者。
import org.springframework.amqp.rabbit.annotation.RabbitListener;

import org.springframework.stereotype.Component;

/**

 * 直连队列监听器

 * @author CodeSail

 */

@Component

public class DirectListener {

    /**

     * 定义此方法为队列test_springboot的监听器,一旦监听到新的消息,就会接受并处理

     * @param message 消息内容

     */

    @RabbitListener(queues = "test_springboot")

    public String customer(String message){

        System.out.println("1号消息队列监听器:" + message);

        return "收到!";

    }

}
启动生产者发送消息。

可以看到,消费完成后接收到了反馈消息。
Json消息
引入依赖。
<dependency>

    <groupId>com.fasterxml.jackson.core</groupId>

    <artifactId>jackson-databind</artifactId>

    <version>2.14.2</version>

</dependency>
定义对象。
import lombok.Data;

/**

 * 用户

 */

@Data

public class User {

    /**

     * 姓名

     */

    private String name;

    /**

     * 年龄

     */

    private Integer age;

}
定义Bean。
import org.springframework.amqp.core.Binding;

import org.springframework.amqp.core.BindingBuilder;

import org.springframework.amqp.core.Exchange;

import org.springframework.amqp.core.ExchangeBuilder;

import org.springframework.amqp.core.Queue;

import org.springframework.amqp.core.QueueBuilder;

import org.springframework.amqp.support.converter.Jackson2JsonMessageConverter;

import org.springframework.beans.factory.annotation.Qualifier;

import org.springframework.context.annotation.Bean;

import org.springframework.context.annotation.Configuration;

/**

 * RabbitMQ配置类

 */

@Configuration

public class RabbitMqConfig {

    ...

    /**

     * 构建Json转换器

     * @return Json转换器

     */

    @Bean

    public Jackson2JsonMessageConverter jackson2JsonMessageConverter(){

        return new Jackson2JsonMessageConverter();

    }

}
定义消费者。
import cn.codesail.rabbitmq.entity.User;

import org.springframework.amqp.rabbit.annotation.RabbitListener;

import org.springframework.stereotype.Component;

/**

 * 直连队列监听器

 */

@Component

public class DirectListener {

    /**

     * 指定messageConverter为创建的Bean名称

     * @param user 用户

     */

    @RabbitListener(queues = "test_springboot", messageConverter = "jackson2JsonMessageConverter")

    public void receiver(User user) {

        System.out.println(user);

    }

}
定义生产者。
import cn.codesail.rabbitmq.entity.User;

import org.junit.jupiter.api.Test;

import org.springframework.amqp.rabbit.core.RabbitTemplate;

import org.springframework.beans.factory.annotation.Autowired;

import org.springframework.boot.test.context.SpringBootTest;

@SpringBootTest

class RabbitMqSpringBootTests {

    /**

     * RabbitTemplate封装了大量的RabbitMQ操作,已经由Starter提供,因此直接注入使用即可

     */

    @Autowired

    private RabbitTemplate rabbitTemplate;

    /**

     * 生产者

     */

    @Test

    void producer() {

        // 发送Json消息

        User user = new User();

        user.setName("张三");

        user.setAge(18);

        rabbitTemplate.convertAndSend("amq.direct", "test_springboot_key", user);

    }

}
启动生产者发送消息。

可以看到,对象转成了Json,消费者接收到Json转为的对象。
Spring Boot操作RabbitMQ是十分方便的,也是现在的主流,后续都用这种方式演示。
- 环境
- JDK 17.0.6
- Maven 3.6.3
- SpringBoot 3.0.4
- spring-boot-starter-amqp 3.0.4
- jackson-databind 2.14.2
RabbitMQ 05 直连模式-Spring Boot操作的更多相关文章
- 使用Spring Boot操作Hive JDBC时,启动时报出错误:NoSuchMethodError: org.eclipse.jetty.servlet.ServletMapping.setDef
使用Spring Boot操作Hive JDBC时,启动时报出错误:NoSuchMethodError: org.eclipse.jetty.servlet.ServletMapping.setDef ...
- MongoDB最简单的入门教程之四:使用Spring Boot操作MongoDB
Spring Boot 是一个轻量级框架,可以完成基于 Spring 的应用程序的大部分配置工作.Spring Boot的目的是提供一组工具,以便快速构建容易配置的Spring应用程序,省去大量传统S ...
- Spring Boot 操作 Excel
Excel 在日常操作中经常使用到,Spring Boot 中使用 POI 操作 Excel 本项目源码 github 下载 1 新建 Spring Boot Maven 示例工程项目 注意:本示例是 ...
- Java框架spring Boot学习笔记(五):Spring Boot操作MySQL数据库增、删、改、查
在pom.xml添加一下代码,添加操作MySQL的依赖jar包. <dependency> <groupId>org.springframework.boot</grou ...
- Java框架spring Boot学习笔记(四):Spring Boot操作MySQL数据库
在pom.xml添加一下代码,添加操作MySQL的依赖jar包. <dependency> <groupId>org.springframework.boot</grou ...
- spring boot 操作MySQL pom添加的配置
1 在项目中的pom.xml配置文件添加依赖 <!--MySQL依赖 --> <dependency> <groupId>mysql</groupId> ...
- 【转】redis 消息队列发布订阅模式spring boot实现
最近做项目的时候写到一个事件推送的场景.之前的实现方式是起job一直查询数据库,看看有没有最新的消息.这种方式非常的不优雅,反正我是不能忍,由于羡慕本身就依赖redis,刚好redis 也有消息队列的 ...
- spring boot实战(第十二篇)整合RabbitMQ
前言 最近几篇文章将围绕消息中间件RabbitMQ展开,对于RabbitMQ基本概念这里不阐述,主要讲解RabbitMQ的基本用法.Java客户端API介绍.spring Boot与RabbitMQ整 ...
- Spring Boot (26) RabbitMQ延迟队列
延迟消息就是指当消息被发送以后,并不想让消费者立即拿到消息,而是等待指定时间后,消费者才拿到这个消息进行消费. 延迟队列 订单业务: 在电商/点餐中,都有下单后30分钟内没有付款,就自动取消订单. 短 ...
- Spring Boot (25) RabbitMQ消息队列
MQ全程(Message Queue)又名消息队列,是一种异步通讯的中间件.可以理解为邮局,发送者将消息投递到邮局,然后邮局帮我们发送给具体的接收者,具体发送过程和时间与我们无关,常见的MQ又kafk ...
随机推荐
- 【Azure 应用服务】如何从App Service for Linux 的环境中下载Container中非Home目录下的文件呢?
问题描述 在App Service for Linux的环境中,我们能通过SSH进入到Container的环境中,并且可以通过在kudu站点的URL后面添加 /newui 打开一个适用于Linux环境 ...
- 【Azure API 管理】APIM的容量指标(Capacity)数据异常高的情况记录
问题描述 APIM从标准版降级到基础版,在没有用户使用的情况,Capacity的指标平均显示在80%以上. 这是什么异常情况呢? 问题分析 APIM的容量指标(Capacity)是 API 管理实例中 ...
- centos7通过配置hosts.allow和hosts.deny限制登陆
etc/hosts.allow和/etc/hosts.deny两个文件是控制远程访问设置的,通过他可以允许或者拒绝某个ip或者ip段的客户访问linux的某项服务. 我们通常只对管理员开放SSH登录, ...
- kafka的数据同步原理ISR、ACK、LEO、HW
1.数据可靠性保证,数据同步 为保证 producer 发送的数据,能可靠的发送到指定的 topic,topic 的每个 partition 收到 producer 发送的数据后,都需要向 produ ...
- MySQL联接表总结笔记
SQL最强的的工呢过之一就是能够在护具检索查询的执行中联结表,联结表利用SQL的select能执行的最重要的操作,很好的理解联结及其语法学习SQL的一个重要的组成部分. 在能够有效的使用联结前,必须了 ...
- The History of the English language 英语语音的起源 - 英语的历史 - 古英语 印欧语 希腊语 拉丁语
印欧语 希腊语 拉丁语 日耳曼语 都是什么年代的语言 https://time.graphics/line/776755 印欧语是指印欧语系,它最初被认为在公元前2500年左右分散流传于欧洲.亚洲和印 ...
- 学习笔记-涛讲F#(中级)
目录 适配器模式 责任链模式 命令模式 策略模式 工厂模式 单例模式 其它内容 这一系列的视频主要讲了F#设计模式的实现,没有太多其它内容,笔记内容主要是转载Snippets tagged desig ...
- shell脚本中常用的自定义函数
在Shell脚本中,你可以定义各种函数来执行不同的任务.以下是20个常用的自定义函数示例,涵盖了从文件操作.文本处理到系统监控等多个方面: 检查文件是否存在 file_exists() { [ -f ...
- Android 获取设备的CPU型号和设备型号
原文: Android 获取设备的CPU型号和设备型号-Stars-One的杂货小窝 之前整的项目的总结信息,可能不太全,凑合着用吧,代码在最下面一节 CPU型号数据 华为: ro.mediatek. ...
- KTL 一个支持C++14编辑公式的K线技术工具平台 - 第九版,数据分析工具。支持通达信日线数据。增强即时插件编程体现。
K,K线,Candle蜡烛图. T,技术分析,工具平台 L,公式Language语言使用c++14,Lite小巧简易. 项目仓库:https://github.com/bbqz007/KTL 国内仓库 ...