RabbitMQ 05 直连模式-Spring Boot操作
Spring Boot集成RabbitMQ是现在主流的操作RabbitMQ的方式。
官方文档:https://docs.spring.io/spring-amqp/docs/current/reference/html/
引入依赖。
<dependency>

    <groupId>org.springframework.boot</groupId>

    <artifactId>spring-boot-starter-amqp</artifactId>

</dependency>
添加配置。
spring:

  rabbitmq:

    addresses: 127.0.0.1

    username: admin

    password: admin

    virtual-host: /test
配置类。
import org.springframework.amqp.core.Binding;

import org.springframework.amqp.core.BindingBuilder;

import org.springframework.amqp.core.Exchange;

import org.springframework.amqp.core.ExchangeBuilder;

import org.springframework.amqp.core.Queue;

import org.springframework.amqp.core.QueueBuilder;

import org.springframework.beans.factory.annotation.Qualifier;

import org.springframework.context.annotation.Bean;

import org.springframework.context.annotation.Configuration;

/**

 * RabbitMQ配置类

 */

@Configuration

public class RabbitMqConfig {

    /**

     * 定义交换机,可以很多个

     * @return 交换机对象

     */

    @Bean("directExchange")

    public Exchange exchange(){

        return ExchangeBuilder.directExchange("amq.direct").build();

    }

    /**

     * 定义消息队列

     * @return 消息队列对象

     */

    @Bean("testQueue")

    public Queue queue(){

        return QueueBuilder

                // 非持久化类型

                .nonDurable("test_springboot")

                .build();

    }

    /**

     * 定义绑定关系

     * @return 绑定关系

     */

    @Bean

    public Binding binding(@Qualifier("directExchange") Exchange exchange,

                           @Qualifier("testQueue") Queue queue){

        // 将定义的交换机和队列进行绑定

        return BindingBuilder

                // 绑定队列

                .bind(queue)

                // 到交换机

                .to(exchange)

                // 使用自定义的routingKey

                .with("test_springboot_key")

                // 不设置参数

                .noargs();

    }

}
普通消费
实现生产者。
import org.junit.jupiter.api.Test;
import org.springframework.amqp.rabbit.core.RabbitTemplate;
import org.springframework.beans.factory.annotation.Autowired;
import org.springframework.boot.test.context.SpringBootTest; @SpringBootTest
class RabbitMqSpringBootTests { /**
* RabbitTemplate封装了大量的RabbitMQ操作,已经由Starter提供,因此直接注入使用即可
*/
@Autowired
private RabbitTemplate rabbitTemplate; /**
* 生产者
*/
@Test
void producer() { /*
发送消息
参数 1:指定交换机。
参数 2:指定路由标识。
参数 3:消息内容。
*/
rabbitTemplate.convertAndSend("amq.direct", "test_springboot_key", "Hello World!");
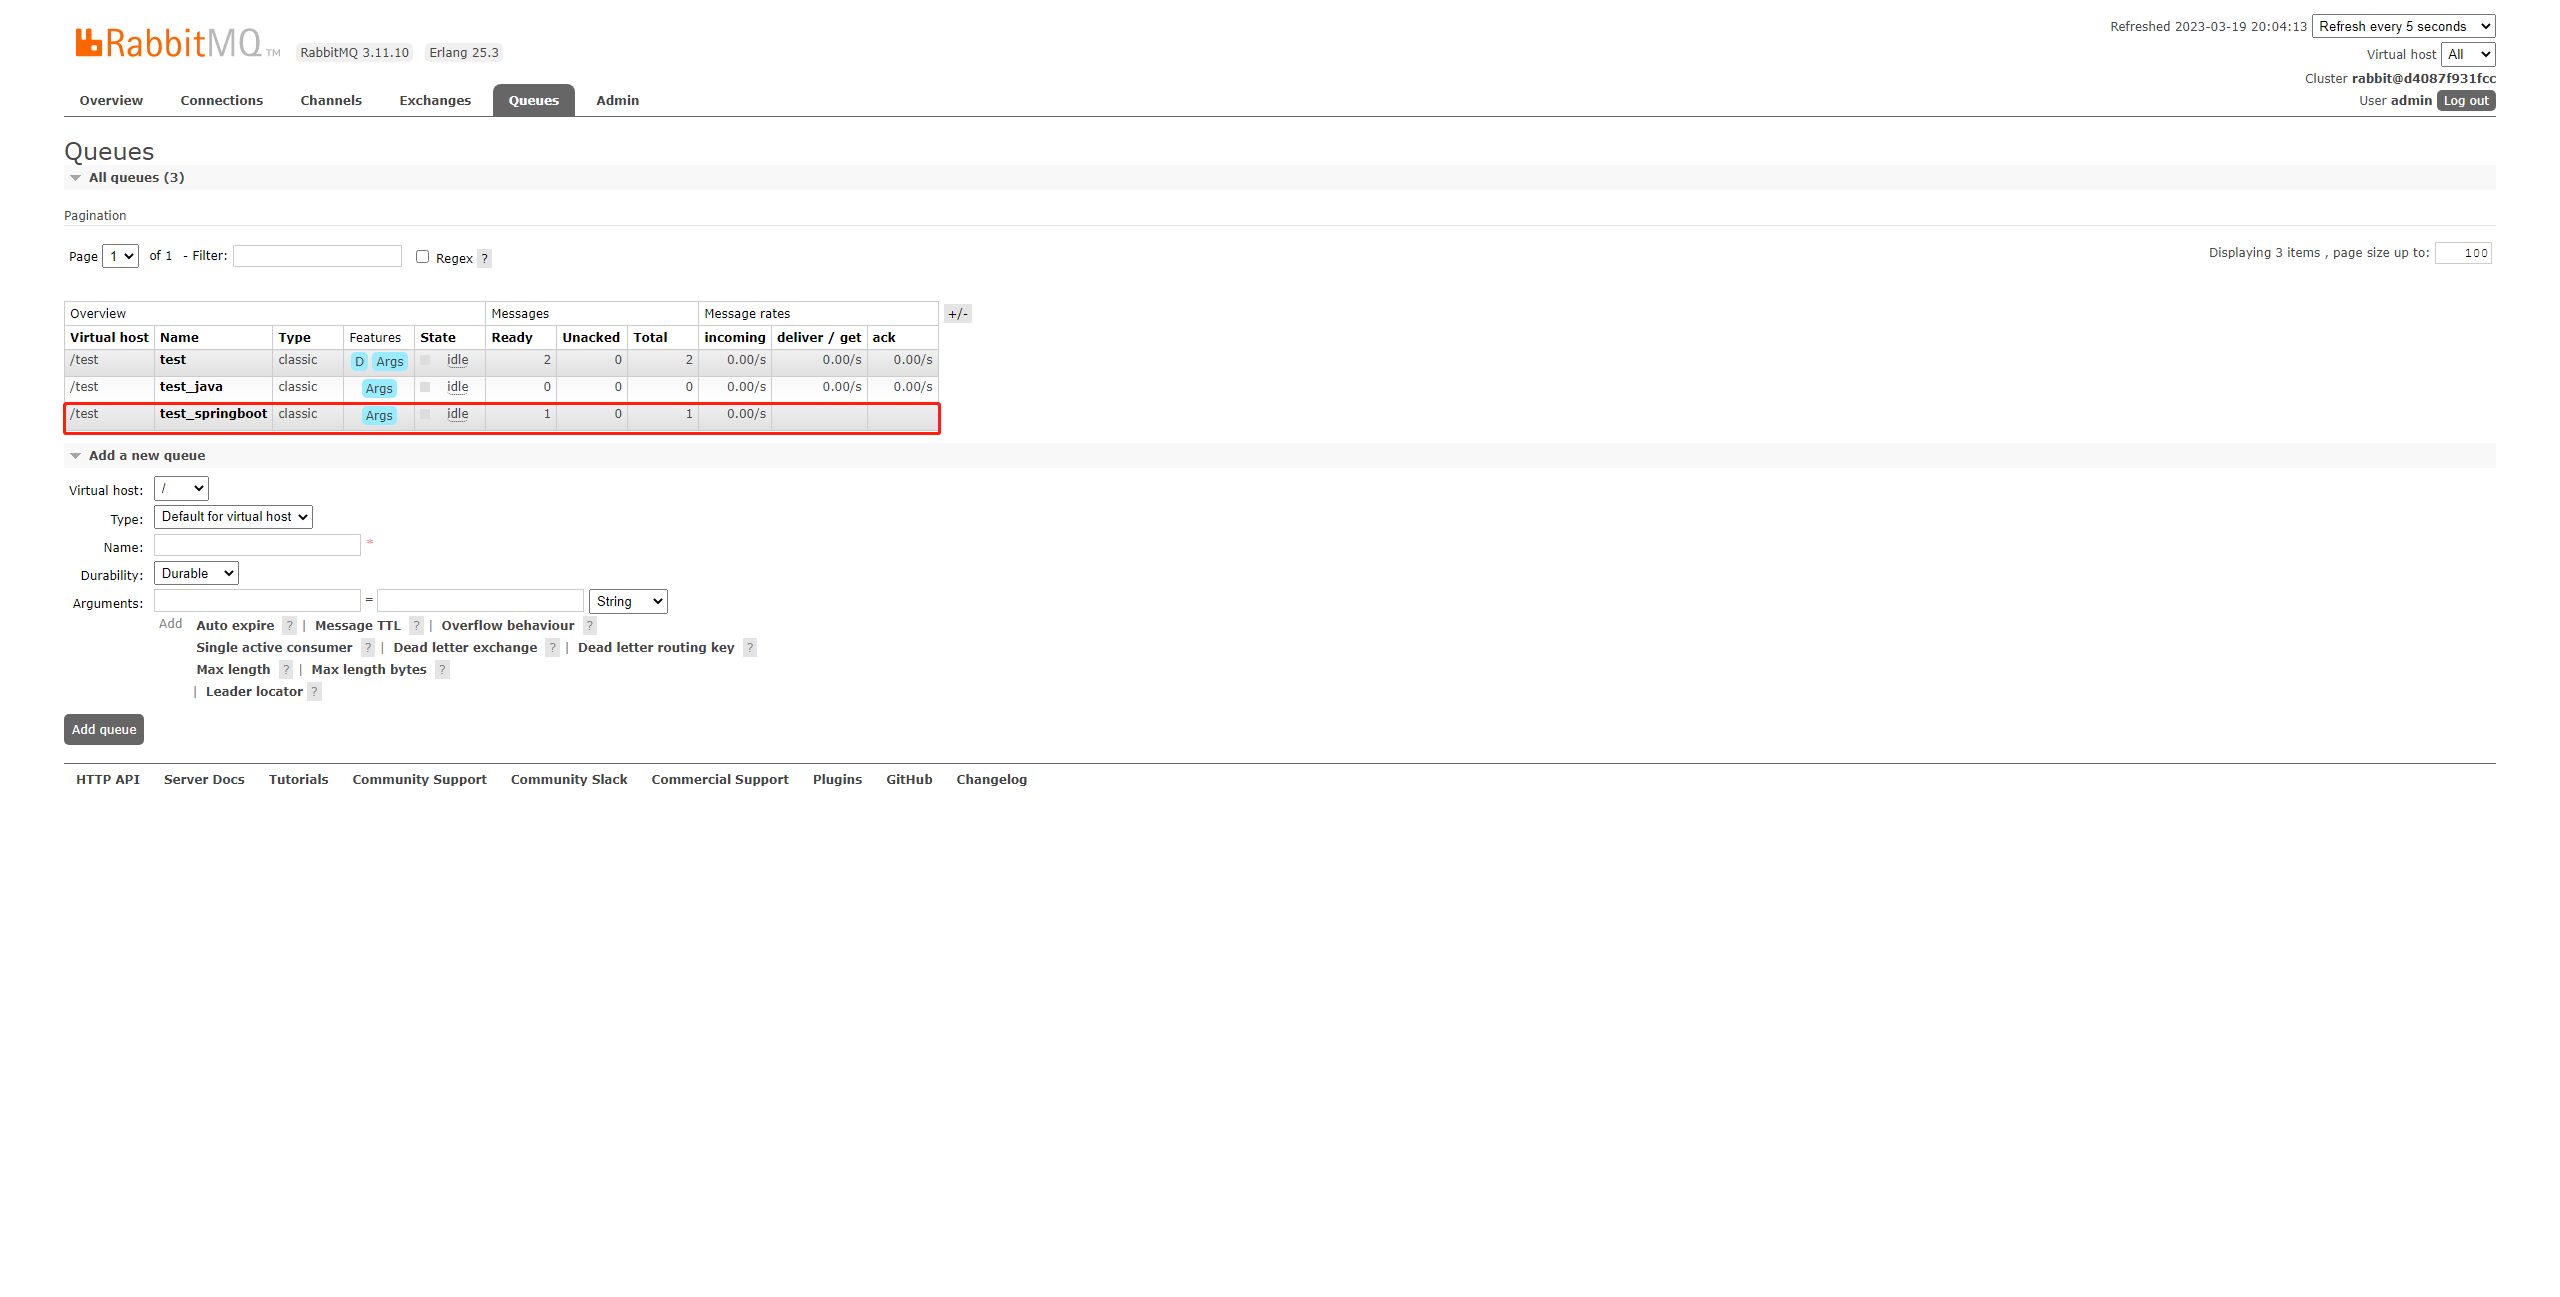
} }运行代码后,查看可视化界面,可以看到创建了一个新的队列:
绑定关系也已经建立:

实现消费者。
消费者实际上就是一直等待消息然后进行处理的角色,这里只需要创建一个监听器就行了,它会一直等待消息到来然后再进行处理:
import org.springframework.amqp.core.Message;

import org.springframework.amqp.rabbit.annotation.RabbitListener;

import org.springframework.stereotype.Component;

/**

 * 直连队列监听器

 * @author CodeSail

 */

@Component

public class DirectListener {

    /**

     * 定义此方法为队列test_springboot的监听器,一旦监听到新的消息,就会接受并处理

     * @param message 消息内容

     */

    @RabbitListener(queues = "test_springboot")

    public void customer(Message message){

        System.out.println(new String(message.getBody()));

    }

}
启动服务。

可以看到,成功消费了消息。
消费并反馈
如果需要确保消息能够被消费者接受并处理,然后得到消费者的反馈,也是可以的。
定义生产者。
import org.junit.jupiter.api.Test;

import org.springframework.amqp.rabbit.core.RabbitTemplate;

import org.springframework.beans.factory.annotation.Autowired;

import org.springframework.boot.test.context.SpringBootTest;

@SpringBootTest

class RabbitMqSpringBootTests {

    /**

     * RabbitTemplate封装了大量的RabbitMQ操作,已经由Starter提供,因此直接注入使用即可

     */

    @Autowired

    private RabbitTemplate rabbitTemplate;

    /**

     * 生产者

     */

    @Test

    void producer() {

        // 会等待消费者消费然后返回响应结果

        Object res = rabbitTemplate.convertSendAndReceive("amq.direct", "test_springboot_key", "Hello World!");

        System.out.println("收到消费者响应:" + res);

    }

}
定义生产者。
import org.springframework.amqp.rabbit.annotation.RabbitListener;

import org.springframework.stereotype.Component;

/**

 * 直连队列监听器

 * @author CodeSail

 */

@Component

public class DirectListener {

    /**

     * 定义此方法为队列test_springboot的监听器,一旦监听到新的消息,就会接受并处理

     * @param message 消息内容

     */

    @RabbitListener(queues = "test_springboot")

    public String customer(String message){

        System.out.println("1号消息队列监听器:" + message);

        return "收到!";

    }

}
启动生产者发送消息。

可以看到,消费完成后接收到了反馈消息。
Json消息
引入依赖。
<dependency>

    <groupId>com.fasterxml.jackson.core</groupId>

    <artifactId>jackson-databind</artifactId>

    <version>2.14.2</version>

</dependency>
定义对象。
import lombok.Data;

/**

 * 用户

 */

@Data

public class User {

    /**

     * 姓名

     */

    private String name;

    /**

     * 年龄

     */

    private Integer age;

}
定义Bean。
import org.springframework.amqp.core.Binding;

import org.springframework.amqp.core.BindingBuilder;

import org.springframework.amqp.core.Exchange;

import org.springframework.amqp.core.ExchangeBuilder;

import org.springframework.amqp.core.Queue;

import org.springframework.amqp.core.QueueBuilder;

import org.springframework.amqp.support.converter.Jackson2JsonMessageConverter;

import org.springframework.beans.factory.annotation.Qualifier;

import org.springframework.context.annotation.Bean;

import org.springframework.context.annotation.Configuration;

/**

 * RabbitMQ配置类

 */

@Configuration

public class RabbitMqConfig {

    ...

    /**

     * 构建Json转换器

     * @return Json转换器

     */

    @Bean

    public Jackson2JsonMessageConverter jackson2JsonMessageConverter(){

        return new Jackson2JsonMessageConverter();

    }

}
定义消费者。
import cn.codesail.rabbitmq.entity.User;

import org.springframework.amqp.rabbit.annotation.RabbitListener;

import org.springframework.stereotype.Component;

/**

 * 直连队列监听器

 */

@Component

public class DirectListener {

    /**

     * 指定messageConverter为创建的Bean名称

     * @param user 用户

     */

    @RabbitListener(queues = "test_springboot", messageConverter = "jackson2JsonMessageConverter")

    public void receiver(User user) {

        System.out.println(user);

    }

}
定义生产者。
import cn.codesail.rabbitmq.entity.User;

import org.junit.jupiter.api.Test;

import org.springframework.amqp.rabbit.core.RabbitTemplate;

import org.springframework.beans.factory.annotation.Autowired;

import org.springframework.boot.test.context.SpringBootTest;

@SpringBootTest

class RabbitMqSpringBootTests {

    /**

     * RabbitTemplate封装了大量的RabbitMQ操作,已经由Starter提供,因此直接注入使用即可

     */

    @Autowired

    private RabbitTemplate rabbitTemplate;

    /**

     * 生产者

     */

    @Test

    void producer() {

        // 发送Json消息

        User user = new User();

        user.setName("张三");

        user.setAge(18);

        rabbitTemplate.convertAndSend("amq.direct", "test_springboot_key", user);

    }

}
启动生产者发送消息。

可以看到,对象转成了Json,消费者接收到Json转为的对象。
Spring Boot操作RabbitMQ是十分方便的,也是现在的主流,后续都用这种方式演示。
- 环境
- JDK 17.0.6
- Maven 3.6.3
- SpringBoot 3.0.4
- spring-boot-starter-amqp 3.0.4
- jackson-databind 2.14.2
RabbitMQ 05 直连模式-Spring Boot操作的更多相关文章
- 使用Spring Boot操作Hive JDBC时,启动时报出错误:NoSuchMethodError: org.eclipse.jetty.servlet.ServletMapping.setDef
使用Spring Boot操作Hive JDBC时,启动时报出错误:NoSuchMethodError: org.eclipse.jetty.servlet.ServletMapping.setDef ...
- MongoDB最简单的入门教程之四:使用Spring Boot操作MongoDB
Spring Boot 是一个轻量级框架,可以完成基于 Spring 的应用程序的大部分配置工作.Spring Boot的目的是提供一组工具,以便快速构建容易配置的Spring应用程序,省去大量传统S ...
- Spring Boot 操作 Excel
Excel 在日常操作中经常使用到,Spring Boot 中使用 POI 操作 Excel 本项目源码 github 下载 1 新建 Spring Boot Maven 示例工程项目 注意:本示例是 ...
- Java框架spring Boot学习笔记(五):Spring Boot操作MySQL数据库增、删、改、查
在pom.xml添加一下代码,添加操作MySQL的依赖jar包. <dependency> <groupId>org.springframework.boot</grou ...
- Java框架spring Boot学习笔记(四):Spring Boot操作MySQL数据库
在pom.xml添加一下代码,添加操作MySQL的依赖jar包. <dependency> <groupId>org.springframework.boot</grou ...
- spring boot 操作MySQL pom添加的配置
1 在项目中的pom.xml配置文件添加依赖 <!--MySQL依赖 --> <dependency> <groupId>mysql</groupId> ...
- 【转】redis 消息队列发布订阅模式spring boot实现
最近做项目的时候写到一个事件推送的场景.之前的实现方式是起job一直查询数据库,看看有没有最新的消息.这种方式非常的不优雅,反正我是不能忍,由于羡慕本身就依赖redis,刚好redis 也有消息队列的 ...
- spring boot实战(第十二篇)整合RabbitMQ
前言 最近几篇文章将围绕消息中间件RabbitMQ展开,对于RabbitMQ基本概念这里不阐述,主要讲解RabbitMQ的基本用法.Java客户端API介绍.spring Boot与RabbitMQ整 ...
- Spring Boot (26) RabbitMQ延迟队列
延迟消息就是指当消息被发送以后,并不想让消费者立即拿到消息,而是等待指定时间后,消费者才拿到这个消息进行消费. 延迟队列 订单业务: 在电商/点餐中,都有下单后30分钟内没有付款,就自动取消订单. 短 ...
- Spring Boot (25) RabbitMQ消息队列
MQ全程(Message Queue)又名消息队列,是一种异步通讯的中间件.可以理解为邮局,发送者将消息投递到邮局,然后邮局帮我们发送给具体的接收者,具体发送过程和时间与我们无关,常见的MQ又kafk ...
随机推荐
- 合并区间(区间排序,vector的动态扩容的应用)
以数组 intervals 表示若干个区间的集合,其中单个区间为 intervals[i] = [starti, endi] .请你合并所有重叠的区间,并返回一个不重叠的区间数组,该数组需恰好覆盖输入 ...
- Java 异常处理(1) : try-catch- finally中finally的使用
1 package com.bytezero.throwable; 2 3 import java.io.File; 4 import java.io.FileInputStream; 5 impor ...
- Fiddler修改响应体
方法1 将请求从左侧列表中,拖入AutoResponder中. 然后右键规则,点击编辑 修改后点击save 方法2 在AutoResponder中选择Create New Response也可类似方式 ...
- ble无线智能工牌解决方案技术解析
场景需求 在无线智能工牌领域,团队做了几个实际场景的解决方案之后,积累了一些行业需求经验和技术经验.这里做一个总结,算是一种沉淀吧.场景一:居家养老,医护和护工人员定期上门服务,根据工作时长来发工资 ...
- JavaFx实现倒计时按钮组件(类似发送激活码)
原文地址: JavaFx实现倒计时按钮组件(类似发送激活码) - Stars-One的杂货小窝 本文基于TornadoFx框架进行编写,封装工具代码是kotlin版本 然后也是顺便把这个封装成了sta ...
- [置顶]
cas单点登录出现的重定向循环问题解决方案
先描述下出现的问题,截图如下: 出现该问题的原因可以通过F12查看Network找到,即http和https两个协议开头的url在不停的跳转,最后就出现了上图所示的重定向循环错误,导致页面崩溃. 解决 ...
- 04_QT_Windows开发环境搭建
FFmpeg 为什么选择FFmpeg? 每个主流平台基本都有自己的音视频开发库(API),用以处理音视频数据,比如: iOS:AVFoundation.AudioUnit等 Android:Media ...
- Miracast技术详解(三):RTP & MPEG2-TS
目录 Miracast音视频流概述 抓包准备 RTP MPEG2-TS TS分组 适配域 PCR PID PSI PAT PMT PES 总结 Miracast音视频流概述 在上一篇文章中,我们已经成 ...
- linux使用hostapd+dnsmasq管理多张网卡,搭建dns服务器,并发射wifi热点(支持360wifi等等)
PS:要转载请注明出处,本人版权所有. PS: 这个只是基于<我自己>的理解, 如果和你的原则及想法相冲突,请谅解,勿喷. 前置说明 本文发布于 2015-03-03 18:37:39 ...
- 记录--用js如何实现将手机号中间的几位数字变成****
这里给大家分享我在网上总结出来的一些知识,希望对大家有所帮助 今天,我们要实现一个很常见并且简单的功能:将手机号中间的几位数变成**** 这个功能其实很常见,比如我们微信的账号安全里面显示的手机号.掘 ...