Springboot+LayUI实现一个简易评论系统
说明
这是个简单的评论系统,目的在于介绍简单的评论和回复功能。同时基于此可以扩展更全面的、自定义的评论系统,本工程仅供学习交流使用。喜欢的朋友给个赞:)
源码
https://gitee.com/indexman/comment_sys_demo
技术路线
- 前端:
LayUI、Thymeleaf、JQuery
- 后端
SpringBoot、Mybatis-Plus、MySQL
项目演示
整体
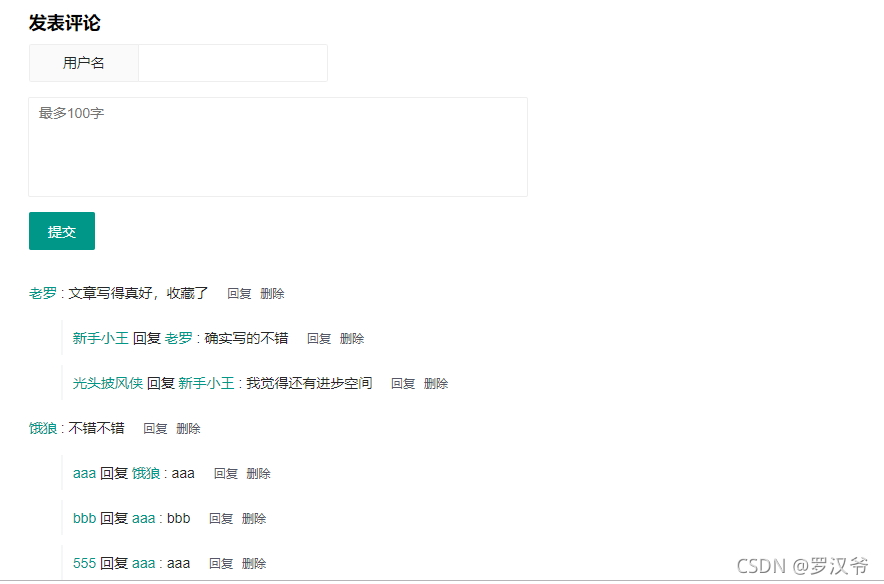
动画演示:

开发步骤
只介绍关键部分,需要完整源码的话找博主要。
1.数据库设计
此处我先只创建了一张存储评论信息的表,关键部分在于reply_to和parent_id字段。
reply_to标识回复谁?、parent_id标识本条评论的最上级评论是哪一条,这个就是前端用来遍历的依据。
CREATE TABLE `tb_comment`  (

  `id` int(11) NOT NULL AUTO_INCREMENT,

  `username` varchar(255) CHARACTER SET utf8 COLLATE utf8_general_ci NULL DEFAULT NULL,

  `reply_to` varchar(255) CHARACTER SET utf8 COLLATE utf8_general_ci NULL DEFAULT NULL,

  `content` varchar(255) CHARACTER SET utf8 COLLATE utf8_general_ci NULL DEFAULT NULL,

  `parent_id` int(11) NULL DEFAULT NULL,

  `create_time` datetime(0) NULL DEFAULT NULL,

  PRIMARY KEY (`id`) USING BTREE

)
2.搭建工程
- 工程结构长这样
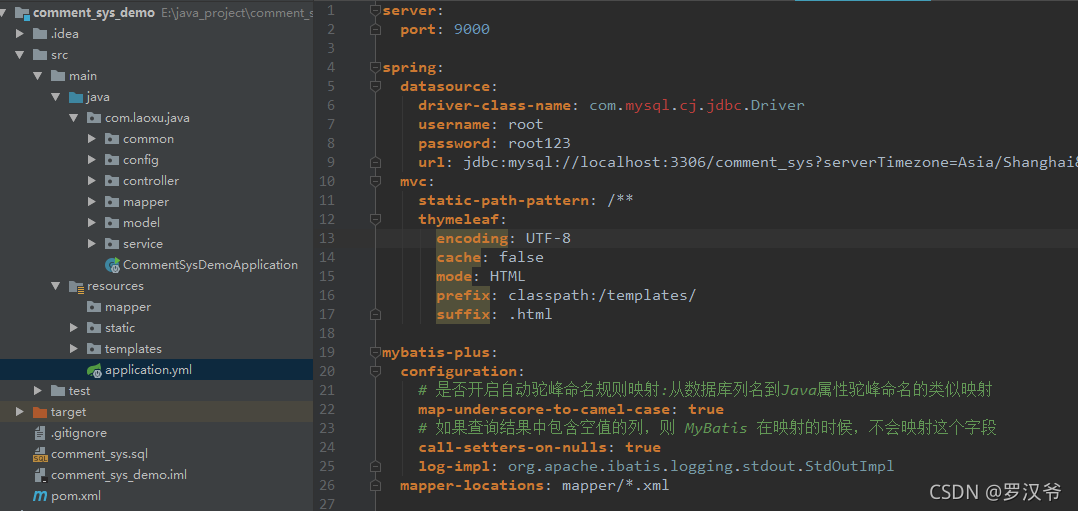
- POM长这样:
<?xml version="1.0" encoding="UTF-8"?>

<project xmlns="http://maven.apache.org/POM/4.0.0" xmlns:xsi="http://www.w3.org/2001/XMLSchema-instance"

         xsi:schemaLocation="http://maven.apache.org/POM/4.0.0 https://maven.apache.org/xsd/maven-4.0.0.xsd">

    <modelVersion>4.0.0</modelVersion>

    <parent>

        <groupId>org.springframework.boot</groupId>

        <artifactId>spring-boot-starter-parent</artifactId>

        <version>2.5.4</version>

        <relativePath/> <!-- lookup parent from repository -->

    </parent>

    <groupId>com.laoxu.java</groupId>

    <artifactId>comment_sys_demo</artifactId>

    <version>0.0.1-SNAPSHOT</version>

    <name>comment_sys_demo</name>

    <description>Demo project for Spring Boot</description>

    <properties>

        <java.version>1.8</java.version>

    </properties>

    <dependencies>

        <dependency>

            <groupId>org.springframework.boot</groupId>

            <artifactId>spring-boot-starter-thymeleaf</artifactId>

        </dependency>

        <dependency>

            <groupId>org.springframework.boot</groupId>

            <artifactId>spring-boot-starter-web</artifactId>

        </dependency>

        <dependency>

            <groupId>mysql</groupId>

            <artifactId>mysql-connector-java</artifactId>

            <scope>runtime</scope>

        </dependency>

        <!--mybatis-plus-->

        <dependency>

            <groupId>com.baomidou</groupId>

            <artifactId>mybatis-plus-boot-starter</artifactId>

            <version>3.0.5</version>

        </dependency>

        <dependency>

            <groupId>org.springframework.boot</groupId>

            <artifactId>spring-boot-devtools</artifactId>

            <scope>runtime</scope>

            <optional>true</optional>

        </dependency>

        <dependency>

            <groupId>org.projectlombok</groupId>

            <artifactId>lombok</artifactId>

            <optional>true</optional>

        </dependency>

        <dependency>

            <groupId>org.springframework.boot</groupId>

            <artifactId>spring-boot-starter-test</artifactId>

            <scope>test</scope>

        </dependency>

    </dependencies>

    <build>

        <plugins>

            <plugin>

                <groupId>org.springframework.boot</groupId>

                <artifactId>spring-boot-maven-plugin</artifactId>

                <configuration>

                    <excludes>

                        <exclude>

                            <groupId>org.projectlombok</groupId>

                            <artifactId>lombok</artifactId>

                        </exclude>

                    </excludes>

                </configuration>

            </plugin>

        </plugins>

    </build>

</project>
3.创建模型
注意这里嵌套了一个下级回复列表:commentList
@Data

@TableName("tb_comment")

public class Comment {

    @TableId(type = IdType.AUTO)

    private Integer id;

    private String username;

    private String replyTo;

    private String content;

    private Integer parentId;

    private Date createTime;

    @TableField(exist = false)

    private List<Comment> commentList;

}
4.创建控制器
由于采用了Mybatis-plus,此处省略DAO和Service层的。
控制器主要有2个:评论控制器和文章控制器,其中文章是静态的,只是个陪衬:
- CommentController
@RequestMapping("/comment")

public class CommentController {

    @Autowired

    CommentService commentService;

    @PostMapping("/add")

    public ResultBean<String> add(@RequestBody Comment comment){

        // 判断内容是否全

        if(StringUtils.isEmpty(comment.getContent())){

            return new ResultBean<>(400,"添加失败",0,"评论内容不能为空!");

        }

        comment.setCreateTime(new Date());

        commentService.save(comment);

        return new ResultBean<>(200,"添加成功",0,null);

    }

    @PostMapping("/remove/{id}")

    public ResultBean<String> remove(@PathVariable Integer id){

        // 先删除子回复

        QueryWrapper queryWrapper = new QueryWrapper();

        queryWrapper.eq("parent_id",id);

        commentService.remove(queryWrapper);

        // 删除父级回复

        commentService.removeById(id);

        return new ResultBean<>(200,"删除成功",0,null);

    }

}
- PostController
@Controller

public class PostController {

    @Autowired

    CommentService commentService;

    @RequestMapping("/post")

    public String post(Model model){

        QueryWrapper query = new QueryWrapper();

        query.isNull("parent_id");

        List<Comment> list = commentService.list(query);

        // 第一层

        if(list.size() > 0 ){

            for (int i = 0; i < list.size(); i++) {

                // 递归查询下层

                getList(list.get(i));

            }

        }

        model.addAttribute("clist",list);

        return "post";

    }

    // 递归查询下级评论

    private void getList(Comment comment){

        QueryWrapper query = new QueryWrapper();

        query.eq("parent_id",comment.getId());

        List<Comment> comments = commentService.list(query);

        // 判断comments是否为空

        if(comments.size() > 0 ){

            comment.setCommentList(comments);

            for (int i = 0; i < comments.size(); i++) {

                // 递归查询下层

                getList(comments.get(i));

            }

        }

    }

}
5.设计前端页面
页面的话这里只有一个仿新闻的页面:post.html
完整的我就不列出来了,DOM列一下:
<div class="layui-row">

    <div class="layui-col-md6 layui-col-md-offset3 art">

        <div class="title">

            <h1>如何学习Java可以拿到高工资</h1>

            <div class="meta">

                <span class="time">发布时间: 08-23 14:01</span>

                <span class="source">三傻子说技术</span>

            </div>

        </div>

        <div class="content">

            <p style="font-weight: bold;color: red">  学习Java拿到高工资的秘诀就是:</p>

            <p>

                  首先学好Java基础,这个过程不是一蹴而就的,需要坚持学习,技术都是不断升级出新的,不断吸收新知识巩固旧知识以达到融会贯通,温故知新的境界。

                其次,就是反复磨炼工作中用到的技术知识点,比如多线程、微服务、数据库等等,争取把自己打造为一名全栈工程师,评价标准就是以一己之力可以实现自己构思的一整套系统。

                最后,咱们搞技术的人不能仅仅只局限与技术本身,还需要拓展自己的知识面,工作之余多读书,书是不断进步的保证。不仅仅是技术类书籍,科技、艺术、历史、推理等等都是非常好的扩展自己知识的材料。

                终身学习是每一个人必备的知识素养,不要羡慕别人比你工资高,你只需要按照自己量身定制的路线一步一步走下去,肯定不会差。

            </p>

        </div>

    </div>

</div>

<!--评论表单-->

<div class="layui-row" id="combox">

    <div class="layui-col-md6 layui-col-md-offset3 com" >

        <h2>发表评论</h2>

        <form class="layui-form layui-form-pane" action="">

            <div class="layui-form-item">

                <label class="layui-form-label">用户名</label>

                <div class="layui-input-inline">

                    <input type="text" id="username" name="username" required  lay-verify="required"

                           placeholder="" autocomplete="off" class="layui-input">

                </div>

            </div>

            <div class="layui-form-item">

                <div class="layui-form-item">

                    <div class="layui-input-inline">

                        <textarea id="content" name="content" placeholder="最多100字" class="layui-textarea" required

                                  lay-verify="required" maxlength="100" style="resize:none;" cols="30"

                        rows="5"></textarea>

                    </div>

                </div>

            </div>

            <input type="text" id="replyTo" hidden="hidden">

            <input type="text" id="parentId" hidden="hidden">

            <div class="layui-form-item">

                <button class="layui-btn" lay-submit lay-filter="comform">提交</button>

            </div>

        </form>

    </div>

</div>

<!--评论展示区-->

<div class="layui-row">

    <div class="layui-col-md6 layui-col-md-offset3 com-box">

        <div class="comment-list-box">

            <ul class="comment-list" th:each="comment: ${clist}">

                <li class="comment-line-box d-flex" data-commentid="15937123" data-username="weixin_46274168">

                    <a href="#">

                        <span class="nickname" th:text="${comment.getUsername()}">我是小白呀</span>

                    </a>

                    <span class="colon">:</span>

                    <span class="comment" th:text="${comment.getContent()}">给大佬递茶,望有空互粉互访点赞(=^ω^=)</span>

                    <span class="opt">

                        <a th:attr="οnclick=|reply(${comment.id},'${comment.username}')|">回复</a>

                        <a th:onclick="remove([[${comment.id}]])">删除</a>

                    </span>

                </li>

                <li class="replay-box" style="display:block" th:each="subComment: ${comment.getCommentList()}">

                    <ul class="comment-list">

                        <li class="comment-line-box" data-commentid="15938081" data-replyname="IndexMan">

                            <a href="#">

                                <span class="nickname" th:text="${subComment.getUsername()}">罗汉鱼</span>

                            </a>

                            <span class="text">回复</span>

                            <a href="#">

                                <span class="nickname" th:text="${subComment.getReplyTo()}">我是小白呀</span>

                            </a>

                            <span class="colon">:</span>

                            <span class="comment" th:text="${subComment.getContent()}">:)</span>

                            <span class="opt">

                                <a th:attr="οnclick=|reply(${comment.id},'${subComment.username}')|">回复</a>

                                <a th:onclick="remove([[${subComment.id}]])">删除</a>

                            </span>

                        </li>

                    </ul>

                </li>

            </ul>

        </div>

    </div>

</div>

<script src="https://cdn.bootcdn.net/ajax/libs/jquery/3.6.0/jquery.min.js"></script>

<script src="../static/plugin/layui/layui.js" th:src="@{/plugin/layui/layui.js}"></script>
扩展方向
本例只演示了最基本的评论回复,连用户都懒得做了。。。,其实还可以扩展很多:
- 添加用户注册、登录,模拟真实用户评论、回复交互
- 回复和删除按钮根据在线用户动态展示
- 添加消息功能,是的当前在线用户能实时收到别人的评论
- 给评论列表添加分页
- 或者给评论列表增加“查看更多”功能
- 评论区支持emoji
- 增加敏感信息过滤
- …
别看一个小小的评论系统可以引出很多功能,所以平时多思考多动手尤其重要。
Springboot+LayUI实现一个简易评论系统的更多相关文章
- AngularJs打造一个简易权限系统
AngularJs打造一个简易权限系统 一.引言 上一篇博文已经向大家介绍了AngularJS核心的一些知识点,在这篇博文将介绍如何把AngularJs应用到实际项目中.本篇博文将使用AngularJ ...
- [后端人员耍前端系列]AngularJs篇:使用AngularJs打造一个简易权限系统
一.引言 上一篇博文已经向大家介绍了AngularJS核心的一些知识点,在这篇博文将介绍如何把AngularJs应用到实际项目中.本篇博文将使用AngularJS来打造一个简易的权限管理系统.下面不多 ...
- 用django搭建一个简易blog系统(翻译)(四)
12. Create the templates 你需要做三件事来去掉TemplateDoesNotExist错误 第一件,创建下面目录 * netmag/netmag/templates * net ...
- 用django搭建一个简易blog系统(翻译)(三)
06. Connecting the Django admin to the blog app Django 本身就带有一个应用叫作Admin,而且它是一个很好的工具 在这一部分,我们将要激活admi ...
- 用django搭建一个简易blog系统(翻译)(二)
03. Starting the blog app 在这部分,将要为你的project创建一个blog 应用,通过编辑setting.py文件,并把它添加到INSTALLED_APPS. 在你的命令行 ...
- 用django搭建一个简易blog系统(翻译)(一)
Django 入门 原始网址: http://www.creativebloq.com/netmag/get-started-django-7132932 代码:https://github.com/ ...
- 使用Phalcon框架开发一个简易的博客系统
使用Phalcon PHP框架开发一个简易的博客系统(类似于CMS) 最近在做Phalcon(Phalcon在英文中指的是鸟类中飞得最快的那一个物种,由于是高性能框架,借用了这个词)相关的项目,由于刚 ...
- Spring Security和 JWT两大利器来打造一个简易的权限系统。
写在前面 关于 Spring Security Web系统的认证和权限模块也算是一个系统的基础设施了,几乎任何的互联网服务都会涉及到这方面的要求.在Java EE领域,成熟的安全框架解决方案一般有 A ...
- 一个简易的Python全站抓取系统
很长时间没有更新博客了,前一阵时间在做项目,里面有一个爬虫系统,然后就从里面整理了一点代码做成了一个简易的爬虫系统,还挺实用的. 简单说来,这个爬虫系统的功能就是:给定初始的链接池,然后设定一些参数, ...
- springboot+layui实现PC端用户的增删改查 & 整合mui实现app端的自动登录和用户的上拉加载 & HBuilder打包app并在手机端下载安装
springboot整合web开发的各个组件在前面已经有详细的介绍,下面是用springboot整合layui实现了基本的增删改查. 同时在学习mui开发app,也就用mui实现了一个简单的自动登录和 ...
随机推荐
- [转帖]WinXP添加TLS1.1、TLS1.2支持
现象 HTTPS服务在Win7及Win10能够正常打开,但是在XP下用IE浏览器却无法打开,XP下用第三方浏览器(我试了谷歌浏览器)却能正常打开.经过抓包分析,用IE浏览器是协商用的是TLS1而用第三 ...
- [转帖]Archery
Archery SQL 审核查询平台 文档 | FAQ | Releases 功能清单 数据库 查询 审核 执行 备份 数据字典 慢日志 会话管理 账号管理 参数管理 数据归档 My ...
- [转帖]【MySQL 8】MySQL 5.7都即将停只维护了,是时候学习一波MySQL 8了!
https://juejin.cn/post/7111255789876019208 MySQL 8新特性 选择MySQL 8的背景:MySQL 5.6已经停止版本更新了,对于 MySQL 5.7 版 ...
- [转帖]sqlplus与shell互相传值的几种情况
https://www.cnblogs.com/youngerger/p/9068888.html sqlplus与shell互相传值的几种情况 情况一:在shell中最简单的调用sqlplus $c ...
- [转帖]LVS入门篇(四)之LVS实战
LVS入门篇(四)之LVS实战 https://www.cnblogs.com/linuxk/p/9360922.html 一.LVS的NAT模式实战 1.环境说明: HOST OS role rem ...
- [转帖]优化命令之iotop命令
文章目录 引言 一.iotop简介 1.iotop安装 2.iotop语法 3.iotop参数 二.I/O的常用快捷键 三.交互模式 四.iotop示例 1.只显示正在产生I/O的进程 2.显示指定P ...
- [转帖]使用Transformers推理
https://github.com/ymcui/Chinese-LLaMA-Alpaca/wiki/%E4%BD%BF%E7%94%A8Transformers%E6%8E%A8%E7%90%86 ...
- [转帖]学习linux必须知道的命令
https://www.cnblogs.com/aibeier/p/15315487.html 基础不牢,地动山摇.在linux命令行下查看命令帮助man用于查看命令的帮助信息 man cp--hel ...
- [转帖]AMD Zen4 霄龙 9004 转战嵌入式:192 框框无敌!秒杀对手 80%
http://www.myzaker.com/article/64104f50b15ec02eb10eb659 其实,它就是把此前用于服务器.数据中心的霄龙 9004 系列的部分型号拿了过来,命名.规 ...
- 京东金融Android瘦身探索与实践
作者:京东科技 冯建华 一.背景 随着业务不断迭代更新,App的大小也在快速增加,2019年~2022年期间一度超过了117M,期间我们也做了部分优化如图1红色部分所示,但在做优化的同时面临着新的增量 ...