
SpringMVC的执行流程及初始化流程
今天大致来看一下Spring MVC的执行流程和初始化流程是什么样的
1,执行流程:也就是一个请求是怎么到我们Controller的
2,初始化流程:也就是那些 HandlerMapping、HandlerAdapter是怎么初始化并让我们拿到的
执行流程
我们都知道 DispatcherServlet(前端控制器) 这样的一个类,是这个类来帮我们执行的,网上的很多图以这个类为核心来画的,那是怎么来到这个类的?(大多数文章并没有说)又是怎么帮我们调用各个组件来执行这个请求的?这些都是问题,我们直接来看源码,看完源码再来画图理解。
首先创建一个最简单的项目:直接使用 Spring Initializer 来帮我们快速创建出一个Web项目,地址使用阿里的(https://start.aliyun.com),依赖就选择一个 starter-web 就行,就最简单的项目。
先来到我们创建的这个项目的这个类的 BasicController#hello() 方法,并在这个上面打一个断点,然后启动项目 向这个地址发送一个请求:
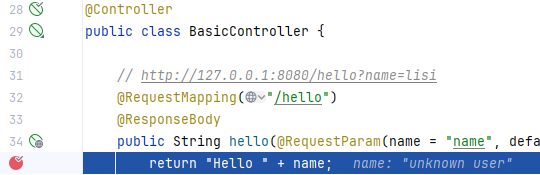
还记得我们上篇文章说的怎么看源码的事情吗?直接来看调用栈:
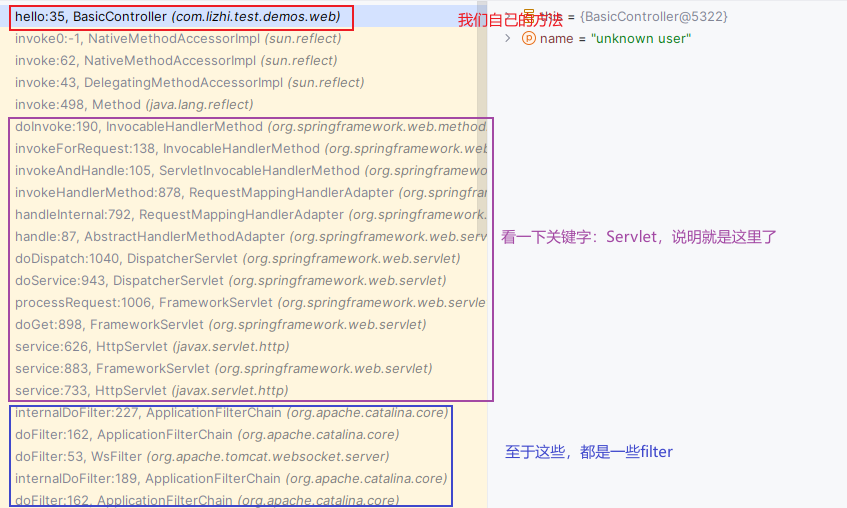
我们通过调用栈又可以发现:
红色框里是我们自己的代码
紫色框里就是执行流程相关的了,SpringMVC 的底层不就是Servlet 吗。Servlet 不就是我们 JavaWeb 学的东西吗?Servlet、Filter、Listener 三大组件。
蓝色框里是一些 filter 过滤器
我们直接在这里打一个断点,开始的地方:
HttpServlet
javax.servlet.http.HttpServlet#service(javax.servlet.ServletRequest, javax.servlet.ServletResponse)
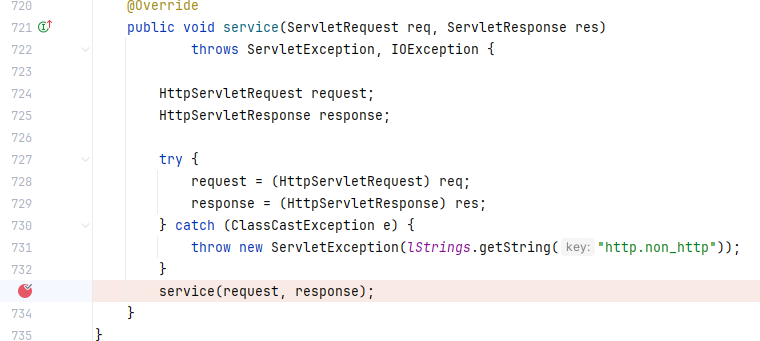
先到 javax.servlet.http.HttpServlet#service(javax.servlet.ServletRequest, javax.servlet.ServletResponse) ,
然后 org.springframework.web.servlet.FrameworkServlet#service,
再到 javax.servlet.http.HttpServlet#service(javax.servlet.http.HttpServletRequest,
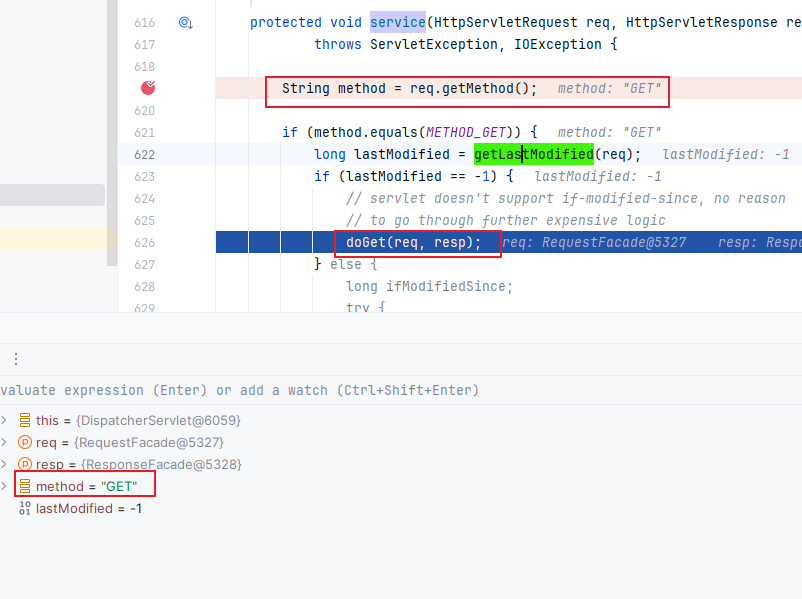
javax.servlet.http.HttpServletResponse),我们来看一下这个方法:
    protected void service(HttpServletRequest req, HttpServletResponse resp)

        throws ServletException, IOException {

        String method = req.getMethod();

        if (method.equals(METHOD_GET)) {

            long lastModified = getLastModified(req);

            if (lastModified == -1) {

                // servlet doesn't support if-modified-since, no reason

                // to go through further expensive logic

                doGet(req, resp);

            } else {

                long ifModifiedSince;

                try {

                    ifModifiedSince = req.getDateHeader(HEADER_IFMODSINCE);

                } catch (IllegalArgumentException iae) {

                    // Invalid date header - proceed as if none was set

                    ifModifiedSince = -1;

                }

                if (ifModifiedSince < (lastModified / 1000 * 1000)) {

                    // If the servlet mod time is later, call doGet()

                    // Round down to the nearest second for a proper compare

                    // A ifModifiedSince of -1 will always be less

                    maybeSetLastModified(resp, lastModified);

                    doGet(req, resp);

                } else {

                    resp.setStatus(HttpServletResponse.SC_NOT_MODIFIED);

                }

            }

        } else if (method.equals(METHOD_HEAD)) {

            long lastModified = getLastModified(req);

            maybeSetLastModified(resp, lastModified);

            doHead(req, resp);

        } else if (method.equals(METHOD_POST)) {

            doPost(req, resp);

        } else if (method.equals(METHOD_PUT)) {

            doPut(req, resp);

        } else if (method.equals(METHOD_DELETE)) {

            doDelete(req, resp);

        } else if (method.equals(METHOD_OPTIONS)) {

            doOptions(req,resp);

        } else if (method.equals(METHOD_TRACE)) {

            doTrace(req,resp);

        } else {

            //

            // Note that this means NO servlet supports whatever

            // method was requested, anywhere on this server.

            //

            String errMsg = lStrings.getString("http.method_not_implemented");

            Object[] errArgs = new Object[1];

            errArgs[0] = method;

            errMsg = MessageFormat.format(errMsg, errArgs);

            resp.sendError(HttpServletResponse.SC_NOT_IMPLEMENTED, errMsg);

        }

    }
分析:就是根据不同的请求方式去执行。doGet、doPost、doPut、doDelete、doHead、doTrace。我们总共支持这么多种的请求方式
FrameworkServlet
我们这次的请求方式是 Get ,所以就来到了 org.springframework.web.servlet.FrameworkServlet#doGet 方法:
	@Override

	protected final void doGet(HttpServletRequest request, HttpServletResponse response)

			throws ServletException, IOException {

		processRequest(request, response);

	}
这里面又调用了 org.springframework.web.servlet.FrameworkServlet#processRequest 方法:
	protected final void processRequest(HttpServletRequest request, HttpServletResponse response)

			throws ServletException, IOException {

		long startTime = System.currentTimeMillis();

		Throwable failureCause = null;

		LocaleContext previousLocaleContext = LocaleContextHolder.getLocaleContext();

		LocaleContext localeContext = buildLocaleContext(request);

		RequestAttributes previousAttributes = RequestContextHolder.getRequestAttributes();

		ServletRequestAttributes requestAttributes = buildRequestAttributes(request, response, previousAttributes);

		WebAsyncManager asyncManager = WebAsyncUtils.getAsyncManager(request);

		asyncManager.registerCallableInterceptor(FrameworkServlet.class.getName(), new RequestBindingInterceptor());

		initContextHolders(request, localeContext, requestAttributes);

		try {

            // 继续调用执行

			doService(request, response);

		}

		catch (ServletException | IOException ex) {

			failureCause = ex;

			throw ex;

		}

		catch (Throwable ex) {

			failureCause = ex;

			throw new NestedServletException("Request processing failed", ex);

		}

		finally {

			resetContextHolders(request, previousLocaleContext, previousAttributes);

			if (requestAttributes != null) {

				requestAttributes.requestCompleted();

			}

			logResult(request, response, failureCause, asyncManager);

			publishRequestHandledEvent(request, response, startTime, failureCause);

		}

	}
DispatcherServlet
这里面调用了 doService() 方法,这里的 doService() 方法是 **DispatcherServlet **类的:
	protected void doService(HttpServletRequest request, HttpServletResponse response) throws Exception {

		logRequest(request);

		// Keep a snapshot of the request attributes in case of an include,

		// to be able to restore the original attributes after the include.

		Map<String, Object> attributesSnapshot = null;

		if (WebUtils.isIncludeRequest(request)) {

			attributesSnapshot = new HashMap<>();

			Enumeration<?> attrNames = request.getAttributeNames();

			while (attrNames.hasMoreElements()) {

				String attrName = (String) attrNames.nextElement();

				if (this.cleanupAfterInclude || attrName.startsWith(DEFAULT_STRATEGIES_PREFIX)) {

					attributesSnapshot.put(attrName, request.getAttribute(attrName));

				}

			}

		}

		// Make framework objects available to handlers and view objects.

		request.setAttribute(WEB_APPLICATION_CONTEXT_ATTRIBUTE, getWebApplicationContext());

		request.setAttribute(LOCALE_RESOLVER_ATTRIBUTE, this.localeResolver);

		request.setAttribute(THEME_RESOLVER_ATTRIBUTE, this.themeResolver);

		request.setAttribute(THEME_SOURCE_ATTRIBUTE, getThemeSource());

		if (this.flashMapManager != null) {

			FlashMap inputFlashMap = this.flashMapManager.retrieveAndUpdate(request, response);

			if (inputFlashMap != null) {

				request.setAttribute(INPUT_FLASH_MAP_ATTRIBUTE, Collections.unmodifiableMap(inputFlashMap));

			}

			request.setAttribute(OUTPUT_FLASH_MAP_ATTRIBUTE, new FlashMap());

			request.setAttribute(FLASH_MAP_MANAGER_ATTRIBUTE, this.flashMapManager);

		}

		try {

            // 核心方法

			doDispatch(request, response);

		}

		finally {

			if (!WebAsyncUtils.getAsyncManager(request).isConcurrentHandlingStarted()) {

				// Restore the original attribute snapshot, in case of an include.

				if (attributesSnapshot != null) {

					restoreAttributesAfterInclude(request, attributesSnapshot);

				}

			}

		}

	}
经过一层层的调用后,终于来到了最核心的方法 doDispatch():
    // 文件上传解析器

    /** MultipartResolver used by this servlet. */

	@Nullable

	private MultipartResolver multipartResolver;

    // 处理器映射器集合

    /** List of HandlerMappings used by this servlet. */

	@Nullable

	private List<HandlerMapping> handlerMappings;

    // 处理器适配器集合

	/** List of HandlerAdapters used by this servlet. */

	@Nullable

	private List<HandlerAdapter> handlerAdapters;

    // 视图解析器集合

	/** List of ViewResolvers used by this servlet. */

	@Nullable

	private List<ViewResolver> viewResolvers;

	protected void doDispatch(HttpServletRequest request, HttpServletResponse response) throws Exception {

		HttpServletRequest processedRequest = request;

        // 处理器执行器链

		HandlerExecutionChain mappedHandler = null;

		boolean multipartRequestParsed = false;

		WebAsyncManager asyncManager = WebAsyncUtils.getAsyncManager(request);

		try {

			ModelAndView mv = null;

			Exception dispatchException = null;

			try {

                // 是否是文件上传的请求,如果是需要包装一下

				processedRequest = checkMultipart(request);

				multipartRequestParsed = (processedRequest != request);

				// 通过当前请求拿到对应的 HandlerExecutionChain 对象

                // 这一步是 HandlerMapping

				mappedHandler = getHandler(processedRequest);

				if (mappedHandler == null) {

					noHandlerFound(processedRequest, response);

					return;

				}

				// 通过 HandlerExecutionChain 对象里的 Handler 拿到 HandlerAdapter 对象

                // 这一步是 HandlerAdapter

				HandlerAdapter ha = getHandlerAdapter(mappedHandler.getHandler());

				// Process last-modified header, if supported by the handler.

				String method = request.getMethod();

				boolean isGet = "GET".equals(method);

				if (isGet || "HEAD".equals(method)) {

					long lastModified = ha.getLastModified(request, mappedHandler.getHandler());

					if (new ServletWebRequest(request, response).checkNotModified(lastModified) && isGet) {

						return;

					}

				}

                // 拦截器的前置处理

				if (!mappedHandler.applyPreHandle(processedRequest, response)) {

					return;

				}

				// 通过 HandlerAdapter 来执行我们 Controller 里的方法

				mv = ha.handle(processedRequest, response, mappedHandler.getHandler());

				if (asyncManager.isConcurrentHandlingStarted()) {

					return;

				}

				applyDefaultViewName(processedRequest, mv);

                // 拦截器的后置处理

				mappedHandler.applyPostHandle(processedRequest, response, mv);

			}

			catch (Exception ex) {

				dispatchException = ex;

			}

			catch (Throwable err) {

				// As of 4.3, we're processing Errors thrown from handler methods as well,

				// making them available for @ExceptionHandler methods and other scenarios.

				dispatchException = new NestedServletException("Handler dispatch failed", err);

			}

            // 拦截器的最终处理 还会渲染 ModelAndView 对象

			processDispatchResult(processedRequest, response, mappedHandler, mv, dispatchException);

		}

		catch (Exception ex) {

			triggerAfterCompletion(processedRequest, response, mappedHandler, ex);

		}

		catch (Throwable err) {

			triggerAfterCompletion(processedRequest, response, mappedHandler,

					new NestedServletException("Handler processing failed", err));

		}

		finally {

			if (asyncManager.isConcurrentHandlingStarted()) {

				// Instead of postHandle and afterCompletion

				if (mappedHandler != null) {

					mappedHandler.applyAfterConcurrentHandlingStarted(processedRequest, response);

				}

			}

			else {

				// Clean up any resources used by a multipart request.

				if (multipartRequestParsed) {

					cleanupMultipart(processedRequest);

				}

			}

		}

	}
分析:我们这里把几个核心的方法拿过来,然后一一做拆解
1,getHandler(): 在这里 HandlerMapping 会根据当前请求拿到 HandlerExecutionChain 对象
2,getHandlerAdapter():会拿到支持处理此 Handler 的 HandlerAdapter 对象
3,mappedHandler.applyPreHandle():拦截器的前置处理
4,ha.handle(): 通过 HandlerAdapter 来处理
5,mappedHandler.applyPostHandle(): 拦截器的后置处理
6,processDispatchResult(): 处理结果、拦截器的最终处理
7,上面的那几个属性在启动的时候会初始化好,在初始化的时候再说
getHandler()
    private List<HandlerMapping> handlerMappings;

	protected HandlerExecutionChain getHandler(HttpServletRequest request) throws Exception {

		if (this.handlerMappings != null) {

			for (HandlerMapping mapping : this.handlerMappings) {

				HandlerExecutionChain handler = mapping.getHandler(request);

				if (handler != null) {

					return handler;

				}

			}

		}

		return null;

	}
分析:就是拿到所有的 HandlerMapping 调用它的 getHandler() 方法来拿到一个 HandlerExecutionChain 对象
就是这个五个 HandlerMapping 对象,可自己查询这几个各自的作用
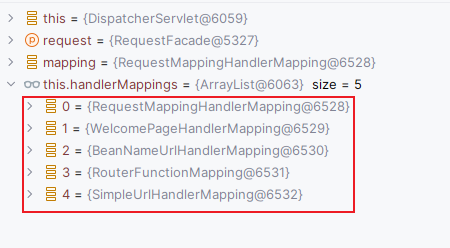
HandlerMapping
就是根据路径找到对应的 HandlerMethod(Handler)、HandlerInterceptor、然后处理跨域,并封装为 HandlerExecutionChain 对象返回。
第一次拿到的是 RequestMappingHandlerMapping,来到 AbstractHandlerMapping#getHandler() 方法:AbstractHandlerMapping 是它的父类:
正好这个 **HandlerMapping **就能找到我们的 Handler。
    private Object defaultHandler;

	public final HandlerExecutionChain getHandler(HttpServletRequest request) throws Exception {

        // 根据当前请求拿到对应的 Handler

		Object handler = getHandlerInternal(request);

        // 没拿到就给一个默认的 Handler

		if (handler == null) {

			handler = getDefaultHandler();

		}

		if (handler == null) {

			return null;

		}

		// Bean name or resolved handler?

		if (handler instanceof String) {

			String handlerName = (String) handler;

			handler = obtainApplicationContext().getBean(handlerName);

		}

        // 根据拿到的 Handler 和 当前请求得到一个 HandlerExecutionChain

		HandlerExecutionChain executionChain = getHandlerExecutionChain(handler, request);

		if (logger.isTraceEnabled()) {

			logger.trace("Mapped to " + handler);

		}

		else if (logger.isDebugEnabled() && !request.getDispatcherType().equals(DispatcherType.ASYNC)) {

			logger.debug("Mapped to " + executionChain.getHandler());

		}

        // 跨域处理

		if (hasCorsConfigurationSource(handler) || CorsUtils.isPreFlightRequest(request)) {

			CorsConfiguration config = (this.corsConfigurationSource != null ? this.corsConfigurationSource.getCorsConfiguration(request) : null);

			CorsConfiguration handlerConfig = getCorsConfiguration(handler, request);

			config = (config != null ? config.combine(handlerConfig) : handlerConfig);

			executionChain = getCorsHandlerExecutionChain(request, executionChain, config);

		}

		return executionChain;

	}
getHandlerInternal()
来到 org.springframework.web.servlet.mvc.method.RequestMappingInfoHandlerMapping#getHandlerInternal
	protected HandlerMethod getHandlerInternal(HttpServletRequest request) throws Exception {

		request.removeAttribute(PRODUCIBLE_MEDIA_TYPES_ATTRIBUTE);

		try {

            // 调用父类的方法来处理

			return super.getHandlerInternal(request);

		}

		finally {

			ProducesRequestCondition.clearMediaTypesAttribute(request);

		}

	}
它的父类是 AbstractHandlerMethodMapping ,所以又来到它这里来处理:
org.springframework.web.servlet.handler.AbstractHandlerMethodMapping#getHandlerInternal
    private UrlPathHelper urlPathHelper = new UrlPathHelper();

	protected HandlerMethod getHandlerInternal(HttpServletRequest request) throws Exception {

        // 拿到请求中的请求路径

		String lookupPath = getUrlPathHelper().getLookupPathForRequest(request);

		request.setAttribute(LOOKUP_PATH, lookupPath);

		this.mappingRegistry.acquireReadLock();

		try {

            // 通过请求路径拿到 HandlerMethod (核心)

			HandlerMethod handlerMethod = lookupHandlerMethod(lookupPath, request);

			return (handlerMethod != null ? handlerMethod.createWithResolvedBean() : null);

		}

		finally {

			this.mappingRegistry.releaseReadLock();

		}

	}

lookupHandlerMethod()
我们直接来看一下是怎么拿到 HandlerMethod 的:
org.springframework.web.servlet.handler.AbstractHandlerMethodMapping#lookupHandlerMethod
	protected HandlerMethod lookupHandlerMethod(String lookupPath, HttpServletRequest request) throws Exception {

        // 根据路径匹配到的集合

		List<Match> matches = new ArrayList<>();

        // 1,根据路径找到对应的 RequestMappingInfo 集合

		List<T> directPathMatches = this.mappingRegistry.getMappingsByUrl(lookupPath);

		if (directPathMatches != null) {

            // 2,匹配到的集合  这里面有 HandlerMethod 对象

			addMatchingMappings(directPathMatches, matches, request);

		}

		if (matches.isEmpty()) {

			// No choice but to go through all mappings...

			addMatchingMappings(this.mappingRegistry.getMappings().keySet(), matches, request);

		}

		if (!matches.isEmpty()) {

            // 3,从匹配到的集合中拿到第一个

			Match bestMatch = matches.get(0);

			if (matches.size() > 1) {

				Comparator<Match> comparator = new MatchComparator(getMappingComparator(request));

				matches.sort(comparator);

				bestMatch = matches.get(0);

				if (logger.isTraceEnabled()) {

					logger.trace(matches.size() + " matching mappings: " + matches);

				}

				if (CorsUtils.isPreFlightRequest(request)) {

					return PREFLIGHT_AMBIGUOUS_MATCH;

				}

				Match secondBestMatch = matches.get(1);

				if (comparator.compare(bestMatch, secondBestMatch) == 0) {

					Method m1 = bestMatch.handlerMethod.getMethod();

					Method m2 = secondBestMatch.handlerMethod.getMethod();

					String uri = request.getRequestURI();

					throw new IllegalStateException(

							"Ambiguous handler methods mapped for '" + uri + "': {" + m1 + ", " + m2 + "}");

				}

			}

			request.setAttribute(BEST_MATCHING_HANDLER_ATTRIBUTE, bestMatch.handlerMethod);

            // 3

			handleMatch(bestMatch.mapping, lookupPath, request);

			return bestMatch.handlerMethod;

		}

		else {

			return handleNoMatch(this.mappingRegistry.getMappings().keySet(), lookupPath, request);

		}

	}
总结:
1,先根据路径找到对应的 RequestMappingInfo
2,再根据找到的 RequestMappingInfo 来找 HandlerMethod 然后封装为 Match 对象,添加到 matches 集合中
3,拿到 matches 集合中的第一个元素,然后通过 handleMatch() 方法来处理
1,先调用了这个方法来找到对应的 RequestMappingInfo 集合:
org.springframework.web.servlet.handler.AbstractHandlerMethodMapping.MappingRegistry#getMappingsByUrl
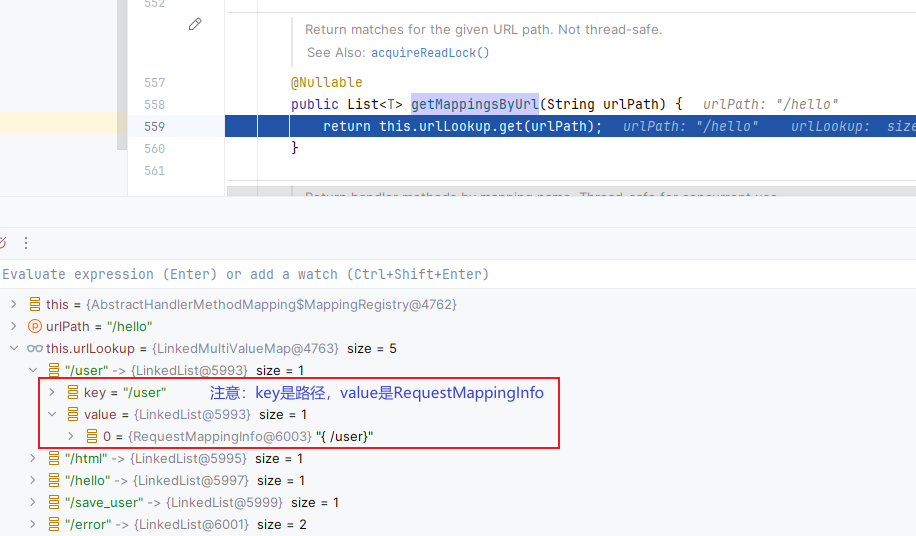
注意:
- PathVariable类型是不会加到这个集合里的,具体逻辑在这里,有兴趣可以去看这两个方法:
org.springframework.web.servlet.handler.AbstractHandlerMethodMapping.MappingRegistry#register()、org.springframework.web.servlet.handler.AbstractHandlerMethodMapping.MappingRegistry#getDirectUrls() - 这里的集合 key 是路径,value 是 RequestMappingInfo
2,得到结果后返回到 lookupHandlerMethod(),继续调用 addMatchingMappings() 方法,来找匹配到的 HandlerMethod:
	private void addMatchingMappings(Collection<T> mappings, List<Match> matches, HttpServletRequest request) {

		for (T mapping : mappings) {

            // 封装一下

			T match = getMatchingMapping(mapping, request);

			if (match != null) {

                // 找到的集合,又会封装为 Match 对象

				matches.add(new Match(match, this.mappingRegistry.getMappings().get(mapping)));

			}

		}

	}
这里的是:key是 RequestMappingInfo,value是 HandlerMethod:
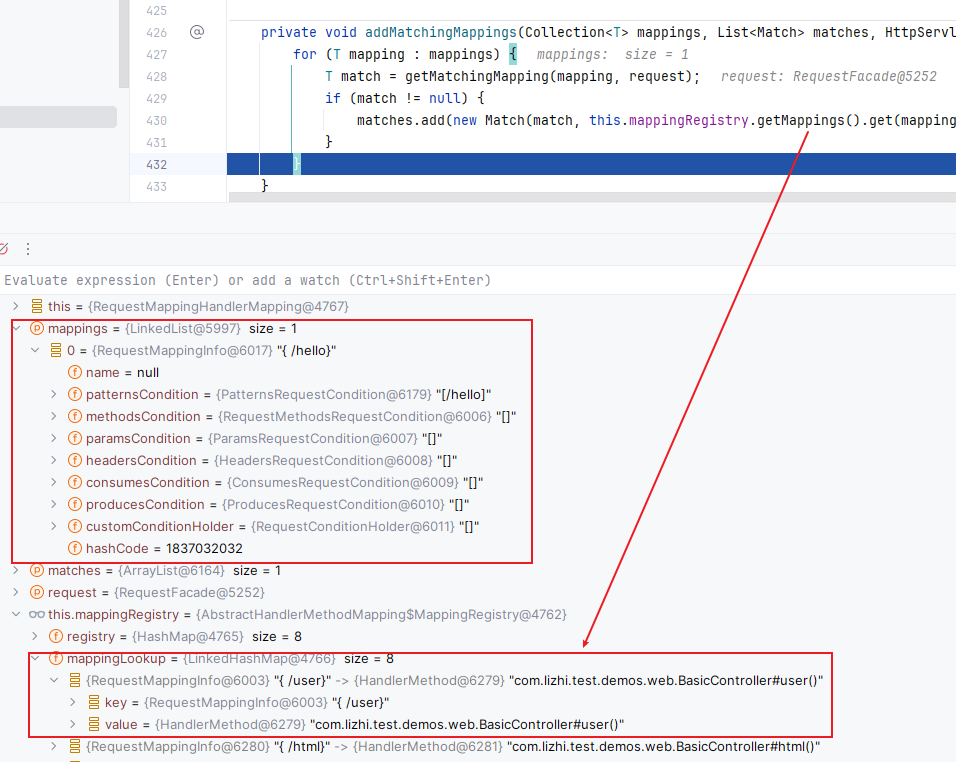
这就是我们找到的 Match 集合:

我们这里就找到了,然后返回到 lookupHandlerMethod() 方法来继续,会先拿到集合中的第一个元素,然后调用 handleMatch() 来处理路径问
题,最后返回Match 对象中的 HandlerMethod。到这一步,我们终于拿到了想到的 HandlerMethod对象!
HandlerMethod:
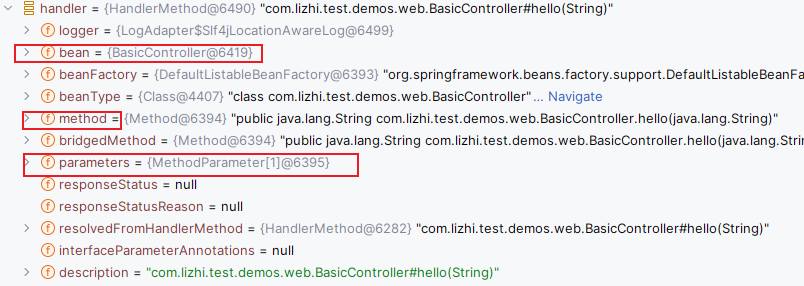
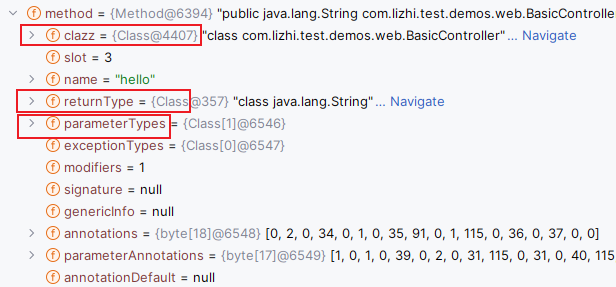
这个对象里面封装了我们的:对应的类、对应的方法、方法的参数类型、方法的返回值类型等等一系列信息
getHandlerExecutionChain()
然后一路返回到 getHandlerInternal() 方法,并调用其中的 getHandlerExecutionChain() 方法来得到 HandlerExecutionChain 对象:
	protected HandlerExecutionChain getHandlerExecutionChain(Object handler, HttpServletRequest request) {

		HandlerExecutionChain chain = (handler instanceof HandlerExecutionChain ?

				(HandlerExecutionChain) handler : new HandlerExecutionChain(handler));

        // 拿到路径

		String lookupPath = this.urlPathHelper.getLookupPathForRequest(request, LOOKUP_PATH);

		for (HandlerInterceptor interceptor : this.adaptedInterceptors) {

			if (interceptor instanceof MappedInterceptor) {

				MappedInterceptor mappedInterceptor = (MappedInterceptor) interceptor;

				if (mappedInterceptor.matches(lookupPath, this.pathMatcher)) {

					chain.addInterceptor(mappedInterceptor.getInterceptor());

				}

			}

			else {

				chain.addInterceptor(interceptor);

			}

		}

		return chain;

	}
分析:
1,先把 HandlerMethod 封装到 HandlerExecutionChain 中
2,拿到路径,再遍历所有的拦截器并添加到我们的 HandlerExecutionChain 对象中,然后返回
HandlerExecutionChain:

里面就仨东西:处理器、拦截器集合、当前执行到第几个拦截器的索引
跨域处理
暂无。后续补充
经过这一波操作,我们终于拿到了对应的 HandlerExecutionChain 对象。
getHandlerAdapter()
终于到了我们 HandlerAdapter 了
拿到对应的 HandlerExecutionChain 对象后,我们就该调用 getHandlerAdapter() 方法来拿能处理我们 Handler 的 HandlerAdapter:
	protected HandlerAdapter getHandlerAdapter(Object handler) throws ServletException {

		if (this.handlerAdapters != null) {

			for (HandlerAdapter adapter : this.handlerAdapters) {

				if (adapter.supports(handler)) {

					return adapter;

				}

			}

		}

		throw new ServletException("No adapter for handler [" + handler +

				"]: The DispatcherServlet configuration needs to include a HandlerAdapter that supports this handler");

	}
分析:还是遍历 HandlerAdapter 集合,来调用每一个的 supports() 方法来判断当前是否支持处理这个 Handler。
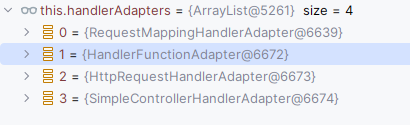
其实即使判断当前的这个 Handler 是不是某一个类。我们直接来看看
各个类的 supports() 方法:
    //*****************AbstractHandlerMethodAdapter 和 RequestMappingHandlerAdapter********************************

	public final boolean supports(Object handler) {

		return (handler instanceof HandlerMethod && supportsInternal((HandlerMethod) handler));

	}

	protected boolean supportsInternal(HandlerMethod handlerMethod) {

		return true;

	}

    // *******************HandlerFunctionAdapter*********************************************

	public boolean supports(Object handler) {

		return handler instanceof HandlerFunction;

	}

    // *******************HttpRequestHandlerAdapter*********************************************

	public boolean supports(Object handler) {

		return (handler instanceof HttpRequestHandler);

	}

    //*******************SimpleControllerHandlerAdapter*********************************************

  	public boolean supports(Object handler) {

		return (handler instanceof Controller);

	}
我们这里 RequestMappingHandlerAdapter 就能处理,因为我们之前拿到的就是一个 HandlerMethod。
还有一种继承 AbstractController 类来实现的,就是通过 SimpleControllerHandlerAdapter 来处理的,因为 AbstractController 是 Controller 的子类
到此我们就拿到了对应的 HandlerAdapter,这一步还是比较简单的。
mappedHandler.applyPreHandle()
拦截器的前置处理:
	boolean applyPreHandle(HttpServletRequest request, HttpServletResponse response) throws Exception {

		HandlerInterceptor[] interceptors = getInterceptors();

		if (!ObjectUtils.isEmpty(interceptors)) {

			for (int i = 0; i < interceptors.length; i++) {

				HandlerInterceptor interceptor = interceptors[i];

				if (!interceptor.preHandle(request, response, this.handler)) {

					triggerAfterCompletion(request, response, null);

					return false;

				}

				this.interceptorIndex = i;

			}

		}

		return true;

	}
分析:就是拿到我们 HandlerExecutionChain 对象里的 HandlerInterceptor 然后遍历调用其前置处理的方法,每处理成功一个就把当前索引赋值给 interceptorIndex 。以便后面拦截器的倒序处理
ha.handle()
这个其实就是用反射来调用我们的方法。invoke()
mappedHandler.applyPostHandle()
拦截器的后置处理
	void applyPostHandle(HttpServletRequest request, HttpServletResponse response, @Nullable ModelAndView mv)

			throws Exception {

		HandlerInterceptor[] interceptors = getInterceptors();

		if (!ObjectUtils.isEmpty(interceptors)) {

			for (int i = interceptors.length - 1; i >= 0; i--) {

				HandlerInterceptor interceptor = interceptors[i];

                // 后置处理

				interceptor.postHandle(request, response, this.handler, mv);

			}

		}

	}
这一次就是倒序处理了。
processDispatchResult()
拦截器的最终处理、还会处理结果 ModelAndView
	private void processDispatchResult(HttpServletRequest request, HttpServletResponse response,

			@Nullable HandlerExecutionChain mappedHandler, @Nullable ModelAndView mv,

			@Nullable Exception exception) throws Exception {

		boolean errorView = false;

		if (exception != null) {

			if (exception instanceof ModelAndViewDefiningException) {

				logger.debug("ModelAndViewDefiningException encountered", exception);

				mv = ((ModelAndViewDefiningException) exception).getModelAndView();

			}

			else {

				Object handler = (mappedHandler != null ? mappedHandler.getHandler() : null);

				mv = processHandlerException(request, response, handler, exception);

				errorView = (mv != null);

			}

		}

		// Did the handler return a view to render?

		if (mv != null && !mv.wasCleared()) {

            // 视图解析器渲染结果

			render(mv, request, response);

			if (errorView) {

				WebUtils.clearErrorRequestAttributes(request);

			}

		}

		else {

			if (logger.isTraceEnabled()) {

				logger.trace("No view rendering, null ModelAndView returned.");

			}

		}

		if (WebAsyncUtils.getAsyncManager(request).isConcurrentHandlingStarted()) {

			// Concurrent handling started during a forward

			return;

		}

		if (mappedHandler != null) {

			// 拦截器的最终处理

			mappedHandler.triggerAfterCompletion(request, response, null);

		}

	}
由于我们这个是json格式,所以没有 ModelAndView,所以来到拦截器的最终处理:
	void triggerAfterCompletion(HttpServletRequest request, HttpServletResponse response, @Nullable Exception ex)

			throws Exception {

		HandlerInterceptor[] interceptors = getInterceptors();

		if (!ObjectUtils.isEmpty(interceptors)) {

			for (int i = this.interceptorIndex; i >= 0; i--) {

				HandlerInterceptor interceptor = interceptors[i];

				try {

					interceptor.afterCompletion(request, response, this.handler, ex);

				}

				catch (Throwable ex2) {

					logger.error("HandlerInterceptor.afterCompletion threw exception", ex2);

				}

			}

		}

	}
这次 i = interceptorIndex,第一次前置处理的时候给这个属性赋的值
到这里 doDispatch() 方法就执行完毕了。
初始化
暂无。
后记
- 跨域的处理
- 返回是 json 格式的时候是怎么处理的?
- 流程图待画
- 初始化的流程
有机会再填坑吧。
SpringMVC的执行流程及初始化流程的更多相关文章
- SpringMVC源码剖析(三)- DispatcherServlet的初始化流程
在我们第一次学Servlet编程,学Java Web的时候,还没有那么多框架.我们开发一个简单的功能要做的事情很简单,就是继承HttpServlet,根据需要重写一下doGet,doPost方法,跳转 ...
- 《SpringMVC从入门到放肆》二、SpringMVC的执行流程及默认配置
上一篇博文我们做了一个hello world的程序,并且已经成功的跑起来了.这一篇我们来深入的了解一下SpringMVC的执行流程以及一些其它的配置. 一.执行流程 来解释一下上图中的各个名词1.Di ...
- SpringMVC的执行流程
解析SpringMVC执行流程 SpringMVC的执行图大概如下所示 1.首先它是由客户端发起请求,到DispatcherServlet,被拦截后到HandlerMapping这里充当一个路由器,通 ...
- 通过自己实现接口来加深理解SpringMVC的执行流程
功能介绍 上篇文章[从源码角度了解SpringMVC的执行流程]通过接口源码向大家介绍了SpringMVC的执行流程,主要偏重于源码.这篇文件我们来自己实现那几个关键接口,来真实体验下SpringMV ...
- 从源码角度了解SpringMVC的执行流程
目录 从源码角度了解SpringMVC的执行流程 SpringMVC介绍 源码分析思路 源码解读 几个关键接口和类 前端控制器 DispatcherServlet 结语 从源码角度了解SpringMV ...
- Shiro权限管理框架(三):Shiro中权限过滤器的初始化流程和实现原理
本篇是Shiro系列第三篇,Shiro中的过滤器初始化流程和实现原理.Shiro基于URL的权限控制是通过Filter实现的,本篇从我们注入的ShiroFilterFactoryBean开始入手,翻看 ...
- Spring框架系列(7) - Spring IOC实现原理详解之IOC初始化流程
上文,我们看了IOC设计要点和设计结构:紧接着这篇,我们可以看下源码的实现了:Spring如何实现将资源配置(以xml配置为例)通过加载,解析,生成BeanDefination并注册到IoC容器中的. ...
- SpringMVC学习笔记 - 第一章 - 工作流程、Bean加载控制、请求与响应(参数接收与内容返回)、RESTful
[前置内容]Spring 学习笔记全系列传送门: Spring学习笔记 - 第一章 - IoC(控制反转).IoC容器.Bean的实例化与生命周期.DI(依赖注入) Spring学习笔记 - 第二章 ...
- 【开源】OSharp3.3框架解说系列(7.1):初始化流程概述
OSharp是什么? OSharp是个快速开发框架,但不是一个大而全的包罗万象的框架,严格的说,OSharp中什么都没有实现.与其他大而全的框架最大的不同点,就是OSharp只做抽象封装,不做实现.依 ...
- u-boot中nandflash初始化流程分析(转)
u-boot中nandflash初始化流程分析(转) 原文地址http://zhuairlunjj.blog.163.com/blog/static/80050945201092011249136/ ...
随机推荐
- 牛客 | 小G的约数引起的对于 整数分块 学习
整除分块是个啥:要求\(∑_{i = 1}^n{n/i}\) 的值,这时候暴力需要O(n)的时间.由于这个区间是连续的,且'/'是向下取整,当i不能整除k时,n/i会等于最小的i(也就是区间最左边的值 ...
- 实时渲染前沿研究:在浏览器上实现了Facebook提出的DLSS算法
大家好,我基于WebNN在浏览器上实现了2020年Facebook提出的Neural-Supersampling-for-Real-time-Rendering算法.它是一个用于实时渲染的神经网络超采 ...
- Python毕业设计推荐
今天给大家推荐几个基于python/django的毕业设计/课程设计. 1. 网上商城系统 这是一个基于python+vue开发的商城网站,平台采用B/S结构,后端采用主流的Python语言进行开发, ...
- 3. Oracle数据库异常关闭,导致错误3. Oracle数据库异常关闭,导致错误ERROR: ORA-01034: ORACLE ngt available; ORA-27101: shared memory realm does not exist
之前由于电脑没电,强制关机,导致Oracle数据库异常关闭,再次启动电脑登陆数据库时,发生以下错误: 当我尝试重新启动数据库时,发生错误: 经过查阅资料后得知:缺少INITXE.ORA文件,需要从下图 ...
- 【java】 向上转型的运用
应用 :求面积 1,抽象类 Geometry . public abstract class Geometry { public abstract double getArea(); } 2,矩形 ...
- SpringMVC03—RestFul和Controller
控制器Controller 控制器复杂提供访问应用程序的行为,通常通过接口定义或注解定义两种方法实现. 控制器负责解析用户的请求并将其转换为一个模型. 在Spring MVC中一个控制器类可以包含多个 ...
- [转帖]Linux 性能监控 Sar (Sysstat) 示例
https://bbs.huaweicloud.com/blogs/345343# [摘要] 使用 sar,您可以实时监控各种 Linux 子系统(CPU.内存.I/O..)的性能,还可以持续收集 ...
- Grafana监控Oracle数据库的表大小等信息
Grafana监控Oracle数据库的表大小等信息 方案 oracledb_exporter 以及 prometheus grafana 使用的SQL以及配置文件 [[metric]] context ...
- 【转帖】bpftrace 指南
文章目录 0. bpftrace 0.1 bpftrace组件 0.2 bpftrace 帮助信息 0.3 bpftrace 工具速览表 0.4 bpftrace 探针 0.4.1 tracepoin ...
- [转帖]2.20 Native Operating System Tools
https://docs.oracle.com/javase/8/docs/technotes/guides/troubleshoot/tooldescr020.html#BABBHHIE 2.20 ...