Android:利用SharedPreferences实现自动登录
主要代码:
public class LoginActivity extends Activity {

    private EditText username;

    private EditText userpassword;

    private CheckBox remember;

    private CheckBox autologin;

    private Button login;

    private SharedPreferences sp;

    private String userNameValue,passwordValue;

    @Override

    protected void onCreate(Bundle savedInstanceState) {

        // TODO Auto-generated method stub

        super.onCreate(savedInstanceState);

        setContentView(R.layout.login);

        // 初始化用户名、密码、记住密码、自动登录、登录按钮

        username = (EditText) findViewById(R.id.username);

        userpassword = (EditText) findViewById(R.id.userpassword);

        remember = (CheckBox) findViewById(R.id.remember);

        autologin = (CheckBox) findViewById(R.id.autologin);

        login = (Button) findViewById(R.id.login);

        sp = getSharedPreferences("userInfo", );

        String name=sp.getString("USER_NAME", "");

        String pass =sp.getString("PASSWORD", "");

        boolean choseRemember =sp.getBoolean("remember", false);

        boolean choseAutoLogin =sp.getBoolean("autologin", false);

  //      Toast.makeText(this, name, Toast.LENGTH_SHORT).show();

        //如果上次选了记住密码,那进入登录页面也自动勾选记住密码,并填上用户名和密码

        if(choseRemember){

            username.setText(name);

            userpassword.setText(pass);

            remember.setChecked(true);

        }

        //如果上次登录选了自动登录,那进入登录页面也自动勾选自动登录

        if(choseAutoLogin){

            autologin.setChecked(true);

        }

        login.setOnClickListener(new OnClickListener() {

            // 默认可登录帐号tinyphp,密码123

            @Override

            public void onClick(View arg0) {

                userNameValue = username.getText().toString();

                passwordValue = userpassword.getText().toString();

                SharedPreferences.Editor editor =sp.edit();

                // TODO Auto-generated method stub

                if (userNameValue.equals("tinyphp")

                        && passwordValue.equals("")) {

                    Toast.makeText(LoginActivity.this, "登录成功",

                            Toast.LENGTH_SHORT).show();

                    //保存用户名和密码

                    editor.putString("USER_NAME", userNameValue);

                    editor.putString("PASSWORD", passwordValue);

                    //是否记住密码

                    if(remember.isChecked()){

                        editor.putBoolean("remember", true);

                    }else{

                        editor.putBoolean("remember", false);

                    }

                    //是否自动登录

                        if(autologin.isChecked()){

                            editor.putBoolean("autologin", true);

                        }else{

                            editor.putBoolean("autologin", false);

                        }

                    editor.commit();

                    //跳转

                    Intent intent =new Intent(LoginActivity.this,SuccessActivity.class);

                    startActivity(intent);

                } else {

                    Toast.makeText(LoginActivity.this, "用户名或密码错误,请重新登录!",

                            Toast.LENGTH_SHORT).show();

                }

            }

        });

    }

}
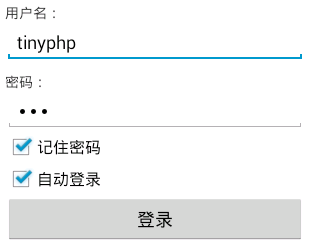
<?xml version="1.0" encoding="utf-8"?>

<LinearLayout xmlns:android="http://schemas.android.com/apk/res/android"

    android:layout_width="match_parent"

    android:layout_height="match_parent"

    android:orientation="vertical"

    android:padding="10dp" >

    <TextView

        android:layout_width="wrap_content"

        android:layout_height="wrap_content"

        android:text="用户名:" />

    <EditText

        android:id="@+id/username"

        android:layout_width="match_parent"

        android:layout_height="wrap_content"

        android:ems="10"

        android:inputType="textPersonName" >

    </EditText>

    <TextView

        android:layout_width="wrap_content"

        android:layout_height="wrap_content"

        android:layout_marginTop="10dp"

        android:text="密码:" />

    <EditText

        android:id="@+id/userpassword"

        android:layout_width="match_parent"

        android:layout_height="wrap_content"

        android:ems="10"

        android:inputType="textPassword" >

    </EditText>

    <CheckBox

        android:id="@+id/remember"

        android:layout_width="wrap_content"

        android:layout_height="wrap_content"

        android:text="记住密码" />

    <CheckBox

        android:id="@+id/autologin"

        android:layout_width="wrap_content"

        android:layout_height="wrap_content"

        android:text="自动登录" />

    <Button

        android:id="@+id/login"

        android:layout_width="match_parent"

        android:layout_height="wrap_content"

        android:text="登录" />

</LinearLayout>
Android:利用SharedPreferences实现自动登录的更多相关文章
- SharedPreferences实现自动登录记住用户名密码
最近Android项目需要一个自动登录功能,完成之后,特总结一下,此功能依靠SharedPreferences进行实现. SharedPreferences简介 SharedPreferences ...
- [技术博客] 利用SharedPreferences来实现登录状态的记忆功能
[技术博客] 利用SharedPreferences来实现登录状态的记忆功能 一.SharedPreferences简介 SharedPreferences是Android平台上一个轻量级的存储辅助类 ...
- Android 记住密码和自动登录界面的实现(SharedPreferences 的用法)
原文:http://blog.csdn.net/liuyiming_/article/details/7704923 SharedPreferences介绍: SharedPreferences是An ...
- Android 利用SharedPreferences保存与删除 用户登录数据
创建SharedPreferences对象: SharedPreferences sharedPreferences = context.getSharedPreferences("user ...
- Android利用HttpURLConnection实现模拟登录
最近在做一个APP,需要模拟登录教务处,之前曾经用HttpClient做过,点这里,但是发现最新的Android SDK已经不支持Httpclient了,所以只好在琢磨一下HttpURLConnect ...
- 利用jquery实现自动登录
前提是需要引入jquery和jquery.cookie html 用户名:<input type="text" id="name"/><br ...
- Android --------- 利用SharedPreferences存取数据
//向SharedPreferences中存放数据 //1.定义SharedPreferences对象,通过getSharedPreferences方法得到 SharedPreferences sp ...
- shell中嵌套执行expect命令实例(利用expect实现自动登录)
expect是 #!/bin/bashpasswd='123456'/usr/bin/expect <<EOFset time 30spawn ssh root@192.168.76.10 ...
- Android记住密码自动登录的实现
我采用的是SharedPreferences来存取数据的,所以先简单的介绍一下SharedPreferences SharedPreferences是Android平台上一个轻量级的存储类,主要是保存 ...
随机推荐
- 客户端访问WebService和PageMethod
客户端访问WebService 客户端访问WebService和后台访问WebService没什么不同,注意的地方是要在ScriptManager中添加 <Services> ...
- vs2010中安装ASP.NET AJAX Control Toolkit
方法一: 第一步 下载Ajax Control Toolkit 进入网址http://ajaxcontroltoolkit.codeplex.com/ 即可下载 第二步 解压下载下来的Ajax Con ...
- useradd命令详解
功能说明:建立用户帐号.语 法:useradd [-mMnr][-c <备注>][-d <登入目录>][-e <有效期限>][-f <缓冲天数>][-g ...
- 扒一扒各大电商网站的m站都用的什么前端技术输入日志标题
凡客首页使用Swiper和zepto,没有使用jquery , 静态首页+js交互, 资源加载使用 lazyLoad X-AspNet-Version: 4.0.30319 X-AspNetMvc- ...
- 【Ibatis】总结各种使用技巧
[Ibatis]总结各种使用技巧 <alias> <typeAlias alias="YintaiMobile_FreeData_Model" type=&quo ...
- ASP.NET 运行机制
原本今天打算继续写ASP.NET MVC第四天的.但是由于里面涉及到asp.net运行机制的原理,如果不分析一下这里,mvc想说清楚还是挺困难的.既然要提到asp.net运行机制,所以打算还是说详细一 ...
- Python实战(2)
在安装python第三方插件库的时候遇到了这个错误 遇到这种问题可以”转战“国内的第三方镜像,问题便可迎刃而解.例如豆瓣镜像——http://pypi.douban.com/simple/ 先安装ea ...
- C++中的多重继承与虚继承的问题
1.C++支持多重继承,但是一般情况下,建议使用单一继承. 类D继承自B类和C类,而B类和C类都继承自类A,因此出现下图所示情况: A A \ / B C ...
- IOS开发实现录音功能
导入框架: ? 1 #import <AVFoundation/AVFoundation.h> 声明全局变量: ? 1 2 3 4 5 @interface ViewController ...
- Android Studio 单刷《第一行代码》系列 01 —— 第一战 HelloWorld
前言(Prologue) 本系列将使用 Android Studio 将<第一行代码>(书中讲解案例使用Eclipse)刷一遍,旨在为想入坑 Android 开发,并选择 Android ...