
JMeter测试工具.jmx文件详解
摘要:了解.jmx文件格式类型,对jmeter二次开发与拓展有很大的帮助,当然也可以利用python对其进行一些处理(生成一些测试用例,对jmx文件进行 ”增删改查“)。
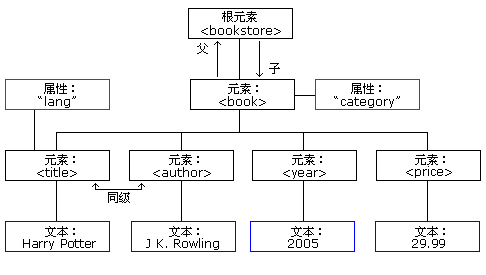
一个完整用例的.jmx文件基本结构是这样,类似于xml结构(树状结构)(文章标红处 均是 可以修改的 地方(也可以说就是一个可控变量));
python 处理xml文件的模块,bs4 , xml.dom;
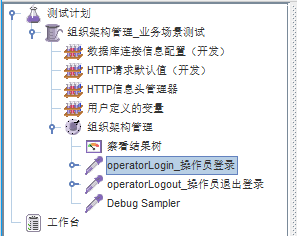
下面按结构自上而下讲解各个部分再.jmx文件中的表示:
测试计划 root
<TestPlan guiclass="TestPlanGui" testclass="TestPlan" testname="测试计划" enabled="true">

      <stringProp name="TestPlan.comments"></stringProp>

      <boolProp name="TestPlan.functional_mode">false</boolProp>

      <boolProp name="TestPlan.serialize_threadgroups">false</boolProp>

      <elementProp name="TestPlan.user_defined_variables" elementType="Arguments" guiclass="ArgumentsPanel" testclass="Arguments" testname="用户定义的变量" enabled="true">

        <collectionProp name="Arguments.arguments"/>

      </elementProp>

      <stringProp name="TestPlan.user_define_classpath"></stringProp>

    </TestPlan>
变量包含: testname, enabled(true启用,false禁用)
线程组 first Child
<ThreadGroup guiclass="ThreadGroupGui" testclass="ThreadGroup" testname="组织架构管理_业务场景测试" enabled="true">

        <stringProp name="ThreadGroup.on_sample_error">continue</stringProp>

        <elementProp name="ThreadGroup.main_controller" elementType="LoopController" guiclass="LoopControlPanel" testclass="LoopController" testname="循环控制器" enabled="true">

          <boolProp name="LoopController.continue_forever">false</boolProp>

          <stringProp name="LoopController.loops">1</stringProp>   -- 循环一次

        </elementProp>

        <stringProp name="ThreadGroup.num_threads">1</stringProp>  -- 线程数1

        <stringProp name="ThreadGroup.ramp_time">1</stringProp>   -- Ramp-up Time =1,启动时间

        <longProp name="ThreadGroup.start_time">1472796674000</longProp>

        <longProp name="ThreadGroup.end_time">1472796674000</longProp>

        <boolProp name="ThreadGroup.scheduler">false</boolProp>

        <stringProp name="ThreadGroup.duration"></stringProp>

        <stringProp name="ThreadGroup.delay"></stringProp>

      </ThreadGroup>
JDBCDataSource
<JDBCDataSource guiclass="TestBeanGUI" testclass="JDBCDataSource" testname="数据库连接信息配置" enabled="true">

          <boolProp name="autocommit">true</boolProp>

          <stringProp name="checkQuery">Select 1</stringProp>

          <stringProp name="connectionAge">5000</stringProp>  -- 最大连接age

          <stringProp name="dataSource">mysql</stringProp>  -- 资源池变量

          <stringProp name="dbUrl">jdbc:mysql://localhost/db</stringProp>  --jdbc连接

          <stringProp name="driver">com.mysql.jdbc.Driver</stringProp>  -- jdbc驱动(可以设置为常量)

          <boolProp name="keepAlive">true</boolProp>

          <stringProp name="password">root</stringProp>  -- db密码

          <stringProp name="poolMax">10</stringProp>  -- 最大连接数

          <stringProp name="timeout">10000</stringProp>

          <stringProp name="transactionIsolation">DEFAULT</stringProp>

          <stringProp name="trimInterval">60000</stringProp>

          <stringProp name="username">name</stringProp>  -- 用户名

        </JDBCDataSource>
HTTP请求默认值
   <ConfigTestElement guiclass="HttpDefaultsGui" testclass="ConfigTestElement" testname="HTTP请求默认值" enabled="true">

          <elementProp name="HTTPsampler.Arguments" elementType="Arguments" guiclass="HTTPArgumentsPanel" testclass="Arguments" testname="用户定义的变量" enabled="true">

          <collectionProp name="Arguments.arguments"/>

          </elementProp>

          <stringProp name="HTTPSampler.domain">host</stringProp>  -- host  服务器IP

          <stringProp name="HTTPSampler.port">port</stringProp>  -- port端口

          <stringProp name="HTTPSampler.connect_timeout">100000</stringProp>  -- 连接超时时间

          <stringProp name="HTTPSampler.response_timeout">100000</stringProp>  -- 请求超时时间

          <stringProp name="HTTPSampler.protocol">http</stringProp>  -- 协议类型(变量可填)

          <stringProp name="HTTPSampler.contentEncoding">utf-8</stringProp>

          <stringProp name="HTTPSampler.path"></stringProp>

          <stringProp name="HTTPSampler.implementation">HttpClient4</stringProp>  -- 可选择(java\HttpCliet4)

          <stringProp name="HTTPSampler.concurrentPool">4</stringProp>

        </ConfigTestElement>
HTTP信息头管理器(http请求头设置,key-value对应)
        <HeaderManager guiclass="HeaderPanel" testclass="HeaderManager" testname="HTTP信息头管理器" enabled="true">

          <collectionProp name="HeaderManager.headers">

            <elementProp name="" elementType="Header">

              <stringProp name="Header.name">Content-Type</stringProp>

              <stringProp name="Header.value">application/json</stringProp>

            </elementProp>

          </collectionProp>

        </HeaderManager>
用户定义的变量
  <Arguments guiclass="ArgumentsPanel" testclass="Arguments" testname="用户定义的变量" enabled="true">

          <collectionProp name="Arguments.arguments">

            <elementProp name="accessToken" elementType="Argument">

              <stringProp name="Argument.name">accessToken</stringProp>

              <stringProp name="Argument.value">${accessToken}</stringProp>

              <stringProp name="Argument.metadata">=</stringProp>

              <stringProp name="Argument.desc">description</stringProp>

            </elementProp>

          </collectionProp>

  </Arguments>
仅一次控制器(循环控制器)
<OnceOnlyController guiclass="OnceOnlyControllerGui" testclass="OnceOnlyController" testname="组织管理" enabled="true"/>
查看结果树(该部分为固定项)
         <ResultCollector guiclass="ViewResultsFullVisualizer" testclass="ResultCollector" testname="察看结果树" enabled="true">

            <boolProp name="ResultCollector.error_logging">false</boolProp>

            <objProp>

              <name>saveConfig</name>

              <value class="SampleSaveConfiguration">

                <time>true</time>

                <latency>true</latency>

                <timestamp>true</timestamp>

                <success>true</success>

                <label>true</label>

                <code>true</code>

                <message>true</message>

                <threadName>true</threadName>

                <dataType>true</dataType>

                <encoding>false</encoding>

                <assertions>true</assertions>

                <subresults>true</subresults>

                <responseData>false</responseData>

                <samplerData>false</samplerData>

                <xml>false</xml>

                <fieldNames>false</fieldNames>

                <responseHeaders>false</responseHeaders>

                <requestHeaders>false</requestHeaders>

                <responseDataOnError>false</responseDataOnError>

                <saveAssertionResultsFailureMessage>false</saveAssertionResultsFailureMessage>

                <assertionsResultsToSave>0</assertionsResultsToSave>

                <bytes>true</bytes>

                <url>true</url>

                <hostname>true</hostname>

                <threadCounts>true</threadCounts>

                <sampleCount>true</sampleCount>

              </value>

            </objProp>

            <stringProp name="filename"></stringProp>

          </ResultCollector>
HTTP请求(Sampler,此处为Json写法,因为请求类型为Application/Json)
<HTTPSamplerProxy guiclass="HttpTestSampleGui" testclass="HTTPSamplerProxy" testname="operatorLogin_操作员登录" enabled="true">
<boolProp name="HTTPSampler.postBodyRaw">true</boolProp>
<elementProp name="HTTPsampler.Arguments" elementType="Arguments">
<collectionProp name="Arguments.arguments">
<elementProp name="" elementType="HTTPArgument">
<boolProp name="HTTPArgument.always_encode">false</boolProp>
<stringProp name="Argument.value">{"operatorNo":"${operatorNo}", "password":"${password}", "verifyCode":"${verifyCode}"}</stringProp>
<stringProp name="Argument.metadata">=</stringProp>
</elementProp>
</collectionProp>
</elementProp>
<stringProp name="HTTPSampler.domain"></stringProp>
<stringProp name="HTTPSampler.port"></stringProp>
<stringProp name="HTTPSampler.connect_timeout"></stringProp>
<stringProp name="HTTPSampler.response_timeout"></stringProp>
<stringProp name="HTTPSampler.protocol"></stringProp>
<stringProp name="HTTPSampler.contentEncoding"></stringProp>
<stringProp name="HTTPSampler.path">/operatorLogin</stringProp> -- 请求路径
<stringProp name="HTTPSampler.method">POST</stringProp>
<boolProp name="HTTPSampler.follow_redirects">true</boolProp>
<boolProp name="HTTPSampler.auto_redirects">false</boolProp>
<boolProp name="HTTPSampler.use_keepalive">true</boolProp>
<boolProp name="HTTPSampler.DO_MULTIPART_POST">false</boolProp>
<boolProp name="HTTPSampler.monitor">false</boolProp>
<stringProp name="HTTPSampler.embedded_url_re"></stringProp>
</HTTPSamplerProxy>
响应断言
<ResponseAssertion guiclass="AssertionGui" testclass="ResponseAssertion" testname="响应断言" enabled="true">
<collectionProp name="Asserion.test_strings">
<stringProp name="-1610171759">"errorCode":"0","errorMsg":"操作成功!"</stringProp>
</collectionProp>
<stringProp name="Assertion.test_field">Assertion.response_data</stringProp>
<boolProp name="Assertion.assume_success">false</boolProp>
<intProp name="Assertion.test_type">2</intProp>
<stringProp name="Assertion.scope">all</stringProp>
<stringProp name="Scope.variable">count_1</stringProp>
</ResponseAssertion>
Debuger Sampler(固定样式)
  <DebugSampler guiclass="TestBeanGUI" testclass="DebugSampler" testname="Debug Sampler" enabled="true">

            <boolProp name="displayJMeterProperties">false</boolProp>

            <boolProp name="displayJMeterVariables">true</boolProp>

            <boolProp name="displaySystemProperties">false</boolProp>

          </DebugSampler>
JMeter测试工具.jmx文件详解的更多相关文章
- Web性能压力测试工具之Siege详解
PS:Siege是一款开源的压力测试工具,设计用于评估WEB应用在压力下的承受能力.可以根据配置对一个WEB站点进行多用户的并发访问,记录每个用户所有请求过程的相应时间,并在一定数量的并发访问下重复进 ...
- IO测试工具之fio详解
目前主流的第三方IO测试工具有fio.iometer和Orion,这三种工具各有千秋. fio在Linux系统下使用比较方便,iometer在window系统下使用比较方便,Orion是oracle的 ...
- IO测试工具之fio详解(转)
http://www.cnblogs.com/raykuan/p/6914748.html 目前主流的第三方IO测试工具有fio.iometer和Orion,这三种工具各有千秋. fio在Linux系 ...
- Web 性能压力测试工具之 Siege 详解
Siege是一款开源的压力测试工具,设计用于评估WEB应用在压力下的承受能力.可以根据配置对一个WEB站点进行多用户的并发访问,记录每个用户所有请求过程的相应时间,并在一定数量的并发访问下重复进行.s ...
- (总结)Web性能压力测试工具之WebBench详解
PS:在运维工作中,压力测试是一项很重要的工作.比如在一个网站上线之前,能承受多大访问量.在大访问量情况下性能怎样,这些数据指标好坏将会直接影响用户体验.但是,在压力测试中存在一个共性,那就是压力 ...
- Web性能压力测试工具之WebBench详解
PS:在运维工作中,压力测试是一项很重要的工作.比如在一个网站上线之前,能承受多大访问量.在大访问量情况下性能怎样,这些数据指标好坏将会直接影响用户体验.但是,在压力测试中存在一个共性,那就是压力测试 ...
- Protobuf 文件生成工具 Prototool 命令详解
Protobuf 文件生成工具 Prototool 命令详解 简介 Prototool 是 Protobuf 文件的生成工具, 目前支持go, php, java, c#, object c 五种语言 ...
- Apache性能测试工具ab使用详解~转载
Apache自带性能测试工具ab使用详解 一. Apache的下载 1. http://www.apache.org/,进入Apache的官网 2. 将页面拖到最下方“Apache Project L ...
- Linux中/proc目录下文件详解
转载于:http://blog.chinaunix.net/uid-10449864-id-2956854.html Linux中/proc目录下文件详解(一)/proc文件系统下的多种文件提供的系统 ...
随机推荐
- Python: 浅淡Python中的属性(property)
起源:项目过程中需要研究youtube_dl这个开源组件,翻阅其中对类的使用,对比c#及Delphi中实现,感觉Python属性机制挺有意思.区别与高级编程语言之单一入口,在类之属性这一方面,它随意的 ...
- 项目总结07:JS图片的上传预览和表单提交(FileReader()方法)
JS图片的上传预览和表单提交(FileReader()方法) 一开始没有搞明白下面这块代码的,今天有时间简单整理下 核心点:FileReader()方法 以下是代码(以JSP文件为例) <!DO ...
- 【php 之根据函数名称动态调用该函数】
解释函数:call_user_func()以及函数call_user_func_array() 对于PHP程序员而言,函数是再熟悉不过的事物了,毕竟我们整天都在和PHP内置函数以及我们自定义的函数打交 ...
- 不常见的javascript调试技巧
原文链接:https://segmentfault.com/a/1190000011857058 有时, 有一组复杂的对象要查看.可以通过console.log查看并滚动浏览,亦或者使用console ...
- 865. Smallest Subtree with all the Deepest Nodes 有最深节点的最小子树
[抄题]: Given a binary tree rooted at root, the depth of each node is the shortest distance to the roo ...
- day 19 类的名称空间,组合,派生
对象的属性: 不仅在__init__里面添加,还可以在其他方法或者类外面添加 class Game: def __init__(self,name,age): self.name = name sel ...
- 17-matlab例题练习
练习 %编写程序使任意输入的一个数反转,如输入123456,输出654321 clc,clear; a = input('输入一个整数\n'); b = 0; while a ~= 0 b = b ...
- Win7 64位VC6调试无法退出
错误信息:LINK: fatal error LNK1168: cannot open Debug/test1.exe for writing 根据网络上查询,找到最终原因,DM.dll,TLLOC. ...
- Android Studio 使用入门
Android Studio 快捷键 Action Mac OSX Win/Linux 注释代码(//) Cmd + / Ctrl + / 注释代码(/**/) Cmd + Option + / Ct ...
- 09. pt-fingerprint
vim pt-fingerprint.txt select name, password from user where id=5;select name, password from user wh ...