android-基础编程-Dialog
Dialog是一种常见的控件。
设置对话框一般步骤如下:
1.实例化dialog
由于AlertDialog的构造函数的关系,不能直接实例化,需要利用Builder来实例化,如
AlertDialog.Builder customizeDialog =new AlertDialog.Builder(this);
2.设置对话框
设置除了指基本设置如title,messages,icon外,还指设置对话框的按钮,单选框,列表,复选框,view等。
customizeDialog.setTitle("我是一个自定义Dialog");
customizeDialog.setView(dialogView);
customizeDialog.setPositiveButton("确定",new DialogInterface.OnClickListener() {}
3.show
显示对话框。
常见的dialog。
a. 正常的dialog
private void showNormalDialog(){

        /* @setIcon 设置对话框图标

         * @setTitle 设置对话框标题

         * @setMessage 设置对话框消息提示

         * setXXX方法返回Dialog对象,因此可以链式设置属性

         */

        final AlertDialog.Builder normalDialog =

                new AlertDialog.Builder(this);

        normalDialog.setIcon(R.drawable.icon);

        normalDialog.setTitle("我是一个普通Dialog");

        normalDialog.setMessage("你要点击哪一个按钮呢?");

        normalDialog.setPositiveButton("确定",

                new DialogInterface.OnClickListener() {

                    @Override

                    public void onClick(DialogInterface dialog, int which) {

                        //...To-do

                    }

                });

        normalDialog.setNegativeButton("关闭",

                new DialogInterface.OnClickListener() {

                    @Override

                    public void onClick(DialogInterface dialog, int which) {

                        //...To-do

                    }

                });

        // 显示

        normalDialog.show();

    }

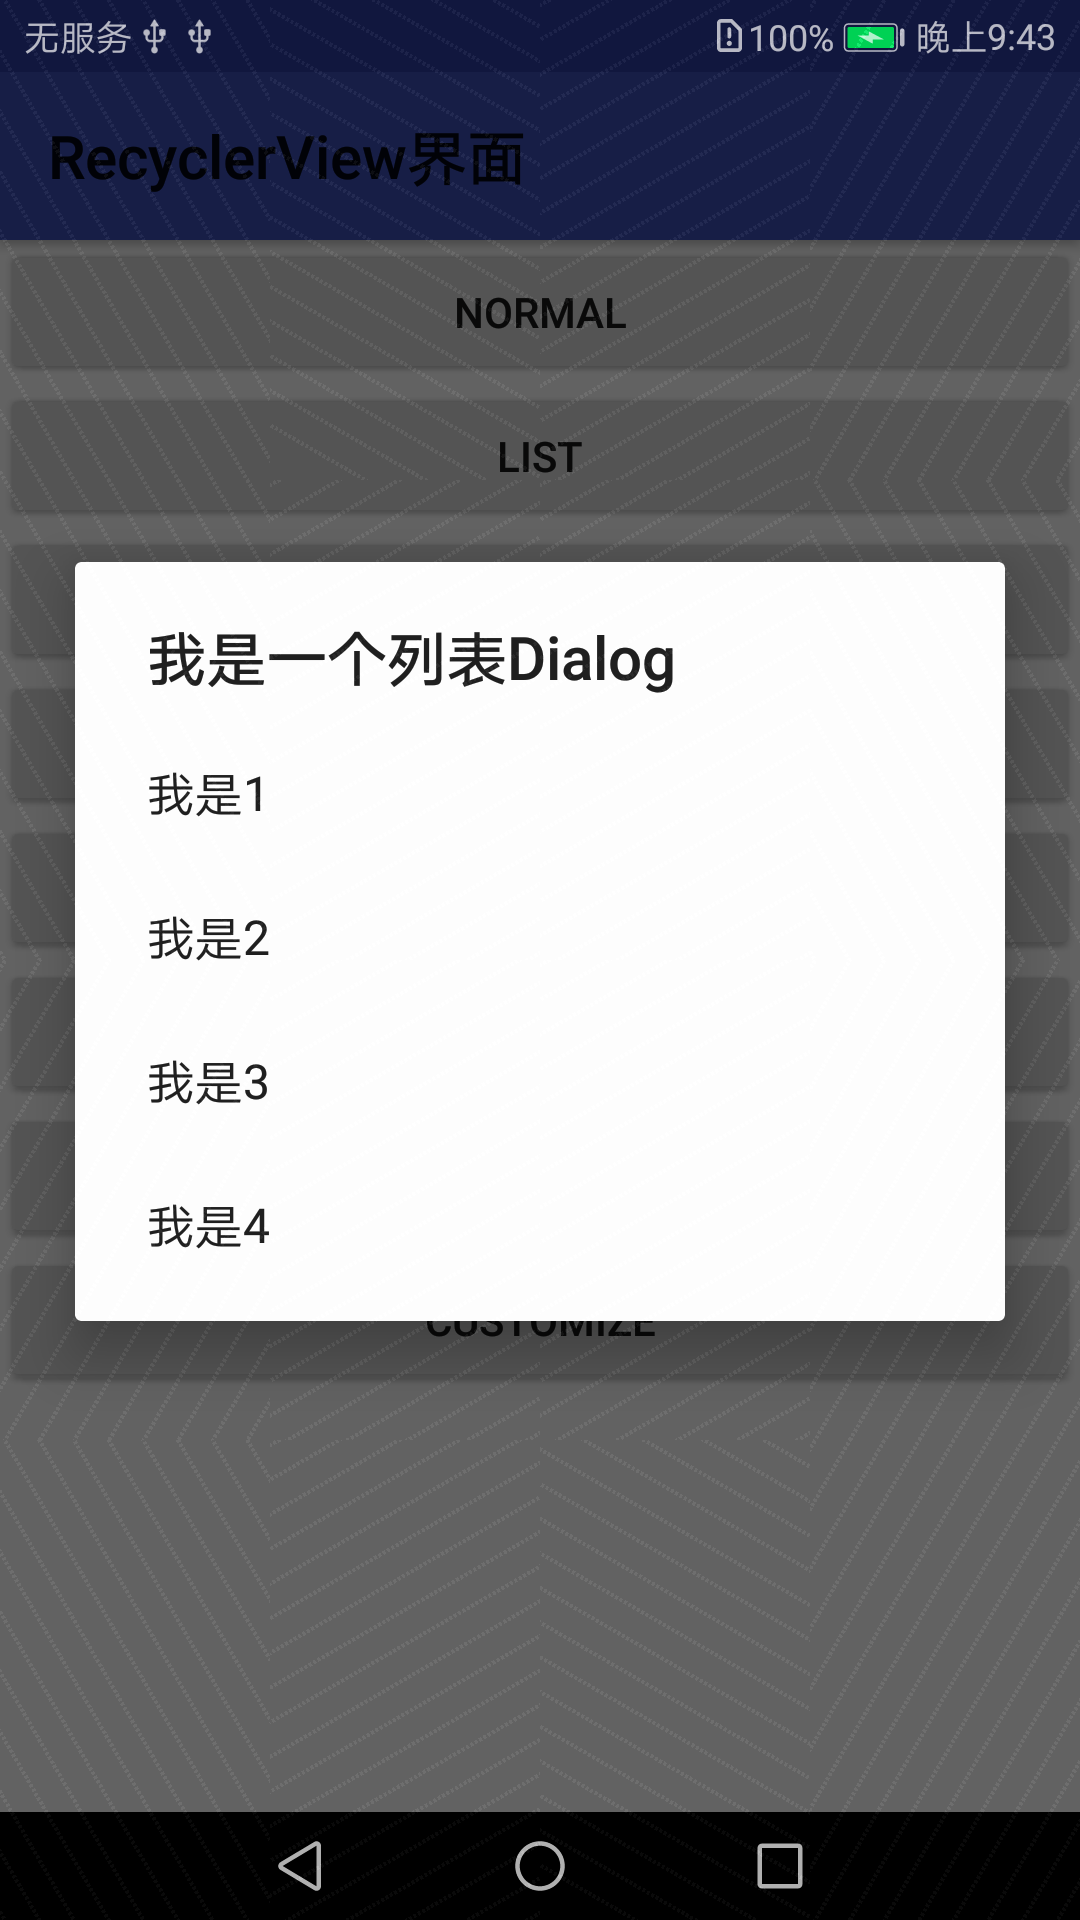
2.List dialog
private void showListDialog() {

        final String[] items = { "我是1","我是2","我是3","我是4" };

        AlertDialog.Builder listDialog =

                new AlertDialog.Builder(this);

        listDialog.setTitle("我是一个列表Dialog");

        listDialog.setItems(items, new DialogInterface.OnClickListener() {

            @Override

            public void onClick(DialogInterface dialog, int which) {

                // which 下标从0开始

                // ...To-do

                Toast.makeText(getApplicationContext(),

                        "你点击了" + items[which],

                        Toast.LENGTH_SHORT).show();

            }

        });

        listDialog.show();

    }
3.单选
private void showSingleChoiceDialog(){

        final String[] items = { "我是1","我是2","我是3","我是4" };

        yourChoice = -1;

        AlertDialog.Builder singleChoiceDialog =

                new AlertDialog.Builder(this);

        singleChoiceDialog.setTitle("我是一个单选Dialog");

        // 第二个参数是默认选项,此处设置为0

        singleChoiceDialog.setSingleChoiceItems(items, 0,

                new DialogInterface.OnClickListener() {

                    @Override

                    public void onClick(DialogInterface dialog, int which) {

                        yourChoice = which;

                    }

                });

        singleChoiceDialog.setPositiveButton("确定",

                new DialogInterface.OnClickListener() {

                    @Override

                    public void onClick(DialogInterface dialog, int which) {

                        if (yourChoice != -1) {

                            Toast.makeText(getApplicationContext(),

                                    "你选择了" + items[yourChoice],

                                    Toast.LENGTH_SHORT).show();

                        }

                    }

                });

        singleChoiceDialog.show();

    }

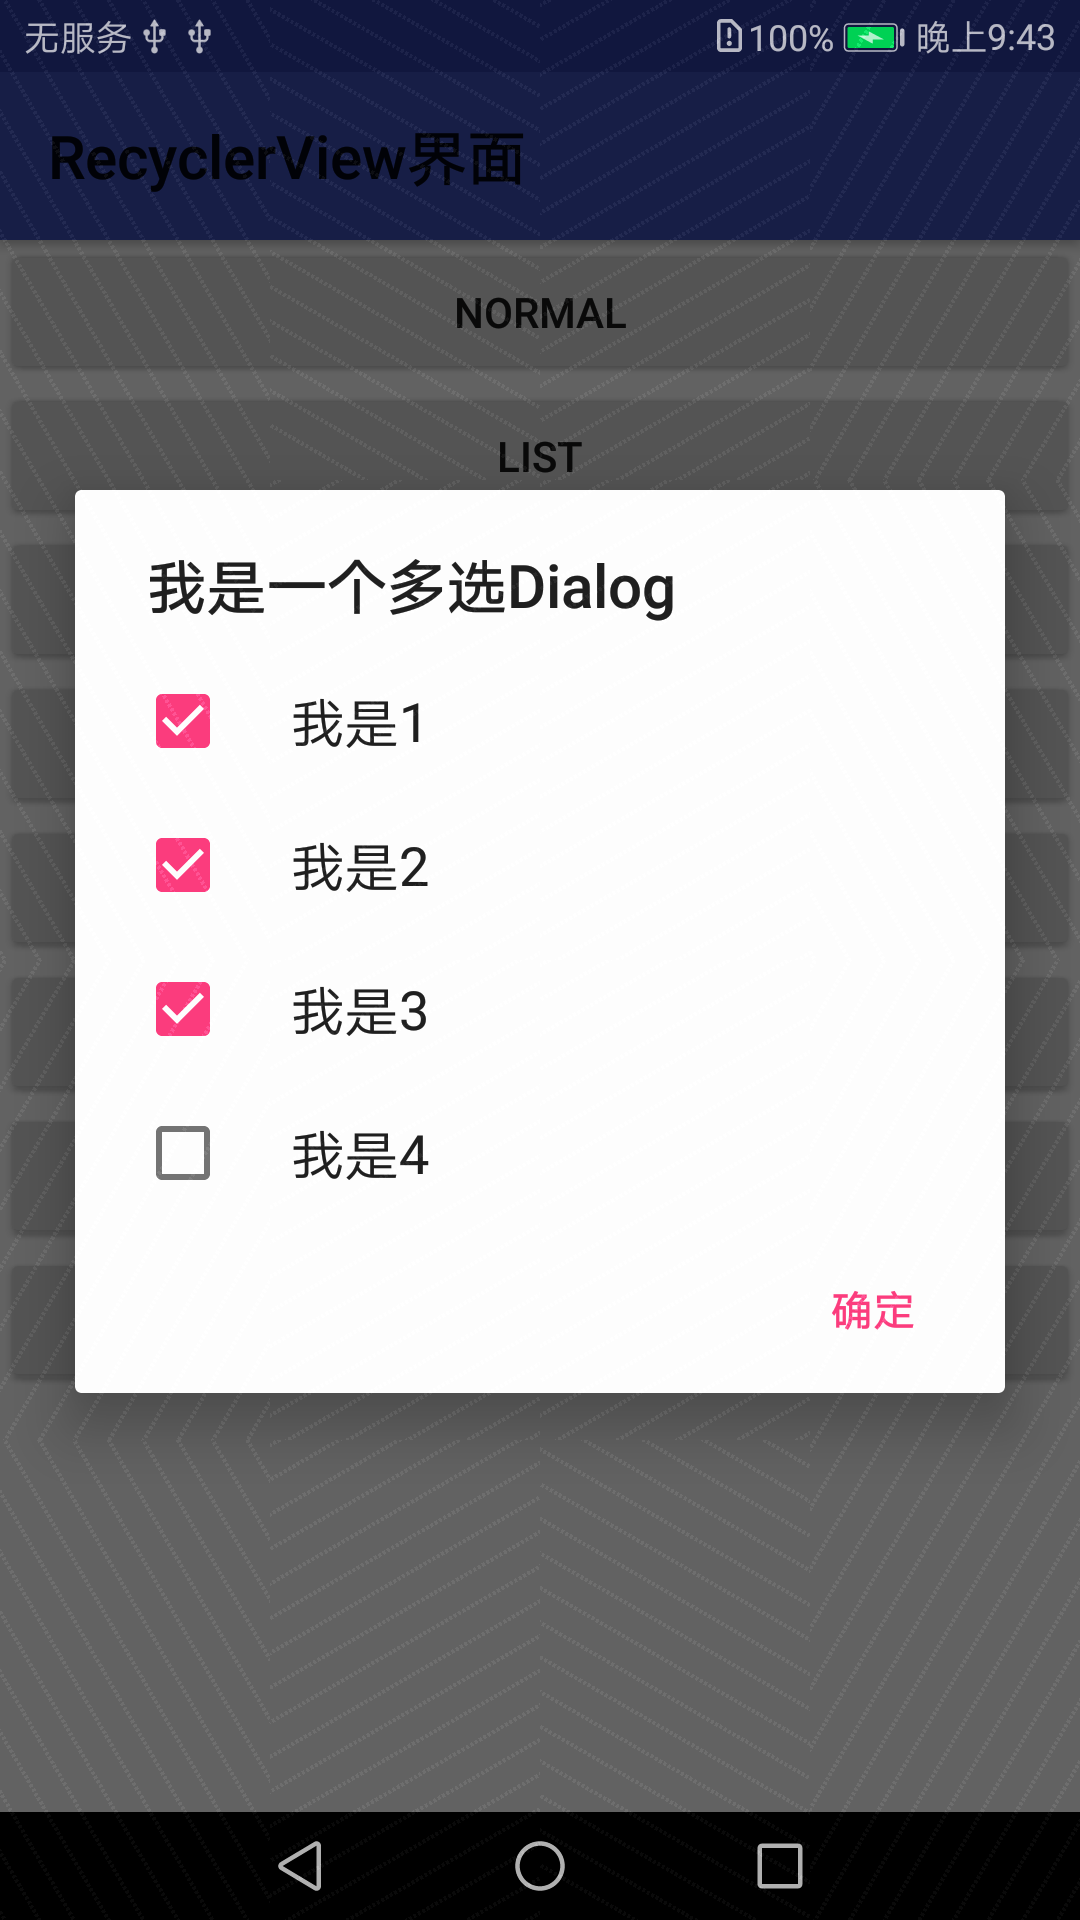
4.多选
ArrayList<Integer> yourChoices = new ArrayList<>();

    private void showMultiChoiceDialog() {

        final String[] items = { "我是1","我是2","我是3","我是4" };

        // 设置默认选中的选项,全为false默认均未选中

        final boolean initChoiceSets[]={false,false,false,false};

        yourChoices.clear();

        AlertDialog.Builder multiChoiceDialog =

                new AlertDialog.Builder(this);

        multiChoiceDialog.setTitle("我是一个多选Dialog");

        multiChoiceDialog.setMultiChoiceItems(items, initChoiceSets,

                new DialogInterface.OnMultiChoiceClickListener() {

                    @Override

                    public void onClick(DialogInterface dialog, int which,

                                        boolean isChecked) {

                        if (isChecked) {

                            yourChoices.add(which);

                        } else {

                            yourChoices.remove(which);

                        }

                    }

                });

        multiChoiceDialog.setPositiveButton("确定",

                new DialogInterface.OnClickListener() {

                    @Override

                    public void onClick(DialogInterface dialog, int which) {

                        int size = yourChoices.size();

                        String str = "";

                        for (int i = 0; i < size; i++) {

                            str += items[yourChoices.get(i)] + " ";

                        }

                        Toast.makeText(getApplicationContext(),

                                "你选中了" + str,

                                Toast.LENGTH_SHORT).show();

                    }

                });

        multiChoiceDialog.show();

    }
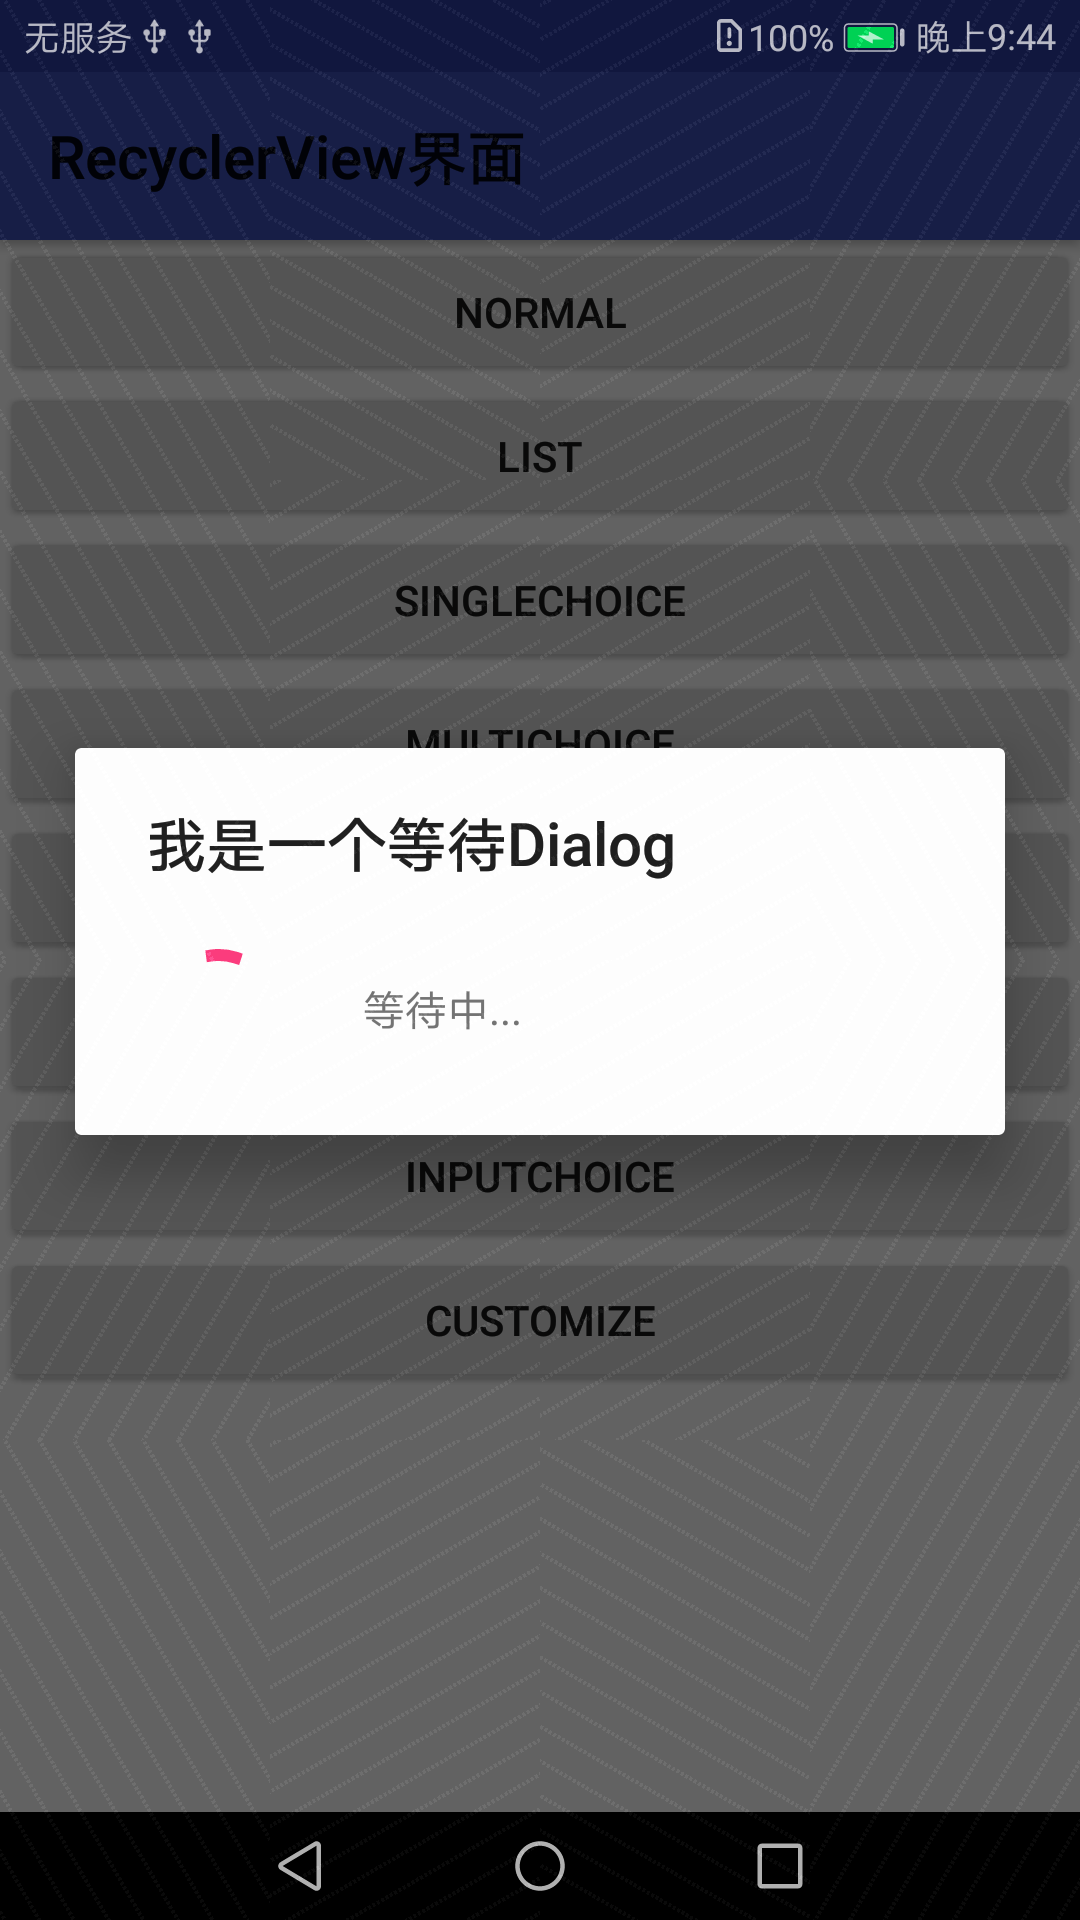
5.等待中
private void showWaitingDialog() {

    /* 等待Dialog具有屏蔽其他控件的交互能力

     * @setCancelable 为使屏幕不可点击,设置为不可取消(false)

     * 下载等事件完成后,主动调用函数关闭该Dialog

     */

        ProgressDialog waitingDialog=

                new ProgressDialog(this);

        waitingDialog.setTitle("我是一个等待Dialog");

        waitingDialog.setMessage("等待中...");

        waitingDialog.setIndeterminate(true);

        waitingDialog.setCancelable(false);

        waitingDialog.show();

    }
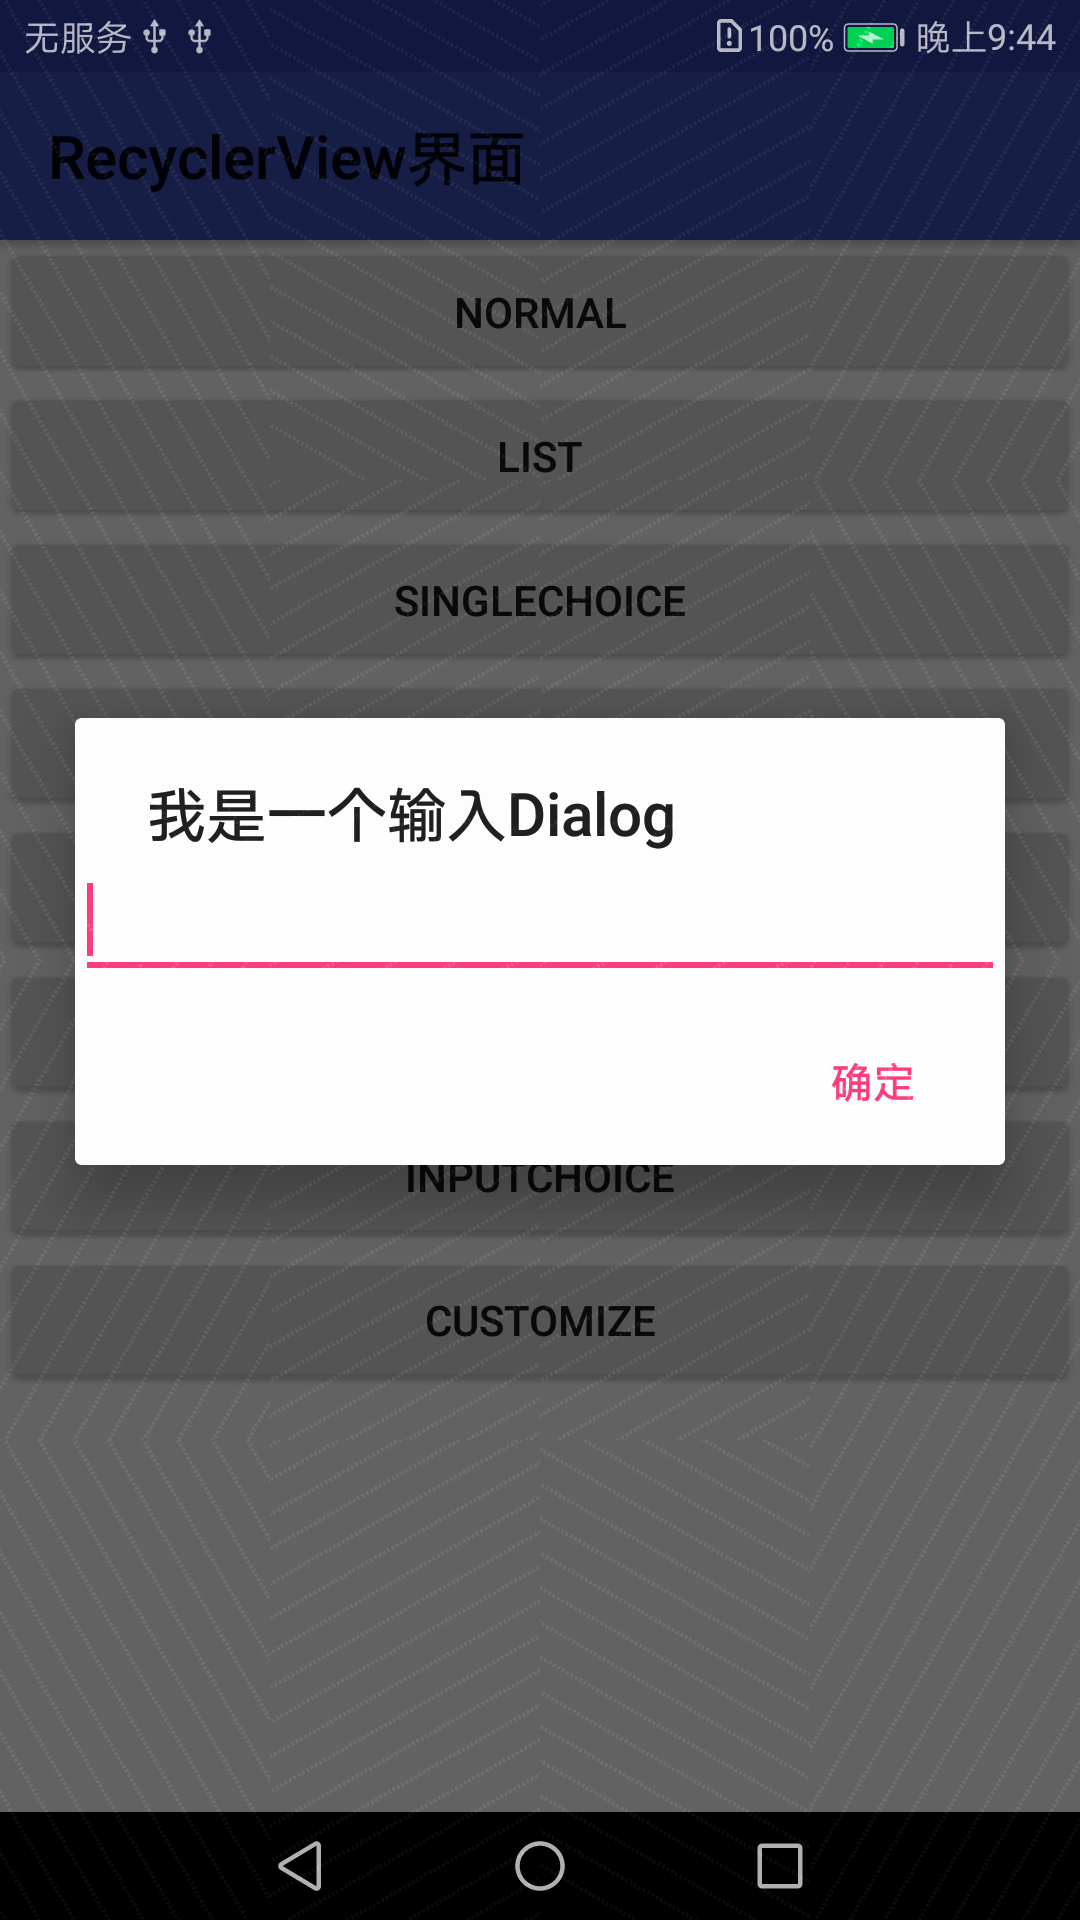
6.输入
private void showInputDialog() {

    /*@setView 装入一个EditView

     */

        final EditText editText = new EditText(this);

        AlertDialog.Builder inputDialog =

                new AlertDialog.Builder(this);

        inputDialog.setTitle("我是一个输入Dialog").setView(editText);

        inputDialog.setPositiveButton("确定",

                new DialogInterface.OnClickListener() {

                    @Override

                    public void onClick(DialogInterface dialog, int which) {

                        Toast.makeText(getApplicationContext(),

                                editText.getText().toString(),

                                Toast.LENGTH_SHORT).show();

                    }

                }).show();

    }
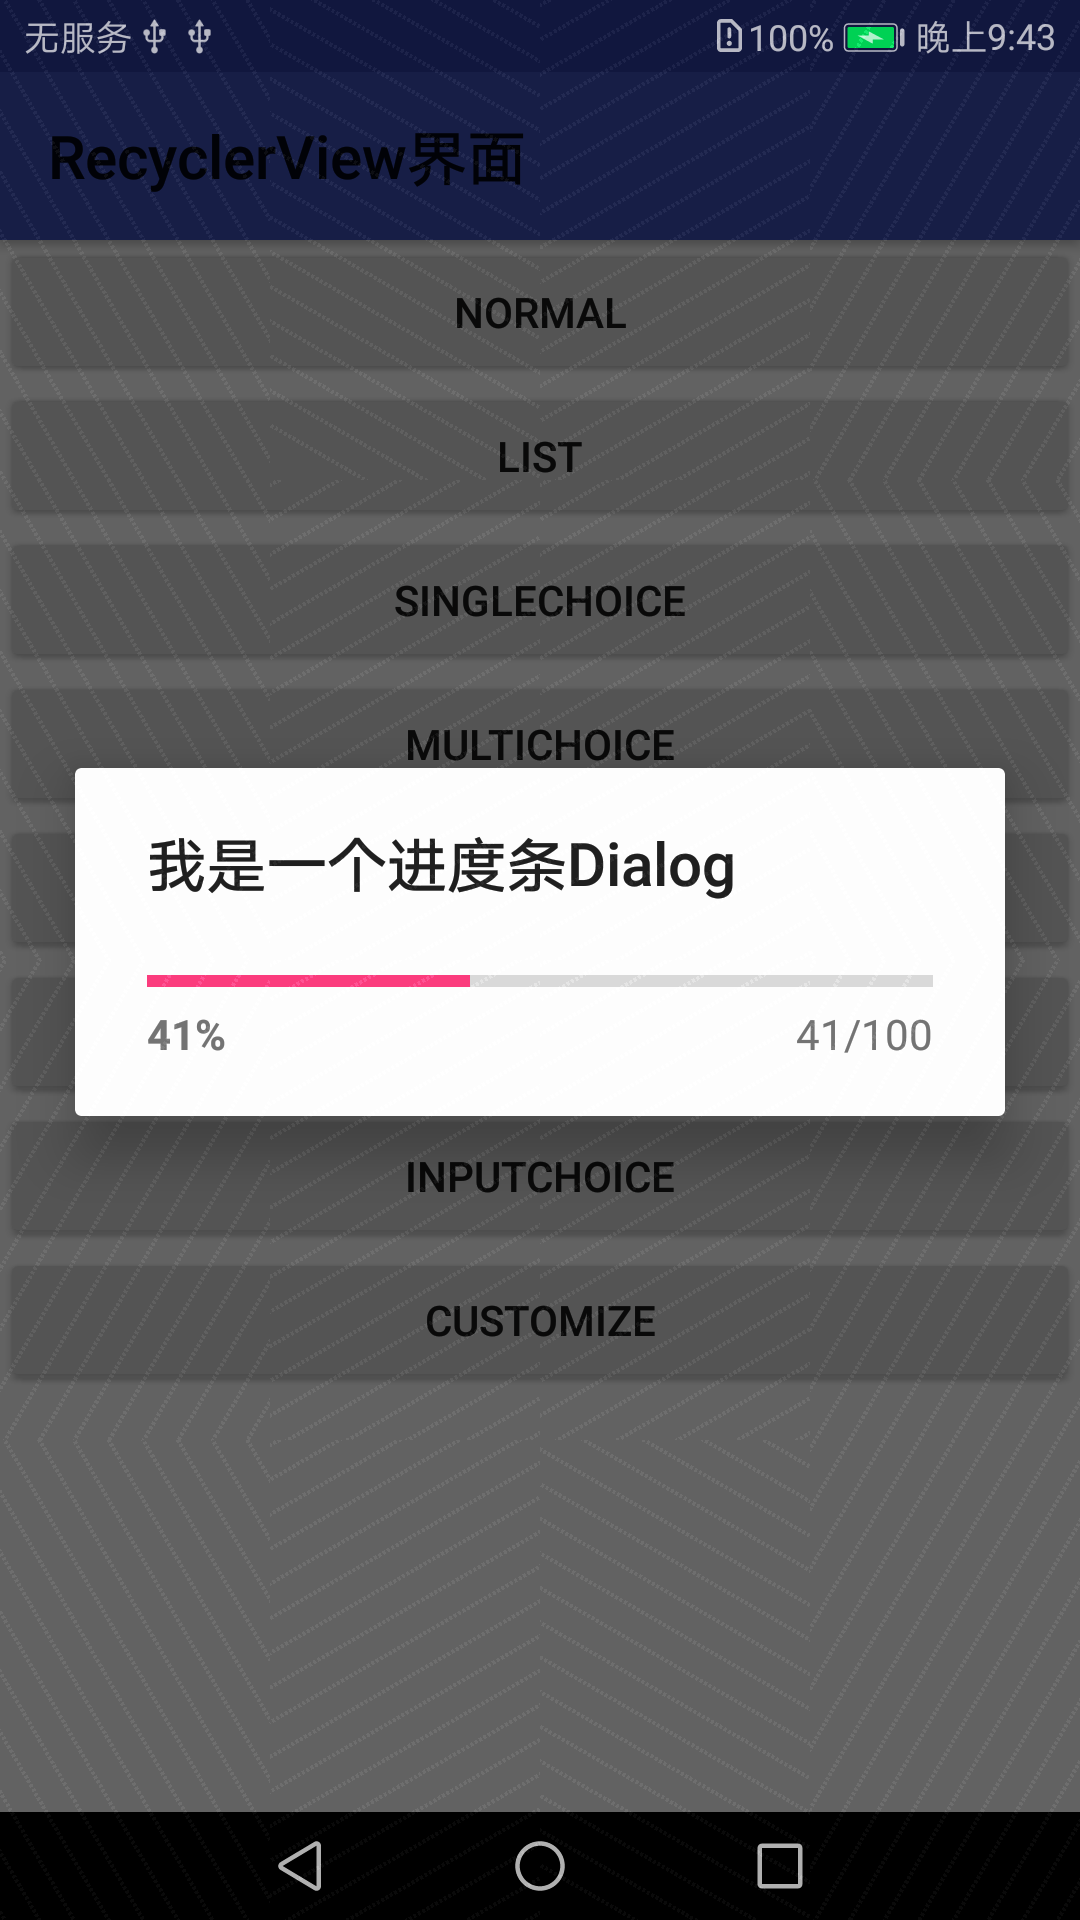
7.进度条
private void showProgressDialog() {

    /* @setProgress 设置初始进度

     * @setProgressStyle 设置样式(水平进度条)

     * @setMax 设置进度最大值

     */

        final int MAX_PROGRESS = 100;

        final ProgressDialog progressDialog =

                new ProgressDialog(this);

        progressDialog.setProgress(0);

        progressDialog.setTitle("我是一个进度条Dialog");

        progressDialog.setProgressStyle(ProgressDialog.STYLE_HORIZONTAL);

        progressDialog.setMax(MAX_PROGRESS);

        progressDialog.show();

    /* 模拟进度增加的过程

     * 新开一个线程,每个100ms,进度增加1

     */

        new Thread(new Runnable() {

            @Override

            public void run() {

                int progress= 0;

                while (progress < MAX_PROGRESS){

                    try {

                        Thread.sleep(100);

                        progress++;

                        progressDialog.setProgress(progress);

                    } catch (InterruptedException e){

                        e.printStackTrace();

                    }

                }

                // 进度达到最大值后,窗口消失

                progressDialog.cancel();

            }

        }).start();

    }
8.自定义
private void showCustomizeDialog() {

    /* @setView 装入自定义View ==> R.layout.dialog_customize

     * 由于dialog_customize.xml只放置了一个EditView,因此和图8一样

     * dialog_customize.xml可自定义更复杂的View

     */

        AlertDialog.Builder customizeDialog =

                new AlertDialog.Builder(this);

        final View dialogView = LayoutInflater.from(this)

                .inflate(R.layout.dialog_customize,null);

        customizeDialog.setTitle("我是一个自定义Dialog");

        customizeDialog.setView(dialogView);

        customizeDialog.setPositiveButton("确定",

                new DialogInterface.OnClickListener() {

                    @Override

                    public void onClick(DialogInterface dialog, int which) {

                        // 获取EditView中的输入内容

                        EditText edit_text =

                                (EditText) dialogView.findViewById(R.id.edit_text);

                        Toast.makeText(getApplicationContext(),

                                edit_text.getText().toString(),

                                Toast.LENGTH_SHORT).show();

                    }

                });

        customizeDialog.show();

    }

android-基础编程-Dialog的更多相关文章
- android: 多线程编程基础
9.1 服务是什么 服务(Service)是 Android 中实现程序后台运行的解决方案,它非常适合用于去执行那 些不需要和用户交互而且还要求长期运行的任务.服务的运行不依赖于任何用户界面,即使 ...
- Android网络编程基础
Android网络编程只TCP通信 TCP 服务器端工作的主要步骤如下.步骤1 调用ServerSocket(int port)创建一个ServerSocket,并绑定到指定端口上.步骤2 调用acc ...
- Android开发面试经——2.常见Android基础笔试题
标签: androidAndroid基础Android面试题Android笔试题 2015-03-12 15:04 3361人阅读 评论(3) 收藏 举报 分类: Android开发(29) 版 ...
- Android采访开发——2.通用Android基础笔试题
注意finddreams博客: http://blog.csdn.net/finddreams/article/details/44219231 正值跳槽的热季.整理一下Android面试中最常考的笔 ...
- Qt on Android 核心编程
Qt on Android 核心编程(最好看的Qt编程书!CSDN博主foruok倾力奉献!) 安晓辉 著 ISBN 978-7-121-24457-5 2015年1月出版 定价:65.00元 4 ...
- Android网络编程系列 一 TCP/IP协议族
在学习和使用Android网路编程时,我们接触的仅仅是上层协议和接口如Apache的httpclient或者Android自带的httpURlconnection等等.对于这些接口的底层实现我们也有必 ...
- Android网络编程系列 一 Socket抽象层
在<Android网络编程>系列文章中,前面已经将Java的通信底层大致的描述了,在我们了解了TCP/IP通信族架构及其原理,接下来我们就开始来了解基于tcp/ip协议层的Socket抽 ...
- Android基础总结(8)——服务
服务(Service)是Android中实现程序后台运行的解决方案,它非常适合用于去执行哪些不需要和用户交互而且还要长期运行的任务.服务的运行不依赖任何用户界面,即使当程序被切换到后台,或者用户打开了 ...
- 【Xamarin开发 Android 系列 4】 Android 基础知识
原文:[Xamarin开发 Android 系列 4] Android 基础知识 什么是Android? Android一词的本义指“机器人”,同时也是Google于2007年11月5日宣布的基于Li ...
- 【Android 应用开发】Android 网络编程 API笔记 - java.net 包 权限 地址 套接字 相关类 简介
Android 网络编程相关的包 : 9 包, 20 接口, 103 类, 6 枚举, 14异常; -- Java包 : java.net 包 (6接口, 34类, 2枚举, 12异常); -- An ...
随机推荐
- 扩展、委托、Lambda、linq
1.扩展 扩展是一个很有用的功能.如果你有一个类.不能修改,同时你又想给他加一个方法.这个过程就是扩展.扩展就是扩展方法. 例1: 类People public class People { publ ...
- 1F - A+B for Input-Output Practice (III)
Your task is to Calculate a + b. Input Input contains multiple test cases. Each test case contains a ...
- ssm介绍
1.Spring Spring是一个开源框架,Spring是于2003 年兴起的一个轻量级的Java 开发框架,由Rod Johnson 在其著作Expert One-On-One J2EE ...
- BZOJ1977或洛谷4180 [BJWC2010]次小生成树
一道LCA+生成树 BZOJ原题链接 洛谷原题链接 细节挺多,我调了半天..累炸.. 回到正题,我们先求出随便一棵最小生成树(设边权和为\(s\)),然后扫描剩下所有边,设扫到的边的两端点为\(x,y ...
- UOJ 274 温暖会指引我们前进 - LCT
Solution 更新掉路径上温暖度最小的边就可以了~ Code #include<cstdio> #include<cstring> #include<algorith ...
- de4dot破解脱壳新版MaxtoCode源数组长度不足解决办法
之前在看雪混了4年.NET破解版主,现在转战这里,发现很多人还在玩的是工具类的破解,可以说这里的人都还是皮毛啊 最近很多人问使用de4dot脱壳MaxtoCode有问题,之前写过一个教程,那是工具篇的 ...
- ubuntu 下通过ftp命令下载文件
/*连接*/ $ ftp 192.168.180.2Connected to 192.168.180.2.Name (192.168.180.2:rivsidn): admin Password: ...
- ApplicationContext(四)BeanFactory 功能扩展
ApplicationContext(四)BeanFactory 功能扩展 上节我们提到容器刷新的第二步初始化 BeanFactory 工厂并解析配制文件,但此时 BeanFactory 的功能还很简 ...
- Centos 装系统 配置网卡,校准时间
Vclient -控制台: 1.编辑网卡,第一块为外网,第二块为内网 #vi /etc/sysconfig/network-scripts/ifcfg-ens160 TYPE=Ethernet NAM ...
- c++11 template 模板练习
直接上代码吧 to do // 111111.cpp: 定义控制台应用程序的入口点. // #include "stdafx.h" #include <iostream> ...