
Flume学习之路 (三)Flume的配置方式
一、单一代理流配置
1.1 官网介绍
http://flume.apache.org/FlumeUserGuide.html#avro-source
通过一个通道将来源和接收器链接。需要列出源,接收器和通道,为给定的代理,然后指向源和接收器及通道。一个源的实例可以指定多个通道,但只能指定一个接收器实例。格式如下:
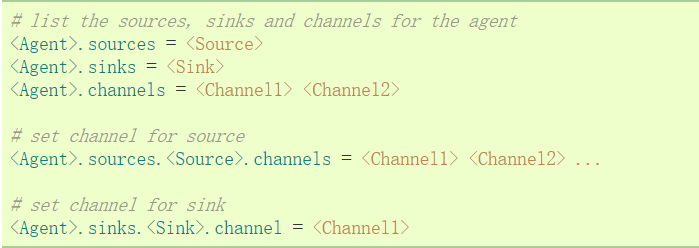
实例解析:一个代理名为agent_foo,外部通过avro客户端,并且发送数据通过内存通道给hdfs。在配置文件foo.config的可能看起来像这样:
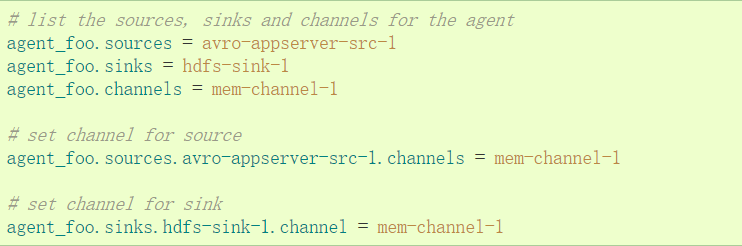
案例说明:这将使事件流从avro-appserver-src-1到hdfs-sink-1通过内存通道mem-channel-1。当代理开始foo.config作为其配置文件,它会实例化流。
配置单个组件
定义流之后,需要设置每个源,接收器和通道的属性。可以分别设定组件的属性值。
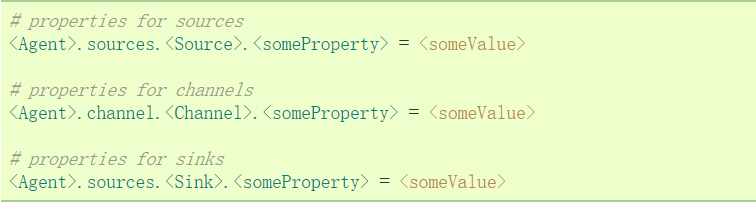
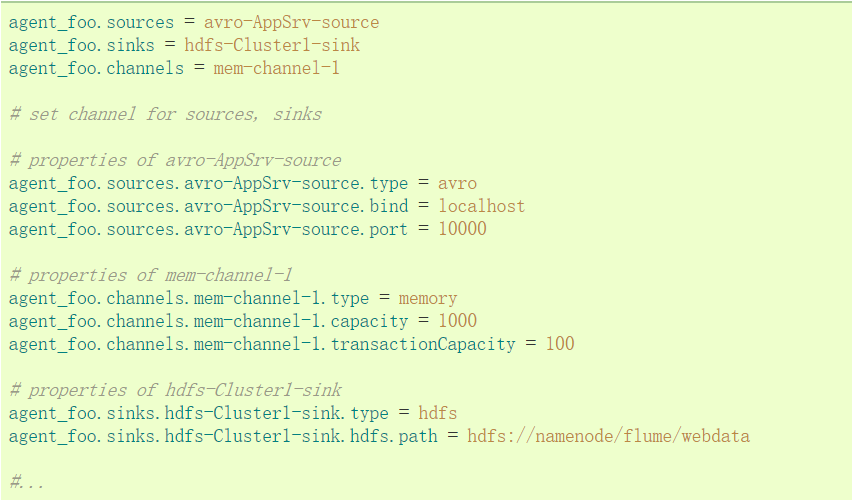
“type”属性必须为每个组件设置,以了解它需要什么样的对象。每个源,接收器和通道类型有其自己的一套,它所需的性能,以实现预期的功能。所有这些,必须根据需要设置。在前面的例子中,从hdfs-sink-1中的流到HDFS,通过内存通道mem-channel-1的avro-appserver-src-1源。下面是 一个例子,显示了这些组件的配置。
1.2 测试示例(一)
通过flume来监控一个目录,当目录中有新文件时,将文件内容输出到控制台。
#配置一个agent,agent的名称可以自定义(如a1)

#指定agent的sources(如s1)、sinks(如k1)、channels(如c1)

#分别指定agent的sources,sinks,channels的名称 名称可以自定义

a1.sources = s1

a1.sinks = k1

a1.channels = c1

#描述source

#配置目录scource

a1.sources.s1.type =spooldir

a1.sources.s1.spoolDir =/home/hadoop/logs

a1.sources.s1.fileHeader= true

a1.sources.s1.channels =c1

#配置sink

a1.sinks.k1.type = logger

a1.sinks.k1.channel = c1

#配置channel(内存做缓存)

a1.channels.c1.type = memory
启动命令
[hadoop@hadoop1 ~]$ flume-ng agent --conf conf --conf-file /home/hadoop/apps/flume/examples/case_spool.properties --name a1 -Dflume.root.logger=INFO,console
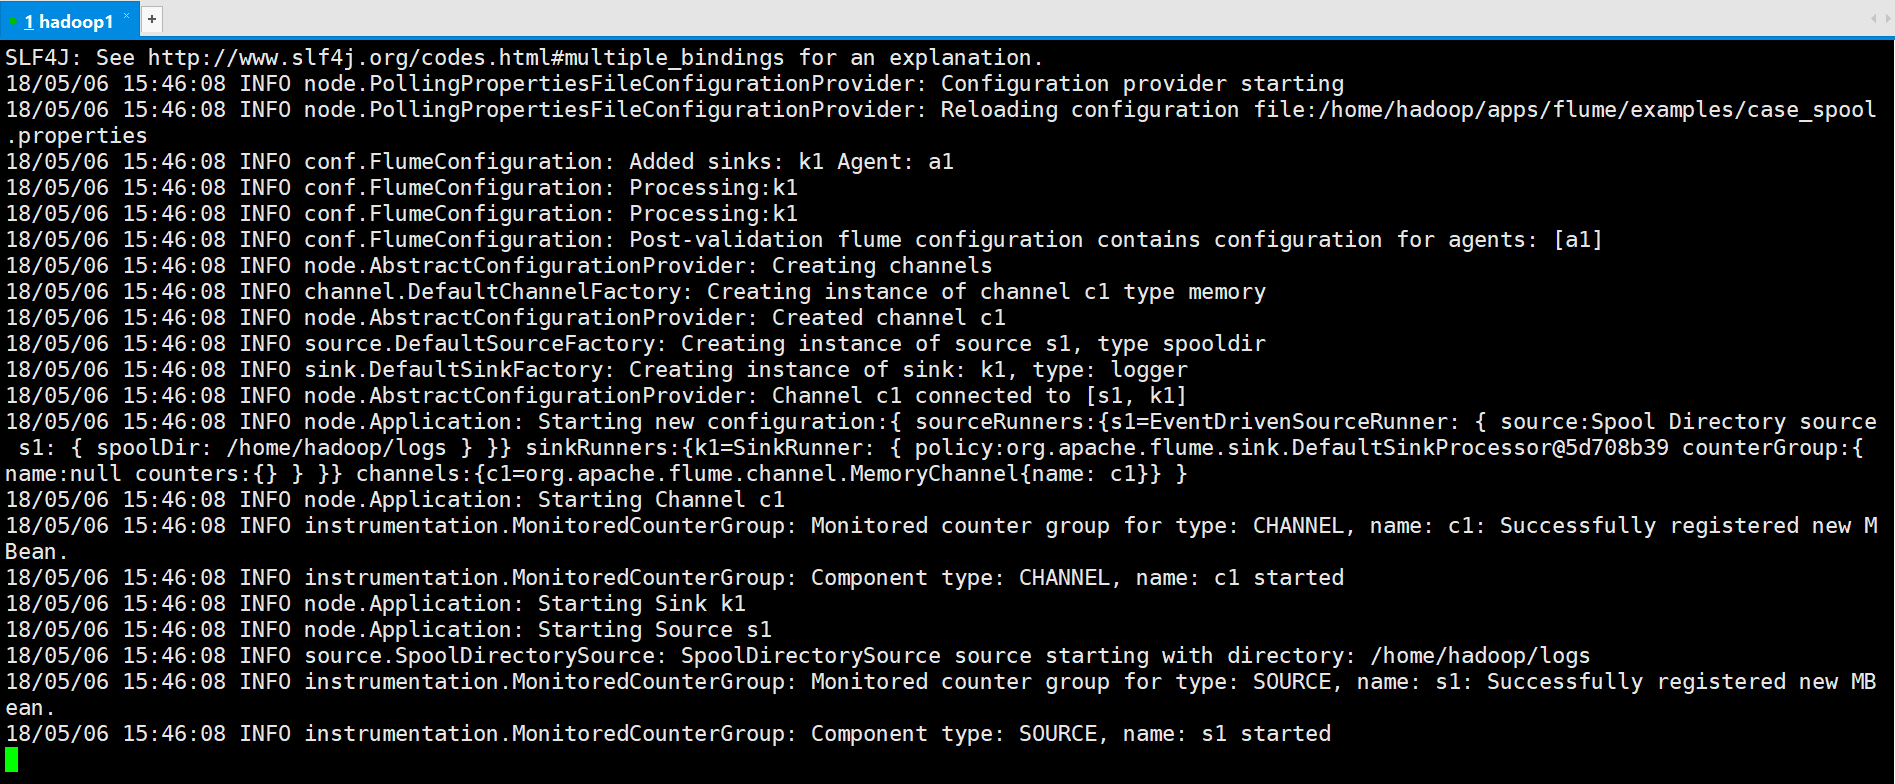
将123.log移动到logs目录

运行结果

1.3 测试案例(二)
案例2:实时模拟从web服务器中读取数据到hdfs中
此处使用exec source详细参考http://www.cnblogs.com/qingyunzong/p/8995554.html
里面的2.3Exec Source介绍
二、单代理多流配置
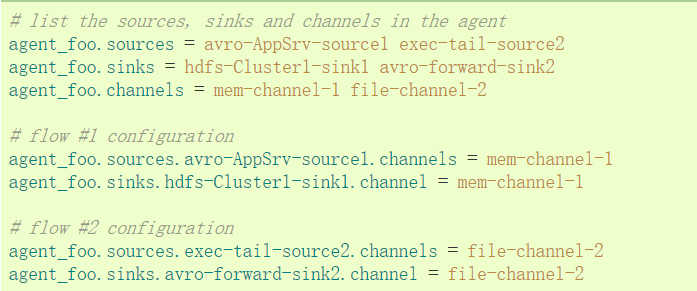
单个Flume代理可以包含几个独立的流。你可以在一个配置文件中列出多个源,接收器和通道。这些组件可以连接形成多个流。
可以连接源和接收器到其相应的通道,设置两个不同的流。例如,如果需要设置一个agent_foo代理两个流,一个从外部Avro客户端到HDFS,另外一个是tail的输出到Avro接收器,然后在这里是做一个配置
2.1 官方案例
三、配置多代理流程
设置一个多层的流,需要有一个指向下一跳avro源的第一跳的avro 接收器。这将导致第一Flume代理转发事件到下一个Flume代理。例如,如果定期发送的文件,每个事件(1文件)AVRO客户端使用本地Flume 代理,那么这个当地的代理可以转发到另一个有存储的代理。
配置如下
3.1 官方案例
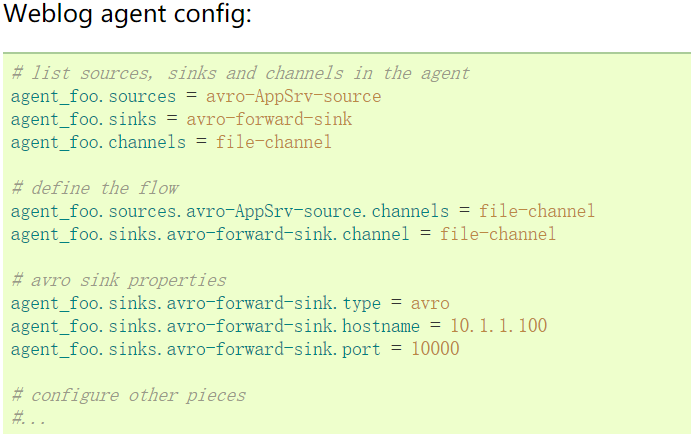
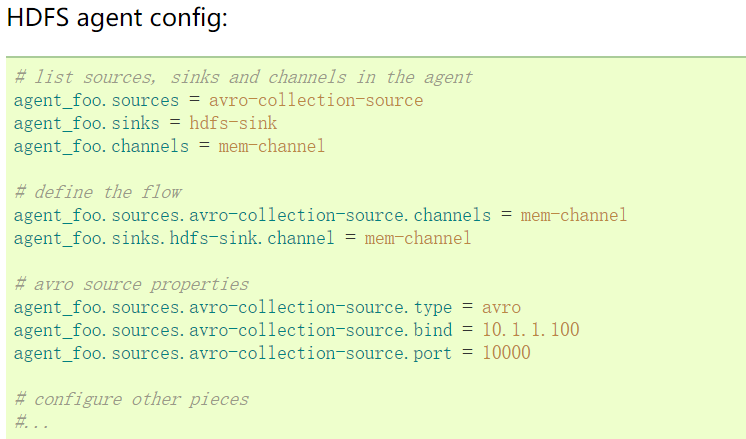
这里连接从weblog-agent的avro-forward-sink 到hdfs-agent的avro-collection-source收集源。最终结果从外部源的appserver最终存储在HDFS的事件。
3.2 测试案例
case_avro.properties
a1.sources = s1

a1.sinks = k1

a1.channels = c1

a1.sources.s1.type = avro

a1.sources.s1.channels = c1

a1.sources.s1.bind = 192.168.123.102

a1.sources.s1.port = 22222

a1.channels.c1.type = memory

a1.channels.c1.capacity = 1000

a1.channels.c1.transactionCapacity = 100

a1.sinks.k1.type = logger

a1.sinks.k1.channel = c1
case_avro_sink.properties
a2.sources = s1

a2.sinks = k1

a2.channels = c1

a2.sources.s1.type = syslogtcp

a2.sources.s1.channels = c1

a2.sources.s1.host = 192.168.123.102

a2.sources.s1.port = 33333

a2.channels.c1.type = memory

a2.channels.c1.capacity = 1000

a2.channels.c1.transactionCapacity = 100

a2.sinks.k1.type = avro

a2.sinks.k1.hostname = 192.168.123.102

a2.sinks.k1.port = 22222

a2.sinks.k1.channel = c1
说明:case_avro_sink.properties是前面的Agent,case_avro.properties是后面的Agent
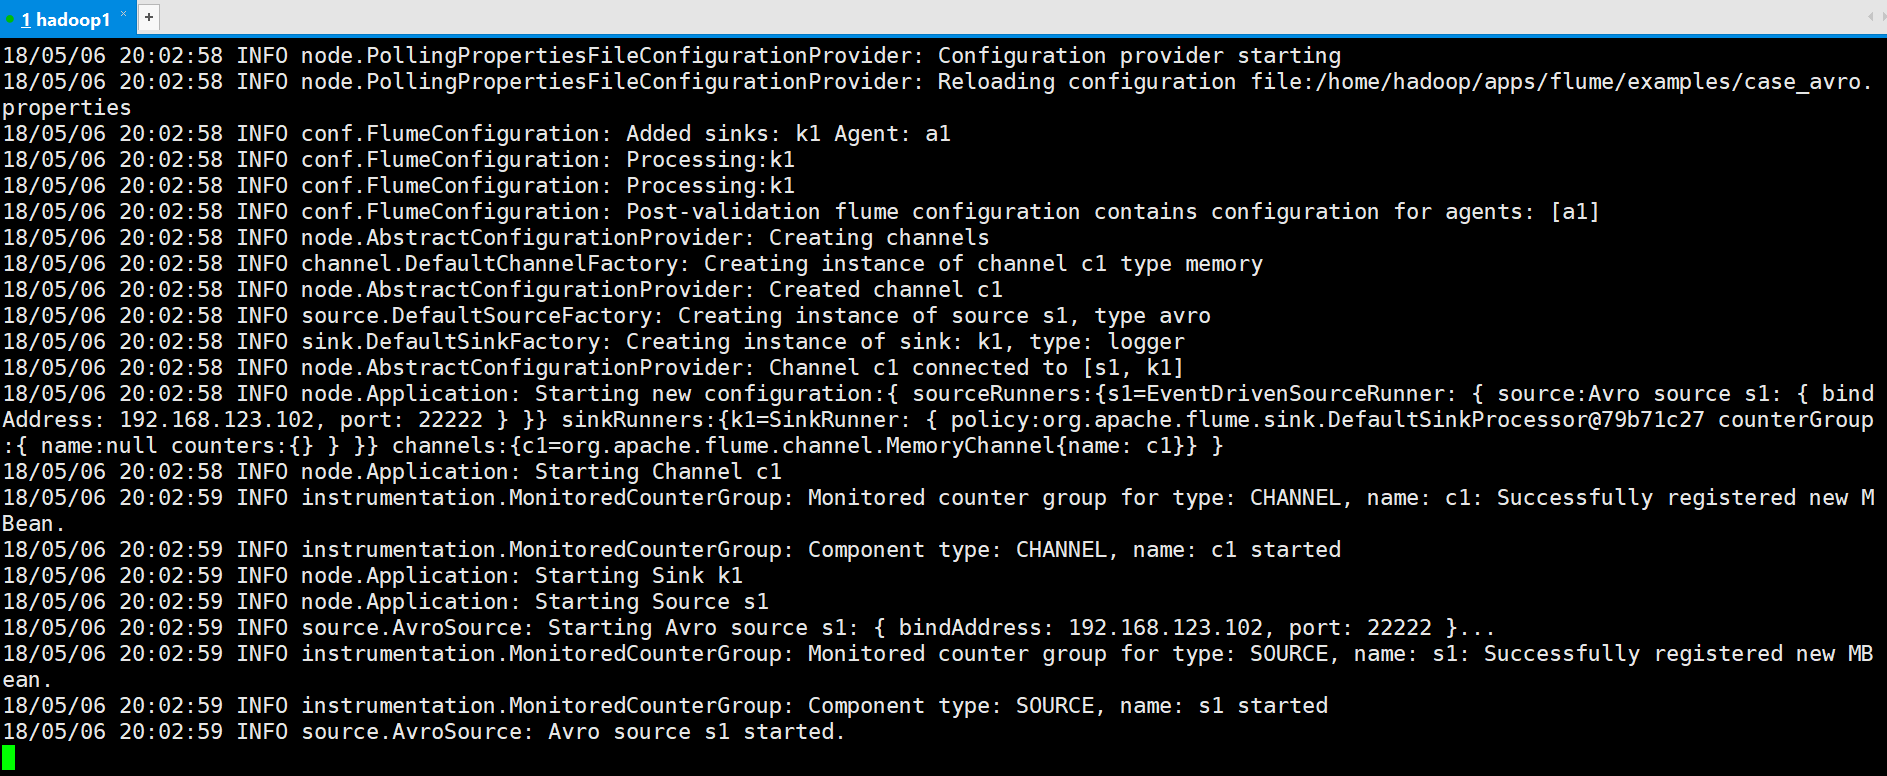
#先启动Avro的Source,监听端口
[hadoop@hadoop1 ~]$ flume-ng agent --conf conf --conf-file ~/apps/flume/examples/case_avro.properties --name a1 -Dflume.root.logger=DEBUG,console -Dorg.apache.flume.log.printconfig=true -Dorg.apache.flume.log.rawdata=true
#再启动Avro的Sink
flume-ng agent --conf conf --conf-file ~/apps/flume/examples/case_avro_sink.properties --name a2 -Dflume.root.logger=DEBUG,console -Dorg.apache.flume.log.printconfig=true -Dorg.apache.flume.log.rawdata=true
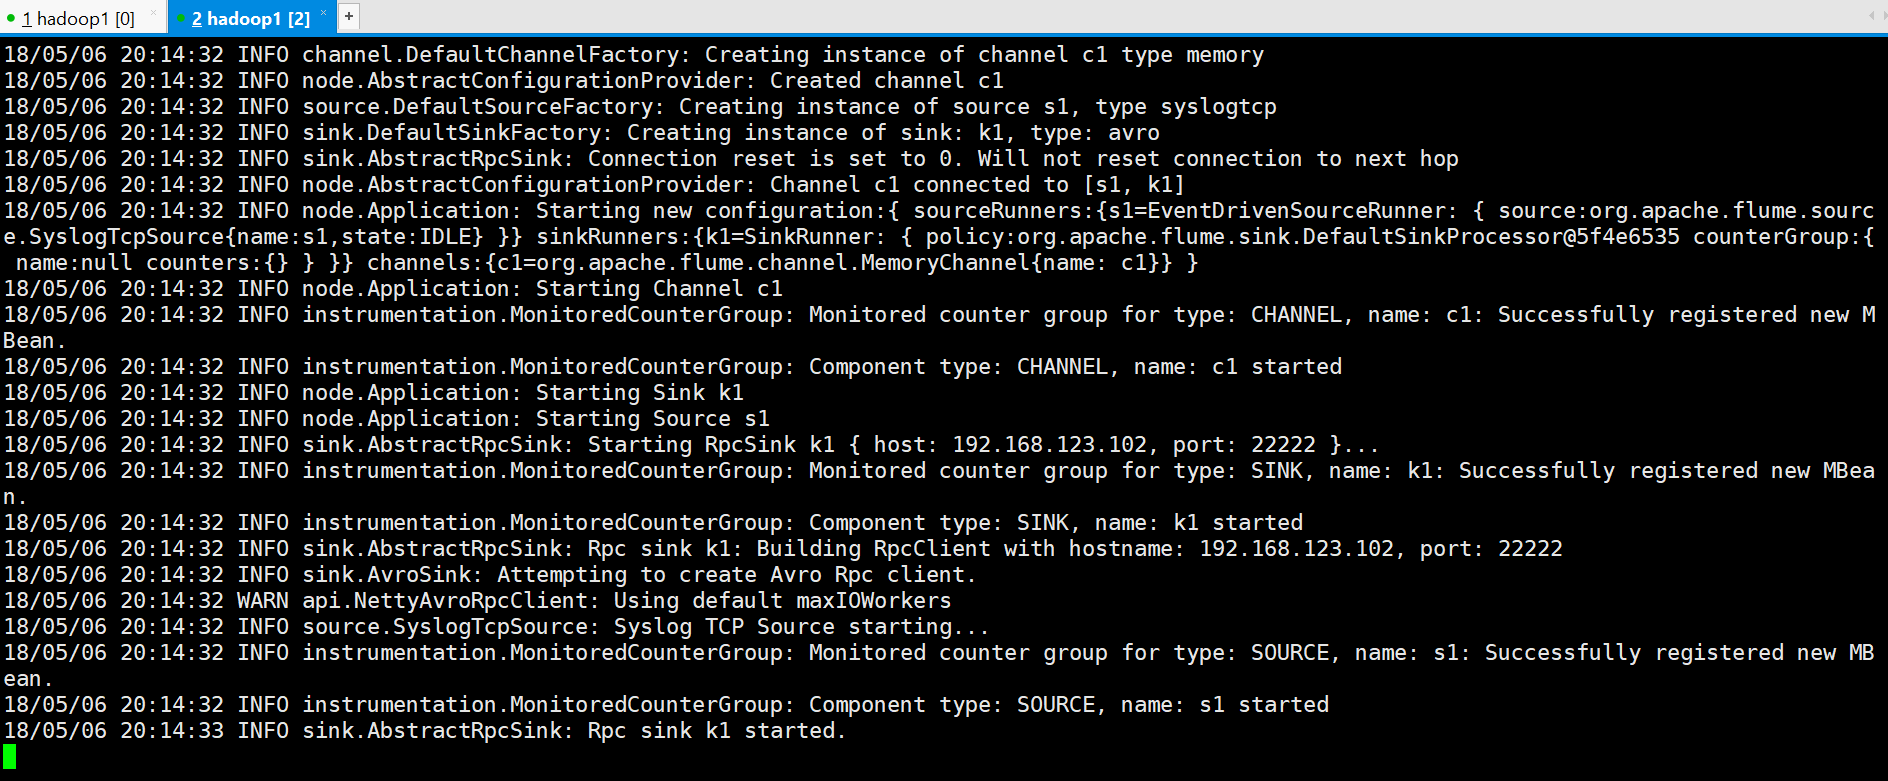
可以看到已经建立连接

#在Avro Sink上生成测试log
[hadoop@hadoop1 ~]$ echo "hello flume avro sink" | nc 192.168.123.102 33333

查看其它结果

四、多路复用流
Flume支持扇出流从一个源到多个通道。有两种模式的扇出,复制和复用。在复制流的事件被发送到所有的配置通道。在复用的情况下,事件被发送到合格的渠 道只有一个子集。扇出流,需要指定源和扇出通道的规则。这是通过添加一个通道“选择”,可以复制或复用。再进一步指定选择的规则,如果它是一个多路。如果你 不指定一个选择,则默认情况下它复制。
复用的选择集的属性进一步分叉。这需要指定一个事件属性映射到一组通道。选择配置属性中的每个事件头检查。如果指定的值相匹配,那么该事件被发送到所有的通道映射到该值。如果没有匹配,那么该事件被发送到设置为默认配置的通道。
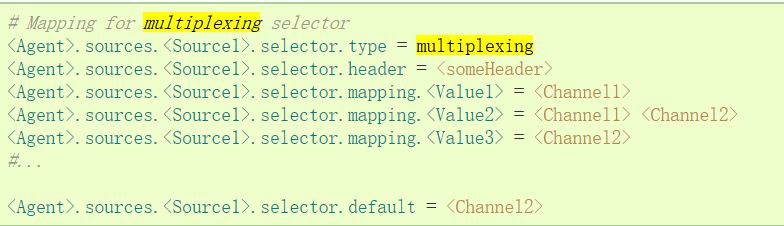
映射允许每个值通道可以重叠。默认值可以包含任意数量的通道。下面的示例中有一个单一的流复用两条路径。代理有一个单一的avro源和连接道两个接收器的两个通道。
4.1 官方案例
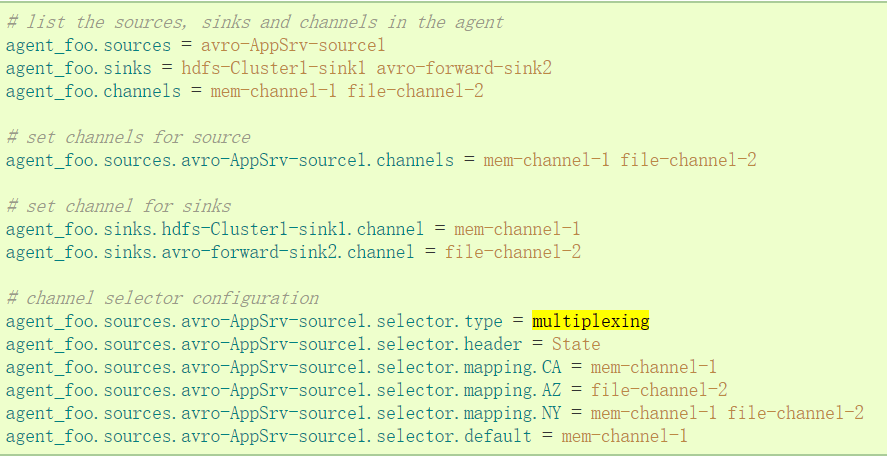
“State”作为Header的选择检查。如果值是“CA”,然后将其发送到mem-channel-1,如果它的“AZ”的,那么jdbc- channel-2,如果它的“NY”那么发到这两个。如果“State”头未设置或不匹配的任何三个,然后去默认的mem-channel-1通道。
4.2 测试案例(一)复制
case_replicate_sink.properties
a1.sources = s1

a1.sinks = k1 k2

a1.channels = c1 c2

a1.sources.s1.type = syslogtcp

a1.sources.s1.channels = c1 c2

a1.sources.s1.host = 192.168.123.102

a1.sources.s1.port = 6666

a1.sources.s1.selector.type = replicating

a1.channels.c1.type = memory

a1.channels.c1.capacity = 1000

a1.channels.c1.transactionCapacity = 100

a1.channels.c2.type = memory

a1.channels.c2.capacity = 1000

a1.channels.c2.transactionCapacity = 100

a1.sinks.k1.type = avro

a1.sinks.k1.hostname = 192.168.123.102

a1.sinks.k1.port = 7777

a1.sinks.k1.channel = c1

a1.sinks.k1.type = avro

a1.sinks.k1.hostname = 192.168.123.102

a1.sinks.k1.port = 7777

a1.sinks.k1.channel = c2
case_replicate_s1.properties
a2.sources = s1

a2.sinks = k1

a2.channels = c1

a2.sources.s1.type = avro

a2.sources.s1.channels = c1

a2.sources.s1.host = 192.168.123.102

a2.sources.s1.port = 7777

a2.channels.c1.type = memory

a2.channels.c1.capacity = 1000

a2.channels.c1.transactionCapacity = 100

a2.sinks.k1.type = logger

a2.sinks.k1.channel = c1
case_replicate_s2.properties
a3.sources = s1

a3.sinks = k1

a3.channels = c1

a3.sources.s1.type = avro

a3.sources.s1.channels = c1

a3.sources.s1.host = 192.168.123.102

a3.sources.s1.port = 7777

a3.channels.c1.type = memory

a3.channels.c1.capacity = 1000

a3.channels.c1.transactionCapacity = 100

a3.sinks.k1.type = logger

a3.sinks.k1.channel = c1
#先启动Avro的Source,监听端口
flume-ng agent --conf conf --conf-file ~/apps/flume/examples/case_replicate_s1.properties --name a2 -Dflume.root.logger=DEBUG,console -Dorg.apache.flume.log.printconfig=true -Dorg.apache.flume.log.rawdata=true
flume-ng agent --conf conf --conf-file ~/apps/flume/examples/case_replicate_s2.properties --name a3 -Dflume.root.logger=DEBUG,console -Dorg.apache.flume.log.printconfig=true -Dorg.apache.flume.log.rawdata=true
#再启动Avro的Sink
flume-ng agent --conf conf --conf-file ~/apps/flume/examples/case_replicate_sink.properties --name a1 -Dflume.root.logger=DEBUG,console -Dorg.apache.flume.log.printconfig=true -Dorg.apache.flume.log.rawdata=true
#生成测试log
echo "hello via channel selector" | nc 192.168.123.102 6666
4.3 测试案例(二)复用
case_multi_sink.properties
#2个channel和2个sink的配置文件

a1.sources = r1

a1.sinks = k1 k2

a1.channels = c1 c2

# Describe/configure the source

a1.sources.r1.type = org.apache.flume.source.http.HTTPSource

a1.sources.r1.port = 5140

a1.sources.r1.host = 0.0.0.0

a1.sources.r1.selector.type = multiplexing

a1.sources.r1.channels = c1 c2

a1.sources.r1.selector.header = state

a1.sources.r1.selector.mapping.CZ = c1

a1.sources.r1.selector.mapping.US = c2

a1.sources.r1.selector.default = c1

# Describe the sink

a1.sinks.k1.type = avro

a1.sinks.k1.channel = c1

a1.sinks.k1.hostname = 172.25.4.23

a1.sinks.k1.port = 4545

a1.sinks.k2.type = avro

a1.sinks.k2.channel = c2

a1.sinks.k2.hostname = 172.25.4.33

a1.sinks.k2.port = 4545

# Use a channel which buffers events in memory

a1.channels.c1.type = memory

a1.channels.c1.capacity = 1000

a1.channels.c1.transactionCapacity = 100

a1.channels.c2.type = memory

a1.channels.c2.capacity = 1000

a1.channels.c2.transactionCapacity = 100
case_ multi _s1.properties
# Name the components on this agent

a2.sources = r1

a2.sinks = k1

a2.channels = c1

# Describe/configure the source

a2.sources.r1.type = avro

a2.sources.r1.channels = c1

a2.sources.r1.bind = 172.25.4.23

a2.sources.r1.port = 4545

# Describe the sink

a2.sinks.k1.type = logger

 a2.sinks.k1.channel = c1

# Use a channel which buffers events in memory

a2.channels.c1.type = memory

a2.channels.c1.capacity = 1000

a2.channels.c1.transactionCapacity = 100
case_ multi _s2.properties
# Name the components on this agent

a3.sources = r1

a3.sinks = k1

a3.channels = c1

# Describe/configure the source

a3.sources.r1.type = avro

a3.sources.r1.channels = c1

a3.sources.r1.bind = 172.25.4.33

a3.sources.r1.port = 4545

# Describe the sink

a3.sinks.k1.type = logger

 a3.sinks.k1.channel = c1

# Use a channel which buffers events in memory

a3.channels.c1.type = memory

a3.channels.c1.capacity = 1000

a3.channels.c1.transactionCapacity = 100
#先启动Avro的Source,监听端口
flume-ng agent -c . -f case_ multi _s1.conf -n a2 -Dflume.root.logger=INFO,console
flume-ng agent -c . -f case_ multi _s2.conf -n a3 -Dflume.root.logger=INFO,console
#再启动Avro的Sink
flume-ng agent -c . -f case_multi_sink.conf -n a1-Dflume.root.logger=INFO,console
#根据配置文件生成测试的header 为state的POST请求
curl -X POST -d '[{ "headers" :{"state" : "CZ"},"body" : "TEST1"}]' http://localhost:5140
curl -X POST -d '[{ "headers" :{"state" : "US"},"body" : "TEST2"}]' http://localhost:5140
curl -X POST -d '[{ "headers" :{"state" : "SH"},"body" : "TEST3"}]' http://localhost:5140
Flume学习之路 (三)Flume的配置方式的更多相关文章
- 学习之路三十九:新手学习 - Windows API
来到了新公司,一开始就要做个程序去获取另外一个程序里的数据,哇,挑战性很大. 经过两周的学习,终于搞定,主要还是对Windows API有了更多的了解. 文中所有的消息常量,API,结构体都整理出来了 ...
- 框架源码系列九:依赖注入DI、三种Bean配置方式的注册和实例化过程
一.依赖注入DI 学习目标1)搞清楚构造参数依赖注入的过程及类2)搞清楚注解方式的属性依赖注入在哪里完成的.学习思路1)思考我们手写时是如何做的2)读 spring 源码对比看它的实现3)Spring ...
- Redis——学习之路三(初识redis config配置)
我们先看看config 默认情况下系统是怎么配置的.在命令行中输入 config get *(如图) 默认情况下有61配置信息,每一个命令占两行,第一行为配置名称信息,第二行为配置的具体信息. ...
- Flume学习之路 (一)Flume的基础介绍
一.背景 Hadoop业务的整体开发流程: 从Hadoop的业务开发流程图中可以看出,在大数据的业务处理过程中,对于数据的采集是十分重要的一步,也是不可避免的一步. 许多公司的平台每天会产生大量的日志 ...
- Flume学习之路 (二)Flume的Source类型
一.概述 官方文档介绍:http://flume.apache.org/FlumeUserGuide.html#flume-sources 二.Flume Sources 描述 2.1 Avro So ...
- spring boot 学习笔记(三)之 配置
一:概述 在Spring boot 中根据业务需求,我们往往会在不同地方配置我们所需的key-value 配置项,配置文件存在不同的地方的场景如下: (1) 默认存在 application.prop ...
- bridged(桥接模式)、NAT(网络地址转换模式)和host-only(主机模式)-VMware下三种网络配置方式
VMWare提供了三种工作模式,它们是bridged(桥接模式).NAT(网络地址转换模式)和host-only(主机模式).要想在网络管理和维护中合理应用它们,你就应该先了解一下这三种工作模式. 1 ...
- 【转】Spring 中三种Bean配置方式比较
今天被问到Spring中Bean的配置方式,很尴尬,只想到了基于XML的配置方式,其他的一时想不起来了,看来Spring的内容还没有完全梳理清楚,见到一篇不错的文章,就先转过来了. 以前Java框架基 ...
- Spring 中三种Bean配置方式比较
今天被问到Spring中Bean的配置方式,很尴尬,只想到了基于XML的配置方式,其他的一时想不起来了,看来Spring的内容还没有完全梳理清楚,见到一篇不错的文章,就先转过来了. 以前Java框架基 ...
- struts2视频学习笔记 22-23(基于XML配置方式实现对action的所有方法及部分方法进行校验)
课时22 基于XML配置方式实现对action的所有方法进行校验 使用基于XML配置方式实现输入校验时,Action也需要继承ActionSupport,并且提供校验文件,校验文件和action类 ...
随机推荐
- 理解JVM之Java内存区域
Java虚拟机运行时数据区分为以下几个部分: 方法区.虚拟机栈.本地方法栈.堆.程序计数器.如下图所示: 一.程序计数器 程序计数器可看作当前线程所执行的字节码行号指示器,字节码解释器工作时就是通过改 ...
- nginx+tomcat抵御慢速连接攻击
一.安装nginx apt-get install nginx 安装中途可能会要求填写许可,输入‘y’就好了 如果安装提示“E: Unable to locate package nginx”,那么输 ...
- Java生成代码(字节码)
一.方式 代码生成器 & IDE 编译时代码生成: Pluggable Annotation Processing API 运行时代码生成: Compiler API 运行时生成字节码: cg ...
- HDU4960(SummerTrainingDay03-F dp)
Another OCD Patient Time Limit: 2000/1000 MS (Java/Others) Memory Limit: 131072/131072 K (Java/Ot ...
- hightcharts 如何修改legend图例的样式
正常情况下hightcharts 的legend图形是根据他本身默认的样式来显示,如下图 这几个图形的形状一般也是改不了的,只能根据图表的类型显示默认的.但是我们可以通过修改默认的样式来展示一些可以实 ...
- vue-router重定向 不刷新问题
前阵子太忙了,自己一个人一边开发着新项目,一边维护着旧项目,没时间写博客,终于让我腾出时间了.废话少说,开始正文. 问题描述: 之前项目是angular开发的,后来用vue重构后.项目路径和vue路径 ...
- 我最喜欢用的css3之2D转换之translate用法
CSS3 2D 转换 div { transform: rotate(30deg); -ms-transform: rotate(30deg); /* IE 9 */ -webkit-transfor ...
- IDEA想创建package,却只有directory 解决办法
只有directory,而我想的是new package 这是因为java是普通的文件夹,要设置为source root 就可以啦
- 关于ajax 传递的参数
ajax 发送的数据,默认都是字符串,不能直接传递list(列表),或者dict(字典). 若要 传递list(列表),或者dict(字典),需要进行一些操作. list 需要进行列表序列化,在aja ...
- 常用的第三方模块 requests url
我们已经讲解了Python内置的urllib模块,用于访问网络资源.但是,它用起来比较麻烦,而且,缺少很多实用的高级功能. 更好的方案是使用requests.它是一个Python第三方库,处理URL资 ...