APICloud AVM框架 封装车牌号输入键盘组件
AVM(Application-View-Model)前端组件化开发模式基于标准Web Components组件化思想,提供包含虚拟DOM和Runtime的编程框架avm.js以及多端统一编译工具,完全兼容Web Components标准,同时兼容Vue和React语法糖编写代码,编译工具将Vue和React相关语法糖编译转换为avm.js代码。
基于标准 Web Components 组件化思想,兼容 Vue / React 语法特性,通过一次编码,分别编译为 App、小程序代码,实现多端开发。
组件功能介绍
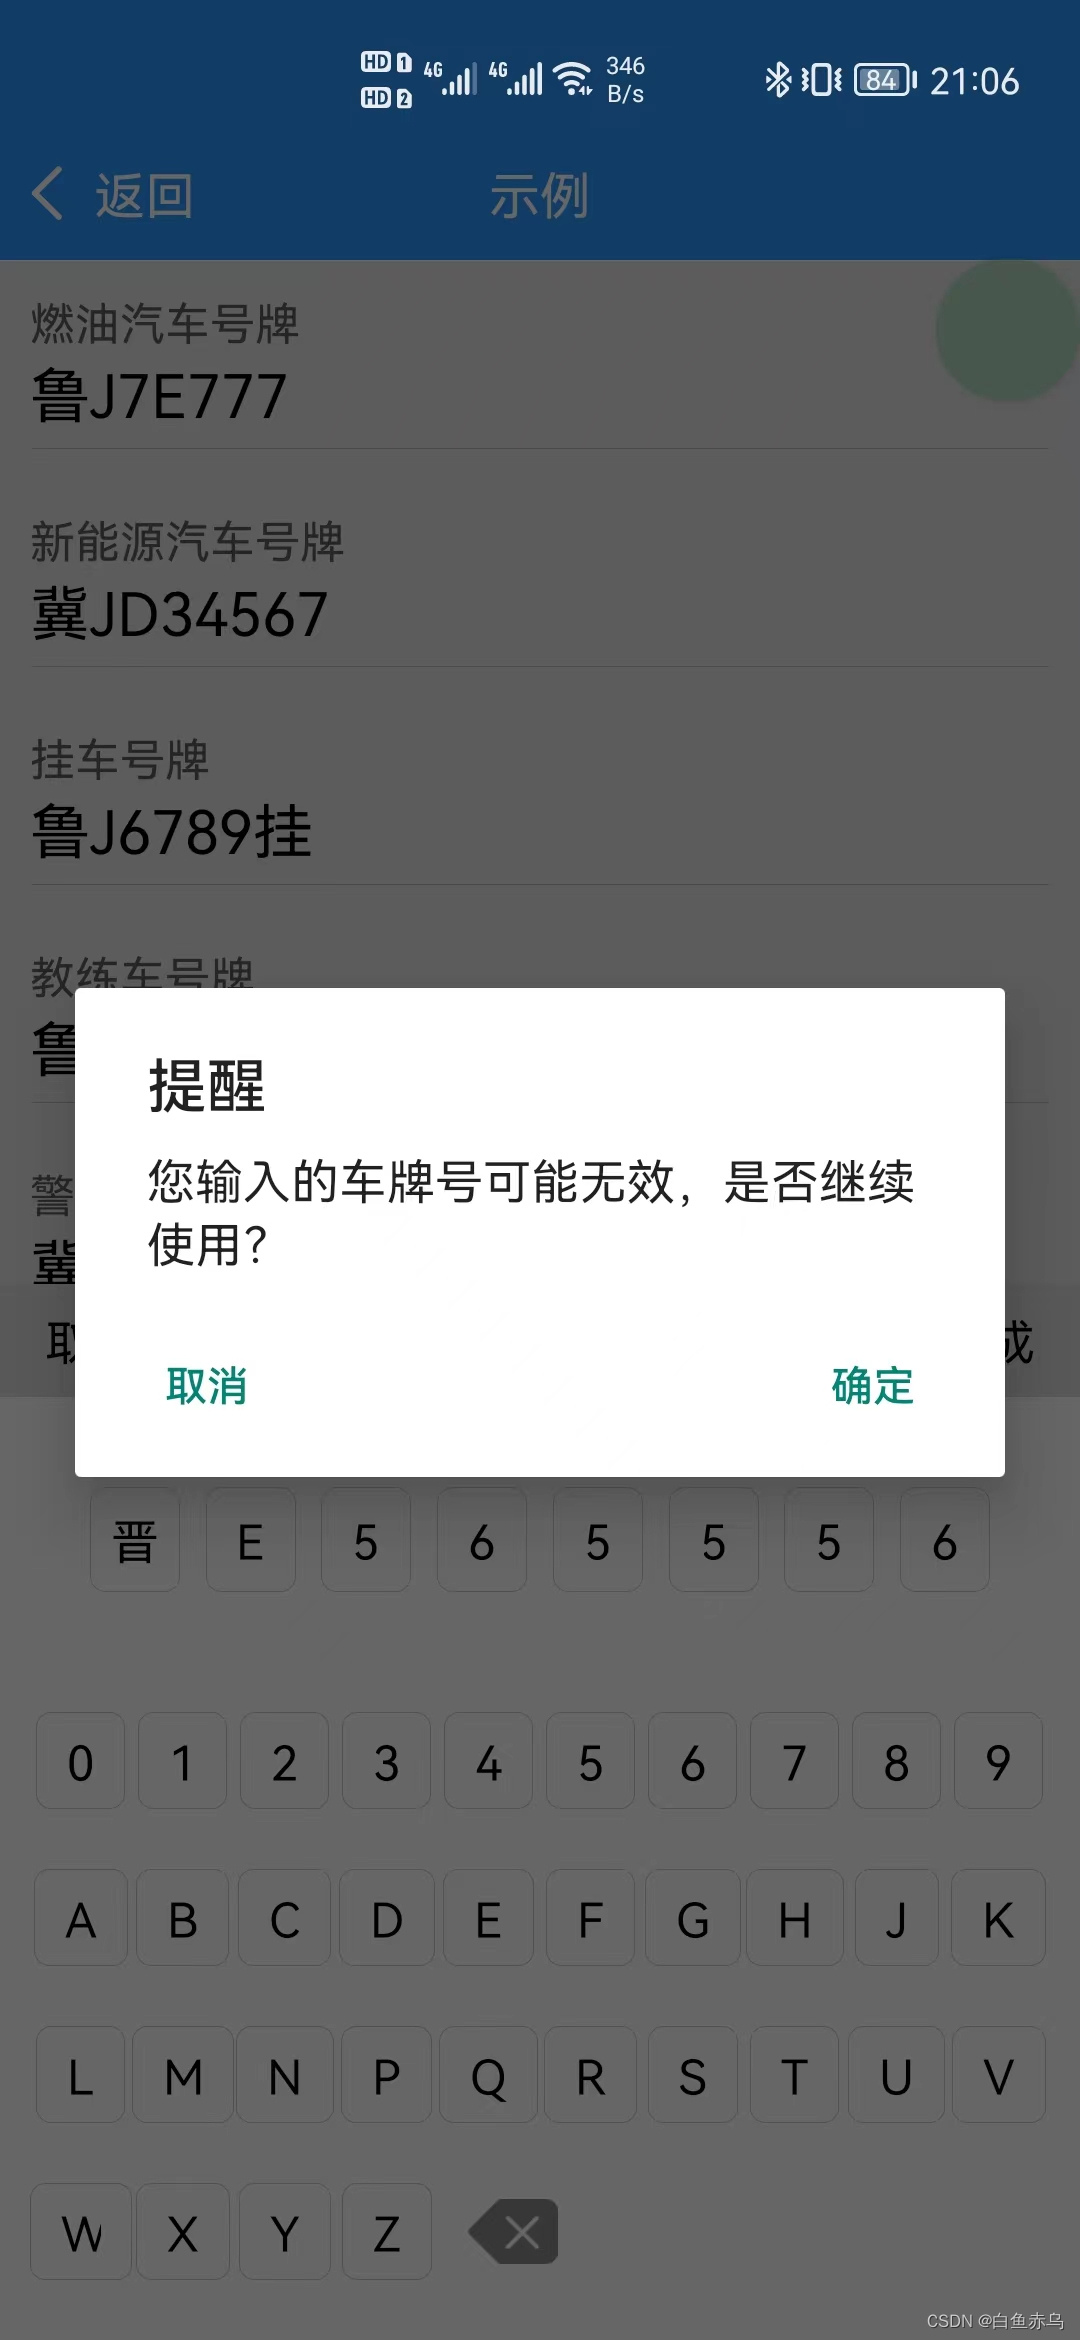
封装了车牌号输入键盘,支持燃油汽车、新能源车辆、教练车、挂车、警车5种模式。针对输入的车牌号进行了正则验证。
如有其他类型的车牌需要输入,可在此基础上进行添加即可,主要是控制号牌长度和一些固定的字。
示例展示

组件开发
组件文件
car-num-keyboard.stml
<template>

	<view class={"keyboard-box-bg" + (transition?' keyboard-box-bg-transition':'')}>

		<view style="height:100%;"></view>

		<view class={"keyboard-box" + (transition?' keyboard-box-transition':'')}>

			<view class="header">

				<text @click="cancelLicense">取消</text>

				<text>{licenseType}</text>

				<text @click="successLicense">完成</text>

			</view>

			<view class="license-number">

				<view class="license-number-item" v-for="item in licenseNumber">

					<text>{item}</text>

				</view>

			</view>

			<view class="keyboard">

				<view class="keyboard-item" v-for="item in provinces" data-value={item} @click="setNumber" v-show="!isProvince">

					<text class="keyboard-item-title">{item}</text>

				</view>

				<view class="keyboard-item-key" v-for="item in licenseKey" data-value={item} @click="setNumberKey" v-show="isProvince">

					<text class="keyboard-item-title">{item}</text>

				</view>

				<image class="keyboard-item-ico" src='../../image/key-back.png' mode="widthFix" @click="delLicenseNUmber"></image>

			</view>

		</view>

		<safe-area></safe-area>

	</view>

</template>

<script>

	export default {

		name: 'car-num-keyboard',

		installed(){

			 if(this.props.mode=='new'){

				this.data.licenseNumber=['','','','','','','',''];

				this.data.licenseType='新能源汽车号牌';

				this.data.numberLength = 8;

			}

			else if(this.props.mode=='trailer'){

				this.data.licenseNumber=['','','','','','','挂'];

				this.data.licenseType='挂车号牌';

				this.data.numberLength = 6;

			}

			else if(this.props.mode=='instructional'){

				this.data.licenseNumber=['','','','','','','学'];

				this.data.licenseType='挂车号牌';

				this.data.numberLength = 6;

			}

			else if(this.props.mode=='police'){

				this.data.licenseNumber=['','','','','','','警'];

				this.data.licenseType='警车号牌';

				this.data.numberLength = 6;

			}

			else{

				this.data.licenseNumber = ['', '', '', '', '', '', ''];

				this.data.licenseType='燃油汽车号牌';

				this.data.numberLength = 7;

			}

			this.data.keyBoards = this.data.licenseKey;

			setTimeout(()=>{

				this.data.transition = true;

			}, 50);

		},

		props:{

			mode:String

		},

		data() {

			return{

				provinces: ['京', '津', '冀', '晋', '蒙', '辽', '吉', '黑', '沪', '苏', '浙', '皖', '闽', '赣', '鲁', '豫', '鄂', '湘', '粤', '桂', '琼', '渝', '川', '贵', '云', '藏', '陕', '甘', '青', '宁', '新'],

				licenseNumber: [],

				licenseKey: ['0', '1', '2', '3', '4', '5', '6', '7', '8', '9', 'A', 'B', 'C', 'D', 'E', 'F', 'G', 'H', 'J', 'K', 'L', 'M', 'N', 'P', 'Q', 'R', 'S', 'T', 'U', 'V', 'W', 'X', 'Y', 'Z'],

				keyBoards: [],

				isProvince: false,

				licenseNumberIndex: 0,

				licenseType: '燃油汽车号牌',

				mode:'',

				numberLength:7,

				transition: false

			}

		},

		methods: {

			setNumber(e) {

				if (this.data.licenseNumberIndex == 0) {

					this.data.licenseNumber[0] = e.dataset.value;

					this.data.licenseNumberIndex += 1;

					this.data.isProvince = true;

				}

			},

			setNumberKey(e) {

				if (this.data.licenseNumberIndex < this.data.numberLength) {

					this.data.licenseNumber[this.data.licenseNumberIndex] = e.dataset.value;

					this.data.licenseNumberIndex += 1;

				}

			},

			delLicenseNUmber() {

				this.data.licenseNumberIndex -= 1;

				if (this.data.licenseNumberIndex == 0) {

					this.data.isProvince = false;

				}

				this.data.licenseNumber[this.data.licenseNumberIndex] = '';

			},

			cancelLicense() {

				this.fire('cancal','');

			},

			successLicense() {

				let licenseNumber = this.data.licenseNumber.join('');

				//校验车牌号

				const carReg=/^(([京津沪渝冀豫云辽黑湘皖鲁新苏浙赣鄂桂甘晋蒙陕吉闽贵粤青藏川宁琼使领][A-Z](([0-9]{5}[DF])|([DF]([A-HJ-NP-Z0-9])[0-9]{4})))|([京津沪渝冀豫云辽黑湘皖鲁新苏浙赣鄂桂甘晋蒙陕吉闽贵粤青藏川宁琼使领][A-Z][A-HJ-NP-Z0-9]{4}[A-HJ-NP-Z0-9挂学警港澳使领]))$/;

				if(!carReg.test(licenseNumber)){

				api.confirm({

						title: '提醒',

						msg: '您输入的车牌号可能无效,是否继续使用?',

						buttons: ['确定', '取消']

					}, (ret, err) => {

						// var index = ret.buttonIndex;

						if(ret.buttonIndex==1){

							this.fire('getNum',{carNum:licenseNumber,mode:this.props.mode});

						}

					});

				}

				else{

					this.fire('getNum',{carNum:licenseNumber,mode:this.props.mode});

				}

			}

		}

	}

</script>

<style>

	.keyboard-box-bg{

		position: absolute;

		width: 100%;

		height: 100%;

		background-color: rgba(0,0,0,0.1);

		transition-property: background-color;

		transition-duration: 0.3s;

	}

	.keyboard-box-bg-transition{

		background-color: rgba(0,0,0,0.4);

	}

	.keyboard-box{

		align-items: center;

		position: absolute;

		bottom: 0;

		width: 100%;

		background-color: white;

		box-sizing: border-box;

		transform: translateY(100%);

		transition-property: transform;

		transition-duration: 0.3s;

	}

	.keyboard-box-transition{

		transform: translateY(0);

	}

	.header {

		background-color: #dddddd;

		flex-flow: row nowrap;

		justify-content: space-between;

		align-items: center;

		padding: 8px 15px;

		width: 100%;

	}

	.license-number {

		flex-flow: row nowrap;

		justify-content: space-between;

		align-items: center;

		padding: 30px;

		background-color: #ffffff;

		width: 100%;

	}

	.license-number-item {

		width: 10%;

		justify-content: center;

		align-items: center;

		border: 0.5px solid #cccccc;

		border-radius: 5px;

		padding: 5px 0;

		min-height: 35px;

	}

	.keyboard {

		background-color: #ffffff;

		width: 100%;

	}

	.keyboard {

		flex-flow: row wrap;

		align-items: center;

		padding: 0 10px 10px 10px;

	}

	.keyboard-item {

		width: 12.5%;

		justify-content: center;

		align-items: center;

	}

	.keyboard-item-key {

		width: 10%;

		justify-content: center;

		align-items: center;

	}

	.keyboard-item-title {

		border: 0.5px solid #ccc;

		border-radius: 5px;

		padding: 5px 10px;

		margin: 10px 0;

	}

	.keyboard-item-ico {

		width: 30px;

		margin-left: 10px;

	}

</style>
组件使用说明
本组件是基于AVM.js开发的多端组件,通常同时适配Android、iOS、小程序、H5 , 具体支持情况还要看每个组件的说明文档。
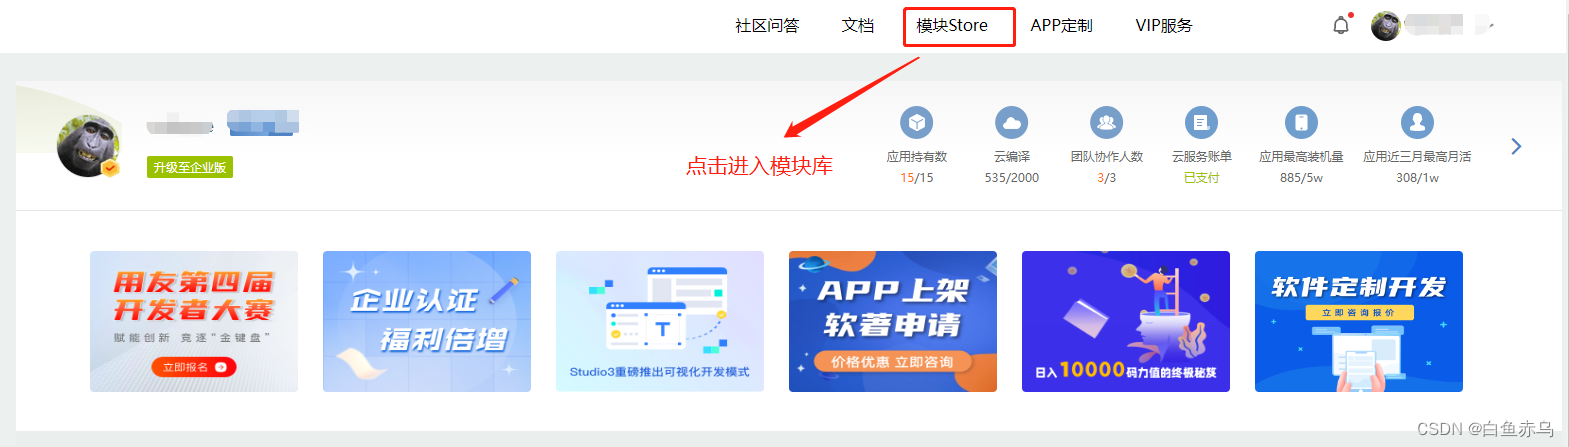
首先需要登录开发平台,http://www.apicloud.com。 通过控制平台右上方的模块Store进入,然后选择AVM组件。

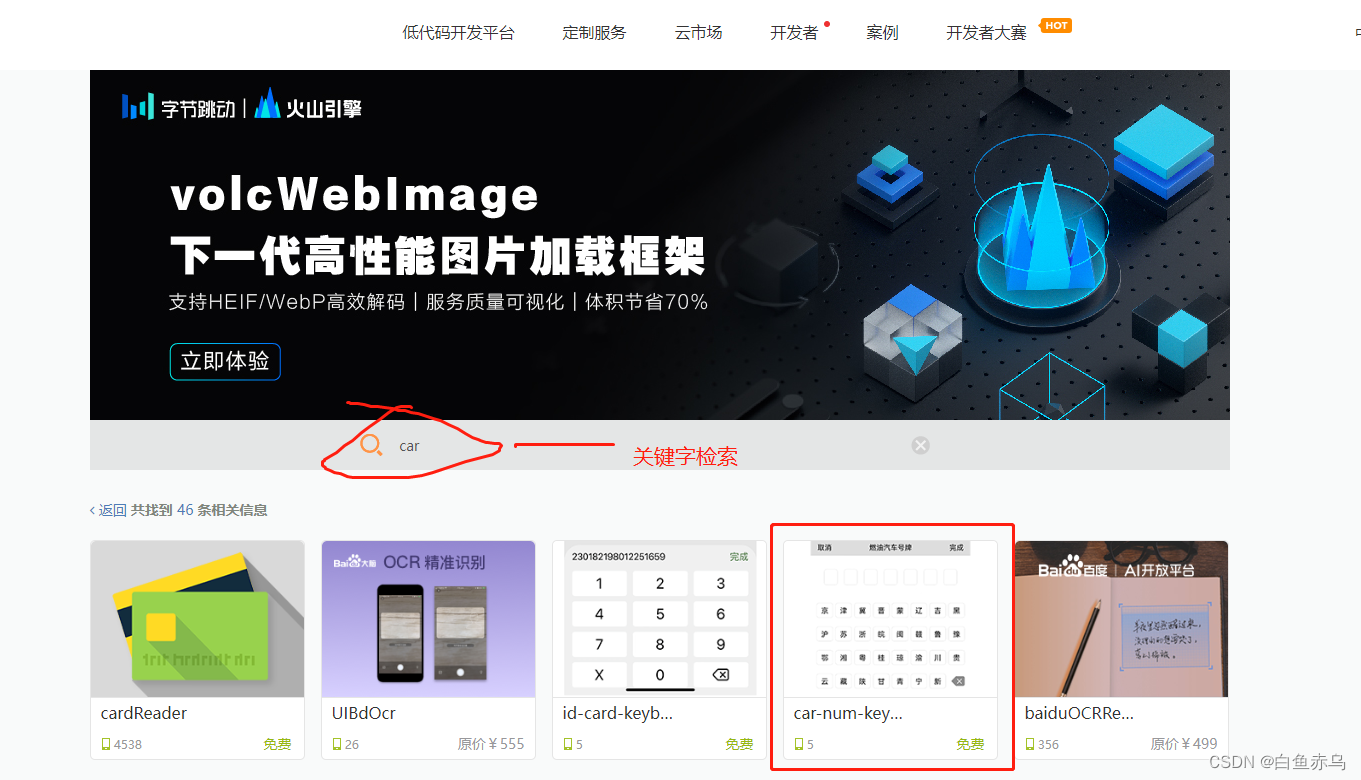
找到对应模块进入,也可通过搜索栏,通过组件名称关键字进行检索。
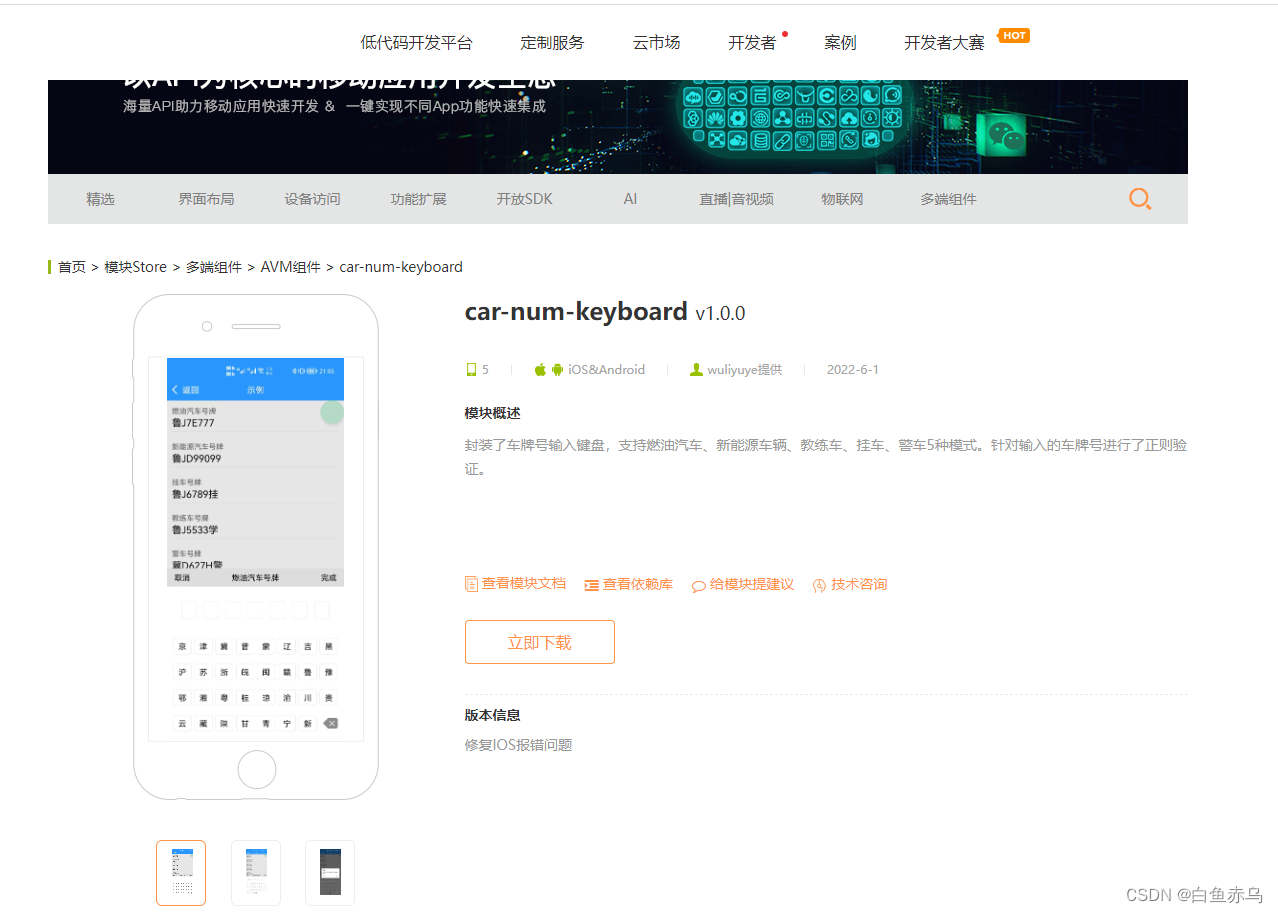
进入模块详情,点击立即下载下载完整的组件安装包。
组件压缩包的文件目录如下
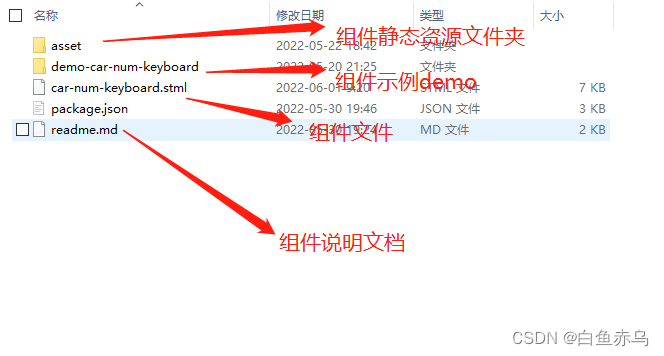
也可通过查看模块文档 来了解模块的具体参数,引用的原生模块,注意事项等。
 具体在项目中的使用步骤是,第一步将压缩文件中的car-num-keyboard.stml文件拷贝到项目的components目录,通过阅读readme.md 文档和查看demo示例文件 demo-car-num-keyboard.stml在需要开发的stml文件中,引入组件文件,完成页面的开发。
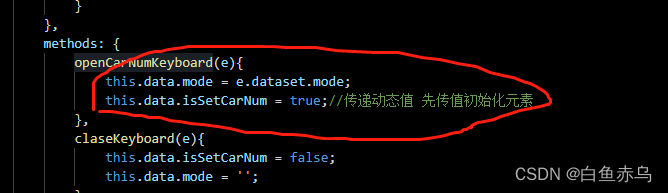
在调用键盘的时候,是通过v-if 进行键盘的显示和隐藏,v-if false的情况会销毁元素,所以需要传递的动态值,必须要在元素重新创建之前进行赋值操作。如下图所示,先后顺序很重要。
demo-car-num-keyboard.stml
<template>

	<view class="page">

		<safe-area></safe-area>

		<view class="car-box" data-mode="oil" @click="openCarNumKeyboard">

			<text class="car-label">燃油汽车号牌</text>

			<text class="car-num">{carNumber}</text>

		</view>

		<view class="car-box" data-mode="new" @click="openCarNumKeyboard">

			<text class="car-label">新能源汽车号牌</text>

			<text class="car-num">{carNumber1}</text>

		</view>

		<view class="car-box" data-mode="trailer" @click="openCarNumKeyboard">

			<text class="car-label">挂车号牌</text>

			<text class="car-num">{carNumber2}</text>

		</view>

		<view class="car-box" data-mode="instructional" @click="openCarNumKeyboard">

			<text class="car-label">教练车号牌</text>

			<text class="car-num">{carNumber3}</text>

		</view>

		<view class="car-box" data-mode="police" @click="openCarNumKeyboard">

			<text class="car-label">警车号牌</text>

			<text class="car-num">{carNumber4}</text>

		</view>

		<car-num-keyboard v-bind:mode={mode} v-if="isSetCarNum" oncancal="claseKeyboard" ongetNum="getCarNum"></car-num-keyboard>

	</view>

</template>

<script>

	import '../../components/car-num-keyboard.stml'

	export default {

		name: 'license-number',

		apiready(){

		},

		data() {

			return{

				carNumber:'',

				carNumber1:'',

				carNumber2:'',

				carNumber3:'',

				carNumber4:'',

				isSetCarNum:false,

				mode:''

			}

		},

		methods: {

			openCarNumKeyboard(e){

				this.data.mode = e.dataset.mode;

				this.data.isSetCarNum = true;//传递动态值 先传值初始化元素

			},

			claseKeyboard(e){

				this.data.isSetCarNum = false;

				this.data.mode = '';

			},

			getCarNum(e){

				this.data.isSetCarNum = false;

				if(e.detail.mode=='new'){

					this.data.carNumber1=e.detail.carNum;

				}

				else if(e.detail.mode=='trailer'){

					this.data.carNumber2=e.detail.carNum;

				}

				else if(e.detail.mode=='instructional'){

					this.data.carNumber3=e.detail.carNum;

				}

				else if(e.detail.mode=='police'){

					this.data.carNumber4=e.detail.carNum;

				}

				else{

					this.data.carNumber = e.detail.carNum;

				}

			}

		}

	}

</script>

<style>

	.page {

		height: 100%;

		background-color: #ffffff;

	}

	.car-box{

		margin: 10px;

		padding-bottom: 5px;

		border-bottom: 0.5px solid #cccccc;

	}

	.car-label{

		font-size: 15px;

		color: #666666;

	}

	.car-num{

		font-size: 20px;

		min-height: 20px;

	}

</style>
如果在AVM组件库中,没有找到实际项目中需要的组件,可以自己尝试封装组件。

APICloud AVM框架 封装车牌号输入键盘组件的更多相关文章
- 使用APICloud AVM框架开发预约应用
前段时间跟朋友一起搞了一个预约的项目,前端用的APICloud的AVM框架做的,后端用的php开发的,用的tp5框架,没几天就搞出来了.简单跟大家分享一下开发中的一些功能点的实现吧.也欢迎大家一起探讨 ...
- KeyboardDemo - Android身份证号、车牌号快捷输入键盘
Android身份证号.车牌号快捷输入键盘 项目地址 Github 键盘部分在 keyboard module 中 键盘与EditText绑定参照 MainActivity
- 从零开始教你封装自己的vue组件
组件(component)是vue.js最强大的功能之一,它可以实现功能的复用,以及对其他逻辑的解耦.但经过一段时间的使用,我发现自己并没有在业务中发挥出组件的最大价值.相信很多刚开始使用vue的朋友 ...
- 最全,可直接用的一些正则校验,判断邮箱,手机号码,车牌号,身份证号,网址,账号,密码,ip,去掉html格式,工商税号等。
一些正则校验,判断邮箱,手机号码,车牌号,身份证号,网址,账号,密码,ip,去掉html格式,工商税号等. // 判断邮箱 isValid = [text isValidEmail]; // 判断手机 ...
- OC仿支付宝输入UITextField输入车牌号
效果图,如果使用,出现任何问题请告知,或者下方留言,我好以及改正 .h文件: #import <UIKit/UIKit.h> @interface LicenseKeyBoardView ...
- day97:MoFang:移动端APP开发准备&移动端项目搭建&APICloud前端框架
目录 1.移动端开发相关概念 1.APP类型 2.移动端屏幕介绍 3.移动端自适配方案 4.元信息(meta) 2.APP开发准备 1.注册APPCLoud账号 2.下载APP开发编辑器 3.下载AP ...
- 【代码笔记】iOS-验证手机号,邮箱,车牌号是否合法
一,代码. - (void)viewDidLoad { [super viewDidLoad]; // Do any additional setup after loading the view. ...
- C#进阶系列——一步一步封装自己的HtmlHelper组件:BootstrapHelper(三:附源码)
前言:之前的两篇封装了一些基础的表单组件,这篇继续来封装几个基于bootstrap的其他组件.和上篇不同的是,这篇的有几个组件需要某些js文件的支持. 本文原创地址:http://www.cnblog ...
- C#进阶系列——一步一步封装自己的HtmlHelper组件:BootstrapHelper
前言:之前学习过很多的Bootstrap组件,博主就在脑海里构思:是否可以封装一套自己Bootstrap组件库呢.再加上看到MVC的Razor语法里面直接通过后台方法输出前端控件的方式,于是打算仿照H ...
随机推荐
- 【RPA之家转载】苏桦 华为RPA 企业财务实践:RPA与AI结合,实现百万级票据、合同处理自动化
[RPA之家转载]苏桦 华为RPA 企业财务实践:RPA与AI结合,实现百万级票据.合同处理自动化 看到大会的主题,说每一位开发者都了不起,说白了我也非常的感触,因为我自己本身也是一个开发者,我从01 ...
- 【Java面试】什么是 ISR,为什么需要引入 ISR
Hi,大家好,我是Mic. 一个工作5年的粉丝,在简历上写精通Kafka. 结果在面试的时候直接打脸. 面试官问他:"什么是ISR,为什么需要设计ISR" 然后他一脸懵逼的看着面试 ...
- 写了个 Markdown 命令行小工具,希望能提高园友们发文的效率!
写了个 Markdown 命令行小工具,希望能提高园友们发文的效率! 前言 笔者使用 Typora 来编写 Markdown 格式的博文,图片采用的是本地相对路径存储(太懒了不想折腾图床). 时间久了 ...
- Linux操作系统(3):crond 任务调度
crontab 进行 定时任务的设置.概述: 任务调度:是指系统在某个时间执行的特定的命令或程序. 任务调度分类: 1.系统工作:有些重要的工作必须周而复始地执行.如病毒扫描等 2.个别用户工作:个别 ...
- Mybatis整合第三方缓存
1) 为了提高扩展性.MyBatis定义了缓存接口Cache.我们可以通过实现Cache接口来自定义二级缓存 2) EhCache 是一个纯Java的进程内缓存框架,具有快速.精干等特点. 3) 整合 ...
- Tomcat 安装及配置,创建动态的web工程
Tomcat可以认为是对Servlet标准的实现,是一个具体的Servlet容器. 1) 将Tomcat的安装包解压到磁盘的任意位(非中文无空格) 2) Tomcat服务的 ...
- Qt点名器
项目已开源,点击跳转 废话不多说,直接上代码. CMakeLists.txt cmake_minimum_required(VERSION 3.10) project(qt-caller) find_ ...
- SQLZOO练习5--join(表的连接)
game表: id mdate stadium team1 team2 1001 8 June 2012 National Stadium, Warsaw POL GRE 1002 8 June 20 ...
- intellidea 快捷键-*01
快捷键: 0.竖向选择文本: alt+shift+insert:https://www.cnblogs.com/JonaLin/p/11422110.html 如果想修改快捷键(setting-> ...
- 使用Properties集合存储数据,遍历取出Properties集合中的数据和Properties集合中的方法store和load
package com.yang.Test.PropertiesStudy; import java.io.FileWriter; import java.io.IOException; import ...