桌面应用自动化winappdriver
桌面应用自动化winappdriver
关于winappdriver
介绍
- WinAppDriver全称是Windows Application Driver,它提供了一些API,使得用户可以像selenium操作web一样来操作windows的应用程序
- 它支持的系统是Windows 10 (Home and Pro) 和Windows Server 2016
- 源码暂未开源
- WinAppDriver可以独立运行,也可以作为appium的一个插件来使用
支持应用类型
UWP – Universal Windows Platform, also known as Universal Apps or Modern Apps, It's Microsoft’s latest desktop application technology. It's XAML based. Only runs on Windows 10 machines
WPF - also XAML based, much more mature, runs on any Windows version and has been around since 2006.
WinForms - one of the older technologies, now found mostly on legacy applications.
WPF和WinForms 是两套界面渲染方式。一个是对传统windows界面元素的封装,通过gdi绘制。另一个是全新的dx渲染绘制的界面,也脱离了对传统windows控件的依赖,没有历史包袱,理论上可以展现更炫酷的界面。
MFC/Classic Windows - MFC is a UI library normally paired with Win32 applications. This option is normally chosen when more efficiency is needed with low-level C++ handling or when supporting non-Microsoft platforms.
资源
| 素材 | 地址 | 说明 |
|---|---|---|
| FlaUInspect | https://github.com/FlaUI/FlaUInspect/releases | 定位工具 |
| WinAppDriver | https://github.com/microsoft/WinAppDriver/releases/tag/v1.2.1 | |
| UIRecorder | https://github.com/microsoft/WinAppDriver/tree/master/Tools/UIRecorder | 定位工具 |
| inspect | 微软官方工具集成于 Windows SDK | 定位工具 |
- UIRecorder(下文不涉及,仅供参考与备忘)
- Open
WinAppDriverUIRecorder.slnin Visual Studio- Select Debug > Start Debugging or simply Run
支持的定位方式
| Client API | Locator Strategy | Matched Attribute in inspect.exe |
Example |
|---|---|---|---|
| FindElementByAccessibilityId | accessibility id | AutomationId | AppNameTitle |
| FindElementByClassName | class name | ClassName | TextBlock |
| FindElementById | id | RuntimeId (decimal) | 42.333896.3.1 |
| FindElementByName | name | Name | Calculator |
| FindElementByTagName | tag name | LocalizedControlType (upper camel case) | Text |
| FindElementByXPath | xpath | Any | //Button[0] |
配置
开启windows的开发者模式
- 你没看错,不是手机,windows也有
- 第一步:搜开发者设置
- 第二步:打开开发人员模式
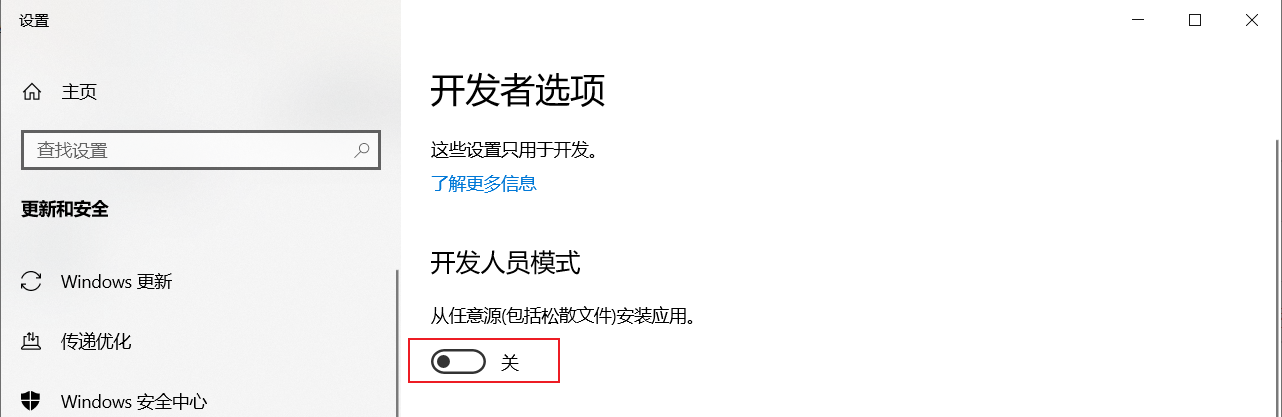
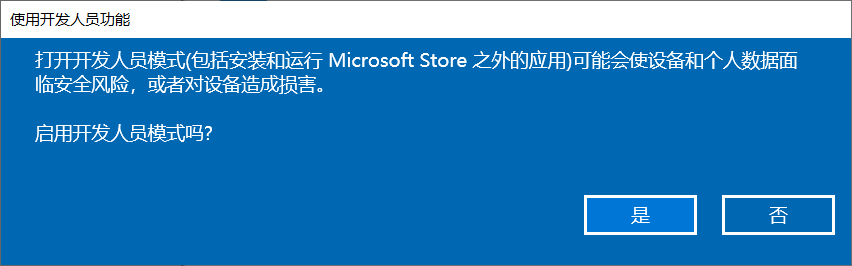
- 第三步:确认启用
启动winappdriver
不开启开发人员模式的提示
C:\Program Files (x86)\Windows Application Driver>WinAppDriver.exe

Developer mode is not enabled. Enable it through Settings and restart Windows Application Driver

Failed to initialize: 0x80004005
开启后启动winappdriver
C:\Program Files (x86)\Windows Application Driver>WinAppDriver.exe

Windows Application Driver listening for requests at: http://127.0.0.1:4723/

Press ENTER to exit.
还可以这样启动
WinAppDriver.exe 4727

WinAppDriver.exe 10.0.0.10 4725

WinAppDriver.exe 10.0.0.10 4723/wd/hub   # 推荐
实例
appium-python-client 版本不要用2.0+,此处是1.2.0
记事本
比如记事本
from appium import webdriver
des_cap = {}
des_cap['app'] = r'C:\Windows\System32\notepad.exe'
driver = webdriver.Remote(command_executor='http://127.0.0.1:4723/wd/hub',
desired_capabilities=des_cap)
driver.implicitly_wait(5)
driver.find_element_by_name('文件(F)').click()
from time import sleep
sleep(2)
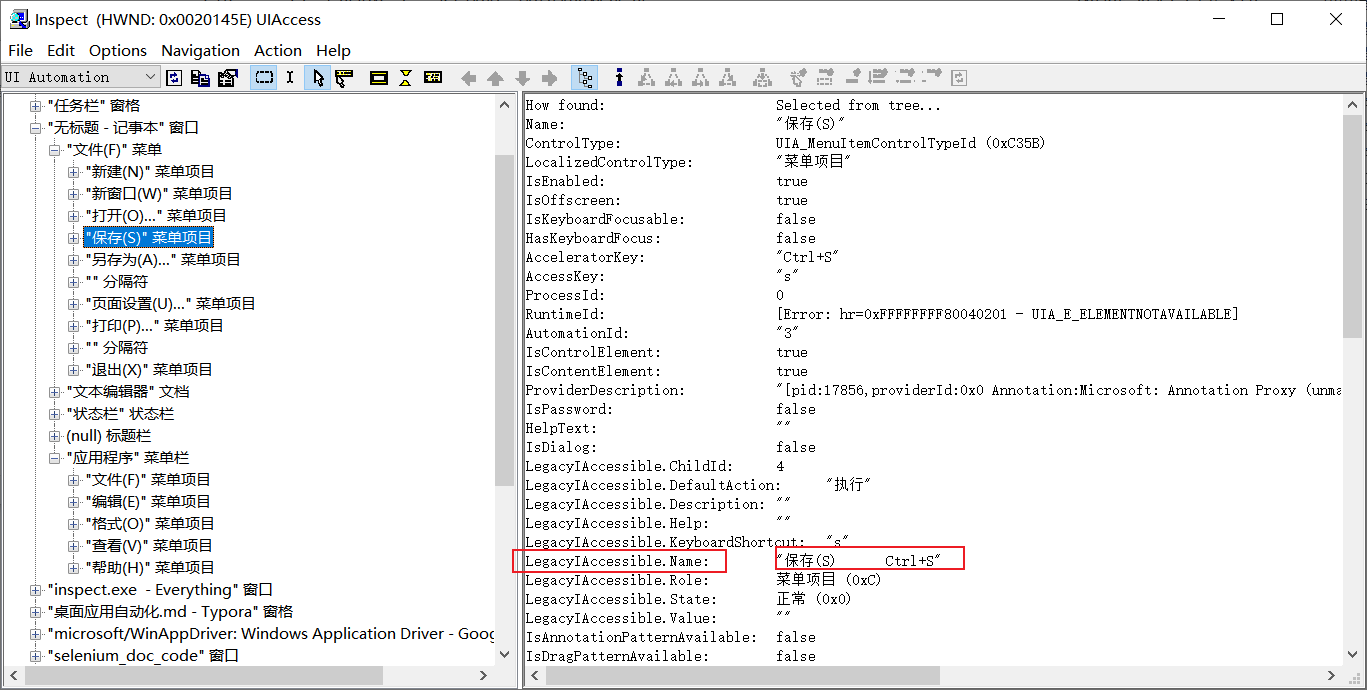
driver.find_element_by_name('保存(S) Ctrl+S').click()
# driver.find_element_by_name('退出(X)').click()
sleep(1)
import pyautogui
pyautogui.PAUSE = 0.5
pyautogui.typewrite(r'D:\hello.txt')
pyautogui.press('enter')
这里的难点是
保存(S) Ctrl+S的获取这里需要用到inspect.exe
计算器
- 你可能会写这样的代码
from appium import webdriver

des_cap = {}

des_cap['app'] = r'C:\Windows\System32\calc.exe'

driver = webdriver.Remote(command_executor='http://127.0.0.1:4723/wd/hub',

                          desired_capabilities=des_cap)

driver.implicitly_wait(5)
- 但会报错
Traceback (most recent call last):

  File "D:/demo_calc.py", line 5, in <module>

    desired_capabilities=des_cap)

  File "D:\Python37\lib\site-packages\appium\webdriver\webdriver.py", line 157, in __init__

    AppiumConnection(command_executor, keep_alive=keep_alive), desired_capabilities, browser_profile, proxy

  File "D:\Python37\lib\site-packages\selenium\webdriver\remote\webdriver.py", line 157, in __init__

    self.start_session(capabilities, browser_profile)

  File "D:\Python37\lib\site-packages\appium\webdriver\webdriver.py", line 226, in start_session

    response = self.execute(RemoteCommand.NEW_SESSION, parameters)

  File "D:\Python37\lib\site-packages\selenium\webdriver\remote\webdriver.py", line 321, in execute

    self.error_handler.check_response(response)

  File "D:\Python37\lib\site-packages\selenium\webdriver\remote\errorhandler.py", line 242, in check_response

    raise exception_class(message, screen, stacktrace)

selenium.common.exceptions.WebDriverException: Message: Failed to locate opened application window with appId: C:\Windows\System32\calc.exe, and processId: 4472

进程已结束,退出代码为 1
- 打开计算器,然后在powershell中执行如下命令
Get-StartApps |Select-String "计算器"

# 输出

@{Name=计算器; AppID=Microsoft.WindowsCalculator_8wekyb3d8bbwe!App} # 你要的是这里的AppID
- 代码
from appium import webdriver

des_cap = {}

des_cap['app'] = r'Microsoft.WindowsCalculator_8wekyb3d8bbwe!App'

driver = webdriver.Remote(command_executor='http://127.0.0.1:4723/wd/hub',

                          desired_capabilities=des_cap)

driver.implicitly_wait(5)

driver.find_element_by_name('一').click()

driver.find_element_by_name('二').click()

driver.find_element_by_name('加').click()

driver.find_element_by_name('三').click()

driver.find_element_by_name('四').click()

driver.find_element_by_name('等于').click()

# 通过inspect 获取 automationID

print(driver.find_element_by_accessibility_id('CalculatorResults').text) # 得到的是   ·显示为 46·  你仍然要处理才能做测试

driver.quit()
计算器测试(官网)
我没跑
# https://raw.githubusercontent.com/microsoft/WinAppDriver/master/Samples/Python/calculatortest.py

import unittest

from appium import webdriver

class SimpleCalculatorTests(unittest.TestCase):

    @classmethod

    def setUpClass(self):

        #set up appium

        desired_caps = {}

        desired_caps["app"] = "Microsoft.WindowsCalculator_8wekyb3d8bbwe!App"

        self.driver = webdriver.Remote(

            command_executor='http://127.0.0.1:4723',

            desired_capabilities= desired_caps)

    @classmethod

    def tearDownClass(self):

        self.driver.quit()

    def getresults(self):

        displaytext = self.driver.find_element_by_accessibility_id("CalculatorResults").text

        displaytext = displaytext.strip("Display is " )

        displaytext = displaytext.rstrip(' ')

        displaytext = displaytext.lstrip(' ')

        return displaytext

    def test_initialize(self):

        self.driver.find_element_by_name("Clear").click()

        self.driver.find_element_by_name("Seven").click()

        self.assertEqual(self.getresults(),"7")

        self.driver.find_element_by_name("Clear").click()

    def test_addition(self):

        self.driver.find_element_by_name("One").click()

        self.driver.find_element_by_name("Plus").click()

        self.driver.find_element_by_name("Seven").click()

        self.driver.find_element_by_name("Equals").click()

        self.assertEqual(self.getresults(),"8")

    def test_combination(self):

        self.driver.find_element_by_name("Seven").click()

        self.driver.find_element_by_name("Multiply by").click()

        self.driver.find_element_by_name("Nine").click()

        self.driver.find_element_by_name("Plus").click()

        self.driver.find_element_by_name("One").click()

        self.driver.find_element_by_name("Equals").click()

        self.driver.find_element_by_name("Divide by").click()

        self.driver.find_element_by_name("Eight").click()

        self.driver.find_element_by_name("Equals").click()

        self.assertEqual(self.getresults(),"8")

    def test_division(self):

        self.driver.find_element_by_name("Eight").click()

        self.driver.find_element_by_name("Eight").click()

        self.driver.find_element_by_name("Divide by").click()

        self.driver.find_element_by_name("One").click()

        self.driver.find_element_by_name("One").click()

        self.driver.find_element_by_name("Equals").click()

        self.assertEqual(self.getresults(),"8")

    def test_multiplication(self):

        self.driver.find_element_by_name("Nine").click()

        self.driver.find_element_by_name("Multiply by").click()

        self.driver.find_element_by_name("Nine").click()

        self.driver.find_element_by_name("Equals").click()

        self.assertEqual(self.getresults(),"81")

    def test_subtraction(self):

        self.driver.find_element_by_name("Nine").click()

        self.driver.find_element_by_name("Minus").click()

        self.driver.find_element_by_name("One").click()

        self.driver.find_element_by_name("Equals").click()

        self.assertEqual(self.getresults(),"8")

if __name__ == '__main__':

    suite = unittest.TestLoader().loadTestsFromTestCase(SimpleCalculatorTests)

    unittest.TextTestRunner(verbosity=2).run(suite)
桌面应用自动化winappdriver的更多相关文章
- 使用 pyautogui 进行跨平台的 GUI 自动化操作
有个朋友最近问我有没有推荐 GUI 桌面应用自动化的技术,我只能回答他:不好意思,这个真有,他是 pyautogui.主要有三大特征: 纯纯的 python, 源码一览无余: 跨平台,linux, w ...
- 如何利用 RPA 实现自动化获客?
大家好,我是二哥.前高级技术专家 & 增长黑客,现一枚爱折腾的小小创业者,专注于 RPA & SaaS 软件这块.这次给大家带来如何利用 RPA 实现自动化获客 一.RPA 是什么?难 ...
- DD XOFT虚拟键盘鼠标
下载:http://www.ddxoft.com/ 简介:最多用户选择,最简单易用,最稳定可靠 永久免费 系统底层集成,真正的驱动级硬件模拟 一键安装,即为电脑添加一对可完全编程控制的键盘鼠标,轻松自 ...
- Python3+Appium安装使用教程
一.安装 我们知道selenium是桌面浏览器自动化操作工具(Web Browser Automation) appium是继承selenium自动化思想旨在使手机app操作也能自动化的工具(Mobi ...
- Selenium上传文件方法总结
Web上本地上传图片,弹出的框Selenium是无法识别的,也就是说,selenium本身没有直接的方法去实现上传本地文件,这里总结了两种上传文件的方式. 一.利用Robot类处理文件上传. 其大致流 ...
- Selenium文件上传
转自:https://www.cnblogs.com/miaojjblog/p/9679915.html Web上本地上传图片,弹出的框Selenium是无法识别的,也就是说,selenium本身没有 ...
- appium+python教程1
Python3+Appium安装使用教程 一.安装 我们知道selenium是桌面浏览器自动化操作工具(Web Browser Automation) appium是继承selenium自动化思想旨在 ...
- 《手把手教你》系列技巧篇(五十五)-java+ selenium自动化测试-上传文件-下篇(详细教程)
1.简介 在实际工作中,我们进行web自动化的时候,文件上传是很常见的操作,例如上传用户头像,上传身份证信息等.所以宏哥打算按上传文件的分类对其进行一下讲解和分享. 2.为什么selenium没有提供 ...
- 聊聊 PC 端自动化最佳方案 - WinAppDriver
1. 前言 大家好,我是安果! 一提到自动化,可能大家想到的是 App 端的 Appium.Airtest.AutoJS,亦或是 Selenium.Puppeteer.Cypress 等 Web 端的 ...
- Electorn(桌面应用)自动化测试之Java+selenium实战例子
基于electorn的桌面应用,网上相关资料较少.所有记录一下.使用java+selenium+testng对该类型应用的自动化测试方法. 代码样例 package com.contract.web. ...
随机推荐
- e.target和this区别
首先,this是指向当前事件所绑定的元素 e.target指向事件执行时所点击区域的元素, 易混淆点,当鼠标所点击的元素有子元素,e.target指向子元素,若没有,则和this一样指向事件所绑定的事 ...
- mysql允许root用户在任何地方进行远程登录,并具有所有库任何操作权限
在本机先使用root用户登录mysql: mysql -u root -p"youpass" 进行授权操作: mysql>GRANT ALL PRIVILEGES ON *. ...
- linux 基线检查
1 检查用户缺省UMASK #cat /etc/profile|sed '/^#/d'|sed '/^$/d'|grep -i "umask" 修改umask vi /etc/pr ...
- sql 字符串末尾空格不占长度
print len('qwer ');--4 print len('qwer ');--4 print len('qwer ' + 't');-- ...
- CC2020 分享信息
CC2020是鄙人第一次参与的国际计算教育报告.CC2020报告的特色是希望面向未来的教育能走近每一个教育的利益相关者,包括家长.学生.行业雇主.政府决策制定者和学术界人士.敬请各位从自己的身份角度对 ...
- linux下opencv contrib安装
opencv安装 1.1 安装依赖 sudo apt-get update sudo apt-get install build-essential sudo apt-get install cmak ...
- antv g6 中自定义tooltip 当有该属性时展示没有时不展示
getContent(e) { const outDiv = document.createElement('div'); outDiv.style.width = '180px'; outDiv.i ...
- C# 自定义控件如何正确的继承父类
C# 自定义控件可以分为三类: 复合控件:基本控件组合而成.应当继承自 UserControl 扩展控件:继承基本控件,扩展一些属性和事件.比如继承 Button 自定义控件:直接继承自 Contro ...
- jxg项目Day4-数据库和mybatis的连接映射
配置:yml配置文件中配置数据库的参数,还有映射的参数 1.建实体类User,属性与数据库表对应 2.Mapper包下建UserMapper,继承BaseMapper<User> 3.Se ...
- Integer类自动拆箱,装箱解析
1.自动拆箱 例1: int i1 = 10; Integer i2 = new Integer(10); System.out.println(i1 == i2); 这个结果是true i1为基本数 ...