MyBatis03:连接池及事务控制、xml动态SQL语句、多表操作
- mybatis中的连接池、事务控制【原理了解,应用会用】
- mybatis中连接池的使用及分析
- mybatis中事务控制的分析
- mybatis中基于xml配置的动态SQL语句使用【会用即可】
- mappers配置文件中的几个标签
- <if>
- <where>
- <foreach>
- <sql>实现代码片段
- mybatis中的多表操作【掌握应用】
- 一对多
- 一对一(?)
- 多对多
- 实际开发中都会使用连接池
- 原因:可以减少获取连接所消耗的时间
- 图解
- 分析:
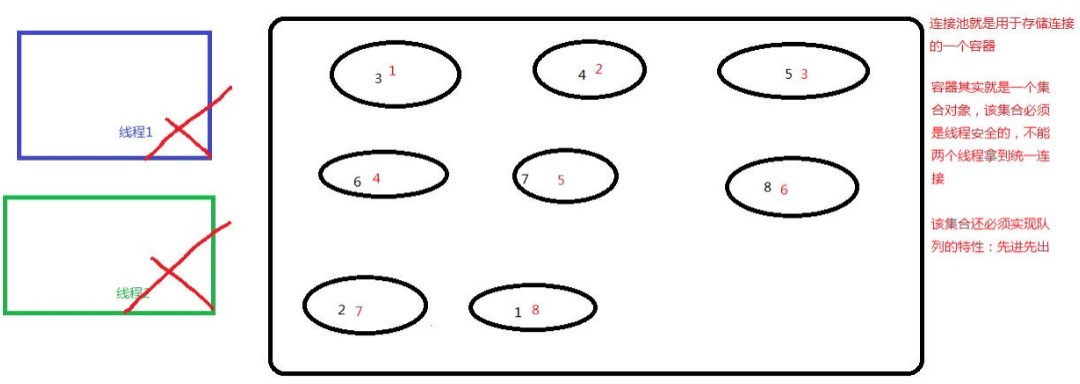
- 连接池就是用于存储连接的容器
- 容器其实就是一个集合对象,只不过该集合是线程安全的,两个线程不能拿到同一个连接
- 该集合还需要实现队列的先进先出特性。
while (conn == null) { //连接为空时创建

      synchronized (state) {

        if (!state.idleConnections.isEmpty()) {

          // Pool has available connection

conn = state.idleConnections.remove(0);- 配置的位置:
- 主配置文件SqlMapConfig.xml中的dataSource标签,type属性表示采用何种连接池方式
- type的取值:
- POOLED:采用传统的javax.sql.DataSource规范中的连接池,mybatis中有针对规范的实现
- UNPOOLED:采用传统的获取连接的方式,虽然也实现了javax.sql.DataSource接口,但是没有使用池的思想--每次使用都获取一个新的连接
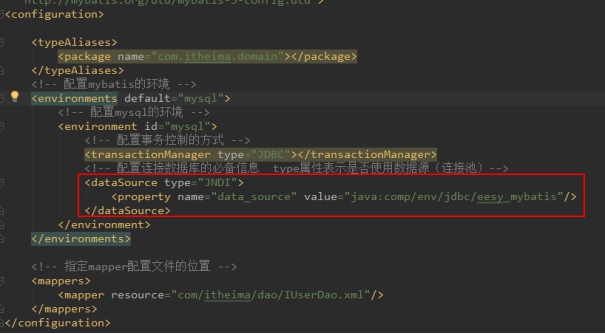
- 【扩展】JNDI:采用服务器提供的JNDI技术实现,来获取DataSource对象,不同服务器所能拿到的DataSource不同。
- 注意:如果不是web或者maven的war工程,是不能使用的
- 我们课程中使用的是tomcat服务器,采用的连接池就是dbcp连接池
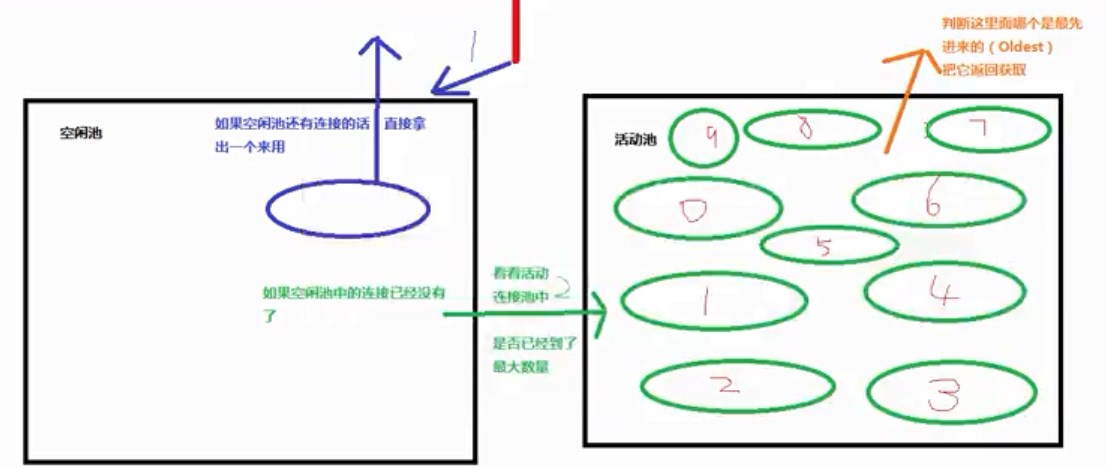
- POOLED是从池中获取一个连接来用
- UNPOOLED是注册驱动、获取连接

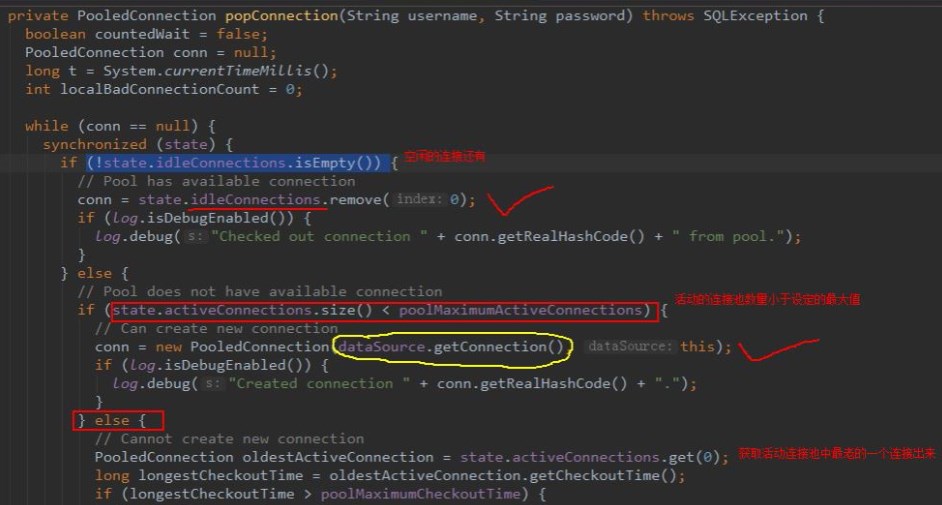
- 空闲连接池
- 活动连接池
- 了解(面试)
- 什么是事务
- 事务的四大特性ACID
- 不考虑隔离性会产生的3个问题
- 解决方法:四种隔离级别
- mybatis的事务
- 通过sqlSession对象的commit方法和rollback方法实现事务的提交和和回滚
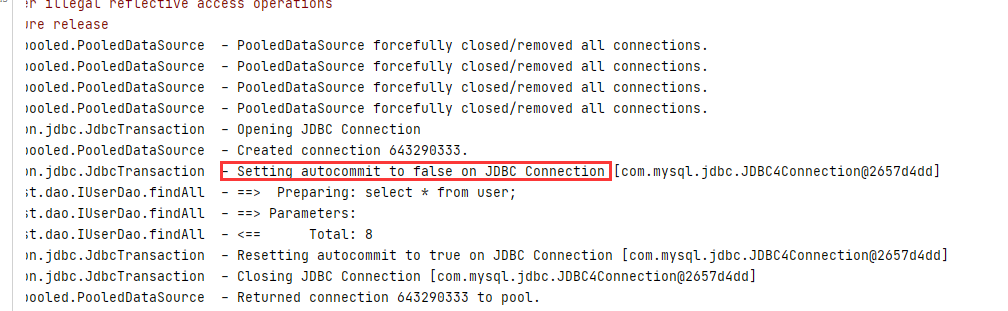
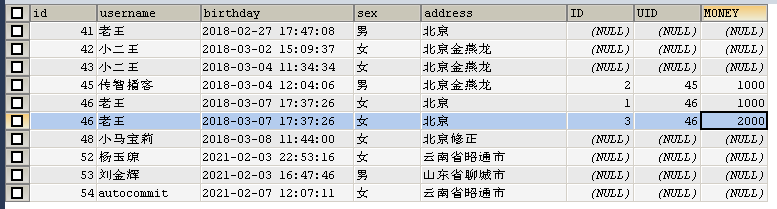
- 如何设置为自动提交
    @Override

    public void saveUser(User user) {

        //1.根据factory获取SqlSession对象

        SqlSession session = factory.openSession(true);

        //2.调用SQLSession中的方法实现查询列表

        session.insert("com.itcast.dao.IUserDao.saveUser",user);

        //3.提交事务

        //session.commit();

        //4.关闭

        session.close();

} <!--根据条件查询-->
<select id="findUserByCondition" resultType="com.itcast.domain.User" parameterType="user">
select * from user where 1=1
<if test="username != null">
and username = #{username}
</if>
</select> <!--根据条件查询-->
<select id="findUserByCondition" resultType="com.itcast.domain.User" parameterType="user">
select * from user
<where>
<if test="username != null">
and username = #{username}
</if>
<if test="sex != null">
and sex = #{sex}
</if>
</where>
</select>- 举例:select * from user where username in(43,44);
    /**

     * 根据queryvo中提供的id集合,查询用户集合

     * @param vo

     * @return

     */

    List<User> findByUserInIds(QueryVo vo);
<!--根据queryvo中的id集合实现查询用户列表-->
<select id="findByUserInIds" resultType="com.itcast.domain.User">
select * from user where id
<where>
<if test="ids != null and ids.size()>0">
<foreach collection="ids" open="id in(" close=")" item="id" separator=",">
#{id}
</foreach>
</if>
</where>
</select> /**
* 测试foreach
*/
@Test
public void testfindInIds() throws IOException {
QueryVo vo = new QueryVo();
List<Integer> list = new ArrayList<>();
list.add(41);
list.add(42);
list.add(44);
vo.setIds(list);
List<User> users = userDao.findByUserInIds(vo);
for (User user : users) {
System.out.println(user);
}
}<sql id="defaultUser">
select * from user
</sql>
<select id="findAll" resultType="com.itcast.domain.User" >
<include refid="defaultUser"></include>
</select>- 一对多
- 举例:一个用户可以下多个订单
- 多对一
- 举例:一个班级有多个学生
- 一对一
- 多对多
- 举例:一个学生可以有多个老师,一个老师可以有多个学生
- 特例:拿出每一个订单都只属于一个用户,所以mybatis就把多对一看成一对一
- 示例:用户和账户
- 一个用户可以有多个账户
- 一个账户只能属于一个用户(多个账户可以只属于同一个用户)
- 步骤:
- 建立用户表和账户表
- 让用户表和账户表之间具备一对多的关系,需要在账户表中添加外键
- 建立两个实体类:用户实体类和账户实体类
- 让用户和账户的实体类能体现出一对多的关系
- 建立两个配置文件
- 用户的配置文件
- 账户的配置文件
- 实现配置:
- 当查询用户时,可以同时得到用户下所包含的账户信息
- 当查询账户时,可以同时得到账户的所属用户信息
<?xml version="1.0" encoding="UTF-8"?>

<!DOCTYPE mapper

        PUBLIC "-//mybatis.org//DTD Mapper 3.0//EN"

        "http://mybatis.org/dtd/mybatis-3-mapper.dtd">

<mapper namespace="com.itcast.dao.IAccountDao">

    <select id="findAll" resultType="account" >

        select * from account

    </select>

    <!--查询所有账户同时包含用户名和地址信息-->

    <select id="findAllAccount" resultType="accountuser" >

        SELECT a.*,u.username,u.address FROM account a, USER u WHERE a.uid = u.id

    </select>

</mapper>
<?xml version="1.0" encoding="UTF-8"?>
<!DOCTYPE configuration
PUBLIC "-//mybatis.org//DTD Config 3.0//EN"
"http://mybatis.org/dtd/mybatis-3-config.dtd">
<configuration>
<properties resource="jdbcConfig.properties">
</properties>
<!--使用typeAliases配置别名,只能配置domain中类的别名-->
<typeAliases>
<!--typeAliases配置别名,type指定全限定类名,alias指定别名,指定别名后不再区分大小写-->
<!--<typeAlias type="com.itcast.domain.User" alias="user"></typeAlias>
<typeAlias type="com.itcast.domain.Account" alias="account"></typeAlias>-->
<!--package用于指定要配置别名的包,当指定后,该包下的实体类都会注册别名,并且类名就是别名,不再区分大小写-->
<package name="com.itcast.domain"></package>
</typeAliases>
<!--配置环境-->
<environments default="mysql">
<!--配置mysql的环境-->
<environment id="mysql">
<!--配置事务-->
<transactionManager type="JDBC"></transactionManager>
<!--配置连接池-->
<dataSource type="POOLED">
<property name="driver" value="${jdbc.driver}"></property>
<property name="url" value="${jdbc.url}"></property>
<property name="username" value="${jdbc.username}"></property>
<property name="password" value="${jdbc.password}"></property>
</dataSource>
</environment>
</environments>
<!--配置映射文件的位置-->
<mappers>
<!--<mapper resource="com/itcast/dao/IAccountDao.xml"></mapper>-->
<!--用于指定dao接口所在的包,当指定完成之后就不需要再写mapper、resource或class了-->
<package name="com.itcast.dao"/>
</mappers>
</configuration> /**
* 测试查询所有账户,同时包含用户名称和地址
*/
@Test
public void testFindAllAccount(){
List<AccountUser> aus = accountDao.findAllAccount();
for (AccountUser au : aus) {
System.out.println(au);
}
} @Override
public String toString() {
return super.toString() +
"AccountUser{" +
"username='" + username + '\'' +
", address='" + address + '\'' +
'}';
}public class Account implements Serializable {
private Integer id;
private Integer uid;
private Double money;
//从表实体应该包含一个主表实体的对象引用
private User user;
public User getUser() {
return user;
}
public void setUser(User user) {
this.user = user;
}<?xml version="1.0" encoding="UTF-8"?>
<!DOCTYPE mapper
PUBLIC "-//mybatis.org//DTD Mapper 3.0//EN"
"http://mybatis.org/dtd/mybatis-3-mapper.dtd">
<mapper namespace="com.itcast.dao.IAccountDao">
<!--定义封装account和user的resultMap-->
<resultMap id="accountUserMap" type="account">
<id property="id" column="aid"></id>
<result property="uid" column="uid"></result>
<result property="money" column="money"></result>
<!--应当建立一对一的关系映射:配置封装user的内容-->
<association property="user" column="uid" javaType="user">
<id property="id" column="id"></id>
<result property="username" column="username"></result>
<result property="address" column="address"></result>
<result property="sex" column="sex"></result>
<result property="birthday" column="birthday"></result>
</association>
</resultMap>
<select id="findAll" resultMap="accountUserMap" >
SELECT u.*,a.id AS aid,a.money,a.uid FROM account a, USER u WHERE a.uid = u.id
</select>
<!--查询所有账户同时包含用户名和地址信息-->
<select id="findAllAccount" resultType="accountuser" >
SELECT a.*,u.username,u.address FROM account a, USER u WHERE a.uid = u.id
</select>
</mapper> /**
* 测试查询所有
*/
@Test
public void testFindAll(){
List<Account> accounts = accountDao.findAll();
for (Account account : accounts) {
System.out.println("-----每个account的信息-----");
System.out.println(account);
System.out.println(account.getUser());
}
}
<?xml version="1.0" encoding="UTF-8"?>

<!DOCTYPE mapper

        PUBLIC "-//mybatis.org//DTD Mapper 3.0//EN"

        "http://mybatis.org/dtd/mybatis-3-mapper.dtd">

<mapper namespace="com.itcast.dao.IUserDao">

    <!--定义user的resultMap-->

    <resultMap id="userAccountMap" type="user">

        <id property="id" column="id"></id>

        <result property="username" column="username"></result>

        <result property="address" column="address"></result>

        <result property="sex" column="sex"></result>

        <result property="birthday" column="birthday"></result>

        <!--配置user对象中account集合的映射-->

        <collection property="accounts" ofType="account">

            <id column="aid" property="id"></id>

            <result column="uid" property="uid"></result>

            <result column="money" property="money"></result>

        </collection>

    </resultMap>

    <select id="findAll" resultMap="userAccountMap" >

        SELECT * FROM USER u LEFT OUTER JOIN account a ON u.id = a.UID

    </select>

</mapper>
/**
* 测试查询所有
*/
@Test
public void testFindAll(){
List<User> users = userDao.findAll();
for (User user : users) {
System.out.println("-----每个account的信息-----");
System.out.println(user);
System.out.println(user.getAccounts());
}
}public class User implements Serializable {
private Integer id;
private String username;
private String address;
private String sex;
private Date birthday;
//建立一对多关系映射,主表实体应该包含从表实体的集合引用
private List<Account> accounts;
public List<Account> getAccounts() {
return accounts;
}
public void setAccounts(List<Account> accounts) {
this.accounts = accounts;
}- 示例:用户和角色(用户的身份)
- 用户可以有多个角色
- 一个角色也可以赋予多个用户
- 步骤:
- 建立用户表和角色表
- 让用户表和角色表之间具备一对多的关系
- 需要使用中间表,中间表中包含各自的主键,在中间表中是外键
- 建立两个实体类:用户实体类和角色实体类
- 让用户和角色的实体类能体现出多对多的关系
- 各自包含对方的集合引用
- 建立两个配置文件
- 用户的配置文件
- 角色的配置文件
- 实现配置:
- 当查询用户时,可以同时得到用户下所包含的角色信息
- 当查询角色时,可以同时得到角色的所赋予的用户信息
public class Role implements Serializable {

    private Integer roleId;

    private String roleName;

    private String roleDesc;
package com.itcast.dao;
import com.itcast.domain.Role;
import java.util.List;
public interface IRoleDao {
/**
* 查询所有角色
* @return
*/
List<Role> findAll();
}<?xml version="1.0" encoding="UTF-8"?>
<!DOCTYPE mapper
PUBLIC "-//mybatis.org//DTD Mapper 3.0//EN"
"http://mybatis.org/dtd/mybatis-3-mapper.dtd">
<mapper namespace="com.itcast.dao.IRoleDao">
<!--定义role表的resultMap-->
<resultMap id="roleMap" type="role">
<id property="roleId" column="id"></id>
<!--windows不区分大小写,linux区分大小写-->
<result property="roleName" column="role_name"></result>
<result property="roleDesc" column="role_desc"></result>
</resultMap>
<select id="findAll" resultMap="roleMap">
select * from role
</select>
</mapper>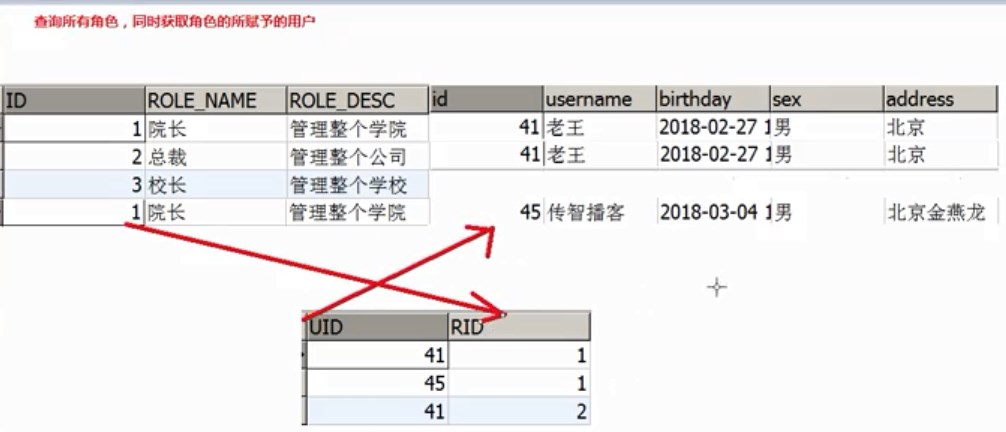
public class Role implements Serializable {

    private Integer roleId;

    private String roleName;

    private String roleDesc;

    //多对多的关系映射:一个角色可以赋予多个用户

    private List<User> users;

    public List<User> getUsers() {

        return users;

    }

    public void setUsers(List<User> users) {

        this.users = users;

    }
<mapper namespace="com.itcast.dao.IRoleDao">
<!--定义role表的resultMap-->
<resultMap id="roleMap" type="role">
<id property="roleId" column="id"></id>
<!--windows不区分大小写,linux区分大小写-->
<result property="roleName" column="role_name"></result>
<result property="roleDesc" column="role_desc"></result>
<collection property="users" ofType="user">
<id column="id" property="id"></id>
<result column="username" property="username"></result>
<result column="address" property="address"></result>
<result column="sex" property="sex"></result>
<result column="birthday" property="birthday"></result>
</collection>
</resultMap>
<select id="findAll" resultMap="roleMap">
SELECT u.*,r.`ID` rid,r.`ROLE_NAME`,r.`ROLE_DESC` FROM role r
LEFT OUTER JOIN user_role ur ON r.id = ur.`RID`
LEFT OUTER JOIN USER u ON u.id = ur.`UID`
</select>
</mapper> /**
* 测试查询所有
*/
@Test
public void testFindAll(){
List<Role> roles = roleDao.findAll();
for (Role role : roles) {
System.out.println("-----每个角色的信息-----");
System.out.println(role);
System.out.println(role.getUsers());
}
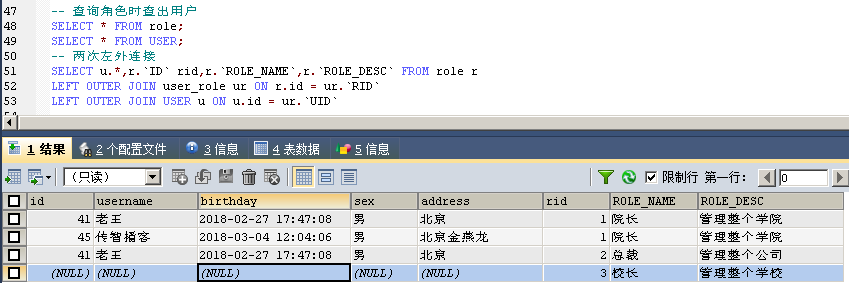
}-- 查询角色时查出用户
SELECT * FROM role;
SELECT * FROM USER;
-- 两次左外连接
SELECT u.*,r.`ID` rid,r.`ROLE_NAME`,r.`ROLE_DESC` FROM role r
LEFT OUTER JOIN user_role ur ON r.id = ur.`RID`
LEFT OUTER JOIN USER u ON u.id = ur.`UID`
-- 查询用户对应的角色,并不是所有用户都有角色
SELECT u.*,r.`ID` rid,r.`ROLE_NAME`,r.`ROLE_DESC` FROM USER u
LEFT OUTER JOIN user_role ur ON u.id = ur.`UID`
LEFT OUTER JOIN role r ON r.id = ur.`RID`<?xml version="1.0" encoding="UTF-8"?>
<!DOCTYPE mapper
PUBLIC "-//mybatis.org//DTD Mapper 3.0//EN"
"http://mybatis.org/dtd/mybatis-3-mapper.dtd">
<mapper namespace="com.itcast.dao.IUserDao">
<!--定义user的resultMap-->
<resultMap id="userAccountMap" type="user">
<id property="id" column="id"></id>
<result property="username" column="username"></result>
<result property="address" column="address"></result>
<result property="sex" column="sex"></result>
<result property="birthday" column="birthday"></result>
<!--配置角色集合的映射-->
<collection property="roles" ofType="role">
<id property="roleId" column="rid"></id>
<result property="roleName" column="role_name"></result>
<result property="roleDesc" column="role_desc"></result>
</collection>
</resultMap>
<select id="findAll" resultMap="userMap" >
SELECT u.*,r.ID rid,r.ROLE_NAME,r.ROLE_DESC FROM USER u
LEFT OUTER JOIN user_role ur ON u.id = ur.UID
LEFT OUTER JOIN role r ON r.id = ur.RID
</select>
</mapper>public class User implements Serializable {
private Integer id;
private String username;
private String address;
private String sex;
private Date birthday;
//多对多的关系映射:一个用户可以具备多个角色
private List<Role> roles;
public List<Role> getRoles() {
return roles;
}
public void setRoles(List<Role> roles) {
this.roles = roles;
}- JNDI(Java Naming and Directory Interface,Java命名和目录接口)是SUN公司提供的一种标准的Java命名系统接口.
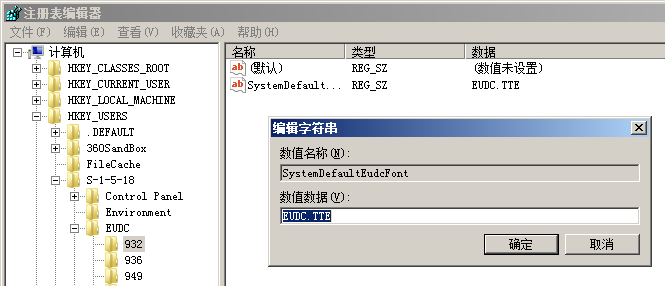
- 是SUN公司推出的一套规范,属于JavaEE技术之一。目的是模仿windows系统中的注册表(搜索-regedit)。
- win的 key存放的为:路径+名称

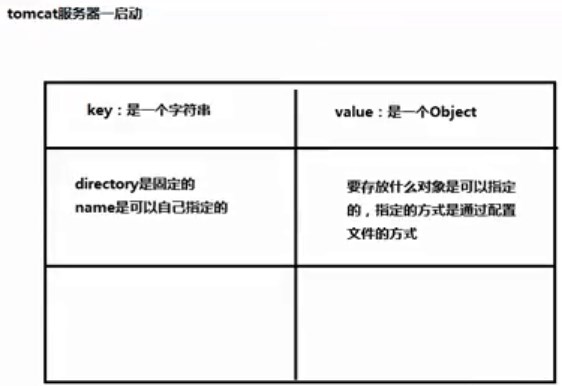

- 使用了tomcat的数据源,必须要经过服务器,原先的test方法无法使用
JNDI:Java Naming and Directory Interface。是SUN公司推出的一套规范,属于JavaEE技术之一。目的是模仿windows系统中的注册表。
在服务器中注册数据源:
1.1 创建Maven的war工程并导入坐标
<dependencies>
<dependency>
<groupId>org.mybatis</groupId>
<artifactId>mybatis</artifactId>
<version>3.4.5</version>
</dependency>
<dependency>
<groupId>mysql</groupId>
<artifactId>mysql-connector-java</artifactId>
<version>5.1.6</version>
</dependency>
<dependency>
<groupId>log4j</groupId>
<artifactId>log4j</artifactId>
<version>1.2.12</version>
</dependency>
<dependency>
<groupId>junit</groupId>
<artifactId>junit</artifactId>
<version>4.10</version>
</dependency>
<dependency>
<groupId>javax.servlet</groupId>
<artifactId>servlet-api</artifactId>
<version>2.5</version>
</dependency>
<dependency>
<groupId>javax.servlet.jsp</groupId>
<artifactId>jsp-api</artifactId>
<version>2.0</version>
</dependency>
</dependencies>
1.2 在webapp文件下创建META-INF目录
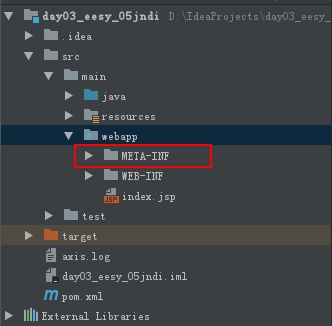
1.3 在META-INF目录中建立一个名为context.xml的配置文件

<?xml version="1.0" encoding="UTF-8"?>
<Context>
<!--
<Resource
name="jdbc/eesy_mybatis" 数据源的名称
type="javax.sql.DataSource" 数据源类型
auth="Container" 数据源提供者
maxActive="20" 最大活动数
maxWait="10000" 最大等待时间
maxIdle="5" 最大空闲数
username="root" 用户名
password="1234" 密码
driverClassName="com.mysql.jdbc.Driver" 驱动类
url="jdbc:mysql://localhost:3306/eesy_mybatis" 连接url字符串
/>
-->
<Resource
name="jdbc/eesy_mybatis"
type="javax.sql.DataSource"
auth="Container"
maxActive="20"
maxWait="10000"
maxIdle="5"
username="root"
password="1234"
driverClassName="com.mysql.jdbc.Driver"
url="jdbc:mysql://localhost:3306/eesy_mybatis"
/>
</Context>
1.4 修改SqlMapConfig.xml中的配置
@font-face { font-family: "Times New Roman" }
@font-face { font-family: "宋体" }
@font-face { font-family: "华文楷体" }
p.MsoNormal { mso-style-name: 正文; mso-style-parent: ""; margin: 0 0 0.0001pt; mso-pagination: none; text-align: justify; text-justify: inter-ideograph; font-family: "Times New Roman"; font-size: 10.5pt; mso-font-kerning: 1.0000pt }
h2 { mso-style-name: "标题 2"; mso-style-next: 正文; margin-top: 13pt; margin-bottom: 13pt; page-break-after: avoid; mso-pagination: lines-together; text-align: center; mso-outline-level: 2; line-height: 173%; font-family: "Times New Roman"; mso-fareast-font-family: 华文楷体; font-weight: bold; font-size: 16pt }
p.MsoFooter { mso-style-name: 页脚; mso-style-noshow: yes; margin: 0 0 0.0001pt; layout-grid-mode: char; mso-pagination: none; text-align: left; font-family: "Times New Roman"; font-size: 9pt; mso-font-kerning: 1.0000pt }
p.16 { mso-style-name: 奇偶数页眉; margin: 0 0 0.0001pt; border-bottom: 1pt solid rgba(0, 0, 0, 1); mso-border-bottom-alt: 0.7500pt solid windowtext; padding: 0 0 1pt; layout-grid-mode: char; mso-pagination: none; text-align: center; font-family: "Times New Roman"; mso-fareast-font-family: 宋体; font-size: 10.5pt; mso-font-kerning: 1.0000pt }
span.msoIns { mso-style-type: export-only; mso-style-name: ""; text-decoration: underline; text-underline: single; color: rgba(0, 0, 255, 1) }
span.msoDel { mso-style-type: export-only; mso-style-name: ""; text-decoration: line-through; color: rgba(255, 0, 0, 1) }
@page { mso-page-border-surround-header: no mso-page-border-surround-footer: no }
@page Section0 { }
div.Section0 { page: Section0 }
<%@ page import="java.io.InputStream" %>

<%@ page import="org.apache.ibatis.io.Resources" %>

<%@ page import="org.apache.ibatis.session.SqlSessionFactoryBuilder" %>

<%@ page import="org.apache.ibatis.session.SqlSession" %>

<%@ page import="org.apache.ibatis.session.SqlSessionFactory" %>

<%@ page import="com.itcast.dao.IUserDao" %>

<%@ page import="com.itcast.domain.User" %>

<%@ page import="java.util.List" %>

<%@ page language="java" contentType="text/html; utf-8" pageEncoding="utf-8" %>

<html>

<body>

<h2>Hello World!</h2>

<%

        //1.读取配置文件

        InputStream in = Resources.getResourceAsStream("SqlMapConfig.xml");

        //2.创建SqlSessionFactory工厂

        SqlSessionFactoryBuilder builder = new SqlSessionFactoryBuilder();

        SqlSessionFactory factory = builder.build(in);

        //3.使用工厂生产SqlSession对象

        SqlSession sqlSession = factory.openSession();//与jsp的隐式对象session冲突

        //4.使用SqlSession创建Dao接口的代理对象

        IUserDao userDao = sqlSession.getMapper(IUserDao.class);

        //5.使用代理对象执行方法

        System.out.println("你好");

        List<User> users = userDao.findAll();

        for (User user : users) {

            System.out.println(user);

        }

        //6.释放资源

        sqlSession.close();

        in.close();

%>

</body>

</html>
@font-face { font-family: "Times New Roman" }
@font-face { font-family: "宋体" }
@font-face { font-family: "华文楷体" }
@font-face { font-family: "Courier New" }
@font-face { font-family: "微软雅黑" }
@font-face { font-family: "Consolas" }
@list l0:level1{
mso-level-number-format:decimal;
mso-level-suffix:tab;
mso-level-text:"第%1章";
mso-level-tab-stop:none;
mso-level-number-position:left;
margin-left:21.0000pt;text-indent:-21.0000pt;font-family:宋体;}
@list l0:level2{
mso-level-number-format:decimal;
mso-level-suffix:tab;
mso-level-text:"%1.%2";
mso-level-tab-stop:none;
mso-level-number-position:left;
margin-left:255.6500pt;text-indent:-28.8000pt;font-family:宋体;}
@list l0:level3{
mso-level-number-format:decimal;
mso-level-suffix:tab;
mso-level-text:"%1.%2.%3";
mso-level-tab-stop:none;
mso-level-number-position:left;
margin-left:36.0000pt;text-indent:-36.0000pt;font-family:宋体;}
@list l0:level4{
mso-level-number-format:decimal;
mso-level-suffix:tab;
mso-level-text:"%1.%2.%3.%4";
mso-level-tab-stop:none;
mso-level-number-position:left;
margin-left:43.2000pt;text-indent:-43.2000pt;font-family:宋体;mso-ascii-font-family:'Times New Roman';mso-hansi-font-family:'Times New Roman';mso-bidi-font-family:'Times New Roman';letter-spacing:0.0000pt;text-transform:none;font-style:normal;font-variant:normal;}
@list l0:level5{
mso-level-number-format:decimal;
mso-level-suffix:tab;
mso-level-text:"%1.%2.%3.%4.%5";
mso-level-tab-stop:none;
mso-level-number-position:left;
margin-left:50.4000pt;text-indent:-50.4000pt;font-family:宋体;}
@list l0:level6{
mso-level-number-format:decimal;
mso-level-suffix:tab;
mso-level-text:"%1.%2.%3.%4.%5.%6";
mso-level-tab-stop:none;
mso-level-number-position:left;
margin-left:57.6000pt;text-indent:-57.6000pt;font-family:宋体;}
@list l0:level7{
mso-level-number-format:decimal;
mso-level-suffix:tab;
mso-level-text:"%1.%2.%3.%4.%5.%6.%7";
mso-level-tab-stop:none;
mso-level-number-position:left;
margin-left:64.8000pt;text-indent:-64.8000pt;font-family:宋体;}
@list l0:level8{
mso-level-number-format:decimal;
mso-level-suffix:tab;
mso-level-text:"%1.%2.%3.%4.%5.%6.%7.%8";
mso-level-tab-stop:none;
mso-level-number-position:left;
margin-left:72.0000pt;text-indent:-72.0000pt;font-family:宋体;}
@list l0:level9{
mso-level-number-format:decimal;
mso-level-suffix:tab;
mso-level-text:"%1.%2.%3.%4.%5.%6.%7.%8.%9";
mso-level-tab-stop:none;
mso-level-number-position:left;
margin-left:79.2000pt;text-indent:-79.2000pt;font-family:宋体;}
p.MsoNormal { mso-style-name: 正文; mso-style-parent: ""; margin: 0 0 0.0001pt; mso-pagination: none; text-align: justify; text-justify: inter-ideograph; font-family: "Times New Roman"; font-size: 10.5pt; mso-font-kerning: 1.0000pt }
h1 { mso-style-name: "标题 1"; mso-style-next: 正文; margin-top: 17pt; margin-bottom: 16.5pt; margin-left: 21pt; text-indent: -21pt; page-break-after: avoid; mso-pagination: lines-together; text-align: center; mso-outline-level: 1; line-height: 240%; font-family: "Times New Roman"; font-weight: bold; font-size: 22pt; mso-font-kerning: 22.0000pt }
h2 { mso-style-name: "标题 2"; mso-style-next: 正文; margin-top: 13pt; margin-bottom: 13pt; margin-left: 255.65pt; text-indent: -28.8pt; page-break-after: avoid; mso-pagination: lines-together; text-align: center; mso-outline-level: 2; line-height: 173%; font-family: "Times New Roman"; mso-fareast-font-family: 华文楷体; font-weight: bold; font-size: 16pt }
p.MsoFooter { mso-style-name: 页脚; mso-style-noshow: yes; margin: 0 0 0.0001pt; layout-grid-mode: char; mso-pagination: none; text-align: left; font-family: "Times New Roman"; font-size: 9pt; mso-font-kerning: 1.0000pt }
p.16 { mso-style-name: 奇偶数页眉; margin: 0 0 0.0001pt; border-bottom: 1pt solid rgba(0, 0, 0, 1); mso-border-bottom-alt: 0.7500pt solid windowtext; padding: 0 0 1pt; layout-grid-mode: char; mso-pagination: none; text-align: center; font-family: "Times New Roman"; mso-fareast-font-family: 宋体; font-size: 10.5pt; mso-font-kerning: 1.0000pt }
p.17 { mso-style-name: 例程代码(无行号); margin: 0 0 0.0001pt; text-indent: 21pt; mso-pagination: none; text-align: justify; text-justify: inter-ideograph; background: rgba(224, 224, 224, 1); font-family: "Courier New"; font-size: 9pt; mso-font-kerning: 1.0000pt; mso-shading: rgb(224,224,224) }
span.msoIns { mso-style-type: export-only; mso-style-name: ""; text-decoration: underline; text-underline: single; color: rgba(0, 0, 255, 1) }
span.msoDel { mso-style-type: export-only; mso-style-name: ""; text-decoration: line-through; color: rgba(255, 0, 0, 1) }
@page { mso-page-border-surround-header: no mso-page-border-surround-footer: no }
@page Section0 { margin-top: 72pt margin-bottom: 72pt margin-left: 70.9pt margin-right: 70.9pt size: 595.3000pt 841.9000pt layout-grid: 15.6000pt }
div.Section0 { page: Section0 }
MyBatis03:连接池及事务控制、xml动态SQL语句、多表操作的更多相关文章
- 【MyBatis】MyBatis 连接池和事务控制
MyBatis 连接池和事务控制 文章源码 MyBaits 连接池 实际开发中都会使用连接池,因为它可以减少获取连接所消耗的时间.具体可查看 MyBatis 数据源配置在 SqlMapConfig.x ...
- Junit 注解 类加载器 .动态代理 jdbc 连接池 DButils 事务 Arraylist Linklist hashset 异常 哈希表的数据结构,存储过程 Map Object String Stringbufere File类 文件过滤器_原理分析 flush方法和close方法 序列号冲突问题
Junit 注解 3).其它注意事项: 1).@Test运行的方法,不能有形参: 2).@Test运行的方法,不能有返回值: 3).@Test运行的方法,不能是静态方法: 4).在一个类中,可以同时定 ...
- JNDI和在tomcat中配置DBCP连接池 元数据的使用 DBUtils框架的使用 多表操作
1 JNDI和在tomcat中配置DBCP连接池 JNDI(Java Naming and Directory Interface),Java命名和目录接口,它对应于J2SE中的javax.namin ...
- MyBatis基础_连接池与事务、动态SQL、注解开发
一.MyBatis连接池及事务控制 1.连接池 在实际开发中,都会使用连接池,因为它可以减少获取连接缩消耗的时间.所谓连接池,就是存储数据库连接的容器.连接池中存储一定数量的数据库连接,当线程需要使用 ...
- 存储过程中执行动态Sql语句
MSSQL为我们提供了两种动态执行SQL语句的命令,分别是EXEC和sp_executesql;通常,sp_executesql则更具有优势,它提供了输入输出接口,而EXEC没有.还有一个最大的好处就 ...
- 怎样SQL存储过程中执行动态SQL语句
MSSQL为我们提供了两种动态执行SQL语句的命令,分别是EXEC和sp_executesql;通常,sp_executesql则更具有优势,它提供了输入输出接口,而EXEC没有.还有一个最大的好处就 ...
- Spring Boot1.5.4 连接池 和 事务
原文:https://github.com/x113773/testall/issues/10 默认连接池---spring Boot中默认支持的连接池有Tomcat.HikariCP .DBCP . ...
- (2.3)DDL增强功能-流程化控制与动态sql
1.流程控制 在T-SQL中,与流程控制语句相关的关键字有8个: BEGIN...END BREAK GOTO CONTINUE IF...ELSE WHILE RETURN WAITFOR 其实还可 ...
- mybatis--MyBatis动态SQL语句
mybatis 的动态sql语句是基于OGNL表达式的.可以方便的在 sql 语句中实现某些逻辑. 总体说来mybatis 动态SQL 语句主要有以下几类: 1. if 语句 (简单的条件判断) 2. ...
- MyBatis学习(三)、动态SQL语句
三.动态SQL语句 有些时候,sql语句where条件中,需要一些安全判断,例如按某一条件查询时如果传入的参数是空,此时查询出的结果很可能是空的,也许我们需要参数为空时,是查出全部的信息.使用Orac ...
随机推荐
- 第五章:Admin管理后台 - 2:自定义Admin actions
通常情况下,admin的工作模式是"选中目标,然后修改目标",但在同时修改大量目标的时候,这种模式就变得重复.繁琐. 为此,admin提供了自定义功能函数actions的手段,可以 ...
- Deployment控制器(pod)更新策略
最小就绪时间: 配置时,用户可以使用Deplpoyment控制器的spec.minReadySeconds属性来控制应用升级的速度.新旧更替过程中,新创建的Pod对象一旦成功响应就绪探测即被视作可用, ...
- 16. 综合使用tail、forward、copy和stdout
通过一个例子进行阶段总结. 本示例使用到如下插件:in_tail, out_copy, out_stdout, out_forward, in_forward. 本示例包含两个节点: node_for ...
- 15_abstract,static,final
一. abstract 1. 抽象类 被abstract修饰的类,称为抽象类 抽象类意为不够完整的类.不够具体的类 抽象类对象无法独立存在,即不能new对象,但可以声明引用 作用: 可被子类继承,提供 ...
- C#.NET ORM 如何访问 Access 数据库 [FreeSql]
最近很多 .net QQ 群无故被封停,特别是 wpf 群几乎全军覆没.依乐祝的 .net6交流群,晓晨的 .net跨平台交流群,导致很多码友流离失所无家可归,借此机会使用一次召唤术,有需要的请加群: ...
- 【LeetCode第 313 场周赛】忘光光
比赛链接 最近不怎么打比赛,不能马上反应过来考察的是什么,全部忘光光了... 6192. 公因子的数目 题意: 给定 \(a\) 和 \(b\),问两者的公因子数量 数据范围:\(1\leq a,b\ ...
- P3008 [USACO11JAN]Roads and Planes G (最短路+拓扑排序)
该最短路可不同于平时简单的最短路模板. 这道题一看就知道用SPFA,但是众所周知,USACO要卡spfa,所以要用更快的算法. 单向边不构成环,双向边都是非负的,所以可以将图分成若干个连通块(内部只有 ...
- 3.版本穿梭&分支概述
版本穿梭 如果我们提交了多个版本到本地仓库,想将工作区恢复到历史版本 可以先使用git reflog查看历史记录,获取到版本号 然后使用git rest --hard 版本号 命令恢复到指定版本 gi ...
- wpf 手指触摸图片放大缩小 设置放大缩小值
xaml代码: <Window x:Class="WpfApp1.MainWindow" xmlns="http://schemas.microsoft.com/w ...
- xss学习笔记(萌新版)
xss简介 xss攻击者构造恶意信息然后在用户的浏览器上执行,主要分为反射性xss,这种主要是某个页面存在有漏洞的参数,然后填上恶意参数把整个链接发给用户或者管理员,他们点击了带有恶意参数的链接就会执 ...