在spring+springMvc+mabatis框架下集成swagger
我是在ssm框架下集成swagger的,具体的ssm搭建可以看这篇博文:
Intellij Idea下搭建基于Spring+SpringMvc+MyBatis的WebApi接口架构
本项目的GitHub地址:https://github.com/chenyangsocool/ssm.git
接下去就正式开始了:
1.通过maven导入相关swagger的jar包:
    <!-- swagger -->

    <dependency>

      <groupId>io.springfox</groupId>

      <artifactId>springfox-swagger2</artifactId>

      <version>2.6.</version>

    </dependency>

    <dependency>

      <groupId>io.springfox</groupId>

      <artifactId>springfox-swagger-ui</artifactId>

      <version>2.6.</version>

    </dependency>

    <dependency>

      <groupId>com.fasterxml.jackson.core</groupId>

      <artifactId>jackson-core</artifactId>

      <version>2.6.</version>

    </dependency>

    <dependency>

      <groupId>com.fasterxml.jackson.core</groupId>

      <artifactId>jackson-databind</artifactId>

      <version>2.6.</version>

    </dependency>

    <dependency>

      <groupId>com.fasterxml.jackson.core</groupId>

      <artifactId>jackson-annotations</artifactId>

      <version>2.6.</version>

    </dependency>

    <!-- /swagger -->
2.在com.chenyangsocool.ssm.tools下新建swagger/Swagger2Config.java:
package com.chenyangsocool.ssm.tools.swagger;

import org.springframework.context.annotation.Bean;

import org.springframework.context.annotation.Configuration;

import org.springframework.web.servlet.config.annotation.EnableWebMvc;

import io.swagger.annotations.ApiOperation;

import springfox.documentation.builders.ApiInfoBuilder;

import springfox.documentation.builders.PathSelectors;

import springfox.documentation.builders.RequestHandlerSelectors;

import springfox.documentation.service.ApiInfo;

import springfox.documentation.spi.DocumentationType;

import springfox.documentation.spring.web.plugins.Docket;

import springfox.documentation.swagger2.annotations.EnableSwagger2;

@Configuration      //让Spring来加载该类配置

@EnableWebMvc       //启用Mvc,非springboot框架需要引入注解@EnableWebMvc

@EnableSwagger2     //启用Swagger2

public class Swagger2Config {

    @Bean

    public Docket createRestApi() {

        return new Docket(DocumentationType.SWAGGER_2)

                .apiInfo(apiInfo()).select()

                //扫描指定包中的swagger注解

                //.apis(RequestHandlerSelectors.basePackage("com.xia.controller"))

                //扫描所有有注解的api,用这种方式更灵活

                .apis(RequestHandlerSelectors.withMethodAnnotation(ApiOperation.class))

                .paths(PathSelectors.any())

                .build();

    }

    private ApiInfo apiInfo() {

        return new ApiInfoBuilder()

                .title("SSM RESTful APIs")

                .description("This API Document is based on RESTful Style, The description is detail and auto-generation, It's very friendly for developers.")

                .termsOfServiceUrl("http://www.cnblogs.com/chenyangsocool/")

                .contact("Young")

                .version("1.0.0")

                .build();

    }

}
3.在实体类中创建注释,以Test实体类为例:
package com.chenyangsocool.ssm.model;

import io.swagger.annotations.ApiModel;

import io.swagger.annotations.ApiModelProperty;

@ApiModel(value="Test",description="Test")//对类进行swagger注解

public class Test {

    @ApiModelProperty(value="测试id",name="id")//对类的字段属性进行swagger注解

    private int id;

    @ApiModelProperty(value="测试内容",name="context")

    private String context;

    @ApiModelProperty(value="测试内容的浏览数",name="viewCount")

    private int viewCount;

    public int getId() {

        return id;

    }

    public void setId(int id) {

        this.id = id;

    }

    public String getContext() {

        return context;

    }

    public void setContext(String context) {

        this.context = context;

    }

    public int getViewCount() {

        return viewCount;

    }

    public void setViewCount(int viewCount) {

        this.viewCount = viewCount;

    }

    @Override

    public String toString() {

        return "Test{" +

                "id=" + id +

                ", context='" + context + '\'' +

                ", viewCount=" + viewCount +

                '}';

    }

}
4.在TestController中添加swagger相关代码:
package com.chenyangsocool.ssm.controller;

import com.chenyangsocool.ssm.model.Test;

import com.chenyangsocool.ssm.service.ITestService;

import io.swagger.annotations.Api;

import io.swagger.annotations.ApiOperation;

import org.springframework.stereotype.Controller;

import org.springframework.web.bind.annotation.ResponseBody;

import org.springframework.ui.Model;

import org.springframework.web.bind.annotation.RequestMapping;

import javax.annotation.Resource;

import javax.servlet.http.HttpServletRequest;

@Controller

@RequestMapping("/test")

@Api(value = "测试信息", tags = {"测试相关接口"})//swagger控制器说明注解

public class TestController {

    @Resource

    private ITestService testService;

    @RequestMapping("/index_page")

    public String showIndex(HttpServletRequest request, Model model) {

        int id = Integer.parseInt(request.getParameter("id"));

        Test test = this.testService.getModelById(id);

        //绑定对象到test/index.jsp

        model.addAttribute("test", test);

        return "test/index";

    }

    @RequestMapping("/index_api")

    @ResponseBody

    @ApiOperation(value = "获取单个测试实例", notes = "传入一个id,获取该id对应的实例。",httpMethod = "GET")//swagger方法注解

    public Test Index(HttpServletRequest request,Model model) {

        int id = Integer.parseInt(request.getParameter("id"));

        return this.testService.getModelById(id);

    }

}
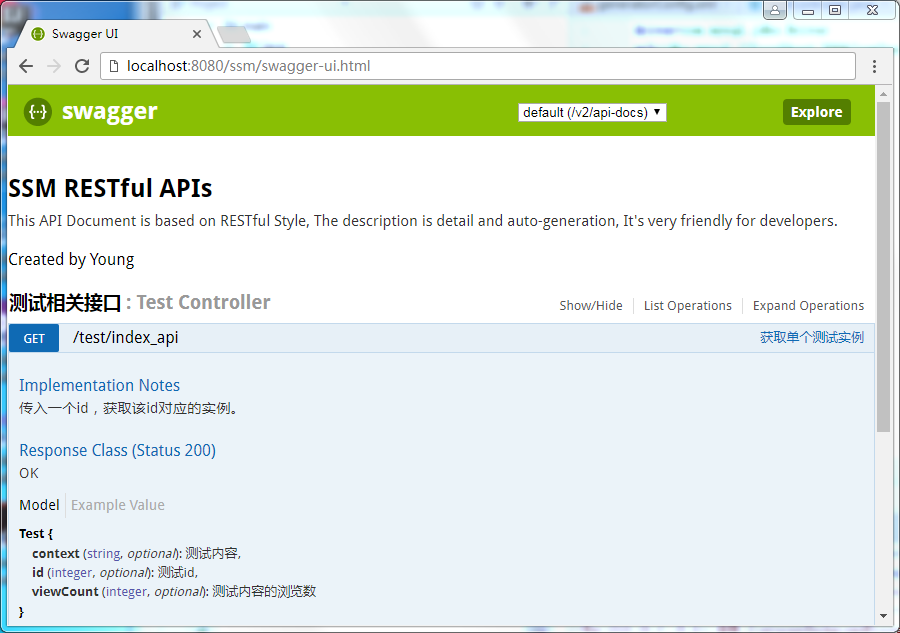
5.访问:
http://localhost:8080/ssm/swagger-ui.html
即可查看所定义的api接口列表:
注:
更多注解可以网上自己搜索
本项目的GitHub地址:https://github.com/chenyangsocool/ssm.git
后续思考:
实体类是由mybatis自动生成,那实体类中的swagger注解是否也可以由mybatis自动生成?
等我有空就把文章写上来~~
参考文章:
SpringMVC集成Swagger插件以及Swagger注解的简单使用
在spring+springMvc+mabatis框架下集成swagger的更多相关文章
- Spring+SpringMvc+Mybatis框架集成搭建教程
一.背景 最近有很多同学由于没有过SSM(Spring+SpringMvc+Mybatis , 以下简称SSM)框架的搭建的经历,所以在自己搭建SSM框架集成的时候,出现了这样或者那样的问题,很是苦恼 ...
- SSM(Spring + Springmvc + Mybatis)框架面试题
JAVA SSM框架基础面试题https://blog.csdn.net/qq_39031310/article/details/83050192 SSM(Spring + Springmvc + M ...
- 用IntelliJ IDEA 开发Spring+SpringMVC+Mybatis框架 分步搭建四:配置springmvc
在用IntelliJ IDEA 开发Spring+SpringMVC+Mybatis框架 分步搭建三:配置spring并测试的基础上 继续进行springmvc的配置 一:配置完善web.xml文件
- 用IntelliJ IDEA 开发Spring+SpringMVC+Mybatis框架 分步搭建二:配置MyBatis 并测试(1 构建目录环境和依赖)
引言:在用IntelliJ IDEA 开发Spring+SpringMVC+Mybatis框架 分步搭建一 的基础上 继续进行项目搭建 该部分的主要目的是测通MyBatis 及Spring-dao ...
- 用IntelliJ IDEA 开发Spring+SpringMVC+Mybatis框架 分步搭建一:建立MAVEN Web项目
一:创建maven web项目er
- SSH(Spring SpringMVC Hibernate)框架整合
项目说明: 使用SSH(Spring SpringMVC Hibernate)框架整合添加部门功能 项目结构 1.导入依赖jar包 <!--单测--> <dependency&g ...
- SSM(Spring +SpringMVC + Mybatis)框架搭建
SSM(Spring +SpringMVC + Mybatis)框架的搭建 最近通过学习别人博客发表的SSM搭建Demo,尝试去搭建一个简单的SSMDemo---实现的功能是对用户增删改查的操作 参考 ...
- SSM(Spring+SpringMVC+Mybatis)框架环境搭建(整合步骤)(一)
1. 前言 最近在写毕设过程中,重新梳理了一遍SSM框架,特此记录一下. 附上源码:https://gitee.com/niceyoo/jeenotes-ssm 2. 概述 在写代码之前我们先了解一下 ...
- SSM:spring+springmvc+mybatis框架中的XML配置文件功能详细解释(转)
原文:https://blog.csdn.net/yijiemamin/article/details/51156189# 这几天一直在整合SSM框架,虽然网上有很多已经整合好的,但是对于里面的配置文 ...
随机推荐
- MariaDB 主从复制
MySQL Replication:NySQL复制,MySQL的复制默认为异步工作模式 mysql的复制功能是mysql内置的,装上它之后就具备了这个功能,而mysql复制是mysql实现大规模 ...
- 理解JavaScript中的事件流
原文地址:http://my.oschina.net/sevenhdu/blog/332014 目录[-] 事件冒泡 事件捕获 DOM事件流 当浏览器发展到第四代时(IE4和Netscape Comm ...
- Android中各级目录的作用
Android中各级目录的作用 一.目录结构 src目录---存放源代码文件 gen目录---ADT插件生成的文件,(自动生成) R.java文件 drawable类---给图片生产的ID ...
- java中的char占几个字节
1:“字节”是byte,“位”是bit : 2: 1 byte = 8 bit : char 在Java中是2个字节.java采用unicode,2个字节(16位)来表示一个字符. 例子代码如下: p ...
- html表格内容自动换行
有时候表格会因为内容多少忽大忽小的很烦人,在网上搜了下解决方案,效果不错哦,给大家分享下!首先介绍两个利器:table-layout:fixed //固定表格大小word-break:break-al ...
- Android -- Vibrator
Vibrator public c ...
- NPOI导出Excel时出现错误“Maximum column number is 255”
此错误并不是NPOI的问题,而是Excel的问题,原因是Excel的最大列255,所以导出的列超过255时就会出现此问题 但Excel2007以上并没有此问题,因为2007以上的列已经增加到16384 ...
- [AngularJS] Angular 1.3 ng-model-options - getterSetter
getterSetter: boolean value which determines whether or not to treat functions bound to ngModel as ...
- Myeclipse最全快捷键
转自:http://www.iteye.com/topic/1051317 Ctrl+1 快速修复(最经典的快捷键,就不用多说了) Ctrl+D: 删除当前行 Ctrl+Alt+↓ 复制当前行到下一 ...
- 极客Web开发资源大荟萃
前端开发已经成为当前炙手可热的技术之一.此次我们总结的前端开发包含了相关技术和流行趋势,希望从中大家可以挖掘你们所需要的,并带给你们最有价值的帮助!原文来自:极客标签 使用代码回放来愉快地学习前端知识 ...