
VUE系列三:实现跨域请求(fetch/axios/proxytable)
1. 在 config/index.js 配置文件中配置proxyTable
'use strict'

// Template version: 1.3.1

// see http://vuejs-templates.github.io/webpack for documentation.

const path = require('path')

module.exports = {

  dev: {

    // Paths

    assetsSubDirectory: 'static',

    assetsPublicPath: '/',

    proxyTable: {

      '/apis': {

        // 测试环境

        target: 'http://www.thenewstep.cn/',  // 接口域名

        changeOrigin: true,  //是否跨域

        pathRewrite: {

            '^/apis': ''   //需要rewrite重写的,

        }

    }

    },

    // Various Dev Server settings

    host: 'localhost', // can be overwritten by process.env.HOST

    port: 8080, // can be overwritten by process.env.PORT, if port is in use, a free one will be determined

    autoOpenBrowser: false,

    errorOverlay: true,

    notifyOnErrors: true,

    poll: false, // https://webpack.js.org/configuration/dev-server/#devserver-watchoptions-

    /**

     * Source Maps

     */

    // https://webpack.js.org/configuration/devtool/#development

    devtool: 'cheap-module-eval-source-map',

    // If you have problems debugging vue-files in devtools,

    // set this to false - it *may* help

    // https://vue-loader.vuejs.org/en/options.html#cachebusting

    cacheBusting: true,

    cssSourceMap: true

  },

  build: {

    // Template for index.html

    index: path.resolve(__dirname, '../dist/index.html'),

    // Paths

    assetsRoot: path.resolve(__dirname, '../dist'),

    assetsSubDirectory: 'static',

    assetsPublicPath: '/',

    /**

     * Source Maps

     */

    productionSourceMap: true,

    // https://webpack.js.org/configuration/devtool/#production

    devtool: '#source-map',

    // Gzip off by default as many popular static hosts such as

    // Surge or Netlify already gzip all static assets for you.

    // Before setting to `true`, make sure to:

    // npm install --save-dev compression-webpack-plugin

    productionGzip: false,

    productionGzipExtensions: ['js', 'css'],

    // Run the build command with an extra argument to

    // View the bundle analyzer report after build finishes:

    // `npm run build --report`

    // Set to `true` or `false` to always turn it on or off

    bundleAnalyzerReport: process.env.npm_config_report

  }

}
2. fetch实现跨域请求
在根组件App.vue里面发送请求
// 1. 模板:html结构 有且只有一个根标签

<template>

  <div id="app">

     <!-- 使用路由实现跳转 注意:to里面写的是路由的名字 -->

     <ul>

       <li><router-link to="/">home</router-link></li>

       <li><router-link to="/Users">Users</router-link></li>

     </ul>

     <!-- 进入首页默认加载的路由 -->

    <router-view></router-view>

  </div>

</template>

//2. 行为:处理逻辑

<script>

export default {

  name: 'App',//组件App.vue的名字

  data () {

    return {

    }

  },

  //实现跨域请求

  created(){

    //fetch实现跨域请求

    fetch("/apis/test/testToken.php",{

      method:"POST",

      headers:{

        token:"f4c902c9ae5a2a9d8f84868ad064e706"

      },

      body:JSON.stringify({username:"lgs",password:"123"})

    }).then(result=>{

      // console.log(result)

      //解析数据

      return result.json()

    }).then(data =>{

      //打印数据

      console.log(data);

    })

  }

}

</script>

//3. 样式:解决样式

<style scoped>

h1

{

  color:purple;

}

</style>
响应结果:

3. axios实现跨域请求
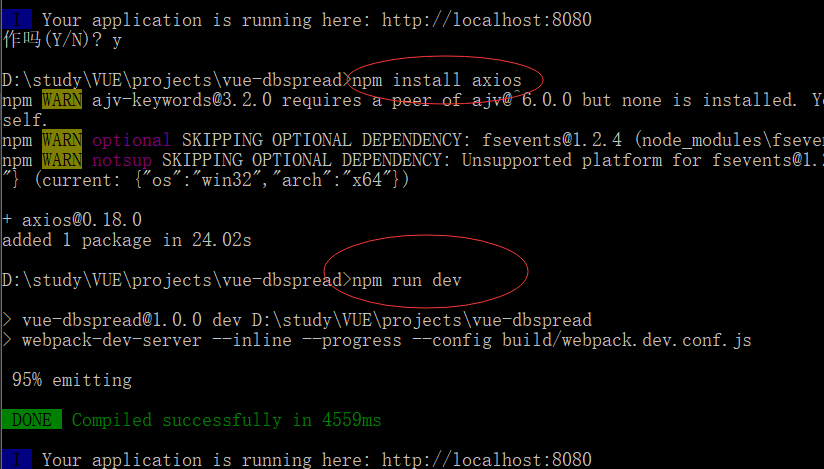
3.1 停止项目,安装axiosnpm install axios,然后重启项目npm run dev
3.2 在main.js里面引入axios,配置全局使用axios,设置token和请求头
// The Vue build version to load with the `import` command

// (runtime-only or standalone) has been set in webpack.base.conf with an alias.

import Vue from 'vue' //导入vue

import VueRouter from 'vue-router' //引入路由

import VueResource from 'vue-resource' //引入vue-resource

import axios from 'axios' //引入axios

import App from './App' //导入根组件App.vue

import Users from './components/Users'//导入组件Users.vue

import Home from './components/Home'//导入组件Users.vue

//全局使用axios

Vue.prototype.$axios = axios

//设置token

axios.defaults.headers.common['token'] = "f4c902c9ae5a2a9d8f84868ad064e706"

//设置请求头

axios.defaults.headers.post["Content-type"] = "application/json"

Vue.config.productionTip = false

//引入路由后使用路由,这样就可以在任何组件中使用路由了

Vue.use(VueRouter)

//引入vue-resource后使用vue-resource,这样就可以在任何组件中使用http了

Vue.use(VueResource)

//配置路由

const router = new VueRouter(

  {

    routes : [

      //配置路由跳转到Home这个组件

      {path:"/",component:Home},

      //配置路由跳转到Users.vue这个组件

      {path:"/Users",component:Users}

    ],

    //去掉地址栏的"/#/"

    mode : "history"

  }

)

/* eslint-disable no-new */

new Vue({ //实例化一个vue对象

  router,//使用路由

  el: '#app', //index.html的根元素app

  components: { App },//注册根组件App.vue才能使用

  template: '<App/>'//VUE模板使用,可以是组件、html标签等

})
3.2 在根组件App.vue里面发送请求
// 1. 模板:html结构 有且只有一个根标签

<template>

  <div id="app">

     <!-- 使用路由实现跳转 注意:to里面写的是路由的名字 -->

     <ul>

       <li><router-link to="/">home</router-link></li>

       <li><router-link to="/Users">Users</router-link></li>

     </ul>

     <!-- 进入首页默认加载的路由 -->

    <router-view></router-view>

  </div>

</template>

//2. 行为:处理逻辑

<script>

export default {

  name: 'App',//组件App.vue的名字

  data () {

    return {

    }

  },

  //实现跨域请求

  created(){

    //fetch实现跨域请求

    // fetch("/apis/test/testToken.php",{

    //   method:"POST",

    //   headers:{

    //     token:"f4c902c9ae5a2a9d8f84868ad064e706"

    //   },

    //   body:JSON.stringify({username:"lgs",password:"123"})

    // }).then(result=>{

    //   // console.log(result)

    //   //解析数据

    //   return result.json()

    // }).then(data =>{

    //   //打印数据

    //   console.log(data);

    // })


    //axios实现跨域请求

    this.$axios.post("/apis/test/testToken.php",{

      username:"lgs",password:"123"

      }).then(data=>{

        console.log(data)

      })

  }

}

</script>

//3. 样式:解决样式

<style scoped>

h1

{

  color:purple;

}

</style>
响应结果:

VUE系列三:实现跨域请求(fetch/axios/proxytable)的更多相关文章
- vue.js学习之 跨域请求代理与axios传参
vue.js学习之 跨域请求代理与axios传参 一:跨域请求代理 1:打开config/index.js module.exports{ dev: { } } 在这里面找到proxyTable{}, ...
- vue-cli3中axios如何跨域请求以及axios封装
1. vue.config.js中配置如下 module.exports = { // 选项... // devtool: 'eval-source-map',//开发调试 devServer: { ...
- Vue.js 2.0 跨域请求数据
Vuejs由1.0更新到了2.0版本.HTTP请求官方也从推荐使用Vue-Resoure变为了 axios .接下来我们来简单地用axios进行一下异步请求.(阅读本文作者默认读者具有使用npm命令的 ...
- web三种跨域请求数据方法
以下测试代码使用php,浏览器测试使用IE9,chrome,firefox,safari <!DOCTYPE HTML> <html> <head> < ...
- flask插件系列之flask_cors跨域请求
前后端分离在开发调试阶段本地的flask测试服务器需要允许跨域访问,简单解决办法有二: 使用flask_cors包 安装 pip install flask_cors 初始化的时候加载配置,这样就可以 ...
- 基于vue移动音乐webapp跨域请求失败的问题解决
在学习一位vue大牛的课程<VUE2.0移动端音乐App开发>时,由于vue的版本原因遇到了一些问题 这是其中之一,花费了很多的时间去解决 虽然搞定了这个问题,但是很多东西理解也不是很到位 ...
- Django 跨域请求 解决 axios 未完待续
import django import os # os.environ.setdefault("DJANGO_SETTINGS_MODULE", "untitled5. ...
- vue-cli项目开发/生产环境代理实现跨域请求+webpack配置开发/生产环境的接口地址
一.开发环境中跨域 使用 Vue-cli 创建的项目,开发地址是 localhost:8080,需要访问非本机上的接口http://10.1.0.34:8000/queryRole.不同域名之间的访问 ...
- spring boot跨域请求访问配置以及spring security中配置失效的原理解析
一.同源策略 同源策略[same origin policy]是浏览器的一个安全功能,不同源的客户端脚本在没有明确授权的情况下,不能读写对方资源. 同源策略是浏览器安全的基石. 什么是源 源[orig ...
随机推荐
- Chunk
Chunk是一系列语句,Lua执行的每一块语句,比如一个文件或者交互模式下的每一行都是一个Chunk. 每个语句结尾的分号(;)是可选的,但如果同一行有多个语句最好用:分开 a = 1 b = a ...
- 从tableview中拖动某个精灵
virtual void registerWithTouchDispatcher(void); virtual bool ccTouchBegan(CCTouch *pTouch,CCEvent *p ...
- angular学习笔记(三十)-指令(9)-一个简单的指令示例
学了前面这么多关于指令的知识,现在就用指令来写一个小组件:expander 这个组件的功能就是点击开展菜单,再点击收起菜单: ↑↓点击展开收起 下面来看它的代码: html: <!DOCTYPE ...
- 【web技术】html特效代码(一)
小续 还记得当初和八哥一起制作百家成员chm电子书的时候,各种特效啊,这里收集了一些个人比较喜欢的html特效,看个人喜欢了,不喜勿喷啊 html特效代码(一) html特效代码(二) 3D相册代码 ...
- 对Inductive Bias(归纳偏置)的理解
参考资料: https://en.wikipedia.org/wiki/Inductive_bias http://blog.sina.com.cn/s/blog_616684a90100emkd.h ...
- MySQL升级后1728错误解决方案
MySQL升级后1728错误解决方案 错误 # 1728,Cannot load from mysql.proc. The table is probably corrupted 造成原因:MySQL ...
- java基础篇---注解(Annotation)
一.概念 Annontation是Java5开始引入的新特征.中文名称一般叫注解.它提供了一种安全的类似注释的机制,用来将任何的信息或元数据(metadata)与程序元素(类.方法.成员变量等)进行关 ...
- [转]MYSQL 与 Oracle 之间的数据类型转换
原文地址:http://www.cnblogs.com/guyueyanzi/archive/2010/02/27/1674788.html Table 2-4 Default Data Type M ...
- tomcat出现的PermGen Space问题<转>
最近做项目碰到了让我纠结的问题,tomcat服务器运行一段时间,总是会自动报异常:java.lang.OutOfmemoryError: PermGen Space 的错误,导致项目无法正常运行. 出 ...
- MSXML4 SP2 sp3安装时出错
没有启动Windows Module Installer 服务或者windows installer服务,重启试试 Windows Installer Cleanup Tool清理早期的在选项框中找到 ...